
You want to build a website. You keep hearing the same three names: Wix, Squarespace, and WordPress.com. All three let you build a site without writing code. But they work very differently, and picking the wrong one wastes your time.
This guide walks you through everything. You will see exactly how each platform works, what you click, what you type, and what happens next. By the end, you will know which platform fits your goal and how to start today.
Here is what this guide covers:
- What each platform is and how it actually works
- How easy it is to get started on each one
- How to customize templates and make your site look the way you want
- How to set up SEO correctly on each platform, step by step
- How to build an online store on each platform, step by step
- Pricing broken down so you know exactly what you pay
- The biggest beginner mistakes and how to avoid them
- A full FAQ section that answers the questions most people search for
No fluff. No vague advice. Just clear steps you can follow right now.
Table of Contents
Key Takeaways
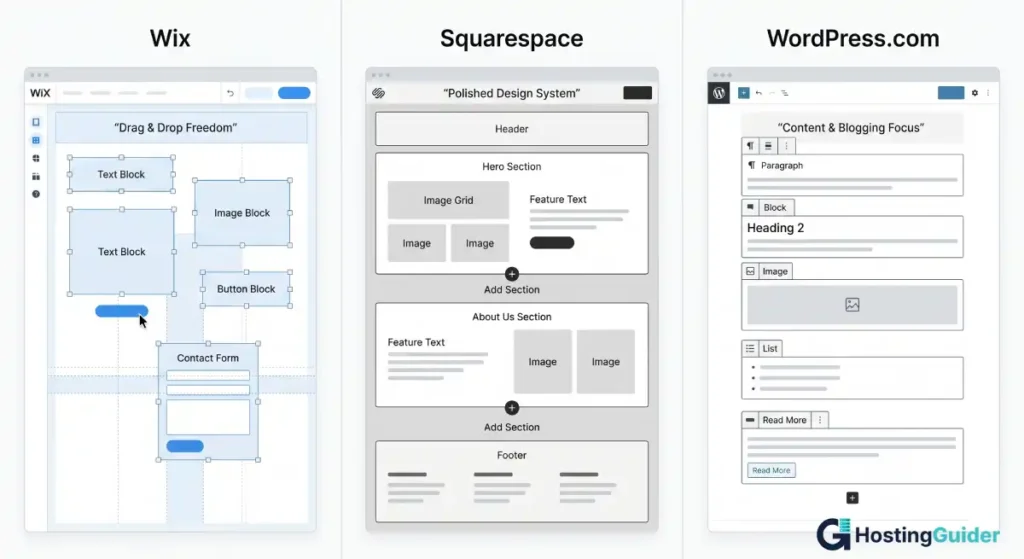
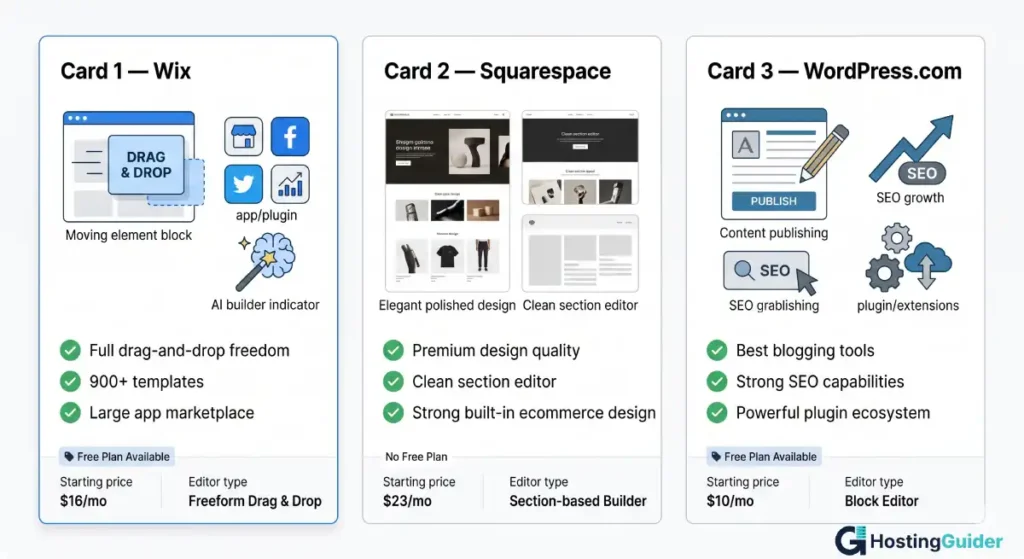
- Wix gives you the most freedom to place elements anywhere on the page
- Squarespace gives you the cleanest, most polished templates of all three
- WordPress.com is the strongest choice for blogging, content, and SEO growth
- All three have free plans, but paid plans are where the real features live
- Switching platforms later is painful, so picking the right one now matters
- Your goal, not your budget, should drive your final decision
Quick Answer
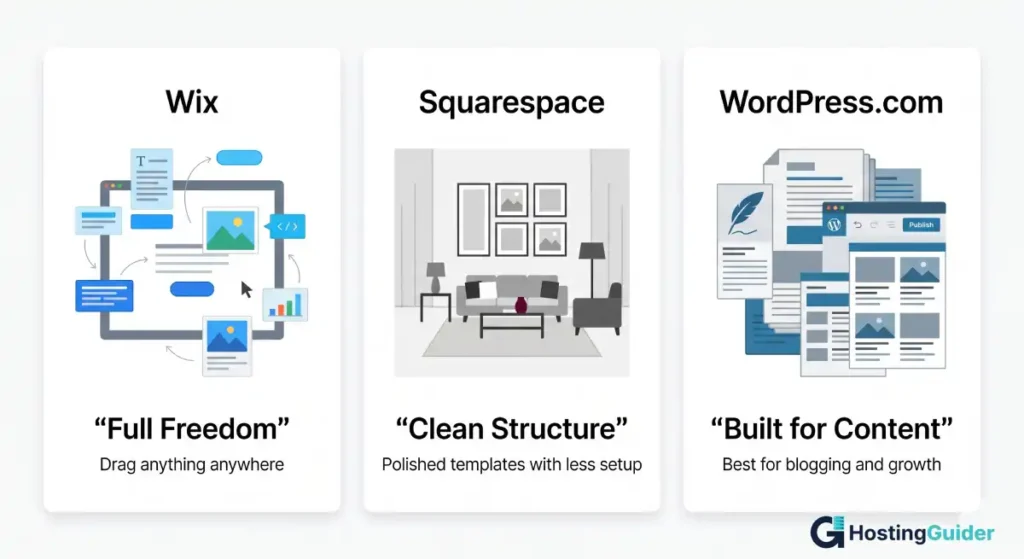
Wix is the easiest website builder for beginners. It uses drag-and-drop editing and lets you place anything anywhere on the page. Squarespace wins on design quality. Every template looks polished and professional with no extra effort. WordPress.com is the best long-term choice for bloggers and content-focused sites. If you are just starting and want something live fast, pick Wix. If design is your priority, pick Squarespace. If you plan to write and grow, pick WordPress.com.
What Are Wix, Squarespace, and WordPress.com?
All three are hosted website builders. That means the platform stores your site on its own servers. You do not need to buy separate hosting or install any software. You log in, build your site in the browser, and publish.
But they are built for very different types of people and goals. Here is what each one actually is.
What is Wix?
Wix is a website builder launched in 2006 and used by over 250 million people worldwide.
It works through a drag-and-drop editor. You pick a template, open the editor, and move any element anywhere on the page. Text boxes, images, buttons, videos, forms. You drag them, resize them, and position them exactly where you want.
Wix also has its own AI builder called Wix AI. It asks you a few questions about your business and builds a starting site for you in about 30 seconds. You then edit it from there.
On top of the editor, Wix has an App Market with over 500 apps. These let you add things like online booking, live chat, event calendars, loyalty programs, and membership areas without any coding.
Wix is best described as a blank canvas. You have total freedom over where everything goes. That freedom makes it very fast to get started. It also means you have to make more decisions yourself.
What is Squarespace?
Squarespace is a website builder launched in 2004 and known for having some of the most visually polished templates available anywhere.
It works through a section-based editor. Your page is made up of stacked sections, like rows. Each section holds content blocks: text, images, galleries, buttons, and more. You can add, remove, and reorder sections. But you work within the structure of each section rather than dragging elements freely across the whole page.
This structure is actually a feature, not a limitation. Squarespace uses it to keep your layout aligned and balanced automatically. You cannot accidentally make things look messy because the platform prevents it.
Squarespace also has built-in tools for scheduling, e-commerce, email marketing, and member areas, all designed to match the clean visual style of the platform.
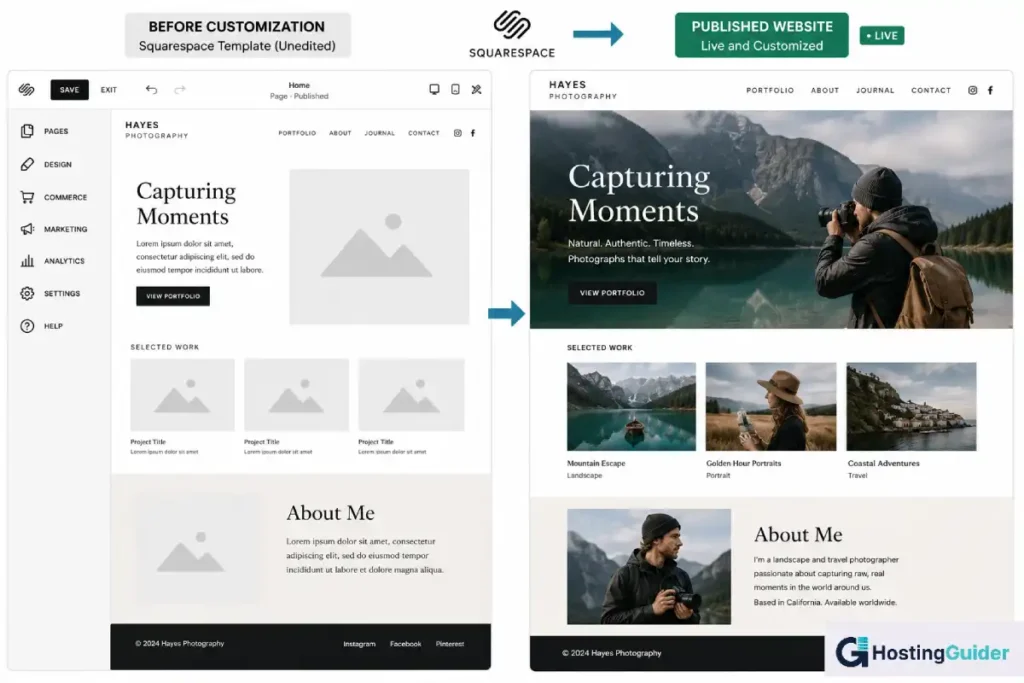
Squarespace is best described as a pre-decorated room. Everything already looks great. Your job is to replace the placeholder content with your own.
What is WordPress.com?
WordPress.com is a hosted website and blogging platform launched in 2005 and run by a company called Automattic.
It is built on WordPress, which is the most widely used website software in the world. According to W3Techs, WordPress powers over 43% of all websites on the internet. That number covers both WordPress.com and the self-hosted WordPress.org version.
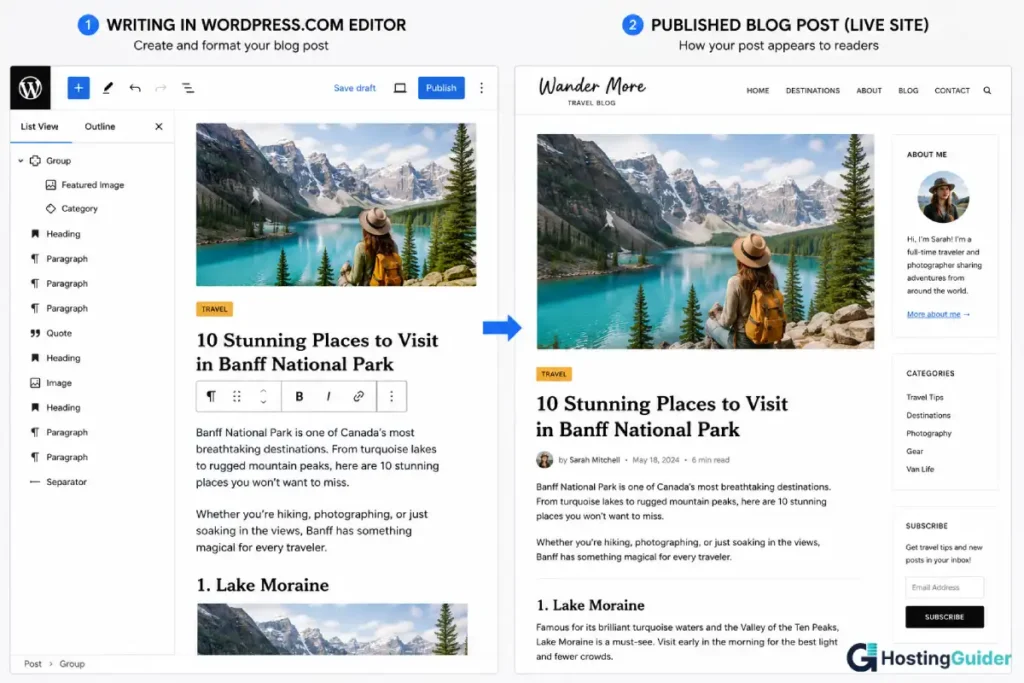
WordPress.com works through a block editor. Every piece of content on your page is a block. A heading is a block. A paragraph is a block. An image is a block. You stack blocks to build pages and write posts.
It has the strongest blogging and content tools of the three platforms. Categories, tags, RSS feeds, subscriber management, and SEO settings are all built in. On higher plans, you can install plugins from a large library to add almost any feature you need.
WordPress.com is best described as a content machine. It is designed from the ground up for publishing, growing an audience, and ranking on Google over time.
Ease of Use: Which Platform Is Easiest to Start?
Wix
Wix is the most beginner-friendly of the three. When you sign up, it asks you a few questions about what kind of site you want to build. Then it gives you two options. You can let Wix AI create a starting layout for you, or you can browse the template library and pick one yourself.
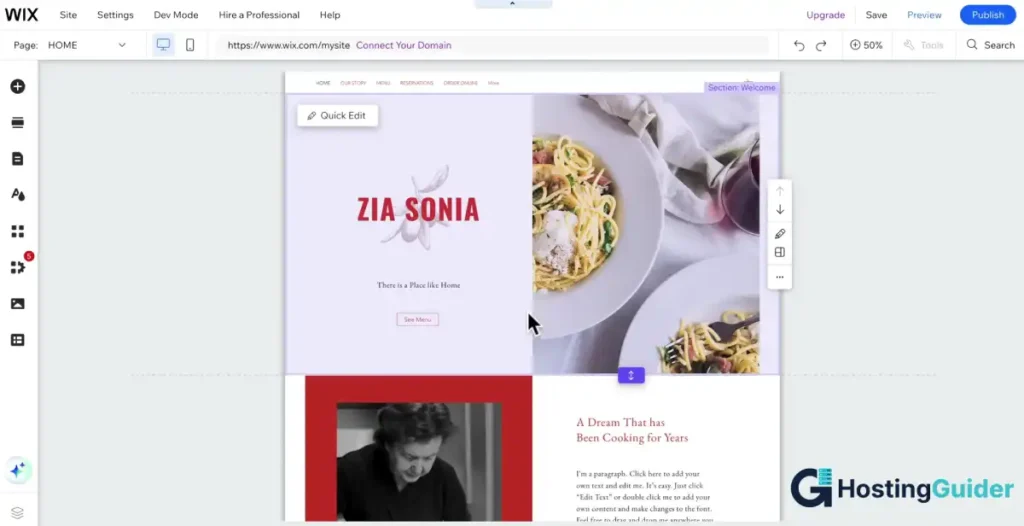
The editor opens in your browser. Every element on the page, every text block, every image, every button, is clickable and draggable. You click something to select it. You drag it to move it. You double-click text to edit it.
There are no rules about where things go. You can put your logo in the middle of the page if you want. You can stack buttons on top of each other. The freedom is total.
That freedom is also the biggest trap for beginners. When there are no rules, it is easy to create a page that looks messy. A good way around this is to stick close to the original template layout, especially when you are just starting out. Change the colors and the text and the images. But leave the structure mostly alone until you feel confident.
Squarespace
Squarespace works differently. Instead of placing elements anywhere, you work inside sections. Think of each section as a row on your page. Every row snaps into place automatically. You cannot drag things outside of their section.
This feels limiting at first. But it has a big benefit. Your site almost always looks clean and balanced because the platform keeps everything aligned for you.
When you click a section, a blue plus button appears. Click it to add a new content block. Squarespace calls these blocks. You can add a text block, an image block, a gallery block, a button, a form, or a video. Every block you add snaps into the section cleanly.
Beginners who care about design love Squarespace because the guardrails prevent them from accidentally making things look messy.
WordPress.com
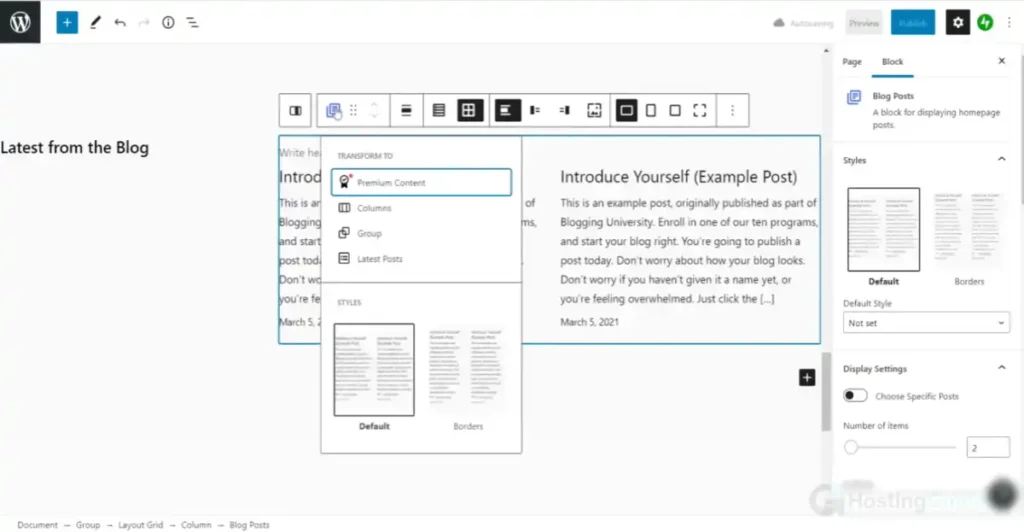
WordPress.com uses a block editor. Every piece of content is a block. A heading is a block. A paragraph is a block. An image is a block. You stack these blocks on top of each other to build your pages and posts.
To add a block, you click the plus button that appears when you hover between existing blocks. A menu opens with dozens of block types to choose from.
The editor takes slightly longer to learn than Wix or Squarespace. But once you know it, it is very fast to use. Bloggers especially love it because writing a long post with multiple headings, images, and quotes is easy and organized.
Design and Templates: Making Your Site Look the Way You Want
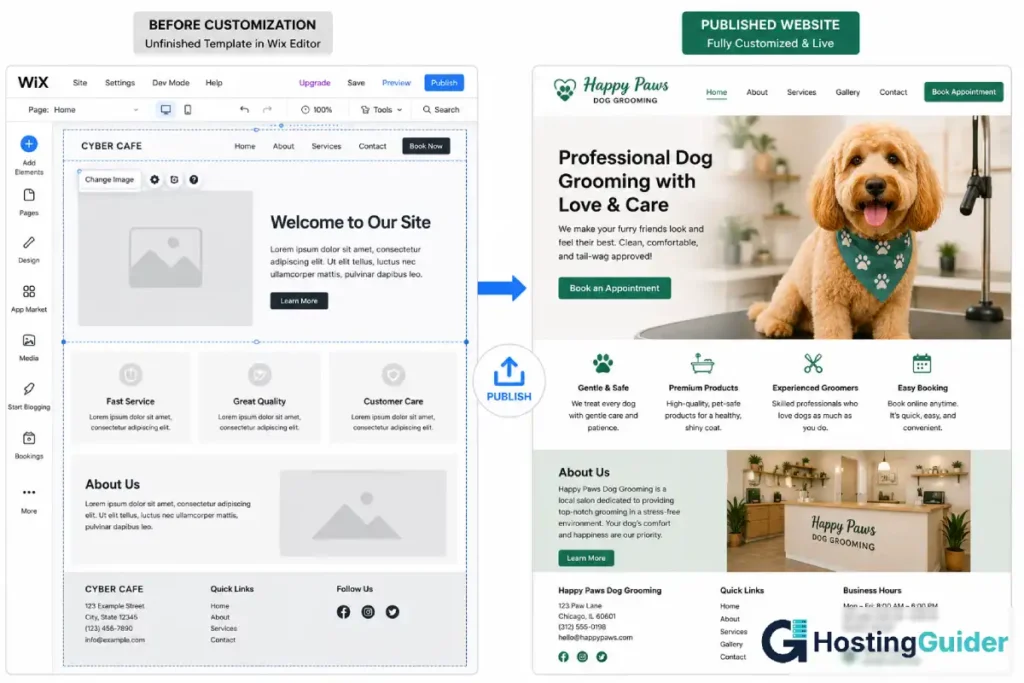
How to Customize a Wix Template
When you open a template in Wix, everything you see is editable. Here is how to make it your own.
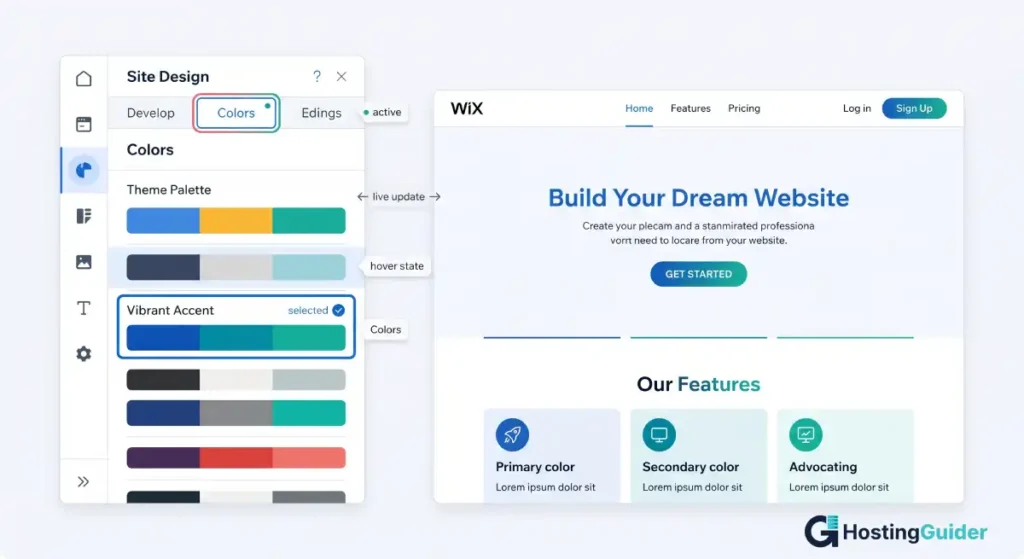
Changing colors: Click on any element. Look at the left panel that opens. Click Colors. You will see the template’s current color palette. Click any color swatch to change it. Wix applies that color across every element that uses it on your site.
You can also set a global color palette. Go to Design in the left sidebar. Click Site Design. Then click Colors. Set your brand colors here. Every new element you add will use these colors automatically.
Changing fonts: Click on any text on the page. A text toolbar appears at the top. Click the font name to open the font picker. Wix has hundreds of fonts to choose from. Pick one for your headings and a different one for your body text.
To apply a font across your whole site, go to Design, then Site Design, then Text. Set your heading font and body font here. Every text element on your site updates automatically.
Replacing images: Click any image on the page. Click Change Image in the menu that appears. You can upload your own image, pick one from the Wix free photo library, or paste in an image URL.
After uploading, use the crop tool to adjust how the image fits inside its frame. Drag the slider to zoom in or out.
Editing the navigation menu: Click on the navigation bar at the top of your page. Click Manage Menu. A panel opens showing all your current pages. Drag them to reorder. Click the toggle to hide or show pages in the menu.
Checking mobile view: Click the mobile icon at the top of the editor. This switches to the mobile view. Wix automatically rearranges your content for smaller screens. Check every page on mobile before you publish. If something looks wrong, click the element and adjust it. Changes you make in mobile view do not affect the desktop version.
Connecting a custom domain: Go to your Wix dashboard (outside the editor). Click Upgrade. Pick a plan that includes a custom domain. After upgrading, click Connect Domain. Type your domain name. Wix walks you through the steps to connect it. If you already bought your domain from a provider like GoDaddy or Namecheap, Wix gives you DNS settings to paste into your domain registrar.
How to Customize a Squarespace Template
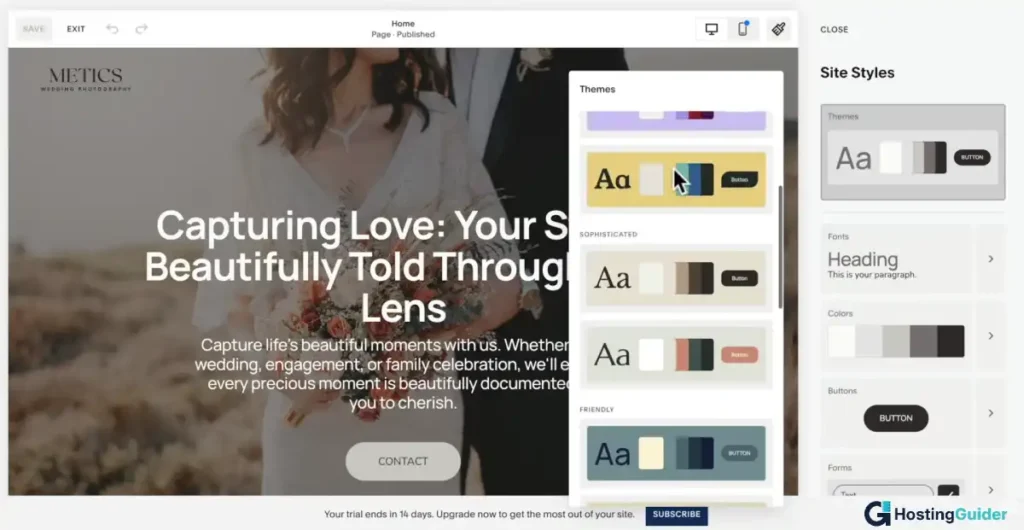
Squarespace has a style panel that controls the look of your entire site from one place.
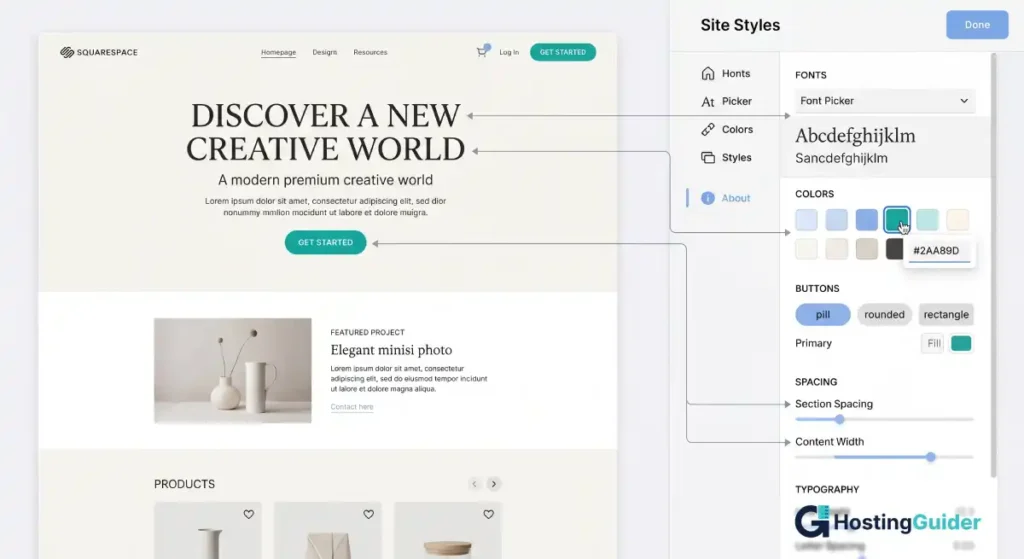
Changing fonts and colors globally: In the left panel, click Design. Then click Site Styles. A panel opens on the right side of your screen. You can change your main font, your heading size, your button style, and your color palette all from here.
Any change you make in Site Styles applies across your whole site instantly. You can see the changes live on your page as you adjust the sliders.
Changing colors: In Site Styles, scroll to Colors. Click any color swatch to open the color picker. Type in a hex code if you have a specific brand color. Squarespace applies this color to every element that uses it.
Replacing images: Click any image on a page. A blue toolbar appears above or below it. Click Edit. Then click Replace. Upload your own image or choose from Unsplash, which is a free photo service built directly into Squarespace.
After uploading, use the focal point tool to tell Squarespace which part of the image is most important. This ensures the right part shows on both desktop and mobile.
Editing the navigation: Click Pages in the left panel. This shows you all your pages. Drag pages up or down to reorder them. Drag a page slightly to the right under another page to make it a dropdown submenu. Pages marked as Not Linked will not appear in your navigation menu.
Checking mobile: Squarespace automatically optimizes your layout for mobile. You do not need a separate mobile editor. However, always click the mobile preview icon at the top to check how things look before publishing. Pay attention to font sizes and image crops on smaller screens.
Connecting a domain: Go to Settings in the left panel. Click Domains. Click Use a Domain I Own. Type your domain name. Squarespace gives you the DNS records to add at your domain registrar. Once connected, your site loads at your custom address.
How to Customize a WordPress.com Theme
WordPress.com uses themes to control the overall look of your site.
Changing your theme: In the left dashboard menu, click Appearance. Then click Themes. Browse the available themes. Click any theme to preview it. Click Activate to apply it to your site.
Customizing colors and fonts: With your theme active, go to Appearance and then click Customize. A live preview of your site opens with a panel on the left. Options here depend on your theme. Most themes let you change colors, fonts, header image, and background.
Changes you make in the Customizer show up live on the right. Click Publish at the top to save them.
Editing the site with the Full Site Editor (block themes): Newer WordPress.com themes use the Full Site Editor. Go to Appearance and then click Editor. This opens your entire site layout as editable blocks, including the header, footer, and page templates.
Click any element to select it. Use the block toolbar to change colors, font size, or alignment. Click the list view icon in the top left to see all blocks on the page in a tree structure. This makes it easier to find and select specific elements.
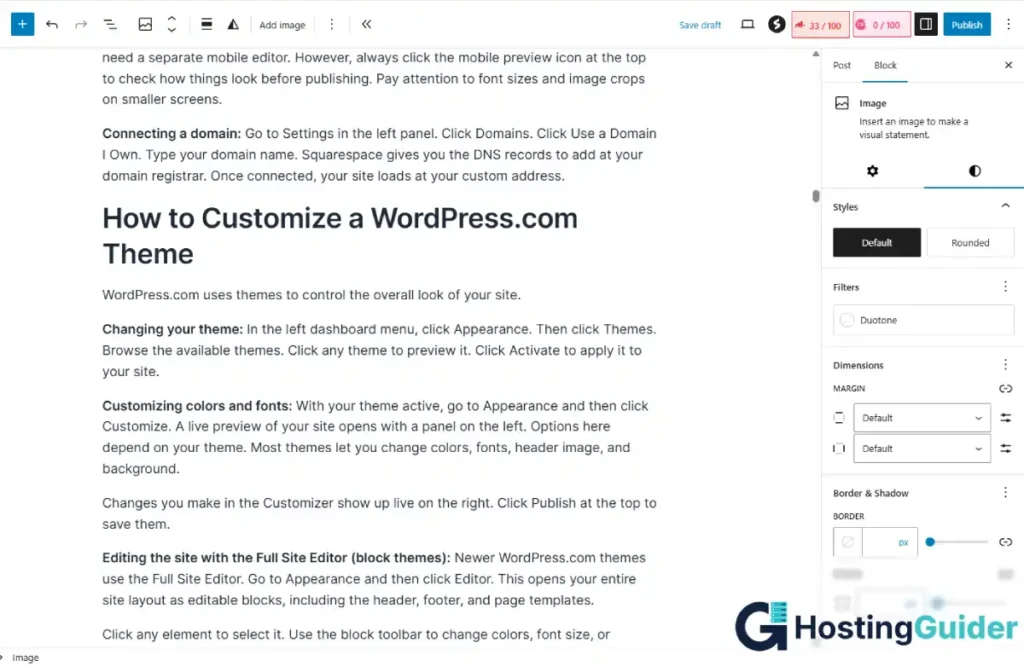
Replacing images: In any post or page, click on an image block. Click Replace in the toolbar. Upload a new image from your computer or pick one from your media library. Use the crop tool to adjust the frame.
Editing the navigation menu: Go to Appearance and then click Menus. Click Create a New Menu. Add pages, posts, or custom links to your menu. Check the box for Primary Menu and click Save Menu. This applies your navigation across the whole site.
If you are using a block theme, edit your menu inside the Full Site Editor instead. Click the navigation block in the header and add or remove links directly.
Checking mobile: WordPress.com themes are responsive by default. Go to Customize and click the mobile icon at the bottom of the left panel to preview your site on a smaller screen.
Connecting a domain: In the left dashboard, click Upgrades. Then click Domains. Click Add a Domain. Type your domain name. If you are on a paid plan, WordPress.com walks you through connecting it.
Pricing: What You Actually Pay
All three platforms have a free plan. But free plans come with limits. You will see the platform’s branding on your site, you cannot use a custom domain, and some features are locked.
All prices below are billed yearly. Monthly billing costs more on every platform. Always check the official pricing pages for the latest numbers since prices can change.
Wix Pricing
| Plan | Price per Month | What You Get |
|---|---|---|
| Free | $0 | Wix subdomain, Wix ads on your site, limited storage |
| Light | $17 | Custom domain, no Wix ads, 2 GB storage |
| Core | $29 | Everything in Light, plus online payments and basic marketing tools |
| Business | $36 | Everything in Core, plus full e-commerce, subscriptions, and advanced analytics |
| Business Elite | $159 | Everything in Business, plus priority support and enterprise features |
You need at least the Core plan to accept payments. See the full Wix pricing breakdown for current plan details.
Squarespace Pricing
| Plan | Price per Month | What You Get |
|---|---|---|
| Free trial | $0 | 14-day trial, all features unlocked, no credit card needed |
| Basic | $12 | Custom domain (free first year), no Squarespace branding, unlimited bandwidth |
| Core | $17 | Everything in Personal, plus selling products and a 3% transaction fee |
| Advanced | $25 | Everything in Business, zero transaction fees, checkout on your domain |
You need at least the Business plan to sell products. The Basic Commerce plan removes the transaction fee. See the full Squarespace pricing breakdown for current plan details.
WordPress.com Pricing
| Plan | Price per Month | What You Get |
|---|---|---|
| Free | $0 | WordPress.com subdomain, ads on your site, 1 GB storage |
| Personal | $4 | Custom domain, no WordPress.com ads, 6 GB storage |
| Premium | $8 | Everything in Starter, plus unlimited pages and live chat support |
| Business | $25 | Everything in Explorer, plus plugin support, Yoast SEO, and monetization tools |
| Commerce | $45 | Everything in Creator, plus WooCommerce for a full online store |
| Enterprise | Custom | Custom pricing for large organizations |
You need the Creator plan to install plugins like Yoast SEO. You need the Entrepreneur plan to run a full WooCommerce store. See the full WordPress.com pricing breakdown for current plan details.
One-Year Cost Comparison
| Goal | Wix | Squarespace | WordPress.com |
|---|---|---|---|
| Simple personal site or blog | $204/year (Light) | $144/year (Basic) | $48/year (Personal) |
| Small business site with payments | $348/year (Core) | $204/year (Core) | $300/year (Business) |
| Online store | $432/year (Business) | $300/year (Advanced) | $540/year (Commerce) |
WordPress.com is by far the cheapest for basic sites and blogs. The gap narrows significantly at the store level. Use the interactive cost calculator in this guide to build your own exact breakdown based on how many years you are planning for.
Features Comparison
| Feature | Wix | Squarespace | WordPress.com |
|---|---|---|---|
| Free plan | Yes, with ads | 14-day trial only | Yes, subdomain only |
| Drag-and-drop editor | Full freedom | Section-based | Block-based |
| Template quality | Good, 900+ options | Excellent, 150+ premium | Good, many themes |
| Blogging tools | Basic | Good | Best in class |
| SEO tools | Basic built-in | Decent built-in | Strong, Yoast on higher plans |
| Online store | From Core plan | From Business plan | From Entrepreneur plan |
| App or plugin library | 500+ in Wix App Market | Limited extensions | Full plugins on Creator plan |
| Mobile editing | Separate mobile editor | Automatic | Automatic |
| AI site builder | Yes, Wix AI | Limited | AI assistant only |
| Custom code access | Yes, Velo dev tools | CSS only | Yes, on Creator plan |
| Cheapest paid plan | $17 per month | $16 per month | $4 per month |
Who Should Use Each Platform?
Pick Wix if you want the fastest start
Wix is best for people who want to build something quickly without worrying about design rules.
It works well for:
- Local businesses like restaurants, salons, gyms, and repair shops
- Small service businesses that need a simple website with a contact form
- People who want to add booking, live chat, or event management later
- Anyone who wants to try AI to generate a first draft of their site
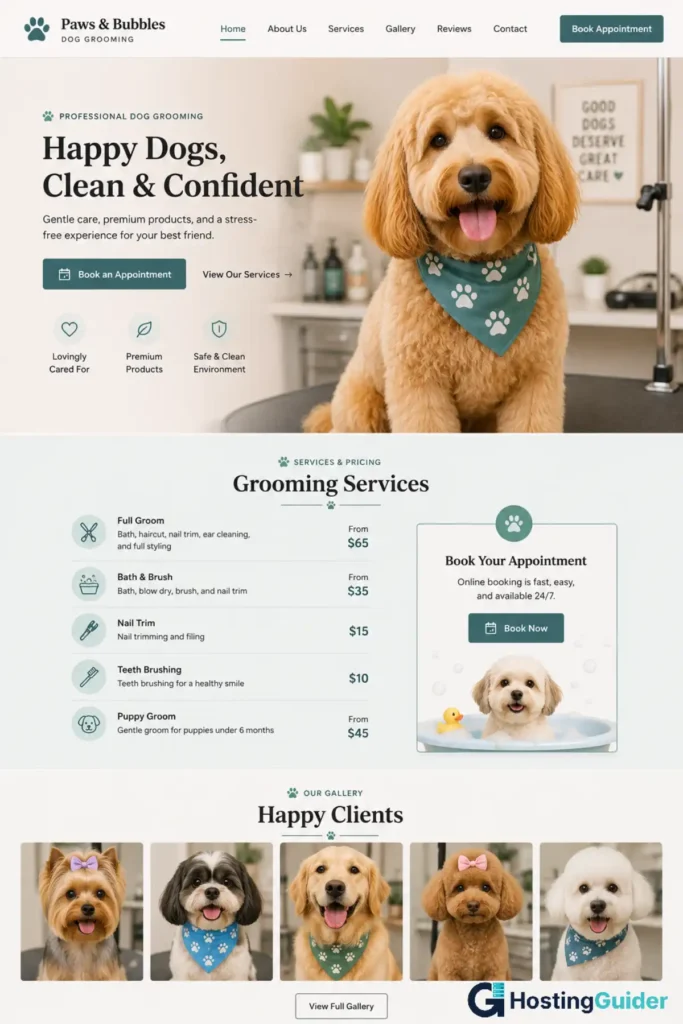
Real example: Maria runs a dog grooming business. She signs up for Wix, picks a pet services template, and replaces the text and photos with her own. She adds the Wix Bookings app so clients can schedule appointments online. Her whole site takes about three hours to finish.
Pick Squarespace if design is your priority
Squarespace is best for people who care about how their site looks and want it to feel polished without hiring a designer.
It works well for:
- Photographers, artists, and illustrators building portfolios
- Wedding planners, interior designers, and architects
- Small restaurants and cafes that rely on visual appeal
- Coaches, consultants, and speakers who need a clean personal brand site
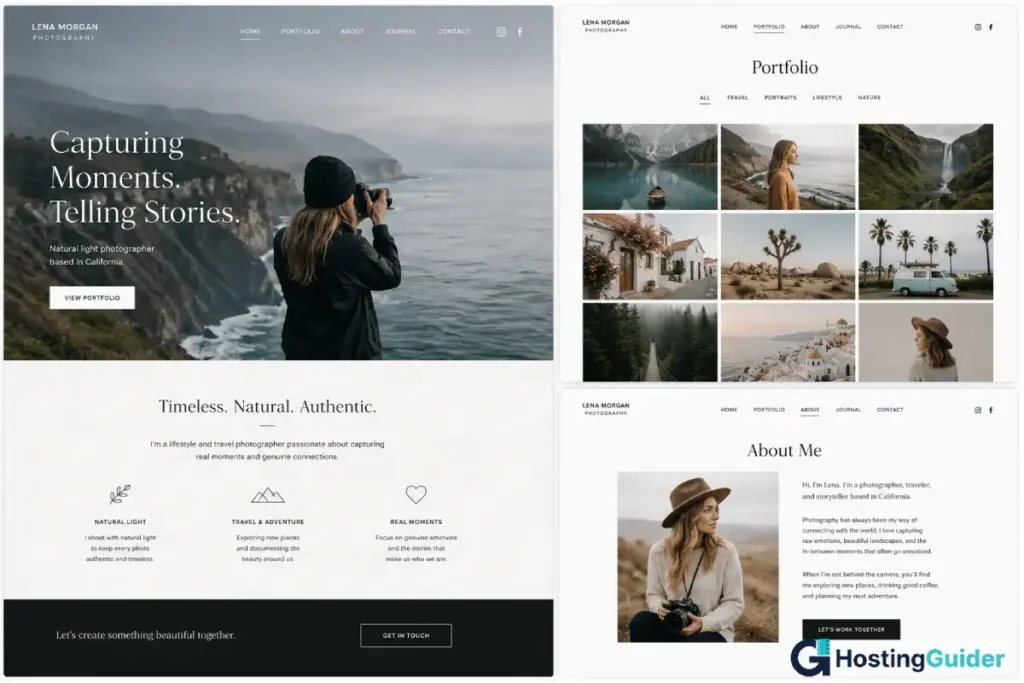
Real example: David is a freelance photographer. He signs up for Squarespace, picks a gallery template, and uploads his best photos. Within two hours, his site looks like a professional agency built it. He did not touch a single design setting.
Pick WordPress.com if you plan to grow with content
WordPress.com is best for people who will publish content regularly and want to rank on Google over time.
It works well for:
- Bloggers in any niche from travel to finance to food to parenting
- News sites, review sites, and tutorial websites
- Businesses that plan to use content marketing as their main growth strategy
- Anyone who wants to eventually run ads or affiliate links on their site
Real example: Ayesha writes about budget travel. She starts on WordPress.com, posts three articles a week, and sets up her categories and SEO settings carefully. After 18 months, she has over 300 articles and gets tens of thousands of monthly readers from Google. Her blog earns money through affiliate links and display ads.

How to Build Your First Website: Full Step-by-Step Guide
Building Your First Website on Wix
Step 1: Create your free Wix account
Go to wix.com. Click Get Started. Sign up with your email address or use your Google account. No credit card is needed for the free plan.
Step 2: Choose how you want to build
Wix shows you two options. The first is Wix AI. It asks you five to seven simple questions about your site, like what kind of business you have and what pages you need. Then it generates a full starting layout in about 30 seconds.
The second option is to browse templates. Click Templates in the top menu. Use the category filter on the left to find templates for your type of site. Scroll through the results. Click Preview to see a full-size version. Click Edit to start building with it.
If you are completely new, use the AI option. You can always change the design later.
Step 3: Understand the editor layout
The editor has a left sidebar with tools. From top to bottom you will see: Pages, Add Elements, Design, and App Market. Above the canvas you see a toolbar with Undo, Preview, and Publish buttons. The blue bar at the very top is the Wix header where you can access your dashboard.
Step 4: Edit your homepage text
Double-click any text on the page. It becomes editable. Type your own content to replace the placeholder text. Click outside the text box when you are done.
Start with your main headline. It should tell visitors exactly what you offer. Bad example: Welcome to My Site. Good example: Affordable Dog Grooming in Chicago, Same-Day Appointments Available.
Step 5: Replace your images
Click any image. Click Change Image in the small toolbar that appears. Click Upload Media to upload a photo from your computer. Or click Wix Free Images to search their photo library.
After picking an image, click the crop icon to adjust how it fits inside the frame. Drag the image within the frame to reposition it.
Step 6: Add a new page
Click Pages in the left sidebar. Click Add Page. Choose a blank page or a pre-designed page layout. Name your page. Common pages to add are About, Services, Contact, and Blog.
After adding a page, it automatically appears in your navigation menu. You can hide it from the menu inside the Pages panel if it is not ready yet.
Step 7: Add a contact form
Go to your Contact page. Click Add Elements in the left sidebar. Search for Form. Click Contact Form to drop one onto your page. Click on the form to open its settings. Choose which fields to include, like name, email, phone, and message. Set the email address where form submissions go.
Step 8: Add your footer information
Scroll to the bottom of any page. The footer section appears across all pages automatically. Double-click the footer text to edit it. Add your business address, phone number, and links to your social media profiles.
Step 9: Preview your site before publishing
Click the Preview button at the top of the editor. This opens a live version of your site so you can click through every page like a real visitor. Check that all links work and all images load correctly.
Click the mobile icon in the preview toolbar to see the mobile version. Fix anything that looks broken or cramped.
Step 10: Publish your site
Click the Publish button in the top right corner. On the free plan, your site goes live at a wixsite.com address. On a paid plan, you can connect a custom domain before or after publishing.
Building Your First Website on Squarespace
Step 1: Start your free trial
Go to squarespace.com. Click Get Started. Answer a few short questions about what you are building. Squarespace uses your answers to recommend the best template category for you.
No credit card is needed during the 14-day trial. You get access to all features.
Step 2: Pick your template
Browse the recommended templates. Click any template to see a full preview. Click Start with This Design when you find one you like.
Pick based on layout and structure, not just the colors. You can change colors easily. The way content is arranged in sections is harder to change.
Step 3: Learn the editor layout
The left panel has: Pages, Design, Commerce, Marketing, Analytics, and Settings. The middle of the screen is your live page preview. Click any element on the preview to start editing it.
At the top of the page, a pencil icon appears next to every editable section when you hover over it.
Step 4: Edit your homepage sections
Click the pencil icon on any section to open its settings. For text blocks, click directly on the text to edit it.
Each section has an option to change its background. Click the section settings icon and choose between a solid color, a gradient, an image, or a video background.
Step 5: Add a new section
Hover between two existing sections. A blue bar with a plus icon appears. Click it to add a new section. Squarespace shows you a library of pre-designed section layouts. Pick one that fits the content you want to add.
Step 6: Add pages
Click Pages in the left panel. Click the plus icon to add a new page. Pick a blank page or a pre-designed page layout. Name your page. Drag it up or down in the list to change its order in the navigation menu.
Step 7: Add a contact form
Open your Contact page. Click the plus button to add a new block. Search for Form. Click to insert a form block. Click the form to open settings on the left. Add or remove fields. In the Storage settings, type the email address where you want to receive form submissions.
Step 8: Set up your footer
Scroll to the bottom of any page. Click the footer area. Edit the text blocks directly. Add links to your social media profiles. Add your copyright notice and business address.
Step 9: Preview on mobile
Click the mobile icon at the top of the editor. Walk through every page on mobile view. Check that images are not cropped badly and that text is easy to read.
Step 10: Publish your site
Click the Publish button in the top right. During the trial, your site is password protected. After publishing, visitors can access it. Connect a custom domain in Settings under Domains before or after publishing.
Building Your First Website on WordPress.com
Step 1: Create your free account
Go to wordpress.com. Click Start Your Website. Enter your email and choose a username and password. WordPress.com will suggest a site address based on your username. You can change it at this step.
Step 2: Choose a theme
After signup, WordPress.com may walk you through a setup wizard. If not, go to your dashboard. Click Appearance in the left menu. Then click Themes. Browse the available themes. Use the filter at the top to narrow by style or feature. Click Activate on the theme you want.
Step 3: Understand the dashboard layout
The left sidebar has everything you need. From top to bottom: Home (dashboard overview), Stats, Posts, Pages, Media, Appearance, Plugins (on higher plans), Users, and Settings. The main area on the right shows a summary of your site activity.
Step 4: Customize your theme
Click Appearance and then Customize. A live preview of your site opens. The left panel has options to change your site title, colors, fonts, header image, background, and navigation menus. Adjust these settings to match your brand. Click Publish at the top to save changes.
Step 5: Create your first page
Click Pages in the left menu. Click Add New Page. The block editor opens. Click the page title area at the top and type your page name.
Below the title, click the plus button to add your first block. Type heading to find the Heading block. Add your main headline. Press Enter and click the plus button again to add a Paragraph block. Type your content.
Keep adding blocks as needed. Use the Heading block for section titles. Use the Paragraph block for body text. Use the Image block to add photos.
Step 6: Create your About and Contact pages
Repeat the same process from Step 5 to create an About page and a Contact page. On your Contact page, click the plus button and search for Form. Add a basic contact form. Set the email address where submissions should go in the form settings.
Step 7: Write your first blog post
Click Posts in the left menu. Click Add New Post. The same block editor opens. Write your post title at the top. Use the plus button to add blocks for your content.
On the right panel, look for Categories. Add a category for your post. Look for Featured Image. Upload a photo that represents your post topic. This image appears as the thumbnail on your blog page.
Click Publish when ready. Confirm the publish date and visibility settings. Click Publish again to make it live.
Step 8: Set up your navigation menu
Click Appearance and then Menus. If no menu exists, click Create a New Menu. Name it Primary Menu. On the left, check the boxes next to the pages you want in your menu. Click Add to Menu. Drag them into the order you want. Under Menu Settings, check Primary Menu. Click Save Menu.
Step 9: Preview on mobile
Click Customize from the Appearance menu. At the bottom left of the panel, click the mobile preview icon. Check every page on mobile. If something looks wrong, adjust font sizes or image sizes inside the relevant blocks.
Step 10: Connect a domain and publish
On the free plan, your site is live at yourusername.wordpress.com. To use a custom domain, click Upgrades in the left menu and choose a paid plan. After upgrading, click Domains and follow the steps to connect or purchase your domain.
How to Set Up SEO on Each Platform
SEO is how your site gets found on Google without paying for ads. Every page on your site needs a title, a description, and a clean URL. Getting these right on every page is one of the most important things you can do after launching. Google’s SEO Starter Guide is a reliable free resource to read alongside this section if you want to go deeper into how search engines work.
SEO Setup on Wix
Good SEO starts with your page settings. Here is exactly where to go and what to fill in.
Setting your page title:
In the Wix editor, look at the left panel. Click Pages and Menu. Hover over the page you want to edit. Click the three-dot icon that appears. Click SEO Basics.
You will see a field called Page Title. This is the blue text that appears on Google search results. Keep it under 60 characters. Put your most important keyword near the front.
Bad example: Welcome to My Grooming Website Good example: Dog Grooming in Chicago | Same-Day Appointments | Maria’s Pets
Writing your meta description:
Below the title is the Meta Description field. This is the two-line preview text that appears below your title on Google. Keep it under 155 characters.
Write one or two sentences that explain exactly what the page is about. Include a reason to click.
Bad example: We offer many services for your pets. Good example: Book a bath, trim, or full groom for your dog in Chicago. Walk-ins welcome. Same-day slots available Monday through Saturday.
Setting your URL slug:
Below that is the Page URL field. The URL slug is the part of your web address after your domain name. Keep it short, clear, and keyword-focused.
Bad: /page-3 Good: /dog-grooming-chicago
Adding alt text to images:
Click any image on your page. Click the settings icon that appears above the image. Find the Alt Text field. Type a short, clear description of what the image shows.
Bad: image1.jpg Good: dog getting a bath at a pet grooming salon in Chicago
Alt text helps Google understand what your images show. It also helps visually impaired visitors who use screen readers.
Connecting Google Search Console:
In your Wix dashboard, click Marketing and SEO in the left menu. Click Get Found on Google. Wix walks you through connecting your site to Google Search Console. This tells Google your site exists and helps it crawl your pages faster.
Using the Wix SEO checklist:
In the same Marketing and SEO section, click SEO Setup Checklist. Wix creates a personalized checklist based on your site type. Work through every item on the list. It covers the most common SEO issues for new sites and takes about 20 to 30 minutes to complete.
SEO Setup on Squarespace
Setting your page title and meta description:
In the left panel, click Pages. Hover over a page and click the gear icon. In the settings panel that opens, click the SEO tab.
You will see an SEO Title field and an SEO Description field. Fill in both using the same rules described above for Wix. Short, clear, keyword-focused, and under the character limits.
Setting your URL slug:
On the same SEO settings page, look for the URL Slug field. Change it to something short and descriptive.
Example: If your page is about wedding photography in London, use /wedding-photographer-london.
Adding alt text to images:
Click any image on your page. Look at the settings panel that opens on the right. Find the Alt Text field. Write a clear description of what the image shows.
Submitting your sitemap to Google:
Squarespace automatically generates a sitemap for your site. Your sitemap URL is yourwebsite.com/sitemap.xml. Go to Google Search Console. Click Sitemaps in the left menu. Enter your sitemap URL and click Submit.
Google uses your sitemap to find and index every page on your site.
Turning on SSL:
Go to Settings. Click Advanced. Then click SSL. Make sure the setting shows Secure. Squarespace handles SSL automatically on all paid plans. This gives your site the padlock icon in the browser and is a basic requirement for Google rankings.
Editing global SEO settings:
Go to Settings. Click SEO. Here you can set a default title format for all pages. For example: Page Name | Site Name. You can also add a site description that search engines use when they cannot find a specific meta description.
SEO Setup on WordPress.com
WordPress.com gives you the most detailed SEO options of the three platforms.
Setting your post or page title:
Open any post or page in the editor. On the right sidebar, scroll down until you see the SEO section. If you do not see it, click the three-dot icon in the top right and check that SEO is enabled under Panels.
Click the SEO Title field. Write your keyword-focused title. Keep it under 60 characters.
Writing your meta description:
Below the title field is the Meta Description field. Write one or two short sentences. Include your main keyword naturally. End with a reason to click or read more.
Setting your URL slug:
In the right sidebar, find the Permalink section. Click Edit. Change the slug to something short and keyword-focused.
Example: For a post about growing a finance blog, use /how-to-grow-finance-blog.
Adding alt text to images:
Click any image block in your post. In the right sidebar, find the Alt Text field. Write a plain description of the image. Include your keyword only if it fits naturally.
Using Yoast SEO on the Creator plan:
The Creator plan and above let you install third-party plugins. Go to Plugins in the left menu. Click Add New Plugin. Search for Yoast SEO. Click Install Now. Then click Activate.
Once active, every post and page will have a new Yoast SEO section at the bottom of the editor. It includes a Focus Keyword field. Type the exact phrase you want that page to rank for.
Yoast then gives you a readability score and an SEO score. Both use a traffic light system. Red means there are problems. Orange means it is okay. Green means it is good. Fix every red issue before publishing.
Connecting Google Search Console:
Go to your WordPress.com dashboard. Click Tools. Then click Marketing. Find the Google Search Console section. Follow the steps to connect your account. Once connected, submit your sitemap at yoursite.com/sitemap.xml through the Search Console interface.
How to Set Up an Online Store on Each Platform
Setting Up a Store on Wix
You need at least the Core plan to accept payments on Wix. The Business plan unlocks more complete e-commerce tools.
Step 1: Add Wix Stores to your site
In the Wix editor, click Add Elements in the left panel. Click App Market. Search for Wix Stores. Click Add to Site. A shop page and product management tools are now added to your site automatically.
Step 2: Add your first product
In the left panel, click Store Products. Click Add Product. Choose Physical Product.
Fill in:
- Product name: keep it clear and specific
- Description: describe what the product is, what it does, and why someone should buy it
- Price: set your selling price
- Product images: upload at least three photos showing the product from different angles
Real example: You sell handmade soy candles. Product name: Lavender Soy Candle, 8oz. Description: Hand-poured soy wax candle with a natural lavender scent. Burns for up to 45 hours. Made in small batches in Austin, Texas. Each candle comes in a reusable glass jar. Price: $22.
Step 3: Add product options
If your product comes in sizes, colors, or scents, click Add Options. Create a dropdown for size or a swatch for color. Set a different price or stock level for each variant if needed.
Example: Small (4oz) for $14. Large (8oz) for $22.
Step 4: Set your inventory
Scroll down to the Inventory section. Turn on Track Inventory. Type how many units you have. When stock hits zero, Wix automatically marks the product as out of stock.
Step 5: Set up payments
In your Wix dashboard, go to Settings. Click Accept Payments. Choose from Wix Payments, PayPal, or Stripe. Wix Payments lets customers pay by credit or debit card directly on your site. PayPal lets customers use their PayPal balance or linked card.
Click Connect next to your chosen payment method. Follow the setup steps. You will need to provide business details and bank account information to receive payouts.
Step 6: Set up shipping
Go to Settings in your dashboard. Click Shipping and Delivery. Click Add Shipping Region. Choose the countries or regions you ship to. Then add shipping methods.
Options include:
- Free shipping (no cost to the customer)
- Flat rate (same price for all orders, example: $5.99 per order)
- Rate by weight (price changes based on how heavy the order is)
- Free shipping over a minimum order amount (example: free shipping on orders over $50)
Step 7: Set up taxes
Go to Settings. Click Tax. Select your country or state. Turn on automatic tax calculation if available for your region. For the US, Wix can calculate state and local sales tax automatically in most states.
Step 8: Test your checkout
Before opening your store, go through a full checkout yourself. Add a product to your cart. Complete the checkout using a test payment method. Check that you receive a confirmation email. Check that the order appears in your dashboard under Orders.
Fix any issues before you start telling customers about your store.
Setting Up a Store on Squarespace
You need at least the Business plan to sell on Squarespace. The Basic Commerce plan removes the additional transaction fee that applies on the Business plan.
Step 1: Open the store section
In the left panel, click Commerce. Then click Inventory. Click Add Item. Choose Physical Product.
Step 2: Add your product details
Fill in your product name and description. Write your description the way a helpful friend would describe the product. Include what it is, what it does, and who it is for.
Set your price. Add a sale price if the item is on discount.
Upload your product photos. Squarespace has a built-in image editor. You can crop, adjust brightness, and apply basic filters without leaving the platform. Use high-quality photos. Clear, bright product photos directly affect how many people buy.
Step 3: Set up product variants
Click the Variants tab inside your product settings. Add options like Size, Color, or Material. Set a price for each if they differ.
Example: A print sold in two sizes. A4 for $24. A3 for $38.
Step 4: Add SKUs and inventory
In the Variants tab, set a SKU (stock keeping unit) for each product. This is an internal reference code for your own tracking. Set the stock quantity for each variant.
Step 5: Set up payments
Go to Commerce in the left panel. Click Payments. Connect Stripe to accept credit and debit cards. Connect PayPal as a second option. You must connect at least one payment provider before your store can accept orders. Squarespace does not have its own payment processor.
Step 6: Set up shipping
Go to Commerce. Click Shipping. Click Add Shipping Option. Set a name for the option, like Standard Shipping or Free Shipping. Set the price. Add different options for different regions.
To offer free shipping on orders above a certain amount, click Add Shipping Option again. Set the price to zero. Under Eligibility, set a minimum order value.
Step 7: Set up taxes
Go to Commerce. Click Taxes. Add your country or region. In the US, Squarespace can calculate tax rates automatically for most states. Turn on automatic tax calculation and confirm your business address.
Step 8: Add a store page to your navigation
Go to Pages in the left panel. If a Shop page does not already exist, click the plus icon to add one. Drag it into your main navigation. Your customers need to be able to find your products easily from the homepage.
Step 9: Test your checkout
Place a test order using Stripe’s test card number. In Stripe, go to your dashboard and enable test mode. Place the order on your site. Check that everything works. Then disable test mode before your store goes live.
Setting Up a Store on WordPress.com
You need the Entrepreneur plan on WordPress.com to access WooCommerce and full e-commerce features.
Step 1: Activate WooCommerce
The Entrepreneur plan includes WooCommerce pre-installed. Go to your dashboard. Click WooCommerce in the left menu. The setup wizard opens. Answer the questions about your business location, currency, and what you sell. Click Continue after each step.
Step 2: Add your first product
In the left menu, click Products. Click Add New. The product editor opens.
Add your product name at the top. Write a long description below. On the right side, add a product image and a product gallery.
In the Product Data section below the description, set:
- Regular price
- Sale price (optional)
- Stock quantity
- SKU
Select the product category on the right. Categories help customers browse your store.
Step 3: Add product attributes and variations
If your product comes in sizes or colors, click the Attributes tab inside Product Data. Add an attribute like Size. List the values: Small, Medium, Large. Check Used for Variations.
Then click the Variations tab. Click Generate Variations. WooCommerce creates a variation row for each combination. Set the price and stock for each one.
Step 4: Set up a payment gateway
Go to WooCommerce. Click Settings. Click the Payments tab. You will see a list of available payment options. Click Set Up next to Stripe or PayPal. Follow the connection steps. Both require you to have an account with the payment provider.
WooCommerce also offers its own payment solution called WooPayments in some countries. It lets you accept cards directly without a third-party account.
Step 5: Set up shipping zones
Go to WooCommerce. Click Settings. Click the Shipping tab. Click Add Shipping Zone. Name the zone, for example United States. Click Add Shipping Method. Choose flat rate, free shipping, or local pickup.
Click the method name to set the rate. For flat rate, type the price. For free shipping, you can set a minimum order amount.
Add a second zone for international orders if you ship globally. Set different rates for each zone.
Step 6: Set up taxes
Go to WooCommerce. Click Settings. Click the Tax tab. Check Enable Tax Rates and Calculations. Set your base country and state. Go to the Standard Rates tab and add your local tax rate.
In the US, you can use WooCommerce’s automatic tax feature through WooPayments or Stripe Tax to calculate rates for each customer’s location.
Step 7: Set up your shop page
WooCommerce creates a Shop page automatically during setup. Go to Pages and confirm it exists. Go to WooCommerce Settings. Click the Products tab. Make sure the Shop Page is set to your Shop page.
Add the Shop page to your navigation menu. Go to Appearance. Click Menus. Find the Shop page in the Pages list. Check its box and click Add to Menu. Save the menu.
Step 8: Set up customer emails
Go to WooCommerce. Click Settings. Click the Emails tab. You will see a list of automated emails WooCommerce sends to customers. These include: New Order confirmation, Order Processing, Order Completed, and Customer Invoice.
Click each one to customize the subject line and the content. Make sure your email address is set correctly in the From Address field so customers can reply to your messages.
Step 9: Test your checkout
WooCommerce has a built-in order simulation tool. Go to WooCommerce. Click Settings. Click the Advanced tab. Look for the Test Mode or use Stripe’s test card numbers to place a test order. Walk through the full checkout. Confirm the order appears in WooCommerce under Orders. Check that confirmation emails arrive.
Common Beginner Mistakes to Avoid
On Wix:
Mistake 1: Moving everything around just because you can. The drag-and-drop editor is flexible, but layouts with randomly placed elements look unprofessional. Stick close to your template’s original structure until you build your design eye.
Mistake 2: Ignoring the mobile editor. Just because your desktop site looks great does not mean mobile is fine. Always check the mobile view before publishing. Many Wix sites have overlapping text or broken layouts on phones.
Mistake 3: Changing templates after you launch. Wix does not let you switch to a completely different template after you go live without rebuilding your site from scratch. Pick your template carefully before you start adding real content.
On Squarespace:
Mistake 1: Uploading tiny or blurry images. Squarespace templates are built around large, high-quality visuals. A small or pixelated image will stand out immediately and make your site look cheap. Use images that are at least 1500 pixels wide.
Mistake 2: Skipping the Site Styles panel. Many Squarespace beginners only edit content but never touch Site Styles. Spending 15 minutes in Site Styles to match your brand colors and fonts will make your site look much more consistent and professional.
Mistake 3: Forgetting to set SEO page titles. Squarespace uses your page name as the default SEO title. A page called About is not a useful SEO title. Go into every page’s SEO settings and write a proper keyword-focused title.
On WordPress.com:
Mistake 1: Publishing posts without a featured image. Posts without a featured image look plain on your blog page and share badly on social media. Always add a relevant featured image before you hit publish.
Mistake 2: Using one long unbroken block of text. Long walls of text drive readers away fast. Break your content into short paragraphs. Use headings every few paragraphs. Add images to break up long sections.
Mistake 3: Ignoring categories and tags. Without categories, your blog has no structure. Set up three to seven clear categories before you publish your first post. Assign every post to a category. This helps both readers and Google understand what your site is about.
Frequently Asked Questions
Is Wix good for beginners with no experience?
Yes. Wix is one of the most beginner-friendly website builders you can use right now. The drag-and-drop editor lets you click and move anything on the page without touching any code. The Wix AI tool can also build a basic starting layout for you in under a minute based on a few simple questions. Most people with zero experience have their first page live within an hour or two of signing up.
Can I switch from Wix to WordPress.com later?
You can switch, but it requires a lot of manual work. There is no direct export tool that moves a Wix site into WordPress. You would need to copy your text, re-upload your images, and rebuild every page by hand. For a small site, that might take a few hours. For a large site with dozens of pages, it could take days. This is why choosing the right platform from the start matters. If you think you will want to publish lots of content or grow aggressively over time, starting on WordPress.com is the safer long-term choice.
Which is cheaper over one year: Wix, Squarespace, or WordPress.com?
WordPress.com is the cheapest for basic sites. The Starter plan costs $4 per month when billed yearly, which works out to $48 for the full year. Squarespace’s cheapest plan is $16 per month ($192 per year) and Wix’s cheapest plan is $17 per month ($204 per year). The gap narrows at higher plan tiers, especially for e-commerce. Use the cost calculator in this guide to build a comparison based on the exact plan type and number of years you are planning for.
Which platform is best for SEO?
WordPress.com gives you the deepest SEO tools of the three. It supports the Yoast SEO plugin on higher plans, which guides you through optimizing every single post and page before you publish. It also handles structured data, sitemaps, and URL control better than the other two. Wix and Squarespace both cover the basics, like page titles, meta descriptions, and sitemaps, and they are good enough for local business sites or simple portfolios. But if you want to rank dozens or hundreds of blog posts on Google over time, WordPress.com has the stronger foundation.
Can I sell products on all three platforms?
Yes, all three support online selling. On Wix, you need at least the Core plan. On Squarespace, you need at least the Business plan. On WordPress.com, you need the Entrepreneur plan to access WooCommerce. For a small shop with under 50 products, all three will work well. For a larger or more complex store with hundreds of products, custom product options, or advanced shipping rules, a dedicated e-commerce platform like Shopify may serve you better than any of these three.
Does WordPress.com need any coding knowledge?
No. The standard block editor on WordPress.com requires zero coding. You build pages by adding and stacking blocks visually, similar to building with a set of toy bricks. Every formatting option is in the toolbar. You can publish a full site without typing a single line of code. Coding only becomes relevant if you upgrade to the Creator plan and start installing custom plugins or editing theme files. Most WordPress.com users never need to do that.
What happens if I outgrow my platform?
All three platforms let you upgrade your plan at any time. More storage, more features, and more tools become available as you move up. If you outgrow WordPress.com completely, migrating to a self-hosted WordPress.org setup is the most common path. Your content, posts, pages, and images can be exported and imported with built-in tools. Moving away from Wix or Squarespace to a different platform is harder because those platforms use proprietary systems. Plan ahead if you think you will need a very large or complex site within the next two to three years.
The Final Verdict
There is no single best platform. The right one depends completely on what you are building.
If you want the fastest and easiest start with full layout freedom, pick Wix.
If design quality is your top priority and you want your site to look polished without hiring a designer, pick Squarespace.
If you plan to publish content regularly, build an audience on Google, and grow over the long term, pick WordPress.com.
All three platforms are trusted by millions of people. You will not go wrong with any of them as long as your choice matches your actual goal.
The worst decision is to spend weeks comparing and never start. Pick the platform that fits your goal from the list above. Follow the steps in this guide. Get your first page live today.