
Imagine you have a business idea ready, a domain name picked, and a rough sketch of how you want your site to look.
The only thing standing between you and a live website is knowing where to start. This guide is that starting point. You will build a real page in Elementor from scratch, step by step, starting from zero.
This guide walks you through every single step. From buying a domain to building a full page and hitting publish. You do not need any design experience. You do not need to know how to code. If you can use a smartphone, you can follow this guide.
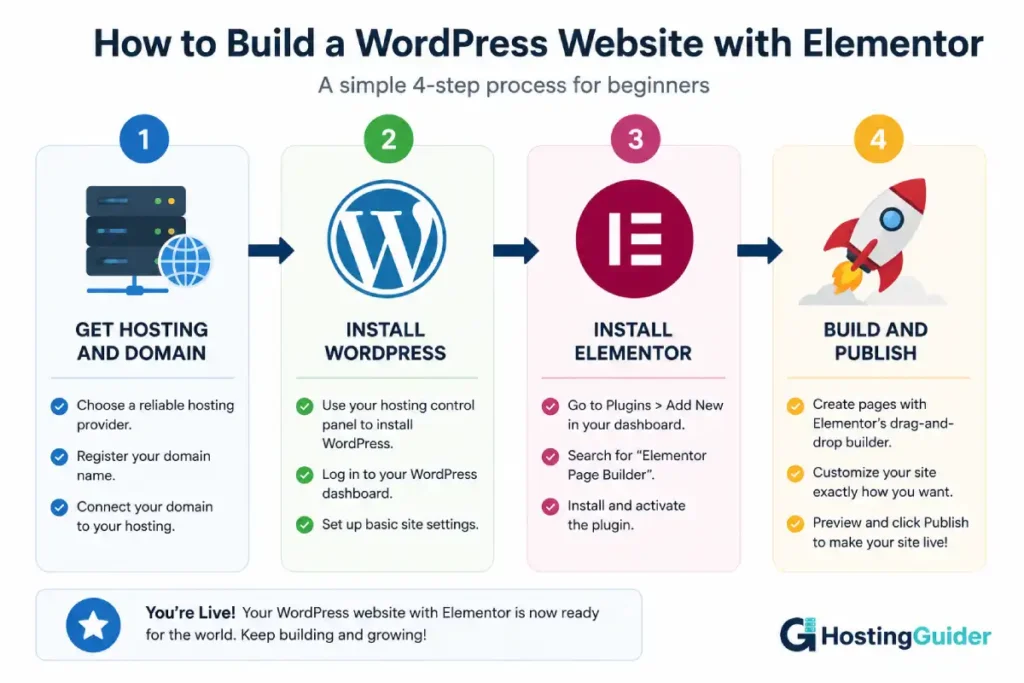
Here is what you will learn:
- What Elementor is and how it works
- What you need before you start
- How to set up hosting and install WordPress
- How to install Elementor on your site
- How the Elementor editor works, explained simply
- How to build a full page from scratch, step by step
- How to set your colors, fonts, and global design
- How to make your site look good on phones
- How to preview and publish your finished site
- The most common beginner mistakes and how to avoid them
By the end of this guide, you will have a real working website built with Elementor.
Table of Contents
Key Takeaways
- Elementor is a free drag-and-drop builder that works on WordPress.org
- You need a domain name and web hosting before you can use Elementor
- Elementor uses sections, columns, and widgets to build pages visually
- You see every change live as you make it, no coding needed
- The free version of Elementor is powerful enough to build a complete website
- Elementor Pro unlocks more widgets, templates, and design options
- Always check your site on mobile before publishing
Quick Answer
Elementor is a drag-and-drop page builder plugin for WordPress.org. To use it, you need a domain name, web hosting, and a WordPress.org installation. Once Elementor is installed, you open any page in the Elementor editor, drag elements called widgets onto the canvas, and design your page visually. Changes appear live as you make them. When you are happy with your page, you click Publish and it goes live.
What Is a Drag-and-Drop Builder?
A drag-and-drop builder is a tool that lets you design web pages by clicking and moving things around on the screen.
Instead of typing code to create a button, you drag a button widget onto your page. Instead of writing CSS to change a color, you click a color picker. Instead of coding a layout, you drag columns and sections into place.
You see exactly what your page looks like as you build it. There is no gap between what you create and what your visitors see. What you build is what they get.
This type of builder is sometimes called a visual editor or a WYSIWYG editor. WYSIWYG stands for What You See Is What You Get. It just means the editor shows you the real result as you work.

What Is Elementor?
Elementor is a drag-and-drop page builder plugin for WordPress. It was launched in 2016 and has grown to be used on over 10 million websites worldwide.
Elementor sits on top of your WordPress site. You install it like any other plugin. Once active, it gives you a completely new way to edit your pages. Instead of the default WordPress block editor, you get Elementor’s full visual canvas where you drag, drop, resize, and style everything in real time.
There are two versions of Elementor:
| Version | Cost | What You Get |
|---|---|---|
| Elementor Free | $0 | 40+ basic widgets, 30+ free templates, full drag-and-drop editing |
| Elementor Pro | From $59 per year | 100+ widgets, 300+ templates, theme builder, popup builder, form builder, WooCommerce support |
For a complete beginner building their first website, the free version of Elementor is more than enough to get started. This guide covers the free version so anyone can follow along without spending anything.
One Important Thing to Know Before You Start
Elementor works with WordPress.org, not WordPress.com.
These are two different things and the difference confuses a lot of beginners.
| WordPress.com | WordPress.org | |
|---|---|---|
| What it is | A hosted website platform | Free software you install yourself |
| Who manages hosting | WordPress.com does | You choose your own hosting provider |
| Can you install Elementor | No | Yes |
| Cost | Free to paid plans | Free software, but you pay for hosting |
| Control level | Limited | Full control |
WordPress.com is the platform we discussed in other guides. It is managed for you and easy to set up.
WordPress.org is the free software that powers millions of websites. You download it, install it on your own hosting, and then install plugins like Elementor on top of it.
To use Elementor, you need WordPress.org. That means you also need a domain name and a web hosting account. The next section walks you through all of that step by step.
What You Need Before You Start
Before you install Elementor, you need three things:
| What You Need | What It Is | Typical Cost |
|---|---|---|
| Domain name | Your website address, like yourname.com | $10 to $15 per year |
| Web hosting | A server that stores your website files | $3 to $15 per month |
| WordPress.org | Free website software installed on your hosting | Free |
You can buy a domain name and hosting from the same provider to keep things simple. Popular and beginner-friendly options include Hostinger, Bluehost, and SiteGround.
This guide uses Hostinger as the example because it is affordable, beginner-friendly, and includes a free domain name with most plans. The steps are very similar on any other hosting provider.
Step 1: Buy a Domain Name and Hosting
What to do:
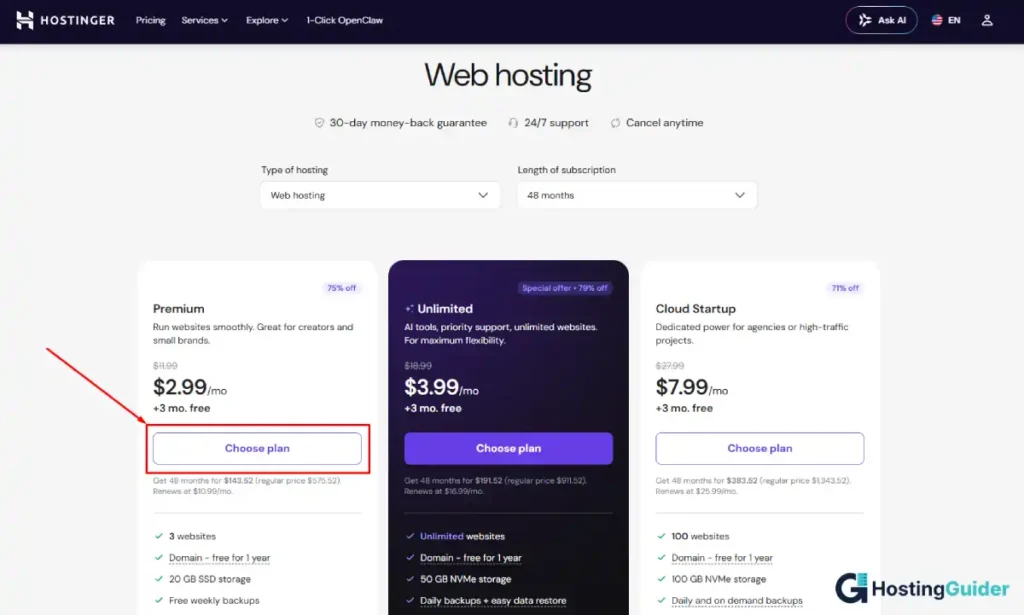
Go to hostinger.com or any other hosting provider. Click on Hosting in the top menu. Choose the WordPress Hosting option.
Pick a plan. For a beginner, the single website plan is enough to start. It typically costs between $3 and $5 per month when you pay for a year upfront.
During checkout, you will be asked to choose a domain name. This is your website address. Type the name you want. Check if it is available. If it is, add it to your order.
Tips for choosing a good domain name:
| Good Practice | Example |
|---|---|
| Keep it short | mariacakes.com not mariastastyhandmadecakes.com |
| Make it easy to spell | Avoid unusual spellings |
| Use .com if possible | It is the most recognised extension worldwide |
| Avoid numbers and hyphens | They are hard to remember and type |
| Match your brand or name | Use your business name or your own name |
Complete your purchase. You will receive a confirmation email with your account details.
Step 2: Install WordPress on Your Hosting
After you buy hosting, you need to install WordPress. Most hosting providers make this very easy with a one-click installer.
On Hostinger:
Log in to your Hostinger account. Go to your hPanel dashboard. Find the section called Website and click Auto Installer. Click the WordPress logo. A setup form appears.
Fill in the following:
| Field | What to Enter |
|---|---|
| Website URL | Your domain name |
| Admin username | A username for your WordPress login, not admin |
| Admin password | A strong unique password |
| Admin email | Your email address |
| Website title | Your site name |
| Website language | English |
Click Install. Hostinger installs WordPress in about 60 seconds.
When it is done, you will see a link to your WordPress admin dashboard. It looks like yourdomain.com/wp-admin. Save this link. You will use it every time you want to edit your site.
Logging into WordPress for the first time:
Go to yourdomain.com/wp-admin. Type your admin username and password. Click Log In. Your WordPress dashboard opens.
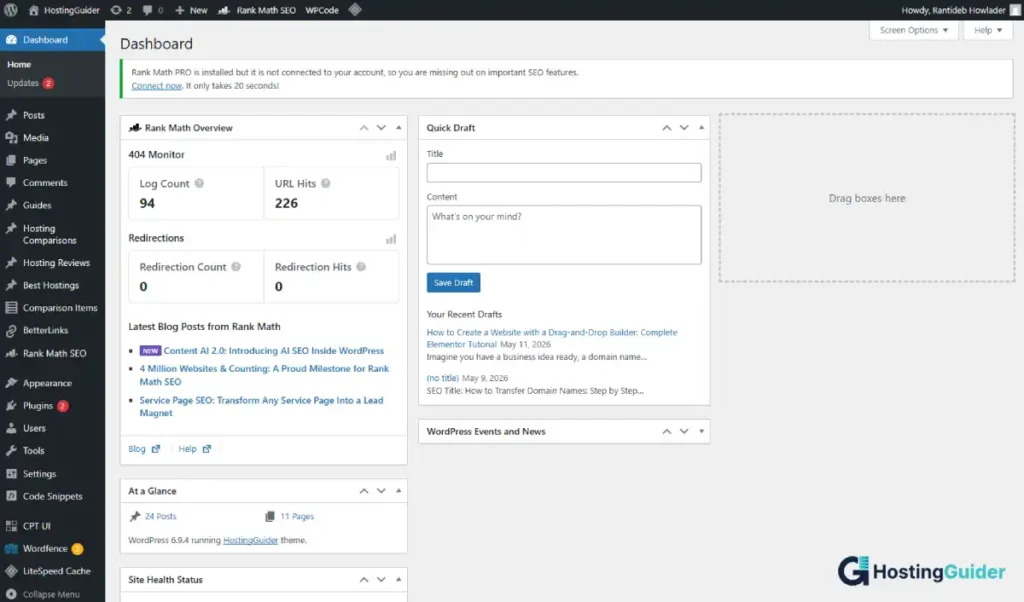
The WordPress dashboard is where you manage everything. Do not worry about all the options right now. You only need a few of them to get started.
Step 3: Install Elementor
Now you install Elementor. This is a plugin, which is a piece of software that adds new features to WordPress.
How to install Elementor:
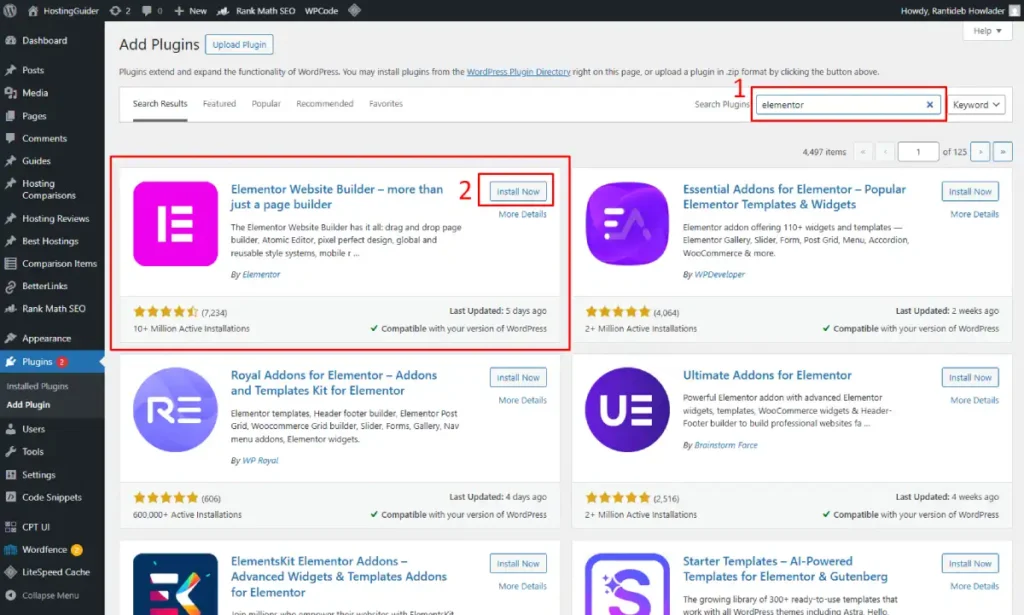
In the left sidebar of your WordPress dashboard, click Plugins. Then click Add New Plugin.
In the search box at the top right, type Elementor. Press Enter.
You will see a plugin called Elementor Website Builder in the results. It has the Elementor logo and shows a very high number of active installations. Click Install Now.
Wait a few seconds for it to install. Then click Activate.
Elementor is now installed and active on your site.
You will see a welcome screen from Elementor asking if you want to connect to an account. You can create a free Elementor account or skip this step. A free account gives you access to free templates. Click Create My Account to sign up for free, or click Skip for now if you want to go straight to building.
Step 4: Create Your First Page
Now you will create your first page and open it in Elementor.
Creating a new page:
In the WordPress dashboard left sidebar, click Pages. Click Add New Page.
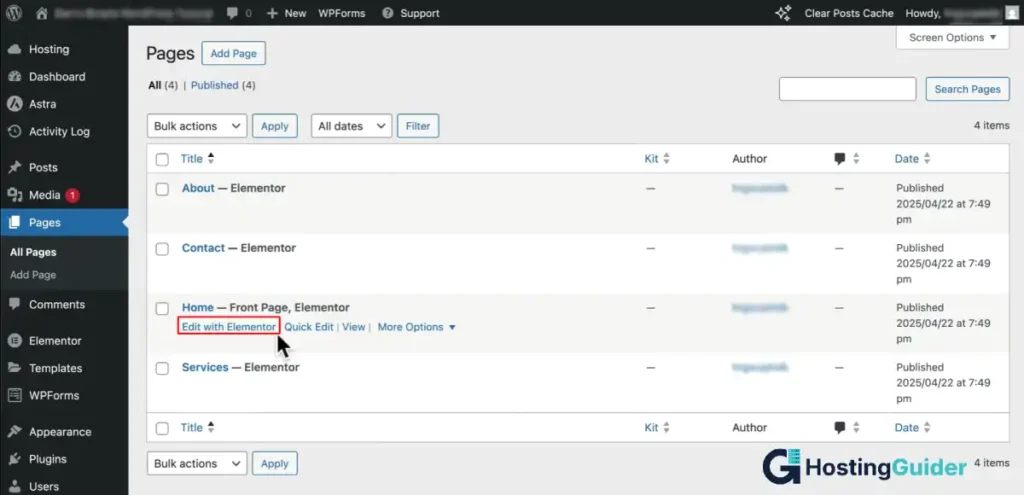
At the top of the editor, you will see a title field. Click it and type your page name. For your homepage, type Home.
Now look for the blue button that says Edit with Elementor. Click it.
The Elementor editor opens in a new full-screen view.
Step 5: Understand the Elementor Editor
Before you start building, take two minutes to understand how the Elementor editor is laid out. This will make everything easier.
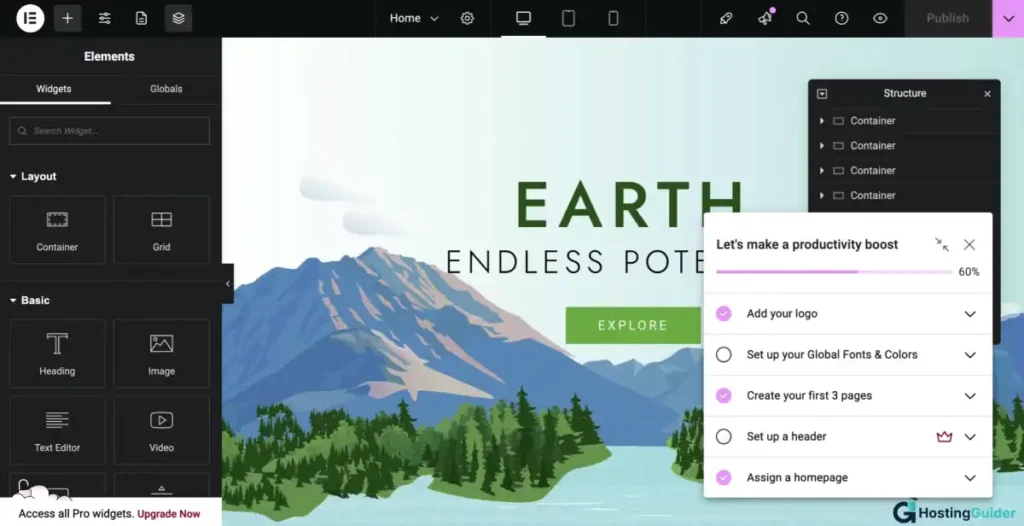
The Elementor editor has three main areas:
The left panel: This is where all your tools live. At the top you see search bar to find widgets. Below it are categories of widgets organized by type. This is where you find everything you want to add to your page, like headings, images, buttons, forms, and videos.
The canvas: This is the big area in the middle. It is your page. Everything you add appears here. You build your page directly on this canvas by dragging widgets from the left panel onto it.
The bottom bar: This is the thin bar at the very bottom. It has icons for switching between desktop, tablet, and phone views of your page. It also has the History button to undo changes and the Publish button to save and publish your page.
Understanding Sections, Columns, and Widgets
Elementor builds pages using three building blocks. Understanding these three things is the key to building anything you want.
| Building Block | What It Is | Real-World Analogy |
|---|---|---|
| Section | A horizontal row that spans the full width of the page | A shelf in a bookcase |
| Column | A vertical division inside a section | A slot on that shelf |
| Widget | An individual element like text, image, or button | A book or object placed on the shelf |
Here is how they work together:
You add a Section to your page. Inside the Section, you choose how many Columns you want, one, two, three, or more. Then you drag Widgets into each Column.
Real example: You want a row on your page with a photo on the left and a description on the right. You add one Section. Inside it you choose two Columns. You drag an Image widget into the left column. You drag a Text Editor widget into the right column.
Step 6: Add Your First Section
Now you will build your first page. Start with the hero section. The hero is the big area at the very top of your page that visitors see first.
Adding a section:
On the blank canvas, you will see a plus icon in the middle. Click it. A popup appears asking how many columns you want. Click the single column option for now.
A blue outlined section appears on your canvas. This is your first section.
Setting a background color or image for the section:
Right-click the section’s blue outline. Click Edit Section. The left panel changes to show the section settings.
Click the Style tab at the top of the left panel. Look for Background. Click the paint bucket icon. Choose Solid Color to set a plain background color. Click the color box and pick a color using the color picker.
To use a background image instead, click Image under Background Type. Click the image area that appears. Upload a photo from your computer or choose from your media library.
If you use a background image, turn on the overlay option below it to add a dark transparent layer over the image. This makes text easier to read on top of photos. Click the overlay color box and pick black. Set the opacity slider to about 0.5.
Step 7: Add a Heading
Now add your main headline inside the hero section.
How to add a Heading widget:
In the left panel, look for the search bar. Type heading. The Heading widget appears at the top of the results. Click and hold on it. Drag it onto your section on the canvas. Release your mouse. The heading appears on the page.
Editing the heading text:
Click on the heading on the canvas. The left panel shows the heading settings. Find the Title field. It probably says Add Your Heading Text Here. Click inside that field. Delete the placeholder text. Type your own headline.
Good headline example for a bakery: Fresh Handmade Cakes Delivered to Your Door in Chicago.
Bad headline example: Welcome to Our Website.
Your headline should tell visitors exactly what you do and who you do it for. Keep it under 10 words.
Styling the heading:
Click the Style tab in the left panel. Here you can change:
| Setting | What It Controls |
|---|---|
| Text color | The color of your headline text |
| Font family | The typeface used for the headline |
| Font size | How big the headline is |
| Font weight | How bold or light the letters are |
| Text alignment | Left, center, or right aligned |
| Text shadow | A subtle shadow behind the letters |
For a hero section, center your text. Set the font size to at least 50px on desktop. Set the color to white if your background is dark.
Step 8: Add a Subheading and Button
Below your main headline, add a shorter line of supporting text and a call-to-action button.
Adding a Text Editor widget:
Search for Text Editor in the widget search bar. Drag it below your heading on the canvas. Click on it and type a short supporting sentence.
Example: Order before noon for same-day delivery. Over 500 happy customers in Chicago.
Keep this text short. One to two sentences maximum.
Adding a Button widget:
Search for Button in the widget search bar. Drag it below your text. Click on it. The left panel shows button settings.
Find the Text field. Change it to something action-focused.
Good button text examples:
| Situation | Good Button Text |
|---|---|
| Bakery | Order Now |
| Photographer | See My Work |
| Consultant | Book a Free Call |
| Blog | Read the Latest |
Bad button text: Click Here, Submit, Go.
Your button text should tell the visitor exactly what happens when they click it.
Setting the button link:
Below the text field, find Link. Type the URL where the button should take the visitor. If you want it to go to your Contact page, type /contact. If it goes to an external site, paste the full URL.
Styling the button:
Click the Style tab. Change the background color to match your brand. Change the text color to white or black depending on contrast. Increase the border radius to make the button slightly rounded. A border radius of 5 to 8 pixels looks clean for most sites.
Step 9: Add a New Section Below the Hero
After the hero, you need more content. Maybe a section showing your services, products, or about information.
Adding a second section:
Hover below your hero section on the canvas. A blue line appears between sections with a plus icon. Click the plus icon. Pick a two-column layout.
Your new section appears below the hero.
Adding an image to the left column:
Search for Image in the widget search bar. Drag it into the left column of your new section. The left panel shows image settings. Click Choose Image. Upload a photo from your computer. Click Insert Media.
After uploading, look at the Image Size setting. Choose Large or Full for the best quality.
Adding content to the right column:
Drag a Heading widget into the right column. Type a short section title like Why Customers Love Us or What We Do.
Below it, drag a Text Editor widget. Write a short paragraph about your business, product, or service. Keep it between 30 and 60 words. Simple, clear, and honest.
Below that, drag another Button widget. Link it to the most relevant page on your site.
Step 10: Add a Contact Form
Every website needs a way for visitors to reach you. Elementor Free includes a basic form widget.
How to add a form:
First add a new full-width section at the bottom of your page. Search for Form in the widget search bar. Drag the Form widget onto the section.
The form automatically includes Name, Email, and Message fields. That is enough for most contact forms.
Customizing the form:
Click on the form. In the left panel, you will see a list of form fields. Click any field to edit it. You can change the field label, the placeholder text inside the field, and whether the field is required.
To make a field required, click on it in the fields list and turn on the Required toggle.
Setting up email notifications:
Click the Email tab inside the form settings. Fill in:
| Field | What to Enter |
|---|---|
| To | Your email address where form submissions go |
| Subject | Contact Form Submission from Your Website |
| From Name | Your website name |
| From Email | your@email.com |
Click the Actions After Submit tab. Make sure Send Email is listed as an action. Add Redirect if you want to send the visitor to a Thank You page after they submit.
Step 11: Set Your Global Colors and Fonts
Right now, every widget you add might use different colors and fonts. Global Styles let you set one consistent color palette and font set that applies across your whole site.
Opening Global Style settings:
In the Elementor editor, look at the very top of the left panel. Click the hamburger menu icon (three horizontal lines). A dropdown appears. Click Site Settings.
The Site Settings panel opens. You will see Global Colors at the top and Global Fonts below it.
Setting Global Colors:
Click Global Colors. You will see four default color slots: Primary, Secondary, Text, and Accent.
Click each slot and set a color using the color picker.
| Color Slot | What It Is Used For |
|---|---|
| Primary | Your main brand color, used on buttons and highlights |
| Secondary | A supporting color for backgrounds and accents |
| Text | The color of your body text, usually dark grey or black |
| Accent | An extra color for hover effects or links |
Once you set these, any widget that uses System Colors will automatically update to match.
Setting Global Fonts:
Click Global Fonts in the Site Settings panel. You will see slots for Primary Headline, Secondary Headline, Body Text, and Accent Text.
Click each slot. A font picker appears. Type the name of a font you like. Elementor supports all Google Fonts for free.
Good font combinations for beginners:
| Style | Heading Font | Body Font |
|---|---|---|
| Modern and clean | Montserrat | Open Sans |
| Professional | Playfair Display | Lato |
| Friendly | Nunito | Nunito Sans |
| Bold and simple | Oswald | Roboto |
Set the font size for your body text to between 16px and 18px. Smaller than 16px is hard to read on most screens.
Step 12: Make Your Site Look Good on Mobile
More than half of all web traffic comes from mobile phones. Your site must look good on small screens.
Elementor has a built-in mobile editor. Here is how to use it.
Switching to mobile view:
At the very bottom of the Elementor editor, look for a row of small icons showing a desktop monitor, a tablet, and a mobile phone. Click the phone icon to switch to mobile view.
Your canvas now shows a phone-sized preview of your page. Scroll through the entire page on this view.
Common mobile problems and how to fix them:
| Problem | How to Fix It in Elementor |
|---|---|
| Text is too small | Click the text widget, click Style, find Font Size, click the phone icon next to the size, and set a larger mobile size |
| Button is too narrow | Click the button, click Advanced, set Width to 100% on mobile |
| Two columns are too cramped | Click the section, click Layout, find Column Gap and reduce it, or stack columns using the Column Width controls |
| Image looks stretched | Click the image widget, click Style, and adjust the image size or object-fit setting |
| Padding is too tight | Click the section, click Advanced, find Padding, click the phone icon and adjust padding for mobile only |
When you change a setting in mobile view, it only affects mobile. Your desktop layout stays the same. This is how Elementor lets you have different layouts for different screen sizes.
Switching to tablet view:
Click the tablet icon at the bottom to check the tablet layout too. Tablets sit between phone and desktop in size. Any layout that looks fine on desktop and phone usually looks fine on tablet too, but always check.
Step 13: Add Navigation to Your Site
Your visitors need to move between pages. You need a navigation menu.
Creating your pages first:
Before you add navigation, make sure you have created all your main pages. Go back to your WordPress dashboard. Click Pages. Create pages for:
- Home
- About
- Services or Blog
- Contact
For each page, click Add New, give it a title, and click Publish. You do not need to add content to all of them right now. Just create and publish the blank pages so they exist.
Setting up your menu in WordPress:
Go to your WordPress dashboard. Click Appearance. Click Menus. Click Create a New Menu. Name it Primary Menu.
On the left side, you will see a list of your pages. Check the boxes next to the pages you want in your menu. Click Add to Menu.
Drag the pages into the order you want them. Under Menu Settings at the bottom, check Primary Menu. Click Save Menu.
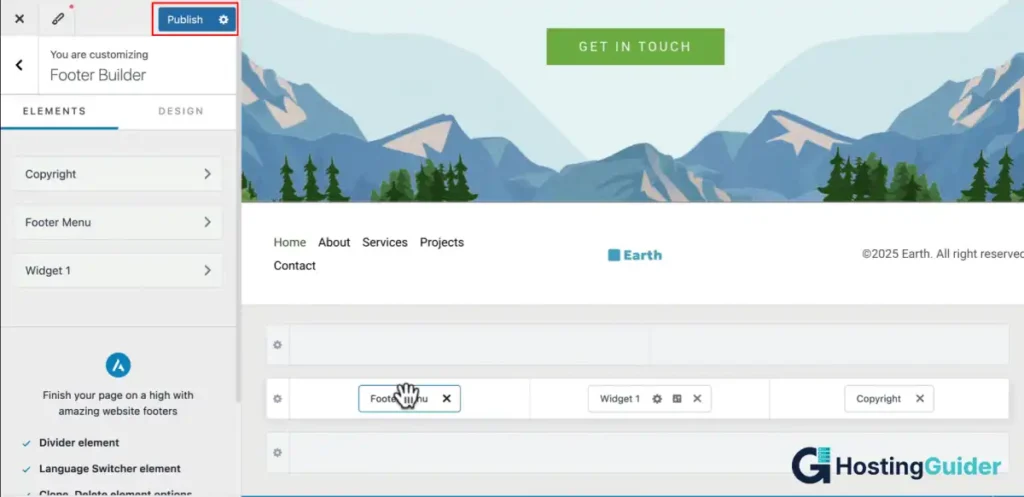
Adding navigation in Elementor:
Elementor Free does not include a full theme header builder. The navigation menu set up in WordPress Appearance Menus will appear automatically through your theme’s default header.
If you want full control over your header and navigation design, that is available in Elementor Pro through the Theme Builder feature.
Step 14: Preview Your Page
Before publishing, always preview your page to see exactly what visitors will see.
How to preview:
In the Elementor editor, look at the bottom left of the left panel. Click the eye icon. A preview of your page opens in a new browser tab. This is your page exactly as a visitor would see it.
Click through every link. Read every line of text. Check the layout on desktop and then on your phone by resizing your browser window or using your phone to visit the page URL.
Look for:
| Thing to Check | What to Look For |
|---|---|
| Typos | Read every word carefully |
| Broken links | Click every button and link |
| Image quality | Check images are not blurry or stretched |
| Mobile layout | Resize browser to check phone view |
| Loading speed | Does the page load within 3 seconds |
| Spacing | Is there consistent space between sections |
| Font readability | Is the text easy to read at normal size |
Step 15: Publish Your Page
When you are happy with your page, it is time to publish.
How to publish:
In the Elementor editor, look at the bottom of the left panel. Click the green Publish button.
Your page is now live. Anyone who visits your website address can see it.
Setting your homepage:
After publishing your home page, you need to tell WordPress to use it as the front page of your site.
Go to your WordPress dashboard. Click Settings. Click Reading. Under Your Homepage Displays, select A Static Page. In the Homepage dropdown, select Home (the page you just built). Click Save Changes.
Now when someone types your domain into their browser, they see your Elementor-built homepage.
How to Add More Pages to Your Site
You now know how to build one page. Every other page on your site works exactly the same way.
Here is the process for each new page:
- Go to WordPress dashboard and click Pages
- Click Add New Page
- Give the page a title
- Click Edit with Elementor
- Build the page using sections, columns, and widgets
- Click Publish when done
For your About page, add a photo of yourself and a short paragraph about your background and what you do.
For your Contact page, add your Elementor form widget and your business address and phone number.
For your Blog page, you do not need to build it in Elementor. WordPress creates a blog archive page automatically. Just set it in Settings, Reading, Posts Page.
Common Beginner Mistakes to Avoid
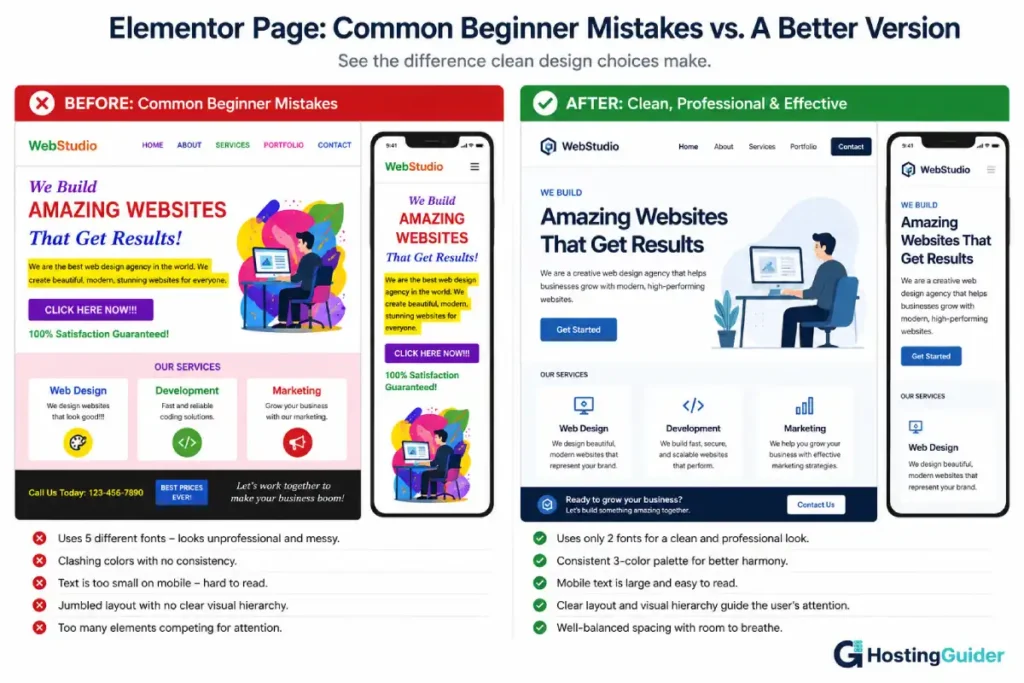
Mistake 1: Using too many fonts
Beginners often pick different fonts for every heading and paragraph. This makes your site look messy and hard to read. Stick to one font for headings and one for body text across your whole site. Set these in Global Fonts so they apply everywhere automatically.
Mistake 2: Using colors that clash
Picking random colors for different sections makes your site look unprofessional. Set your Global Colors to two or three colors and use only those throughout your site. A simple palette of one brand color, one neutral color, and one dark color is enough for most sites.
Mistake 3: Making text too small on mobile
Text that looks fine on a desktop can be tiny on a phone. Always switch to mobile view in Elementor after you finish each section and check that all text is large enough to read without zooming in.
Mistake 4: Not saving regularly
Elementor saves your work when you click Publish or Update. But if your browser crashes before you save, you can lose your recent changes. Click the Save Draft or Update button every 10 to 15 minutes while working.
Mistake 5: Ignoring page speed
Adding too many large photos, videos, and fancy animations slows down your page. A slow page drives visitors away and ranks lower on Google. Compress your images before uploading them. Keep your layout clean and avoid loading dozens of large files at once. Use Google PageSpeed Insights to check your page speed after publishing.
Mistake 6: Not setting a page title and meta description
Elementor lets you build beautiful pages but you still need to set SEO settings. After publishing a page in Elementor, go back to the WordPress page editor. Look for the Yoast SEO or Rank Math panel at the bottom. Set your page title and meta description for every page. This is what appears on Google search results.
Elementor Free vs Elementor Pro: What Is the Difference?
You can build a complete website with Elementor Free. But Elementor Pro unlocks more powerful tools if you ever need them.
| Feature | Elementor Free | Elementor Pro |
|---|---|---|
| Drag-and-drop editor | Yes | Yes |
| Basic widgets (40+) | Yes | Yes |
| Pro widgets (60+ extra) | No | Yes |
| Free templates | 30+ | 300+ |
| Theme Builder (header and footer) | No | Yes |
| Popup Builder | No | Yes |
| Form Builder (advanced) | Basic only | Full features |
| WooCommerce widgets | No | Yes |
| Dynamic content | No | Yes |
| Price | Free | From $59 per year |
Start with the free version. Learn the editor. Build your first site. Upgrade to Pro only when you hit a specific limitation that Pro solves.
Frequently Asked Questions
Do I need to know coding to use Elementor?
No. Elementor is designed for people with zero coding knowledge. Every design decision is made by clicking, dragging, and using sliders and color pickers. You never need to write HTML, CSS, or JavaScript to build a complete professional website with Elementor. The only situation where coding knowledge helps is if you want to add very advanced custom features beyond what any Elementor widget provides, which most beginners never need.
Is Elementor free to use?
Yes. Elementor has a free version that you can download and install from the WordPress plugin library at no cost. The free version includes over 40 widgets, 30+ free templates, and the full drag-and-drop editor. That is enough to build a complete website. Elementor Pro is a paid upgrade starting at $59 per year that adds more widgets, templates, and advanced features like a theme builder and popup builder.
Does Elementor work with WordPress.com?
No. Elementor only works with WordPress.org, the self-hosted version of WordPress. WordPress.com is a separate hosted platform that does not allow third-party plugin installation on most plans. To use Elementor, you need a domain name, web hosting, and a WordPress.org installation. Once WordPress.org is installed on your hosting, you install Elementor as a plugin just like any other WordPress plugin.
Can I use Elementor on a mobile phone?
You can view and preview your Elementor-built pages on a mobile phone. But you cannot use the Elementor editor itself on a phone. The drag-and-drop editing experience requires a desktop or laptop computer. You can check how your site looks on mobile by using the mobile preview mode inside the Elementor editor on your computer.
How do I add a blog to my Elementor website?
WordPress handles blog functionality automatically. You do not need Elementor to run a blog. Go to your WordPress dashboard, click Posts, and click Add New Post. Write your post in the WordPress editor and click Publish. WordPress creates a blog archive page that lists all your posts. You set which page shows your blog in Settings, then Reading, then Posts Page. You can use Elementor to style individual blog post layouts if you upgrade to Elementor Pro and use the Theme Builder feature.
Why is my Elementor page not showing as my homepage?
After publishing your Elementor homepage, you need to tell WordPress to use it as the front page. Go to Settings in your WordPress dashboard. Click Reading. Under Your Homepage Displays, select A Static Page. Set Homepage to the page you built in Elementor. Click Save Changes. Your Elementor page will now appear when visitors go to your domain address.
Final Checklist Before You Launch
Go through this list before you tell anyone your website is live:
| Task | Done? |
|---|---|
| Homepage built and published in Elementor | |
| Homepage set as front page in WordPress Reading settings | |
| About, Contact, and other main pages created | |
| Navigation menu set up and working | |
| Contact form tested by sending a message to yourself | |
| All images are high quality and not blurry | |
| All buttons link to the correct pages | |
| Mobile view checked on every page | |
| Global Colors and Global Fonts set consistently | |
| Page title and meta description set for every page | |
| Site loads in under 3 seconds (checked with Google PageSpeed) | |
| SSL certificate active (padlock visible in browser bar) |