
Your hosting account holds everything: your website files, databases, email settings, and sometimes payment details. If someone gets into your control panel without your knowledge, they can delete files, inject malicious code, redirect your traffic, or lock you out completely. A strong password alone does not stop that. Two-factor authentication (2FA) adds a second lock that only you can open, even if your password gets stolen.
This guide walks you through everything from understanding how 2FA works to setting it up across different hosting environments. Whether you are managing a shared hosting plan or running your own VPS, this guide covers you with practical steps.
Here is what you will learn:
- What 2FA is and why it matters for hosting accounts
- The different types of 2FA methods and which ones work best
- Step-by-step setup for cPanel, Plesk, WHM, SSH, and WordPress admin
- How to avoid common setup mistakes
- What to do if you get locked out
- Best practices for managing 2FA across multiple accounts
By the end, you will have a working 2FA setup and a clear plan for keeping your hosting environment secure without making your daily workflow painful.
Key Takeaways
- Two-factor authentication blocks unauthorized access even when your password is compromised
- Authenticator apps like Google Authenticator or Authy are more secure than SMS-based 2FA
- Most major hosting control panels, including cPanel and Plesk, have built-in 2FA support
- You should always save backup codes before activating 2FA to avoid lockouts
- SSH key authentication combined with 2FA is the strongest setup for VPS and dedicated servers
- Team accounts need a shared 2FA policy to avoid security gaps across users
What Is Two-Factor Authentication and How Does It Work?
Two-factor authentication is a login method that requires two separate forms of verification before granting access. The first factor is something you know, like your password. The second factor is something you have, like a phone that generates a time-based code or receives a push notification.
When you log in with 2FA active, you enter your username and password as usual. Then the system prompts you for a second verification step. That second step is typically a six-digit code that expires every 30 seconds, generated by an app on your phone. Because the code changes constantly and is tied to your physical device, someone with just your password cannot log in.
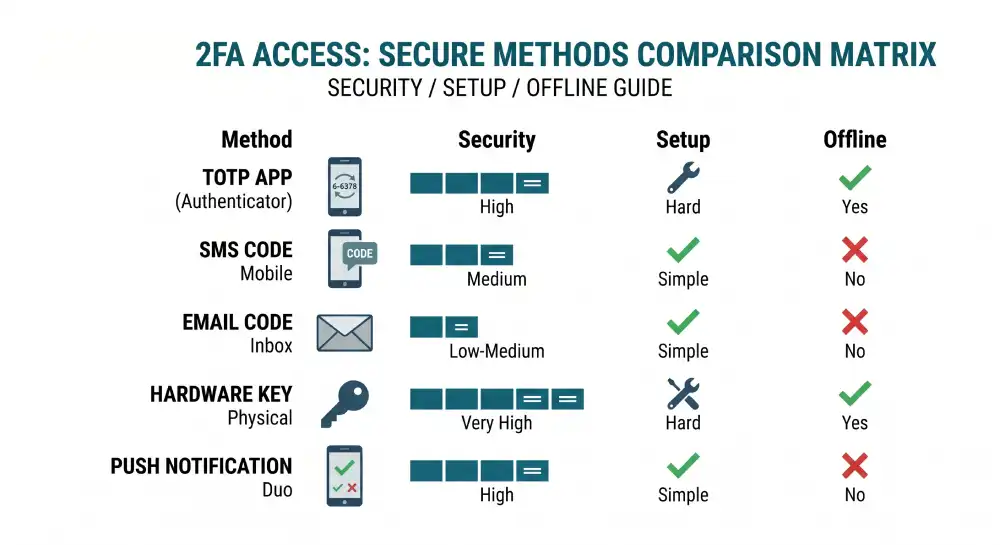
The most common 2FA methods for hosting accounts include:
- Time-based One-Time Passwords (TOTP): Generated by apps like Google Authenticator, Authy, or Microsoft Authenticator. These work offline and are the most widely supported option.
- SMS codes: A one-time code sent to your mobile number. Easy to set up but weaker than app-based methods due to SIM-swapping attacks.
- Email-based codes: A code sent to your email inbox. Convenient, but only as secure as your email account.
- Hardware security keys: Physical devices like YubiKey that plug into your USB port or tap via NFC. Extremely secure, used mostly in high-risk or enterprise environments.
- Push notifications: Apps like Duo Security send an approval request to your phone. You simply tap Approve or Deny.
For hosting accounts, TOTP authenticator apps are the recommended choice. They work without a cellular signal, do not rely on email security, and are supported by virtually every major hosting platform. According to NIST Special Publication 800-63B, the technical standard for digital identity, TOTP-based authentication qualifies as a valid second factor and is classified as a permitted authenticator at Authentication Assurance Level 2 (AAL2), the level recommended for accounts that access sensitive data.
Why Hosting Accounts Are a High-Value Target
Hosting accounts are attractive targets because compromising one account can affect dozens or hundreds of websites at once. A shared hosting account often houses multiple domains. A reseller account might serve hundreds of clients.
Even a single WordPress site hosted on a compromised account can be used to send spam, host phishing pages, or mine cryptocurrency using your server’s resources. Implementing a comprehensive WordPress security checklist is vital to closing these entry points.
According to Sucuri’s 2023 Hacked Website Report, which analyzed data from over 39,000 website cleanups and more than 108 million remote scans, phishing content was found on 5.06% of compromised websites at the time of infection. Many of those infections trace back to stolen hosting credentials rather than software vulnerabilities. Compromised cPanel and WHM accounts in particular are noted attack vectors, allowing attackers to inject malicious code across every site on the server.
Sucuri’s ongoing research has also found that malicious WordPress admin users appeared in nearly a third of infected databases during remediation in 2021, highlighting how often attackers go directly for admin-level credentials rather than exploiting code-level vulnerabilities.
Adding 2FA to your hosting account directly cuts off those attack paths. Even if your email and password appear in a data breach, the attacker still cannot get in without your second factor.
Setting Up 2FA in cPanel (Step by Step)
cPanel is the most widely used web hosting control panel. Most shared and managed hosting providers offer it, and it has built-in 2FA support through TOTP.
What you need before starting:
- Access to your cPanel account
- A smartphone with an authenticator app installed (Google Authenticator, Authy, or Microsoft Authenticator)
Step 1: Log into cPanel
Go to your hosting provider’s login URL. This is usually yourdomain.com:2083 or accessible through your hosting dashboard. Enter your username and password.
Step 2: Find the Two-Factor Authentication section
In the cPanel home screen, look for the Security section. Click on Two-Factor Authentication. If you do not see it, your hosting provider may have it under a slightly different label or it may need to be enabled by your host.
Step 3: Set up the authenticator app
Click Set Up Two-Factor Authentication. cPanel will display a QR code on screen. Open your authenticator app on your phone, tap the option to add a new account (usually a + icon), and choose Scan a QR code. Point your camera at the code on your screen.
Your app will now show a six-digit code that refreshes every 30 seconds.
Step 4: Verify and activate
Enter the six-digit code from your app into the verification field in cPanel. Click Configure Two-Factor Authentication. If the code is correct, 2FA is now active on your account.
Step 5: Save your backup codes
cPanel will display backup codes after activation. Download or write these down and store them somewhere safe, like a password manager or a printed sheet kept offline. These are your recovery option if you lose access to your phone.
From now on, every cPanel login will ask for both your password and the current code from your authenticator app.
Enabling 2FA in Plesk
Plesk is another popular control panel used by many hosting providers, especially for Windows-based servers and some Linux environments.
Step 1: Log into your Plesk account
Navigate to your Plesk dashboard using the URL your hosting provider gave you.
Step 2: Access Account Settings
Click on your username or account name in the top right corner. Select My Profile or Account Settings from the dropdown.
Step 3: Enable Google Authenticator
In the profile settings, look for the Two-factor Authentication tab. Click Enable Google Authenticator. Plesk supports TOTP through any standard authenticator app despite the Google branding.
Step 4: Scan the QR code
A QR code appears on screen. Open your authenticator app, add a new account, and scan the code. Enter the six-digit code shown in your app to confirm the setup.
Step 5: Save recovery codes
Plesk provides a set of recovery codes once 2FA is confirmed. Store these immediately. Unlike regular codes, recovery codes each work once and are not time-sensitive.
For Plesk reseller and admin accounts: If you manage a Plesk server as an administrator, you can enforce 2FA for all users under Server Settings > Security Policy. This is essential for any hosting business serving multiple clients.
Two-Factor Authentication in WHM (Web Host Manager)
WHM is the administrative layer above cPanel, used by resellers and server administrators. Because WHM gives access to the entire server and all cPanel accounts on it, securing it with 2FA is critical.
Step 1: Log into WHM
Access WHM at yourdomain.com:2087 or through your server management panel.
Step 2: Navigate to the 2FA settings
In the WHM search bar, type Two-Factor Authentication. Click the result. You will see options to enable 2FA for your own WHM account and also an option to enforce it for all cPanel users on the server.
Step 3: Enable for your WHM account
Click Manage My Account’s Two-Factor Authentication and follow the same QR code scanning and verification process as in cPanel.
Step 4: Enforce 2FA for all accounts (recommended for server admins)
In the same 2FA section, you can toggle on Two-Factor Authentication Enforced for all users. Once enabled, users logging into their cPanel accounts will be prompted to set up 2FA before they can access anything.
This is especially important if you are running a hosting business or managing a server with multiple clients. It protects both your server and your clients from compromised credentials. The CISA guidance on requiring MFA for small and medium businesses specifically recommends starting with admin accounts and users who handle sensitive data, which maps directly to WHM-level access.
Setting Up 2FA for Popular Web Hosting Providers
While cPanel and Plesk are standard control panels, many of the largest hosting companies use their own unique systems. If someone breaks into your main hosting account, they can access your billing, change your domain name settings, and log right into your WordPress site without needing a password.
Here is exactly how to lock down five of the most popular hosting platforms using simple steps.
1. Hostinger
Hostinger uses a control panel called hPanel. Because Hostinger often handles your domains and your hosting in one place, securing this account is extremely important.
Here is how to add Two-Factor Authentication in Hostinger:
Step 1: Log into your Hostinger account. Go to the Hostinger website and log in using your email and password.
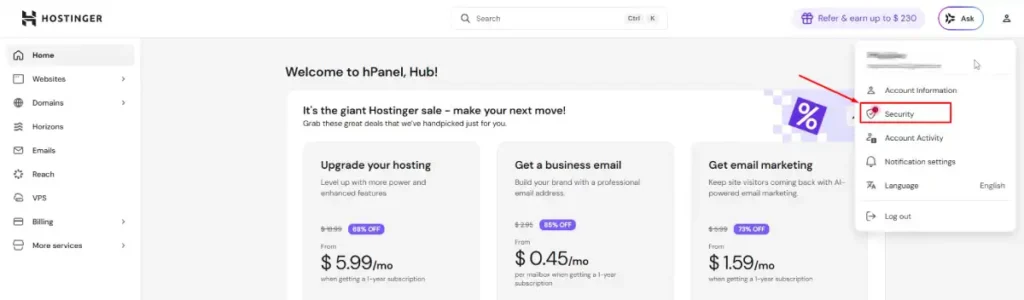
Step 2: Find your Security Settings. Look at the top right corner of your screen. Click on your profile icon. A menu will drop down. Click on Security from that list.
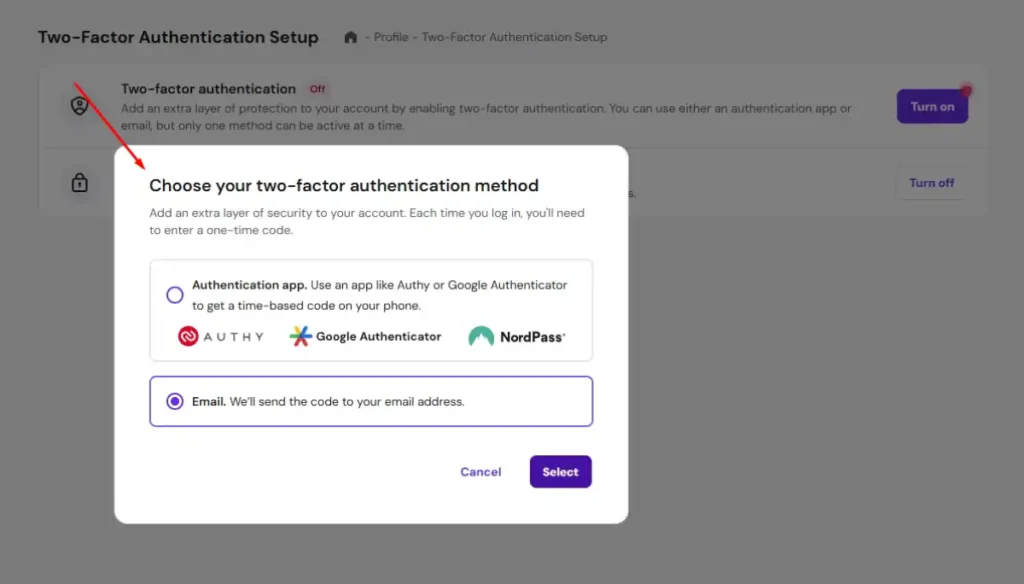
Step 3: Pick your two-factor method. You will see a section for Two-Factor Authentication.
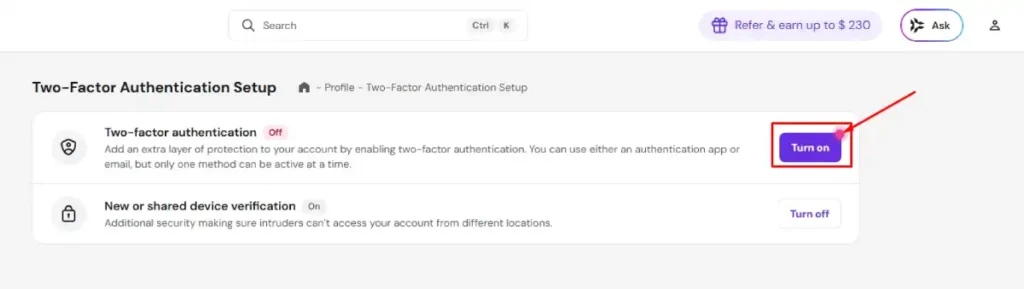
Hostinger gives you two choices: an Authenticator Application or Email. Choose Authenticator Application because it is much safer than using email.
Step 4: Scan the code and verify. Open the authenticator app on your phone, like Authy or Google Authenticator. Tap the button to add a new account. Point your phone camera at the square QR code on your computer screen. Your phone will show a new 6-digit number. Type that number into the box on the Hostinger website.
Step 5: Save your backup codes safely. Hostinger will instantly show you a list of backup recovery codes. You must copy these codes and save them somewhere safe, like a printed piece of paper or a secure password manager. If you lose your phone, you need these codes to get back in. Click Finish Setup to save everything.
2. GoDaddy
GoDaddy calls this feature 2-Step Verification. GoDaddy holds many domain names. If someone gets in, they could transfer your domain to someone else, and getting it back is very hard.
Here is how to add Two-Factor Authentication in GoDaddy so hackers cannot steal or transfer your domains.
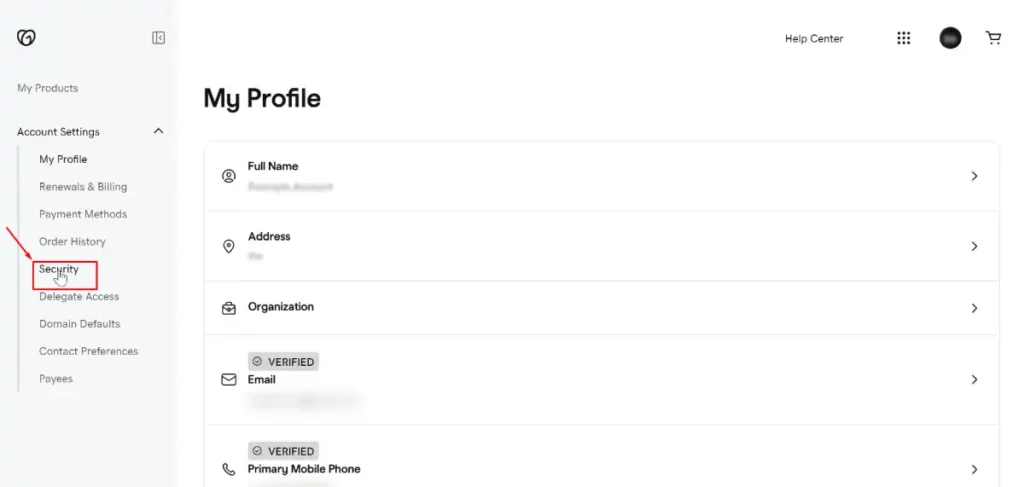
Step 1: Open your GoDaddy Security settings. Log into the GoDaddy website. Look for your profile name in the top right corner and click it. Next, click on Account Settings.

From there, click on Login and PIN or Security. The exact name changes depending on where you live.
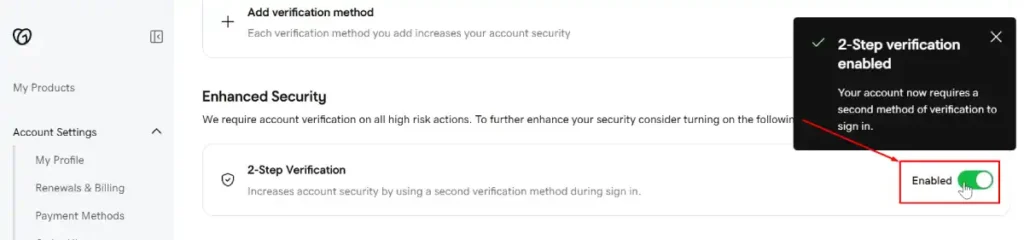
Step 2: Add the verification step. Scroll down the page until you see the 2-Step Verification section. Click the button that says Add Verification.
Step 3: Set up a backup method. GoDaddy will ask you to add a backup way to log in. Do not skip this step.
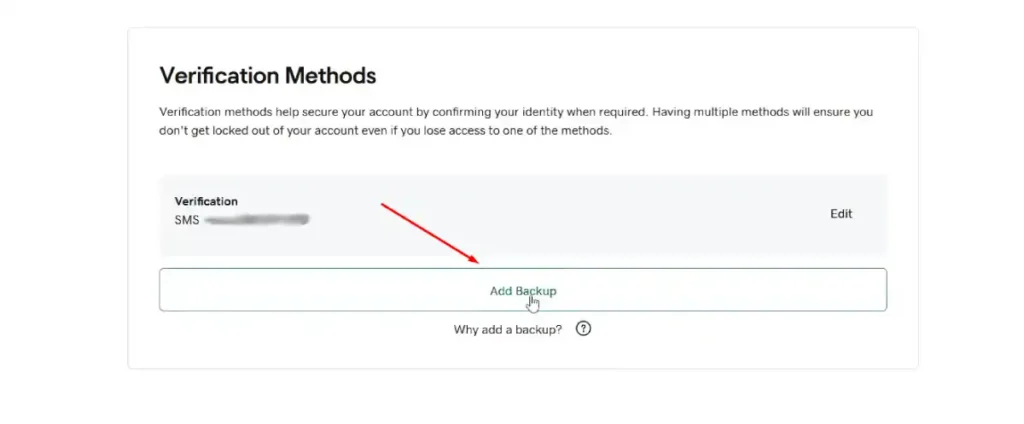
If you lose your phone and have no backup, GoDaddy makes you wait up to 72 hours and send a photo of your government ID to unlock your account.
Step 4: Choose the Authenticator App. GoDaddy will ask how you want to get your security codes. They will push you to use text messages. Ignore that option.
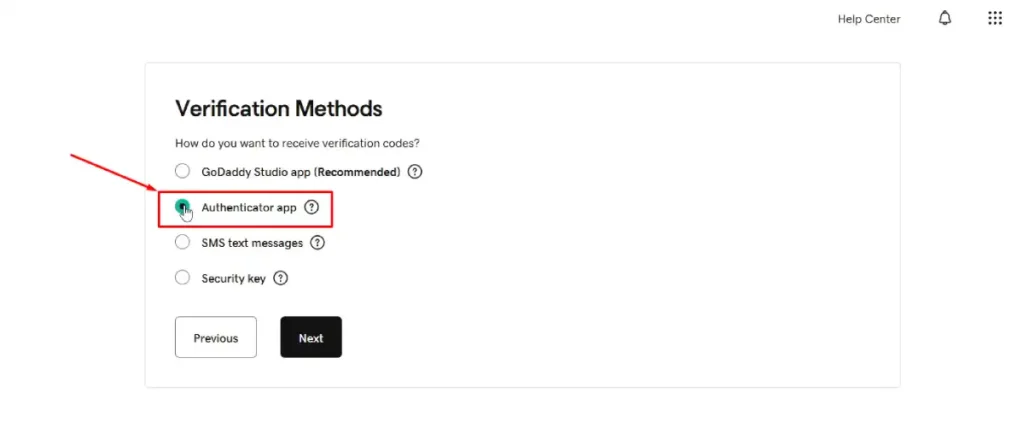
Select the Authenticator app option because it protects you from phone hacking. Click the Next button.
Step 5: Scan and type the code. Use your phone app to scan the square barcode on your screen.
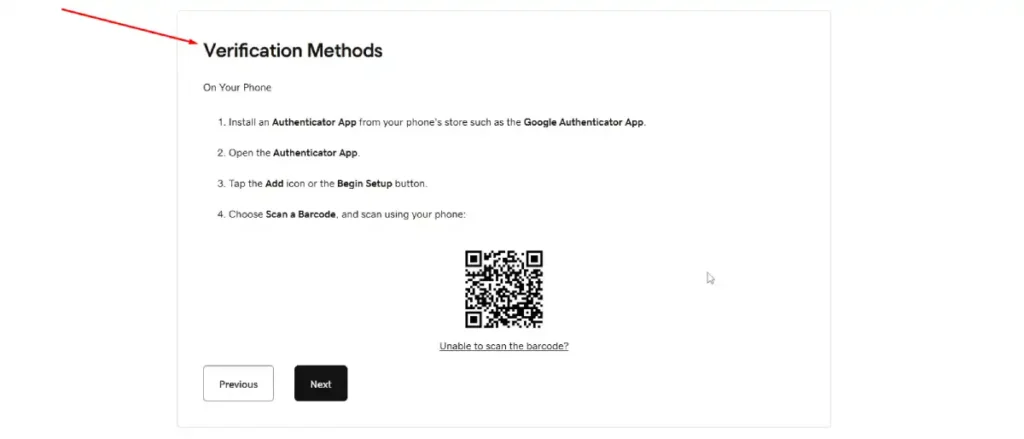
Type the 6-digit number from your phone into the GoDaddy website to prove it works.
3. Bluehost
Bluehost connects directly to WordPress. If someone hacks your Bluehost account, they can bypass the normal WordPress login screen completely.
Here is how to add Two-Factor Authentication in Bluehost to stop that.
Step 1: Access your Bluehost Dashboard. Log into the Bluehost website using your domain name or username and your password.
Step 2: Go to the Security menu. Find the Profile icon in the top right corner of the screen and click it.
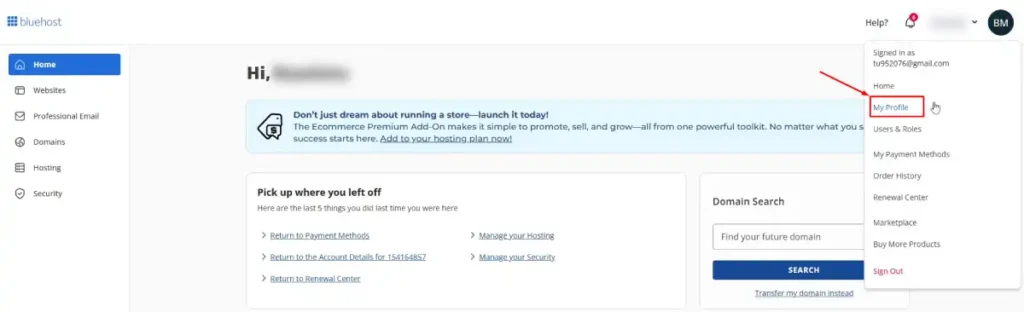
Click on My Profile from the drop down list.
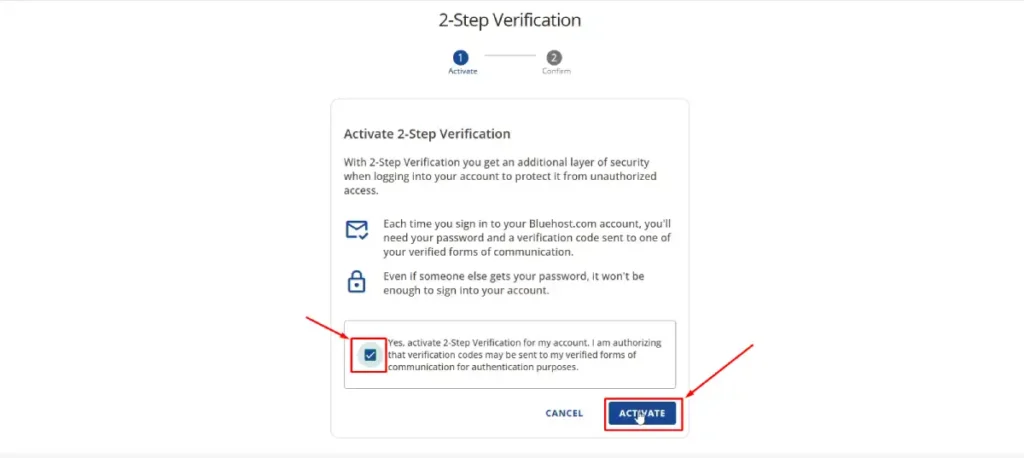
Step 3: Enable the two-factor setting. Scroll down the page to the Two-Factor Authentication section.

Click the Activate button to turn the feature on.
It will show you this screen, and there you just need to do two quick things: first, check the small box to say it’s okay for them to send you the special codes. Then, click the blue ACTIVATE button to turn it on.
Step 4: Link your authenticator app. Scan the square QR code on your computer screen using your phone app.
Step 5: Verify and save backups. Type the 6-digit number from your app into Bluehost. Bluehost will then show you backup codes. Save these codes in a safe spot offline. Bluehost also lets you require this 6-digit code before making big account changes, like updating your billing information.
4. Namecheap
Namecheap is famous for domain names, but they also offer popular web hosting. Namecheap gives you very strong security options that other companies skip.
Here is exactly how to add Two-Factor Authentication in Namecheap:
Step 1: Log into your Namecheap Account. Go to the Namecheap website and sign into your dashboard.
Step 2: Find the Profile Security page. Look at the menu bar on the left side of your screen. Click on Profile, and then click on Security.
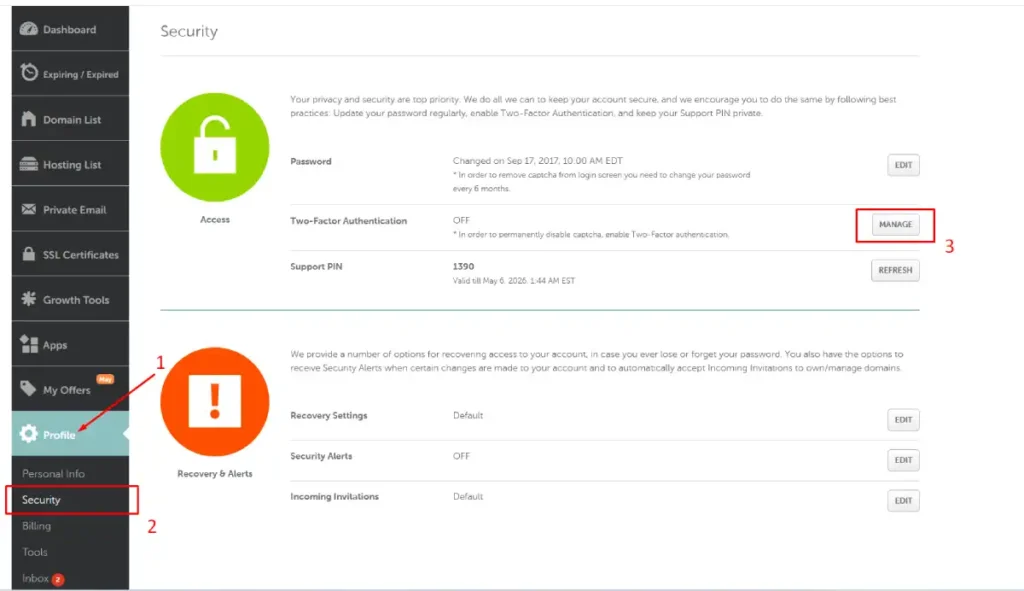
Step 3: Manage your settings. Scroll until you see the Two-Factor Authentication section. Click the MANAGE button. Namecheap will ask you to type your regular password again to prove it is really you.
Step 4: Pick your security method. Namecheap lets you choose how to protect your account. Under Authentication App (TOTP), click the Enable button.
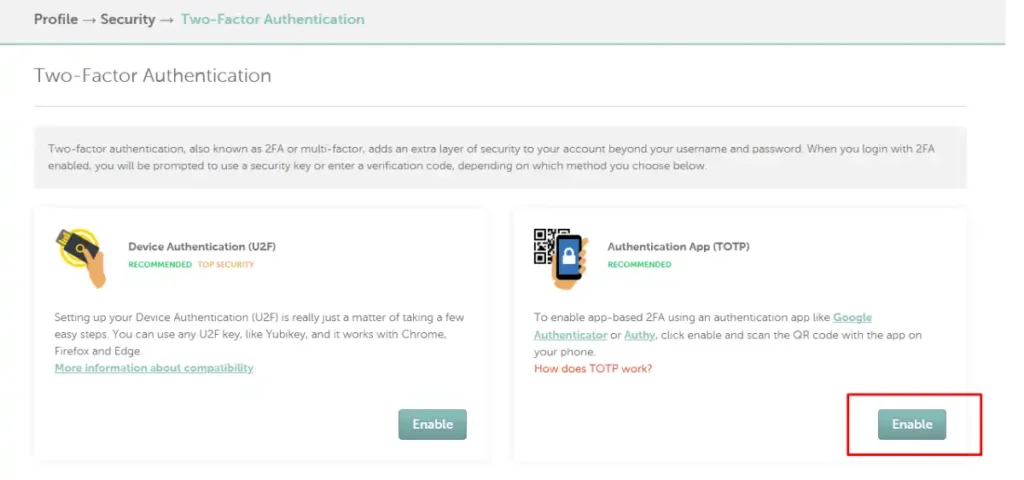
Note: If you own a physical security key like a YubiKey, you can select Device Authentication (U2F) instead.
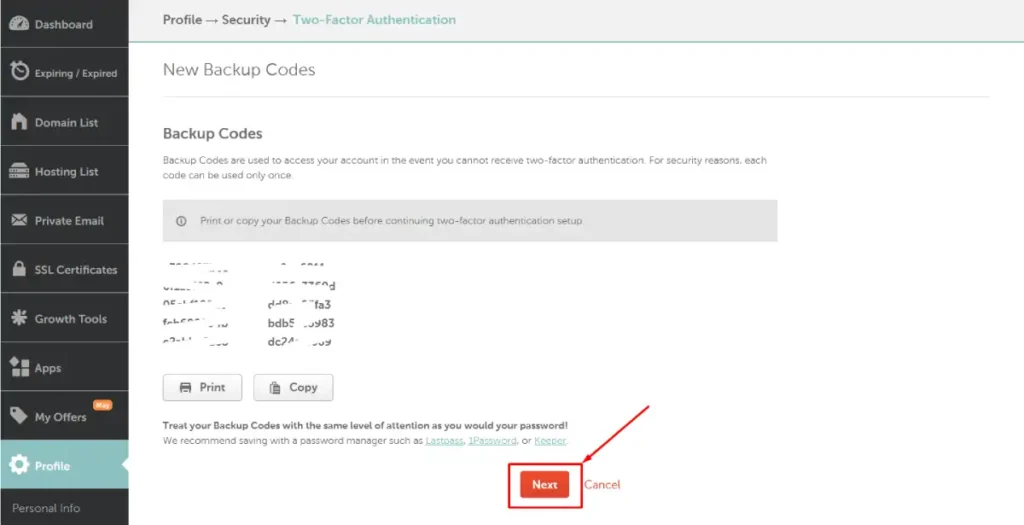
Step 5: Store your backup codes. Namecheap will show you New Backup Codes. These are used if you lose access to your phone. Click Print or Copy to save them safely offline, then click the orange Next button.
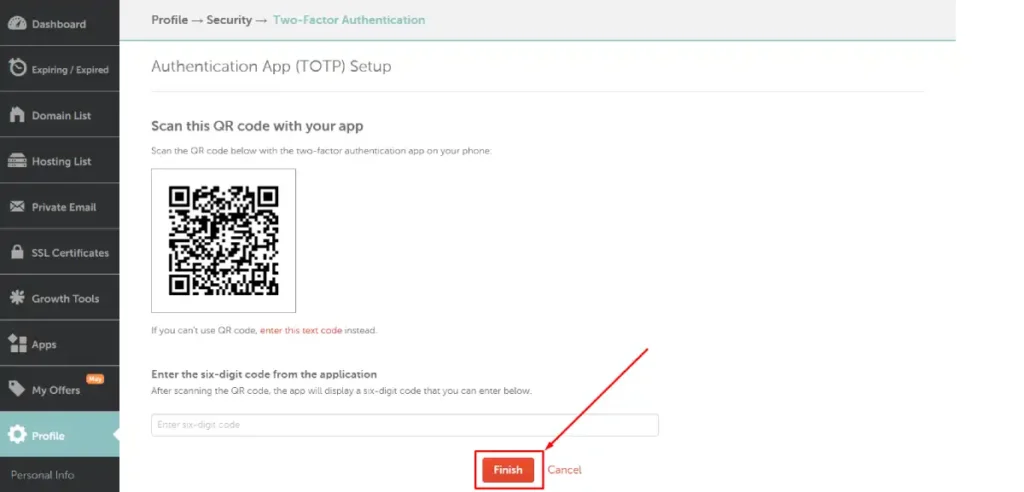
Step 6: Scan the code and finish. Scan this QR code with your app on your phone. Then, Enter the six-digit code from the application into the text box and click the orange Finish button to complete the setup.
Securing SSH Access With 2FA on a VPS or Dedicated Server
If you run a VPS or dedicated server, SSH (Secure Shell) is your direct command-line access to the system. An attacker who gets SSH access has full control of the server. Beyond using SSH keys instead of passwords, you can add TOTP-based 2FA to SSH logins for an extra layer of protection.
The following steps are written for Ubuntu or Debian-based Linux systems. The process is similar on CentOS or AlmaLinux with minor adjustments.
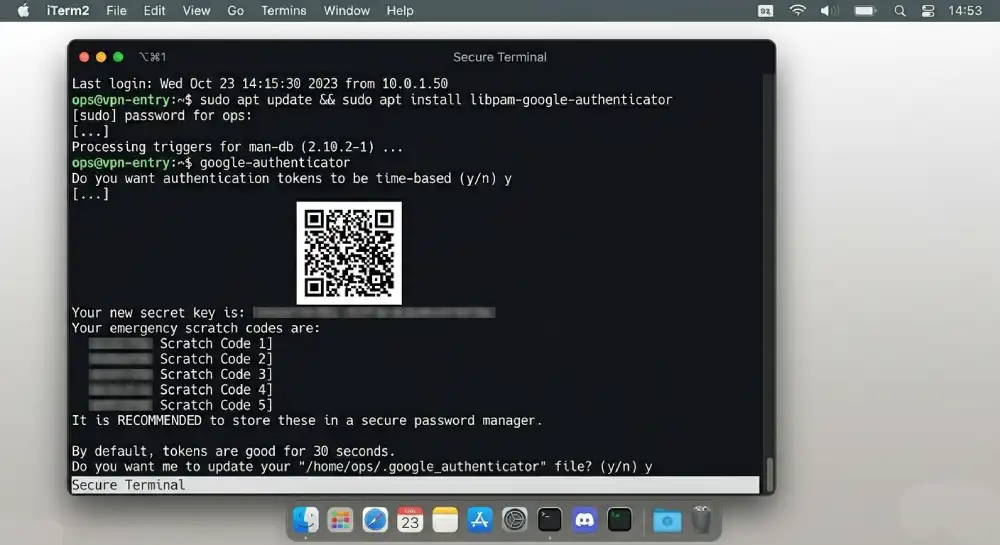
Step 1: Install Google Authenticator PAM module
Connect to your server via SSH and run:
sudo apt update
sudo apt install libpam-google-authenticator
Step 2: Configure the authenticator
Run the setup command as the user you want to protect (usually your regular sudo user, not root):
google-authenticator
The tool will ask you several questions. Here are the recommended answers:
- Make tokens time-based: Yes
- Update the
.google_authenticatorfile: Yes - Disallow multiple uses of the same token: Yes
- Allow up to 30 seconds of token skew: Yes
- Enable rate limiting: Yes
It will display a QR code in your terminal. Scan it with your authenticator app. It will also show emergency scratch codes, which are your one-time backup codes. Write these down now.
Step 3: Configure SSH to use PAM
Edit the SSH daemon configuration file:
sudo nano /etc/ssh/sshd_config
Make sure the following line is set:
ChallengeResponseAuthentication yes
Save and exit the file.
Step 4: Update the PAM configuration for SSH
Open the PAM SSH configuration file:
sudo nano /etc/pam.d/sshd
Add this line at the top of the file:
auth required pam_google_authenticator.so
Step 5: Restart SSH
Apply the changes by restarting the SSH service:
sudo systemctl restart sshd
Step 6: Test in a new session before closing your current one
Open a new terminal window and try to SSH into your server. Do not close your existing connection yet. If something is misconfigured, you want to be able to fix it from your existing session.
You should now be prompted for a verification code after entering your password (or after your SSH key is accepted, depending on your setup).
Adding 2FA to WordPress Admin
Your hosting account is just one entry point. Your WordPress login page is another. If your site is a target, attackers will try both. Protecting your WordPress dashboard with 2FA closes the second door.
Using a Plugin
The easiest approach is using a plugin. Several solid options exist:
- WP 2FA: Clean interface, works with any authenticator app, supports enforcing 2FA for all users or by role
- Google Authenticator by miniOrange: Flexible, supports multiple 2FA methods
- Wordfence Login Security: Includes 2FA as part of a broader security suite
Setup steps using WP 2FA:
- Install and activate the plugin from the WordPress plugin directory
- After activation, a setup wizard will launch. Follow the prompts
- Choose TOTP as your method when asked
- Scan the QR code with your authenticator app
- Enter the verification code to confirm
- Download or copy your backup codes
If you manage multiple users or run a membership site, WP 2FA lets you enforce 2FA for specific roles, like editors or administrators, and gives users a grace period to set it up before being locked out.
Common Mistakes When Setting Up 2FA (And How to Avoid Them)
Even with good intentions, people make a few predictable mistakes when setting up 2FA. Here is what to watch for.
Not saving backup codes
This is the most common mistake. If you lose your phone or the authenticator app gets wiped, backup codes are the only way back in. Save them in a password manager or print them and keep them somewhere secure.
Using SMS as the only 2FA method
SMS codes are better than no 2FA, but they can be intercepted through SIM-swapping attacks, where someone convinces your carrier to transfer your number to a new SIM. The NIST SP 800-63B standard explicitly classifies PSTN-delivered authentication (including SMS) as a restricted authenticator, meaning it is permitted but not preferred for accounts with sensitive access. Use an authenticator app instead.
Setting up 2FA only on the main admin account
If you have team members with hosting or WordPress access, each account should have 2FA enabled. One weak account can be the entry point that bypasses all your other protections.
Not testing login after setup
Always test a new 2FA setup by logging out and logging back in before you close your session. A misconfiguration in SSH especially can lock you out entirely.
Storing backup codes in the same place as your password
If both are stored in the same place and that place gets compromised, neither offers protection. Keep backup codes separate from your regular password manager, or use a dedicated entry for the 2FA backups.
What to Do If You Get Locked Out
Getting locked out because of 2FA issues is stressful but fixable. Here are your options depending on the situation.
Lost phone or deleted authenticator app
Use one of your backup codes. Most platforms prompt you for a backup code option on the login screen. If you saved them earlier, this gets you back in immediately.
Lost backup codes and lost phone
Contact your hosting provider’s support team. They will ask you to verify your identity (usually through account ownership details, ID, or email access). Once verified, they can disable 2FA on your account so you can set it up again.
Locked out of SSH with 2FA
If you have root or another admin-level account without 2FA, use that to SSH in and edit the PAM or SSH configuration to temporarily disable the 2FA requirement. If you are locked out completely, you may need to use your hosting provider’s emergency console or rescue mode to access the server.
WordPress admin locked out
If you cannot log in to your WordPress dashboard because of a 2FA plugin, you can disable the plugin via FTP or your hosting file manager by renaming the plugin folder. Rename wp-2fa to wp-2fa-disabled inside the /wp-content/plugins/ directory. This deactivates it without requiring a login.
Managing 2FA for Teams and Multiple Users
If you manage a team, 2FA needs a coordinated approach. Each person should have their own authenticator app set up independently. Shared credentials are a security risk on their own, but shared 2FA compounds it. Review our guide on fundamental business hosting security needs to align your staff policies.
For hosting teams:
- Give each team member their own hosting sub-account or role-based access where the control panel supports it
- Enforce 2FA at the admin or server level so users cannot bypass it
- Document your 2FA recovery process in a shared internal guide so everyone knows what to do if they get locked out
For agencies managing client accounts:
- Set up 2FA on the client’s behalf during onboarding but hand over the authenticator account to the client
- Store a separate recovery process in your project management system
- Consider using a team-friendly 2FA manager like 1Password Teams or Bitwarden for Business, which support shared vault entries with TOTP codes for team accounts that need shared access
CISA’s multifactor authentication resources provide practical guidance for organizations of all sizes and are worth bookmarking as a reference for building your internal security policy around MFA enforcement.
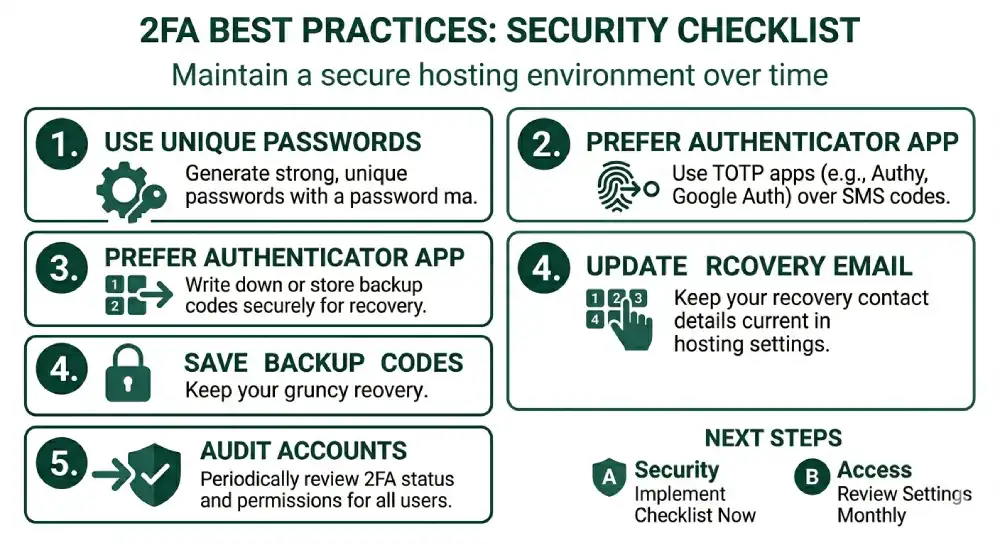
Best Practices for Keeping Your 2FA Secure Long-Term
Setting up 2FA is step one. Keeping it working and secure over time takes a few habits.
Use Authy instead of Google Authenticator if you want backup
Authy supports encrypted cloud backup of your TOTP accounts, meaning if you lose your phone, you can restore your authenticator accounts on a new device. Google Authenticator has added Google Account backup as well, but Authy is still preferred by many security-conscious users for its cross-device support.
Audit your 2FA-protected accounts periodically
Every few months, go through your accounts and check which ones have 2FA active. Remove access from apps or users who no longer need it, and make sure your backup codes are still accessible.
Keep your recovery email and phone number current
Hosting providers often use email or phone verification as a recovery path when 2FA fails. If those contact details are outdated, you have a problem. Keep them updated in your hosting account settings.
Do not screenshot QR codes
Scanning a QR code once is enough. If you screenshot the QR code and store it, anyone who gets that screenshot can add your account to their authenticator app. Let the one-time scan be one-time.
Use a password manager alongside 2FA
2FA is most effective when paired with a strong, unique password for each account. A password manager generates and stores those passwords for you. Combined with 2FA, this gives you two strong, independent layers of protection.
A Quick Comparison: 2FA Methods for Hosting Accounts
| Method | Security Level | Works Offline | Requires Phone | Best For |
|---|---|---|---|---|
| TOTP App (Authy, Google Auth) | High | Yes | Yes | All hosting accounts |
| SMS Code | Medium | No | Yes | Basic accounts, backup only |
| Email Code | Low to Medium | No | No | Low-risk accounts only |
| Hardware Key (YubiKey) | Very High | Yes | No | High-security/enterprise |
| Push Notification (Duo) | High | No | Yes | Business/team environments |
For most hosting users, a TOTP app is the sweet spot between security and convenience. As CISA notes in its phishing-resistant MFA guidance, any MFA is better than none, but authenticator apps and hardware keys consistently outperform SMS and email-based methods in blocking real-world attacks.
Frequently Asked Questions
What happens if I lose my phone after enabling 2FA on my hosting account?
Use your backup codes to log in. These are provided during the 2FA setup process and each code works once. If you also lost your backup codes, contact your hosting provider’s support team with your account verification details. They can disable 2FA after confirming your identity so you can set it up again.
Is SMS-based 2FA safe enough for a hosting account?
SMS 2FA is significantly better than no 2FA, but it has known vulnerabilities. SIM-swapping attacks allow attackers to redirect your phone number by tricking your mobile carrier. NIST’s SP 800-63B classifies SMS as a restricted authenticator, meaning it is acceptable but not preferred for accounts with elevated access. For hosting accounts, an authenticator app is a stronger and more reliable choice.
Can I enable 2FA for my hosting account without a smartphone?
Yes. Hardware security keys like YubiKey work without a smartphone. Some hosting providers also support email-based verification codes. However, the most convenient and secure offline option is a TOTP app, which works on most mobile devices.
Do I need to set up 2FA separately for cPanel, WHM, and SSH?
Yes. These are separate access points and each has its own authentication system. Setting up 2FA on your cPanel account does not automatically protect your WHM login or SSH access. Each entry point should be secured individually.
Will 2FA slow down my daily workflow?
Minimally. Logging in takes about ten extra seconds to open your authenticator app and enter the code. Most platforms also offer remember this device options for trusted computers, which reduces how often you need to enter the code. The security gain outweighs the minor inconvenience significantly.
What is the difference between 2FA and two-step verification?
The terms are often used interchangeably, but technically, two-factor authentication requires two different types of credentials (something you know plus something you have). Two-step verification just adds a second step, which could involve two things of the same type (like two passwords). In practice, most two-step verification systems function like true 2FA with a password and a code.
Wrapping Up
Two-factor authentication is one of the most effective security steps you can take for your hosting account. It blocks the most common attack methods, takes less than ten minutes to set up, and requires minimal effort to use day to day.
Start with your hosting control panel, whether that is cPanel, Plesk, or WHM. Then extend it to SSH access if you manage a VPS, and to your WordPress admin if you run CMS-based sites. Save your backup codes before anything else, use an authenticator app over SMS, and enforce 2FA across all users who have access to your account.
Security is not a one-time setup. Review your access settings regularly, keep recovery information current, and treat each login point as a separate door that needs its own lock.