
Moving a domain name from one registrar to another sounds intimidating the first time you try it. The fear is real because one wrong click can take your website offline or push the transfer into a 60 day lock. The good news is that the actual process follows a clear pattern that any registrar uses, and once you see it, you can transfer any domain you own with confidence.
This guide walks you through every step in plain language. You will learn what to check before you start, how to get your authorization code, how to keep your site and email online while the transfer runs, and how to fix the most common errors that block transfers.
Here is what you will learn in this guide:
- What a domain transfer actually does, and what it does not move
- The pre transfer checklist that prevents most failures
- The full step by step process from unlock to confirmation
- A complete real world walkthrough with exact clicks and timing
- Real costs, timelines, and what to expect day by day
- Fixes for stuck transfers, denied requests, and missing EPP codes
- How to handle special cases like ccTLDs and change of ownership
By the end, you will be able to plan and complete your first transfer without help, and you will know what to do if something looks off.
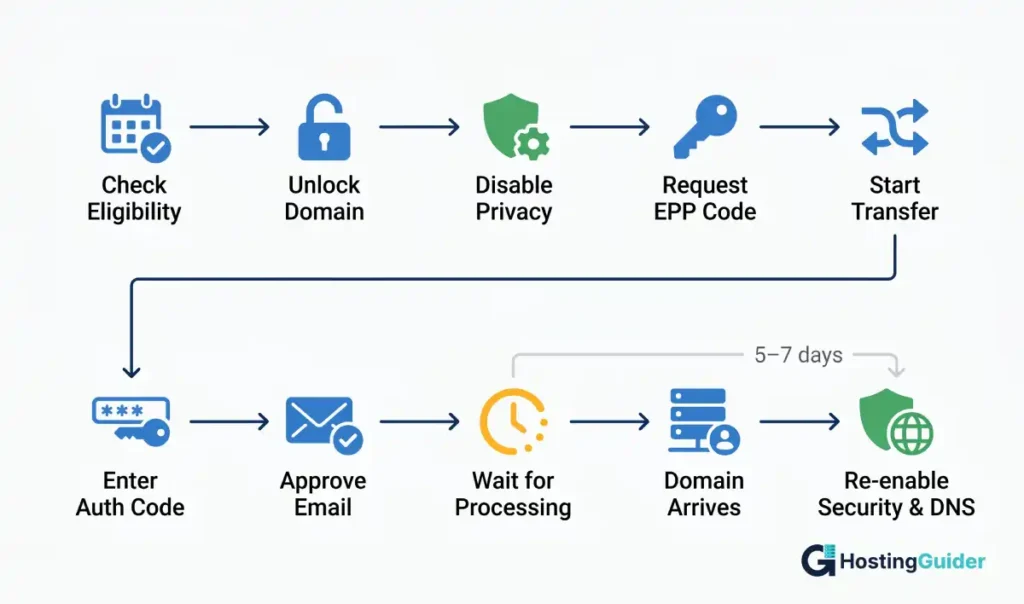
Table of Contents
Key Takeaways
- A domain transfer moves your registration from one registrar to another. Only the domain moves. Hosting, email, and SSL stay where they are unless you move them too.
- ICANN rules block transfers within 60 days of a new registration, a previous transfer, or a registrant contact change.
- You need three things from your old registrar to start: an unlocked domain, the EPP authorization code, and access to the registrant email.
- Most transfers finish in 5 to 7 days. The transfer fee usually adds one extra year to your domain registration.
- Set up DNS at the new registrar before the transfer completes if you want zero downtime for your website and email.
Quick Answer
To transfer a domain name, log in to your current registrar, unlock the domain, and copy the EPP authorization code. Then go to the new registrar, paste the code, pay the transfer fee, and confirm the request through the email sent to the registrant address. The transfer completes in 5 to 7 days.
What is a domain name transfer
A domain name transfer is the act of moving your domain registration from one registrar to a different one. The domain itself, like yourbusiness.com, stays exactly the same. Your visitors keep typing the same address, and your email keeps using the same name after the move. What changes is the company that bills you, manages your DNS records, and renews the name each year.
A transfer is different from a domain push. A push moves a domain between two accounts at the same registrar. It is fast, often free, and finishes in minutes. A transfer crosses companies, so it triggers ICANN rules, security checks, and a fee. According to Cloudflare’s domain transfer guide, the transfer process is standardized so any accredited registrar can hand off a domain to any other accredited registrar.
A transfer is also different from changing the registrant. The registrant is the legal owner. Switching owners is called a Change of Registrant or change of ownership, and it has its own steps covered later in this guide.
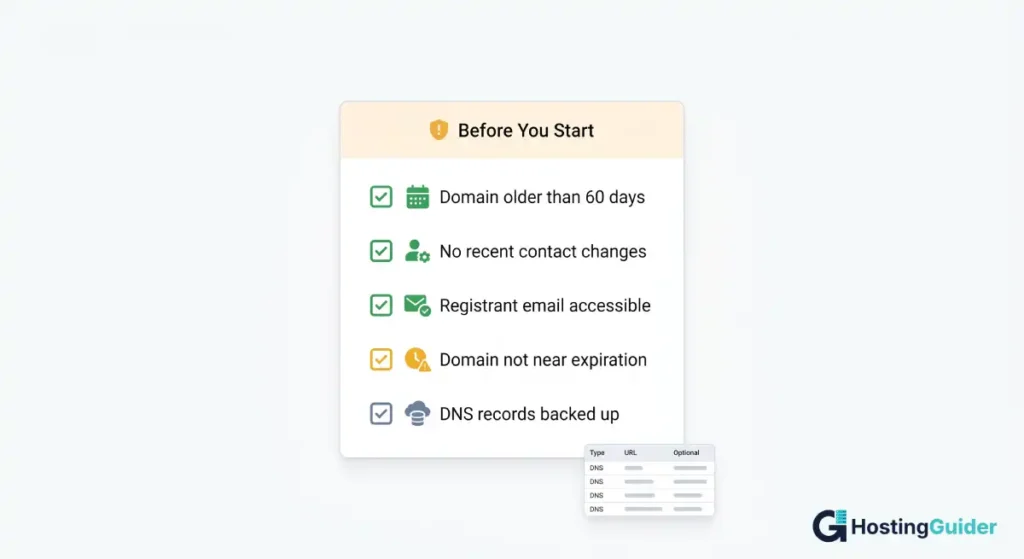
Before You Start: 5 Things to Check
Skipping the pre-flight checks is the top reason transfers get denied or stall for weeks. Run through these five points before you touch anything.
1. Domain age. Your domain must be at least 60 days old. New registrations and recently transferred domains cannot be moved again until 60 days have passed. This is set by ICANN’s transfer policy and no registrar can override it.
2. Recent contact changes. If you updated your registrant name, organization, or email address in the last 60 days, you triggered the Change of Registrant lock. Wait it out, or check if your registrar offered an opt-out at the time of the change.
3. Registrant email access. The transfer approval email goes to the registrant’s email on the WHOIS or RDAP record. Use our free Domain WHOIS Lookup tool to confirm which email address is currently on file before you start. If that email is dead, change it now and then wait the 60 days, or you will not be able to approve anything.
4. Expiration date. Do not transfer a domain in the last week before it expires. Renew first, or wait until after the transfer. If a domain expired with the old registrar and you renewed it there, hold off transferring for at least 45 days, or you may lose that paid year.
5. Backup of DNS records. Before you start, write down or screenshot every DNS record at the old registrar. You will need this list to rebuild the DNS at the new registrar.
Sample DNS record list for a small business site:
| Record Type | Name | Value | TTL |
|---|---|---|---|
| A | @ | 192.0.2.45 | 3600 |
| CNAME | www | yourbusiness.com | 3600 |
| MX | @ | mail.protonmail.ch (priority 10) | 3600 |
| TXT | @ | v=spf1 include:protonmail.ch ~all | 3600 |
| TXT | _dmarc | v=DMARC1; p=quarantine | 3600 |
Save this list before doing anything else. If a transfer goes sideways, this is what gets your site back online.
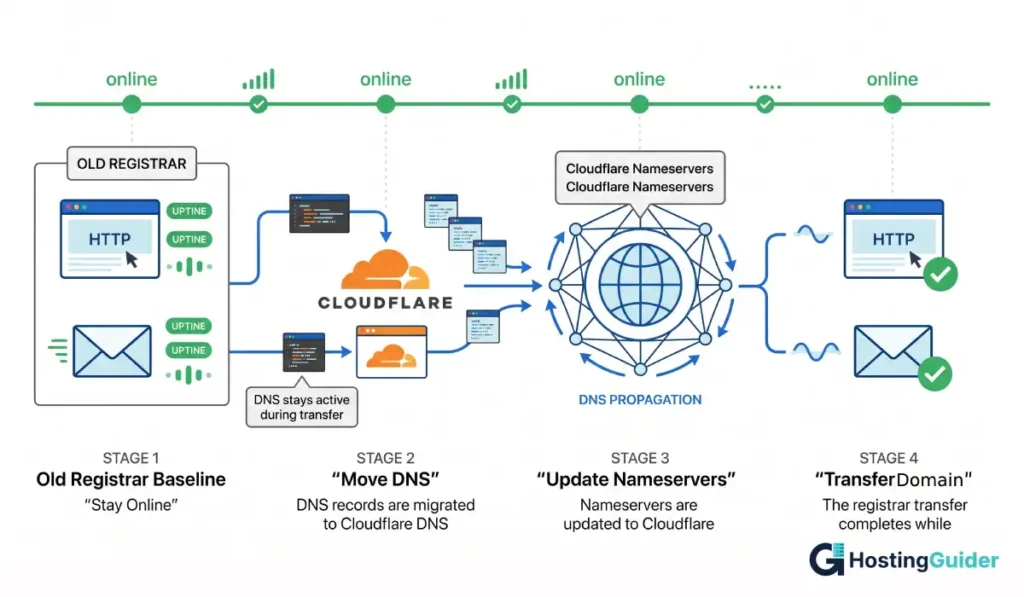
How to Transfer a Domain Name: 10 Step Process
The process below works at every major registrar including GoDaddy, Namecheap, Cloudflare, Hostinger, Bluehost, and Squarespace (which now hosts former Google Domains accounts).
Step 1: Pick your new registrar
Choose a registrar based on price, included features, and renewal cost. Renewal price matters more than the first year price because you will pay it every year. Look for free WHOIS privacy, two factor authentication, and clear DNS management. Avoid registrars that lock features behind upsells like a separate fee for DNSSEC or for editing nameservers.
Real example pricing for .com renewals (varies by promo):
- Cloudflare Registrar: at cost, around 10 dollars
- Porkbun: around 11 dollars
- Namecheap: around 14 dollars
- GoDaddy: around 22 dollars
For a portfolio of 20 domains, that is the difference between paying 200 dollars a year and 440 dollars a year for the same service.
Step 2: Prepare a working email and update contact info
Make sure the registrant email on file is one you actually check daily. The whole transfer depends on you clicking a link in that inbox within a set window, often 5 days. If you need to update the email, do it more than 60 days before the transfer to avoid the Change of Registrant lock. Use a personal email like a Gmail account, not an email tied to the domain you are moving, because that mailbox can break during DNS changes.
Concrete example: If your registrant email is sarah@yourbusiness.com and you change DNS during the transfer, that mailbox might go offline at the wrong moment, and you will miss the approval link. Switch it to sarah.smith@gmail.com first, wait 60 days, then transfer.
Step 3: Turn off WHOIS privacy
Some registrars require you to disable WHOIS privacy before they will release the EPP code or before the new registrar can read your contact data. If you skip this and the new registrar cannot read your record, the transfer can stall. Turn privacy back on at the new registrar after the transfer finishes.
Where to find it:
- GoDaddy: Domain Settings > Privacy and Protection > Toggle off
- Namecheap: Domain List > Manage > scroll to Domain Privacy > Disable
- Hostinger: Domain Management > Privacy Protection > Off
Step 4: Unlock the domain
Every domain has a registrar lock by default. The status is called clientTransferProhibited and it blocks all transfer attempts. Log in to your current registrar, find the domain settings, and switch the lock off. The new status should read ok or active.
Click paths at major registrars:
- GoDaddy: My Products > Domains > select domain > Domain Lock > toggle off
- Namecheap: Domain List > Manage > Sharing and Transfer tab > Lock toggle off
- Cloudflare: Domain Registration > select domain > Configuration > Transfer Lock off
- Bluehost: Domains > select domain > Lock Status > unlock
After you flip the switch, refresh the page and confirm the status updated. Some dashboards take a minute to reflect the change.
Step 5: Get the EPP authorization code
The EPP code (also called the authorization code, auth code, or transfer key) is a unique password for your domain. It looks like a long random string of letters, numbers, and symbols.
Sample EPP code format: A8bx9!Kf4Lq2Mn7P
Each registrar has a different button for this, often called Get Auth Code, Transfer Out, or Send Authorization Code. The code arrives by email or appears on screen.
Where to click:
- GoDaddy: Domain Settings > Additional Settings > Transfer domain away from GoDaddy > Continue with transfer
- Namecheap: Domain List > Manage > Sharing and Transfer > Auth Code section > Get Auth Code
- Cloudflare: Configuration tab > Get authorization code
Important: Treat this code like a password. Anyone who has it plus your domain name can pull your domain to another registrar. Do not paste it into chat apps or unsecured forms.
Step 6: Start the transfer at the new registrar
Go to the new registrar and find the transfer page. Type your domain name into the transfer search box. The site will check eligibility and then ask for the EPP code. Paste it in. Some registrars run a few extra checks at this point and may show a warning if the domain is locked or under privacy.
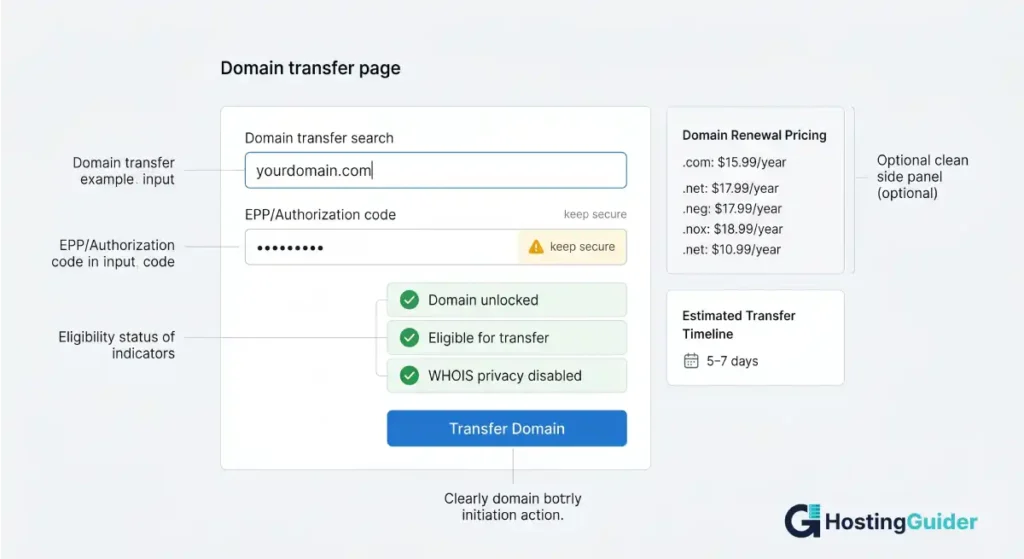
Step 7: Pay the transfer fee
Most registrars charge a fee that includes one extra year added to your current expiration date. Typical pricing for a .com sits between 9 and 14 US dollars. The new year stacks on top of the time you already paid for, so you do not lose any days.
Quick example: If your domain expires on March 15, 2027, and you transfer in May 2026, the new expiration date becomes March 15, 2028.
Step 8: Approve the transfer email
After payment, the new registrar sends an approval link to the registrant email. Open the email, click the link, and confirm the transfer. Some registrars also send a confirmation request from the old registrar. Approving both speeds the process from 7 days down to 1 to 2 days. If you ignore the email, the transfer often still completes after 5 days, but you risk losing it if the old registrar denies.
The email subject usually reads something like Confirmation of Registrar Transfer Request or Authorize Domain Transfer. Search your inbox for the domain name if you cannot spot it. Check the spam folder too.
Step 9: Wait for the old registrar to release the domain
The old registrar has up to 5 days to deny the transfer for a valid reason such as a recent dispute or unpaid balance. Most release sooner, especially if you confirm the request from inside their dashboard. According to DNSimple’s transfer guidance, SSL certificates keep working through this stage, so your secure pages stay secure.
To speed it up: Log back into the old registrar after you start the transfer. Look for a notification like Pending Transfer Out or a section called Transfers. Click Approve or Release Now to skip the 5 day wait.
Step 10: Verify settings at the new registrar
Once the transfer completes, you receive a confirmation email. Log in to the new registrar and check three things:
- The nameservers point to the right DNS provider
- The DNS records match your backup list
- WHOIS privacy is on
Also turn the registrar lock back on right away. Most new registrars enable lock by default after transfer, but verify this yourself.
Real Walkthrough: How to Transfer a Domain from GoDaddy to Hostinger (With Screenshots)
This is a real transfer of a live domain from GoDaddy to Hostinger. Screenshots are for reference only. The interface at your registrar may look slightly different depending on updates they have made, but the steps and logic remain the same.
Part 1: Prepare and Unlock the Domain at GoDaddy
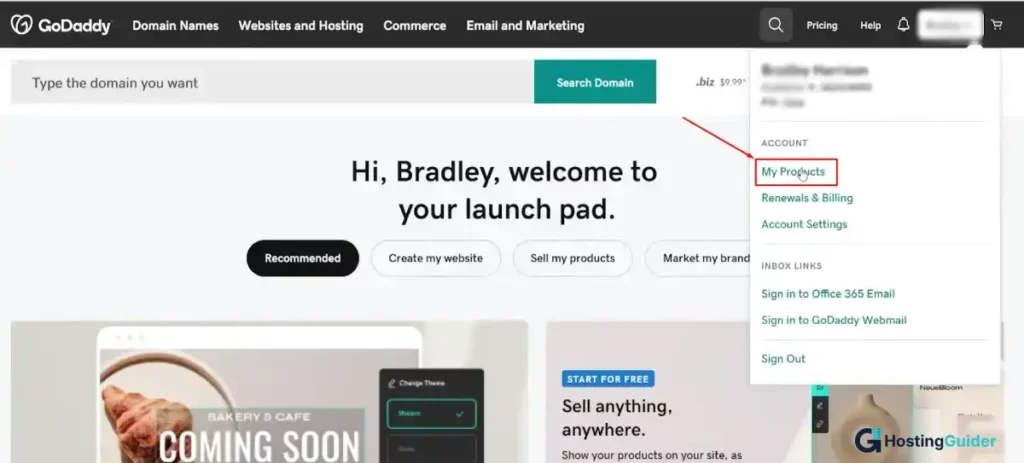
Step 1: Log in and go to My Products
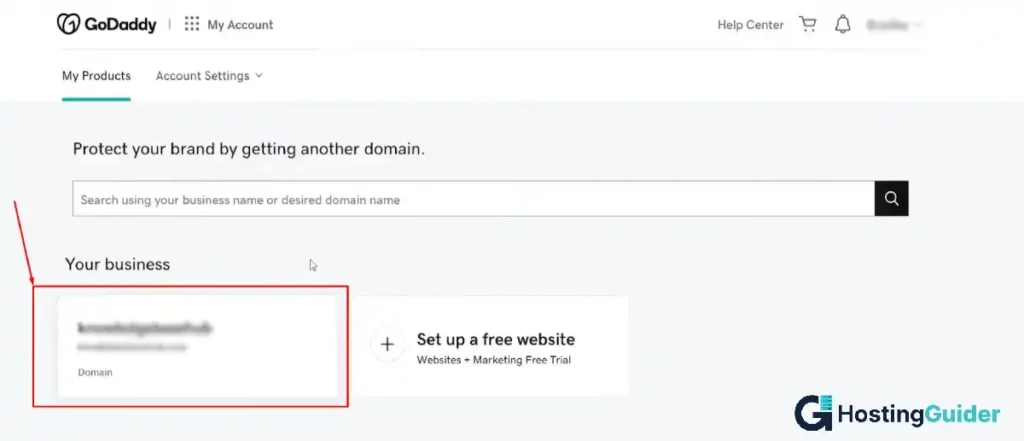
Open GoDaddy and click your account name in the top right corner. A dropdown appears. Click My Products from the list.
Step 2: Find your domain
On the My Products page, you will see your domains listed under Your Business. Click on the domain you want to transfer.
Step 3: Check the Domain Lock status
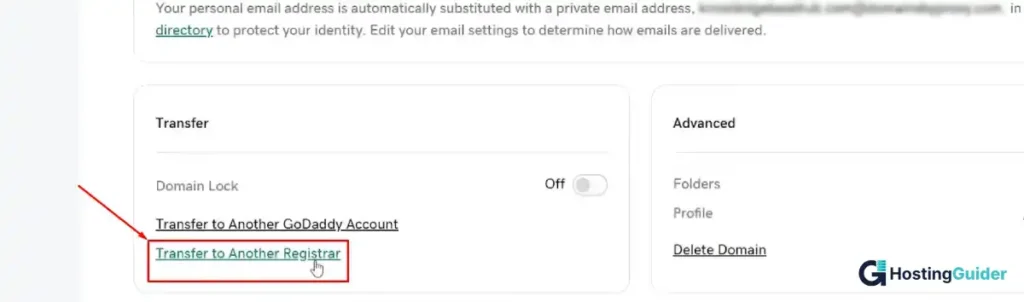
Scroll down on the domain settings page. You will see a section called Transfer. Look at the Domain Lock toggle. By default it is set to On shown in green. You need to turn this off before anything else.
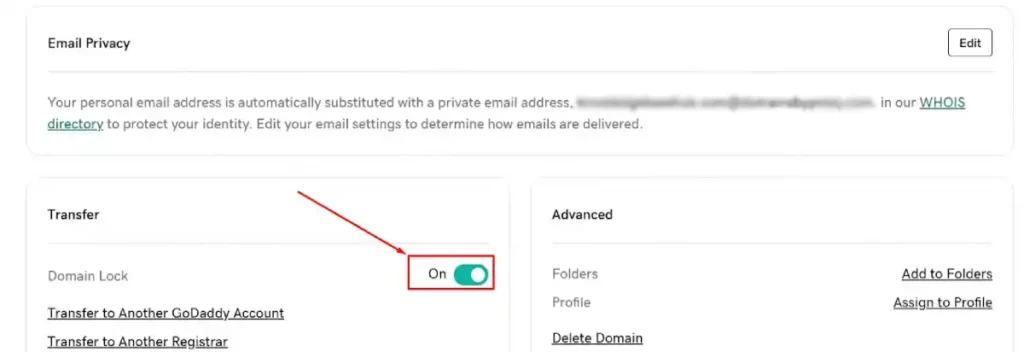
Click the toggle to turn it Off. This is the step most people forget. Without doing this, the new registrar cannot pull your domain.
Step 4: Click Transfer to Another Registrar
Once the lock is off, the toggle turns grey. You will now see two links appear below it. Click Transfer to Another Registrar.
Step 5: Copy your authorization code
GoDaddy now shows you the Domain Transfer Out page. Your authorization code is displayed in a blurred field. Click Copy to Clipboard to copy it.
GoDaddy also emails this code to the administrative email address on your domain. If you have WHOIS privacy on, check that your proxied email still forwards to your real inbox so you do not miss the code.
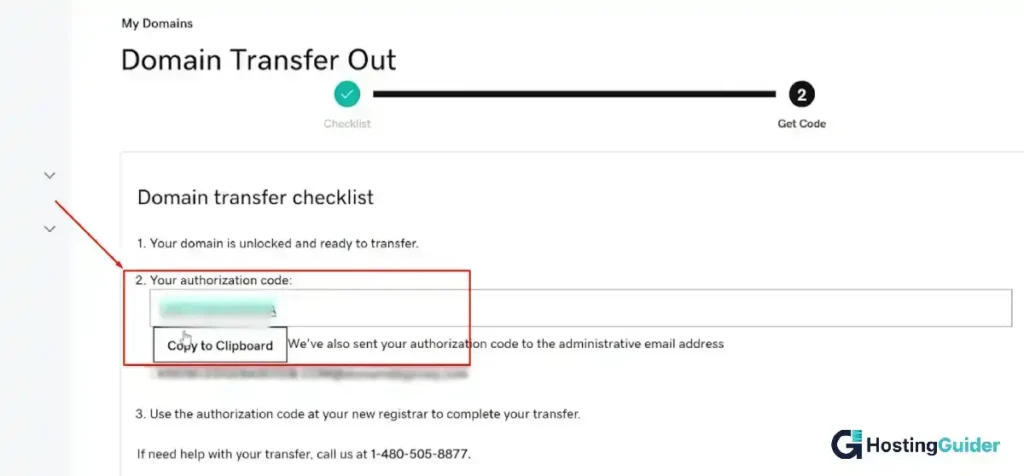
Paste the code somewhere safe like a password manager or a private note. Do not close this tab yet.
Part 2: Start the Transfer at Hostinger
Step 6: Go to Hostinger and open the Transfer page
Log in to Hostinger. Click Domains in the top navigation bar. From the left sidebar, click Transfers. You will land on the Transfer Domain page.
You will see three requirements listed:
- Domain meets transfer requirements (over 60 days old)
- Domain is unlocked
- You have an authorization code
Type your domain name in the search box and click Transfer.

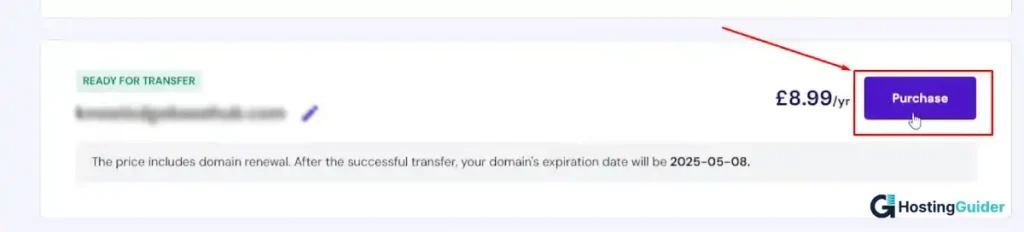
Step 7: Check transfer eligibility and pay
Hostinger checks the domain and shows you a READY FOR TRANSFER badge if everything looks good. It also shows the transfer price which includes one extra year of registration. Click the Purchase button.
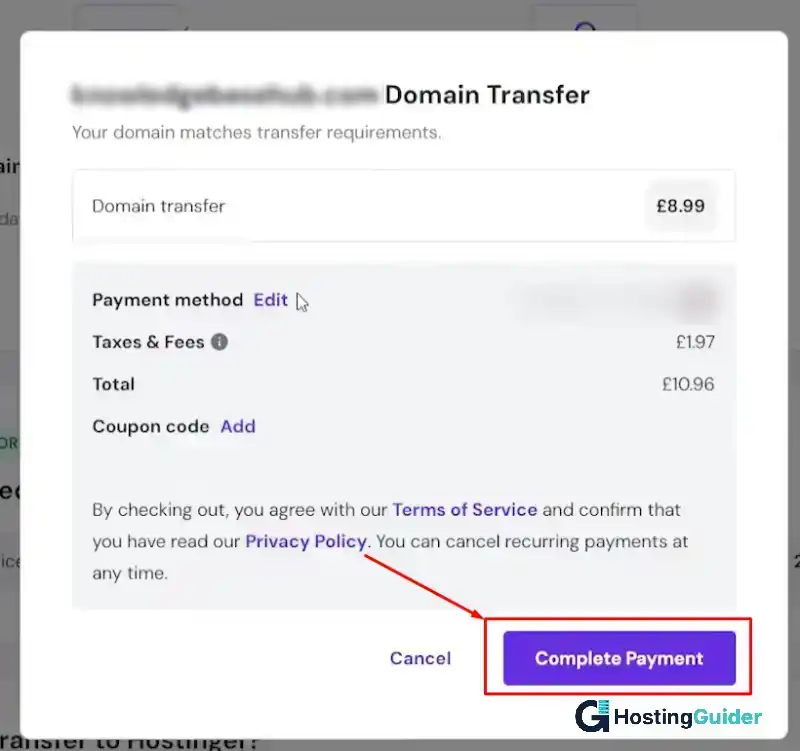
Step 8: Complete payment
A payment popup appears. It shows a full breakdown of costs including the domain transfer fee, taxes, and the total amount due. You can add a coupon code if you have one. When ready, click Complete Payment.
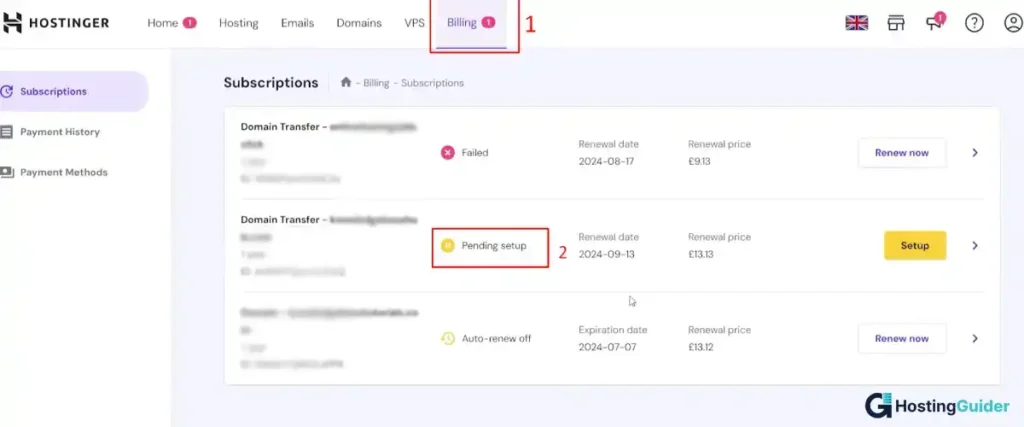
Step 9: Go to Billing to finish setup
After payment, go to Billing in the top navigation bar. Click Subscriptions in the left sidebar. You will see your transfer listed with a Pending setup status. Click the yellow Setup button next to it.
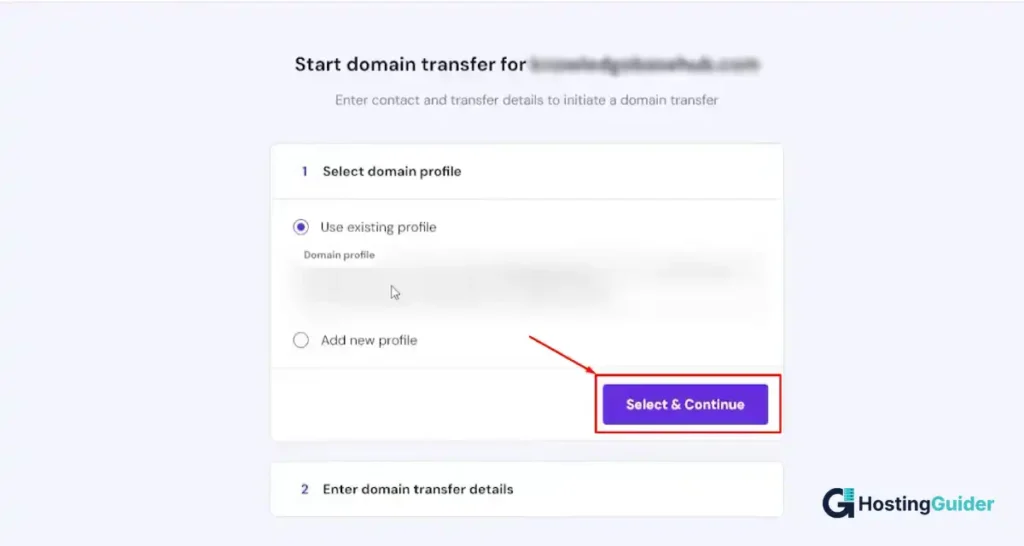
Step 10: Select your domain profile
Hostinger asks you to select a domain profile. This is the contact information that will be attached to your domain at Hostinger. If you already have an account with details filled in, choose Use existing profile. If this is your first domain at Hostinger, choose Add new profile and fill in your details. Click Select and Continue.
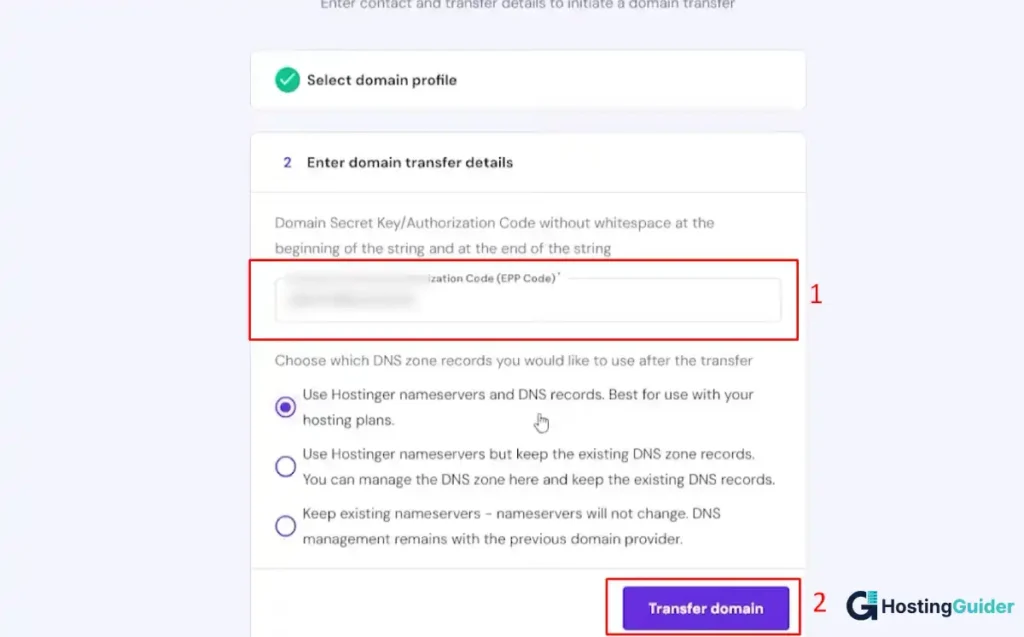
Step 11: Paste your EPP code and choose DNS settings
This is the most important screen in the whole process. You will see a field labeled Domain Secret Key/Authorization Code (EPP Code). Paste the code you copied from GoDaddy in Step 5.
Make sure there are no spaces before or after the code. Hostinger reminds you of this on screen. An extra space is the most common reason EPP codes get rejected.
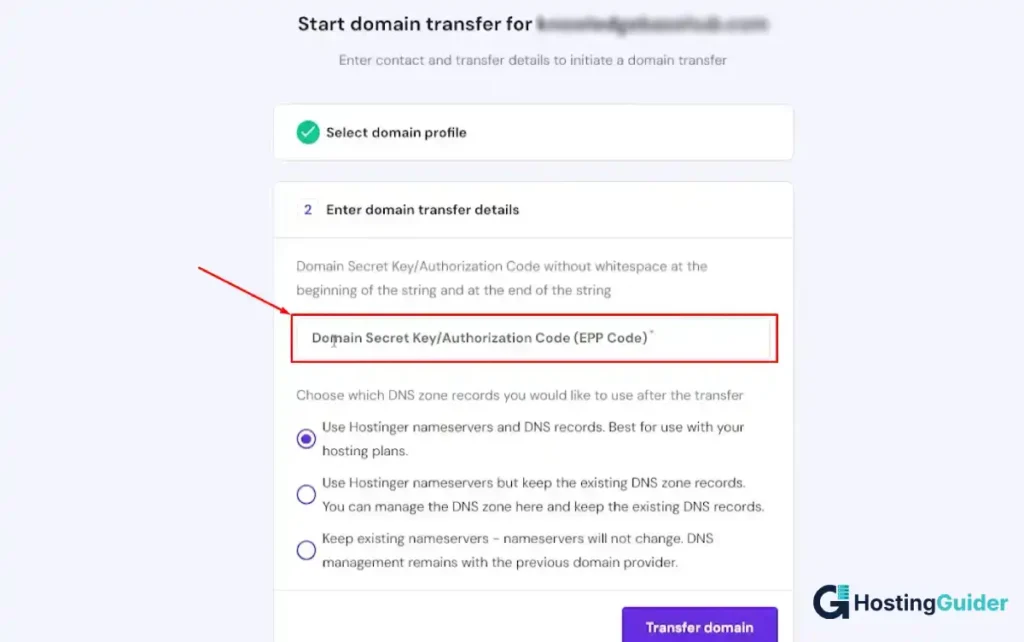
Below the code field, choose your DNS zone option:
- Use Hostinger nameservers and DNS records is the best choice if your site is also hosted at Hostinger
- Use Hostinger nameservers but keep existing DNS zone records works well if you want to manage DNS at Hostinger while keeping your current records intact
- Keep existing nameservers means DNS stays at your old provider. Use this if you manage DNS through Cloudflare or another third party
Once you have chosen, click Transfer domain.
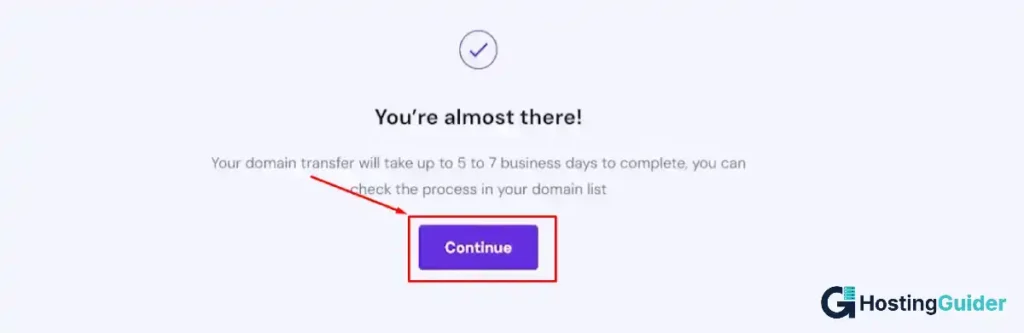
Step 12: Confirm and wait
Hostinger confirms the transfer was submitted. You will see a screen that says You’re almost there! with a note that the transfer takes up to 5 to 7 business days. Click Continue.
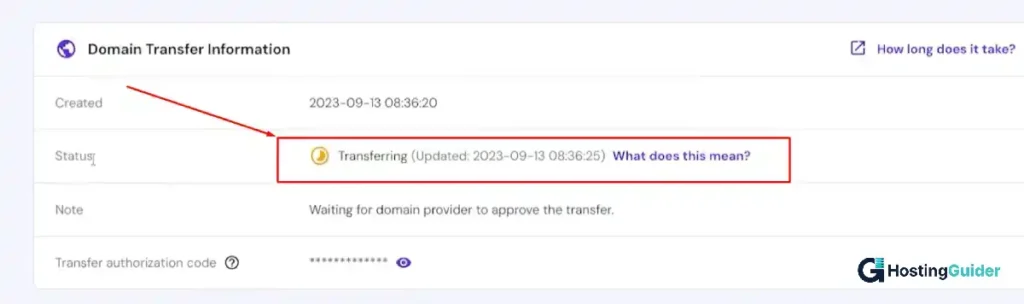
Step 13: Monitor the transfer status
Go back to Billing > Subscriptions and click on your domain transfer. You will see the Domain Transfer Information panel. The status will show Transferring and a note that reads Waiting for domain provider to approve the transfer.
This means GoDaddy now needs to release your domain. You can speed this up by logging back into GoDaddy and approving the transfer out from their dashboard if that option appears.
What happens next
Keep checking the Hostinger Billing page every day. Once GoDaddy releases your domain, the status changes from Transferring to Active. You will also get a confirmation email at that point.
When the transfer completes, log in to Hostinger and do these three things right away:
- Verify your DNS records match the backup list you made before starting
- Turn WHOIS privacy back on
- Enable the registrar lock to protect your domain
The whole active effort takes about 20 minutes. The waiting part takes 1 to 5 days depending on how fast GoDaddy releases your domain.
Domain Transfer Timeline and Cost
How long does a domain transfer take
A standard generic top level domain transfer takes 5 to 7 days from start to finish. If you confirm the request inside the old registrar dashboard, the time drops to about 1 to 2 days. Country code top level domains, like .uk or .au, often run faster (a few hours to 1 day) because they use different release rules set by the country registry.
How much does it cost to transfer a domain
Transfer pricing for the most common gTLDs ranges from about 9 to 14 US dollars and includes one year of renewal. ccTLDs and premium domains cost more. The fee covers the transfer, ICANN fees, and the added year. There is no charge from the old registrar to leave. According to Namecheap’s transfer guide, the transfer fee is the same as a renewal fee for that domain at the new registrar.
What can break during a transfer
Several common problems trip up first time transfers. The fixes are simple once you spot the cause.
| Problem | Likely Cause | Fix |
|---|---|---|
| Transfer denied | 60 day lock active | Wait out the lock or check eligibility date |
| EPP code rejected | Code copied with extra spaces | Re copy the code without leading or trailing spaces |
| No approval email arrived | WHOIS email outdated | Cancel transfer, fix email, wait 60 days, retry |
| Transfer stuck for days | Old registrar requires manual approval | Log in to old registrar and click Approve Transfer Out |
| Site went offline mid transfer | DNS was at old registrar only | Set up DNS at new registrar before starting next time |
| Privacy mismatch error | WHOIS privacy still on | Disable privacy, request new EPP code |
If your transfer is denied with no clear reason, the old registrar must give you the reason in writing under ICANN policy. Ask them, then fix the cause and try again.
How to Transfer a Domain to Another Person
Moving a domain to a new owner is called a Change of Registrant. It is a different process from moving registrars, and you can do both in either order.
Inside the same registrar: Use the registrar’s built in change of ownership flow. Both old and new owners get verification emails. The new owner usually needs an account at the same registrar.
Across registrars: Two clean ways to do this.
- Change the registrant name first, wait 60 days for the lock to clear, then transfer to the new registrar.
- Transfer to the new registrar under your name, then complete the change of registrant inside the new registrar’s dashboard.
The second route is faster because you skip the lock.
Real example: A small agency selling a client website would transfer the domain into the buyer’s account at the new registrar. They send the EPP code through a secure note (not email), the buyer pulls the domain in, and ownership records update during the transfer.
For high value domains worth more than 1000 dollars, use an escrow service like Escrow.com to hold payment until transfer completes. It protects both parties from fraud.
Transferring Country Code Domains
Country code TLDs (ccTLDs) like .uk, .ca, .eu, .au, and .in follow different rules set by each country registry, not ICANN. The basics are similar but the details vary.
- .uk: Instead of an EPP code, you change the IPS tag to the code of your new registrar. Example tag: GODADDY or NAMECHEAP.
- .ca: Requires Canadian Presence Requirements compliance and a registrar specific code.
- .eu: Uses an authorization code but needs you to be an EU resident or organization.
- .au: Allows transfers without a 60 day lock, and codes are often valid for limited periods.
Always check your specific country registry rules before starting. The new registrar’s help page is usually the fastest reference.
How to Keep Your Site and Email Online During Transfer
Zero downtime is the goal. Here is how to make it happen:
- Before you start the transfer, set up your DNS at the new registrar. Add every record from your backup list.
- Once DNS is verified at the new provider using a tool like dig or a DNS checker, change the nameservers at the old registrar to point at the new provider.
- Wait 24 to 48 hours for DNS propagation.
- Then start the transfer.
This way, the actual registrar transfer becomes a paperwork swap. Your site and email keep responding the entire time because the DNS lookups are already going to the new home.
If your DNS lives at a third party like Cloudflare DNS or AWS Route 53, even better. Your registrar move does not touch DNS at all, so there is nothing to break.
A note on common situations and tools
If you used Google Domains before 2024, your account moved to Squarespace Domains automatically. The transfer steps are the same: unlock, get auth code, paste at new registrar.
If you registered through a website builder like Wix or Shopify, the domain may be tied to the platform. Check the dashboard for a Transfer Out option. Some builders charge a release fee or hold the domain in a renewal window.
For technical users, you can use the GoDaddy transfer page bulk option to move up to 500 domains in one batch, which is useful for portfolio holders or agencies.
FAQ’s
How long does a domain name transfer take?
A typical domain name transfer takes 5 to 7 days to complete. The time can drop to 1 to 2 days if you manually approve the transfer at both registrars. Country code domains like .uk or .au often finish within a day. Approval delays usually come from missed confirmation emails sent to the registrant address.
Can I transfer a domain name for free?
Most domain transfers are not free. The new registrar charges a fee that ranges from about 9 to 14 US dollars for common gTLDs like .com. The fee usually includes one extra year of registration added to your current expiration date. Some promotional offers waive the fee, but this is the exception, not the rule.
What is an EPP code or authorization code?
An EPP code is a unique password used to verify your identity when transferring a domain to a new registrar. It is also called an authorization code, auth code, or transfer key. The code is generated by your current registrar and sent to the registrant email or shown in your dashboard. Treat it like a password.
Will my website go down during a domain transfer?
Your website does not have to go down during a domain transfer. If your DNS is hosted by a separate provider or already configured at the new registrar before you start, your site stays online the entire time. Downtime usually happens only when DNS records live at the old registrar and you fail to copy them over before the transfer.
How do I transfer a domain name to another person?
To transfer a domain name to another person, use your current registrar’s change of registrant flow. Log in, find the domain, and start a Change of Registrant or change of ownership request. Both you and the new owner approve the change by email. Across registrars, transfer first, then change the owner inside the new registrar.
Can I cancel a domain transfer in progress?
Yes, you can cancel a domain transfer in progress in most cases. To stop a transfer, log in to the old registrar and select the Deny Transfer or Cancel Transfer option, or do not approve the request and let it expire. Refunds depend on the new registrar’s policy. Once a transfer completes, you cannot cancel it, only reverse it with another transfer.
Why is my domain transfer being denied?
Common reasons a domain transfer is denied include the 60 day rule after a new registration, transfer, or contact change, an active registrar lock, an incorrect EPP code, an expired or recently renewed domain, or unpaid fees with the old registrar. The old registrar must tell you the reason in writing under ICANN policy. Fix the cause, then try again.
Final thoughts
Transferring a domain name is mostly a matter of preparation. The actual click flow takes about 10 minutes once you have your EPP code in hand. Everything else is making sure your contact email works, your DNS records are backed up, and you are outside the 60 day lock window.
Run the pre flight checklist, copy your DNS records, get the auth code, and follow the 10 steps in order. Use the Sarah walkthrough as a mental template the first time you do it. If something stalls, the troubleshooting table covers most fixes. With one practice run, you will move faster the second time, and a portfolio of domains becomes easy to consolidate at a registrar that fits how you actually work.