
At some point, many website owners hit a wall. Their current platform no longer does what they need. Features are locked behind expensive plan upgrades. Design flexibility runs out. SEO control is limited. Monthly costs keep climbing. And the thought of switching platforms feels overwhelming because nobody told them what the process actually looks like.
This guide does exactly that. It explains why people make the move to self-hosted WordPress, what the process looks like for each major platform, how to preserve your SEO rankings during the transition, and what to do after your new site is live.
Whether you are moving from Wix, Squarespace, or Shopify, this guide walks through every step in plain language. You do not need technical experience to follow it. You do need patience and a few hours of focused time.
Before you start, it helps to understand whether migrating is actually the right decision for your situation. Our Pros and Cons of Using a Website Builder guide covers the limitations of hosted platforms in detail and can help you confirm whether self-hosted WordPress is the right next step for you.
Table of Contents
Key Takeaways
- Migrating to WordPress.org is not as simple as clicking an export button, it requires careful planning
- Content like text and images can usually be transferred, but your design and layout cannot
- Setting up 301 redirects after migration is essential for preserving your Google rankings
- You need a domain name, web hosting, and WordPress.org installed before you start any migration
- Wix, Squarespace, and Shopify each have different export tools with different limitations
- Migrating an e-commerce store is significantly more complex than migrating a blog or business site
- Most migrations take between a few hours and a few days depending on site size
Quick Answer
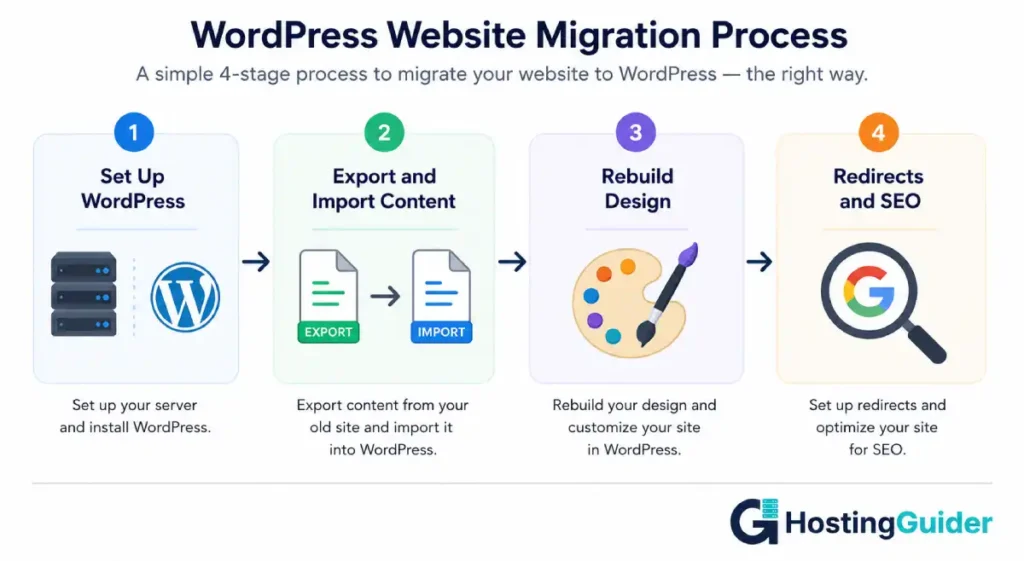
Migrating from a website builder to self-hosted WordPress involves four main stages. First, you set up your new WordPress hosting and install WordPress.org. Second, you export your content from your current platform and import it into WordPress. Third, you rebuild your design using a WordPress theme or a page builder like Elementor. Fourth, you set up 301 redirects from your old URLs to your new ones and submit your new sitemap to Google. Content transfers with varying success depending on the platform. Design does not transfer and must be rebuilt.
Why People Move from a Website Builder to WordPress
The most common reasons people make this move are worth understanding before you start. Knowing your reason also helps you plan what your new WordPress site needs to do differently.
| Reason for Migrating | What It Means in Practice |
|---|---|
| Hit a platform feature limit | The builder cannot do something you need, like a specific plugin |
| Rising monthly costs | Plan upgrades and app fees have pushed costs too high |
| SEO limitations | The builder’s SEO tools are not deep enough for your growth goals |
| Design restrictions | You cannot achieve the layout or visual style you want |
| Want full ownership | You want your site to live on your own server, not someone else’s |
| E-commerce needs | WooCommerce offers more flexibility than the built-in store |
| Switching to a developer | Your developer works in WordPress and needs full access |
| Content volume | Publishing at scale is easier and more powerful on WordPress |
If your reason is in this table, you are making a reasonable decision. If your reason is simply that someone told you WordPress is better, go back and read our SEO Features of Popular Website Builders and Wix vs Squarespace vs WordPress.com guides first. Moving to WordPress is not always the right choice, and it is not worth the effort if your current platform actually meets your needs.
What You Need Before You Start
Before you touch anything on your current site, you need to have your new WordPress environment ready. Migrating content into a half-built site causes problems. Do this setup first.
What You Need
| Item | What It Is | Where to Get It |
|---|---|---|
| Domain name | Your website address (you may already have this) | Namecheap, GoDaddy, or your hosting provider |
| Web hosting | A server where your WordPress site will live | Hostinger, SiteGround, WP Engine, Kinsta |
| WordPress.org | The free CMS software installed on your hosting | wordpress.org or via your host’s auto-installer |
| A WordPress theme | The design template for your new site | WordPress theme directory or a premium theme marketplace |
| Elementor or another page builder | Optional but useful for building pages visually | How to Create a Website with a Drag-and-Drop Builder |
Choosing Your Hosting
For a migration, choose a hosting provider that offers a one-click WordPress installer and a staging environment. A staging environment is a private version of your site where you can build and test everything before it goes live publicly.
Recommended hosting providers for WordPress migrations:
| Host | Starting Price | Best For |
|---|---|---|
| Hostinger | From $3/month | Budget-conscious beginners |
| SiteGround | From $5/month | Reliability and support |
| WP Engine | From $23/month | Managed WordPress with staging |
| Kinsta | From $35/month | High-performance managed hosting |
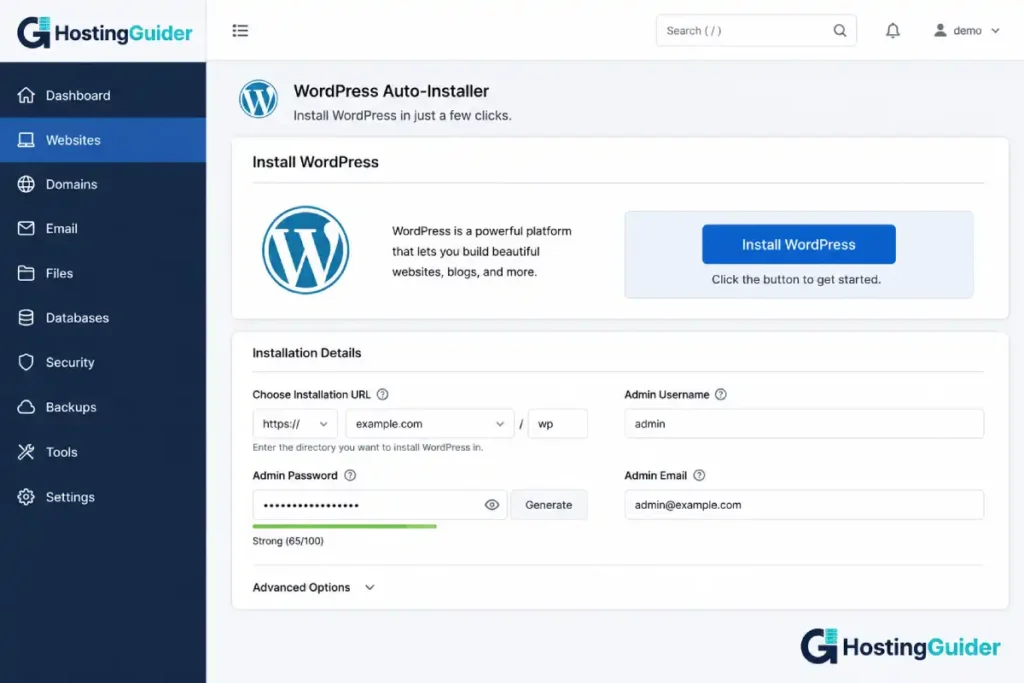
Install WordPress using your host’s auto-installer. Most providers have a one-click WordPress install button in their control panel. This installs the latest version of WordPress and sets up your database automatically. You then log in at yourdomain.com/wp-admin.
Once WordPress is installed, install a theme and optionally a page builder before you import your content. Having the design framework in place makes it easier to see how your content will look as you bring it across.
Understanding What Does and Does Not Transfer
This is the part most guides skip over and it is the part that causes the most frustration. Before you start any migration, understand exactly what you can move and what you have to rebuild.
| What Usually Transfers | What Does Not Transfer |
|---|---|
| Blog post text content | Your page layouts and design |
| Page text content (partially) | Your navigation menu structure |
| Images (sometimes, with extra steps) | Your site-wide colors and fonts |
| Categories and tags | Your forms and their settings |
| Basic metadata | Your apps or plugins and their data |
| Product names and descriptions (e-commerce) | Your checkout and payment settings |
| Customer emails (e-commerce) | Your order history (partially) |
The design of your site does not transfer from any platform to WordPress. This is not a limitation of WordPress. It is a fundamental reality of how different website builders store and structure design data. Every platform uses its own proprietary format. WordPress uses none of them.
You will be rebuilding your site design from scratch on WordPress. Budget time for this. For a small site with five to ten pages, rebuilding takes a few hours. For a larger site, it can take days or weeks.
Stage 1: Migrating from Wix to WordPress
Wix does not have an official export tool that works directly with WordPress. This means a Wix to WordPress migration requires more manual effort than a Squarespace migration. If you want to understand Wix as a platform before you leave it, our Wix vs Squarespace vs WordPress.com guide covers it in full detail. Here is the most reliable migration process.
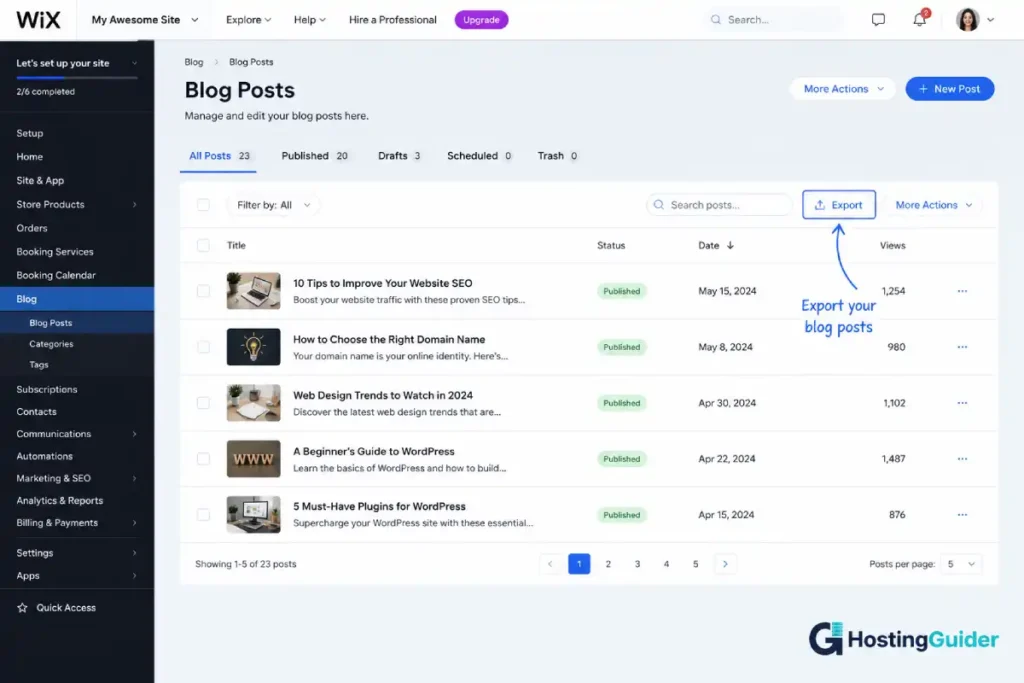
Step 1: Export your Wix blog posts
If you have a blog on Wix, go to your Wix dashboard. Click Blog. In the top right area, look for an option to export your posts. Wix allows you to export blog posts as an RSS feed or in some cases as an XML file.
The export captures post titles, body text, publish dates, categories, and tags. It does not capture your images automatically. Images must be downloaded separately.
Step 2: Download your images
Go through your Wix media library and download every image you use on your site. In the Wix dashboard, click Media. You can download images individually or in batches. Save them in organized folders on your computer by page or section so you know where each image goes on your new site.
This step takes time if you have a large media library. Do not skip it. Images that are only stored on Wix will not be accessible once you cancel your Wix plan.
Step 3: Note your page content
For non-blog pages like your homepage, about page, services page, and contact page, there is no export option. You need to copy the text content manually.
Open each page on your Wix site. Copy all the text from each section. Paste it into a document with clear labels for each page and section. This becomes your content reference when you rebuild pages in WordPress.
Step 4: Import blog posts into WordPress
In your WordPress dashboard, go to Tools and then Import. Click on RSS or Blogger depending on your export file format. Follow the import wizard to upload your export file.
WordPress processes the file and creates draft posts for each entry. Review them after import to check that formatting is correct and that images are referenced properly.
Step 5: Upload your images to WordPress
Go to Media in your WordPress dashboard. Click Add New Media File. Upload your downloaded images. Then go through each post and page and re-attach the correct images to the correct places.
For blog posts that referenced Wix-hosted images in the import file, those image links will still point to Wix’s servers. Once your Wix plan ends, those images will break. Replace them with your uploaded WordPress media files before you cancel Wix.
Step 6: Rebuild your pages in WordPress
Using your saved text documents from Step 3, rebuild each page in the WordPress editor or in Elementor if you have it installed. Start with your most important pages first: homepage, about, services or products, and contact.
Step 7: Recreate your navigation menu
Go to Appearance and then Menus in your WordPress dashboard. Create a new menu. Add your pages to it. Set it as your primary menu. This replaces the navigation structure from your Wix site.
Wix to WordPress Migration Summary
| Step | What to Do | Time Estimate |
|---|---|---|
| Export blog posts | Export as RSS or XML from Wix Blog | 15 minutes |
| Download images | Download all media from Wix media library | 30 min to 2 hours |
| Copy page text | Copy all non-blog page content into documents | 1 to 3 hours |
| Import blog posts | Import RSS or XML file into WordPress | 30 minutes |
| Upload images | Upload all media to WordPress | 1 to 2 hours |
| Rebuild pages | Recreate pages in WordPress editor or Elementor | 2 to 8 hours |
| Recreate menus | Set up navigation in WordPress | 30 minutes |
Stage 2: Migrating from Squarespace to WordPress
Squarespace has a built-in export tool that works with WordPress. The export covers blog posts and basic pages better than Wix does, which makes this migration somewhat easier. Our Wix vs Squarespace vs WordPress.com guide covers Squarespace’s full feature set if you want to compare what you are leaving behind before you start.
Step 1: Export your Squarespace content
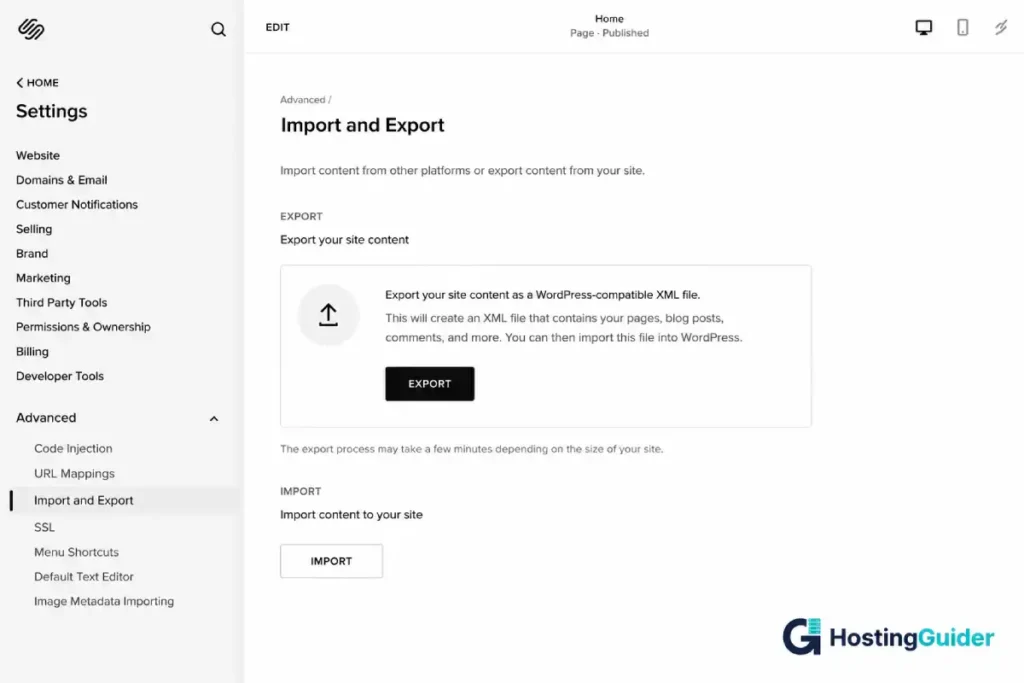
In your Squarespace dashboard, go to Settings. Click Advanced. Click Import and Export. Click Export. Choose WordPress as the export format.
Squarespace generates a WordPress-compatible XML file. This file contains your blog posts, basic pages, and some image references.
What the Squarespace XML export includes:
- Blog posts with titles, body text, categories, and tags
- Basic pages with their text content
- Image URLs (these still point to Squarespace servers)
What it does not include:
- Gallery pages
- Product pages
- Cover pages
- Heavily formatted layout pages
Download the XML file to your computer.
Step 2: Download your Squarespace images
The export file references your images by their Squarespace URLs. Once you cancel Squarespace, those URLs stop working. You need to download your images now.
Go through your Squarespace pages and download every image you use. The quickest way is to open each image in your browser, right-click, and save it. For galleries with many images, Squarespace does not have a bulk download option, so this step requires time.
Alternatively, you can use a browser extension or download tool to bulk save images from specific pages. Save all images to organized folders on your computer.
Step 3: Import the XML file into WordPress
In your WordPress dashboard, go to Tools and then Import. Click WordPress (for a WordPress-format XML file). You may be prompted to install the WordPress Importer plugin. Install and activate it.
Upload your Squarespace XML file. The importer creates posts and pages in WordPress from the file contents. It also attempts to import media by fetching images from the Squarespace URLs. Run this import while your Squarespace site is still live so the image URLs are still accessible.
Step 4: Check imported content
After the import, go to Posts and then Pages in your WordPress dashboard. Check through the imported content. Look for:
- Missing images (these need to be uploaded manually from your downloaded files)
- Broken formatting
- Posts that imported as pages or vice versa
- Missing categories or tags
Fix any issues before moving on.
Step 5: Rebuild your key pages
Squarespace pages that use heavy layout blocks, galleries, or cover pages will not have imported cleanly. Rebuild these pages from scratch using WordPress and your chosen page builder.
Use your downloaded images for hero sections, galleries, and any other image-heavy areas.
Step 6: Rebuild your store (if applicable)
If you had a Squarespace store, the XML export does not include product data. You need to migrate products manually or use a third-party migration service.
For each product, you will add it manually in WooCommerce: product name, description, price, images, and variants. For stores with fewer than 50 products, this takes a few hours. For larger stores, consider a WooCommerce CSV import using a spreadsheet of your product data that you prepare in advance.
Our Website Builders for E-commerce: Top Choices guide covers WooCommerce in detail if you need to understand how to set up your new store before you migrate products.
Squarespace to WordPress Migration Summary
| Step | What to Do | Time Estimate |
|---|---|---|
| Export XML | Export from Squarespace Settings, Advanced, Export | 10 minutes |
| Download images | Download all images from Squarespace pages | 1 to 3 hours |
| Import XML | Import into WordPress via Tools, Import | 30 minutes |
| Check content | Review all imported posts and pages | 1 to 2 hours |
| Rebuild layout pages | Recreate gallery, cover, and layout pages | 2 to 6 hours |
| Migrate store (if needed) | Re-enter products manually in WooCommerce | 2 to 10+ hours |
Stage 3: Migrating from Shopify to WordPress and WooCommerce
Moving from Shopify to WooCommerce is the most complex migration on this list because you are moving an entire e-commerce operation, not just a content site. Products, customers, orders, and settings all need to transfer. Our Website Builders for E-commerce: Top Choices guide covers how WooCommerce compares to Shopify in full detail if you want to confirm this is the right move for your store.
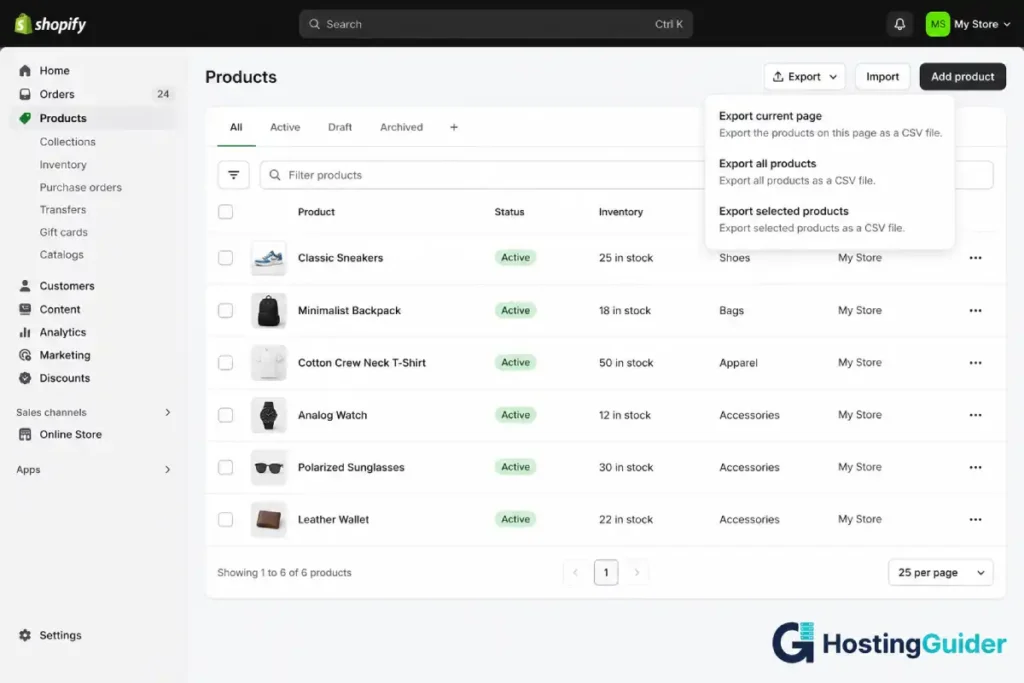
Step 1: Export your Shopify products
In your Shopify admin, go to Products. Click Export at the top right. Choose All Products. Select CSV for Excel, Numbers, or other spreadsheet applications.
Shopify generates a CSV file containing your product names, descriptions, prices, SKUs, variants, and image URLs. This is the most useful export file in the whole migration because WooCommerce can import this data in bulk.
Step 2: Export your customer data
In your Shopify admin, go to Customers. Click Export. Export all customers as a CSV file. This file contains customer names, email addresses, and order counts.
WordPress and WooCommerce do not automatically import Shopify customer accounts. You will have the customer data as a reference, but customers will need to create new accounts on your WooCommerce store or you can import them using a WooCommerce customer import plugin.
Step 3: Export your orders (for reference)
In your Shopify admin, go to Orders. Click Export. Export all orders as a CSV file. You cannot import historical orders into WooCommerce in a way that replicates the full Shopify order management experience. But having the order history as a CSV gives you a record you can refer to.
Step 4: Set up WooCommerce on WordPress
Install the WooCommerce plugin in your WordPress dashboard. Go to Plugins, click Add New Plugin, search for WooCommerce, install it, and activate it.
Run through the WooCommerce setup wizard. Set your business location, currency, and payment preferences. Configure your shipping zones and tax settings.
Step 5: Convert and import your products CSV
The Shopify product CSV format is not identical to WooCommerce’s CSV format. You need to convert the column headers. Open your Shopify CSV in a spreadsheet tool like Google Sheets or Excel.
WooCommerce’s product importer expects specific column names. The key ones are: ID, Type, SKU, Name, Published, Description, Short description, Price, Stock, Images.
Rename the columns from your Shopify export to match WooCommerce’s expected format. WooCommerce has a sample CSV template you can download from the product importer tool to use as a reference.
Once your CSV is converted, go to WooCommerce in your WordPress dashboard. Click Products. Click Import. Upload your converted CSV. Map any remaining columns during the import wizard and run the import.
Step 6: Download and re-upload product images
Product images referenced in your Shopify CSV still point to Shopify’s image servers. Download your product images from Shopify and upload them to your WordPress media library. Then update each product in WooCommerce to use the correct locally hosted images.
For large catalogs, this is the most time-consuming part of the migration. Some WooCommerce import plugins can automatically fetch and download images from URLs during import, which saves significant time.
Step 7: Set up payment gateways in WooCommerce
WooCommerce connects to Stripe, PayPal, and many other payment processors. Go to WooCommerce, click Settings, click Payments, and connect your chosen payment gateway.
If you were using Shopify Payments, note that it is not available on WooCommerce. You will connect directly to Stripe instead, which is the same underlying payment processor in most markets.
Step 8: Migrate your blog content
If you had a blog on Shopify, go to Settings and then Export in your Shopify admin. Shopify provides a blog export in XML format. Import this into WordPress using Tools, then Import, then WordPress.
Shopify to WooCommerce Migration Summary
| Step | What to Do | Time Estimate |
|---|---|---|
| Export products CSV | Export all products from Shopify admin | 15 minutes |
| Export customers CSV | Export all customers from Shopify admin | 10 minutes |
| Export orders CSV | Export order history for records | 10 minutes |
| Set up WooCommerce | Install and configure WooCommerce | 1 to 2 hours |
| Convert and import products | Reformat CSV and import to WooCommerce | 2 to 4 hours |
| Re-upload product images | Download from Shopify and upload to WordPress | 2 to 8 hours |
| Set up payments | Connect Stripe or PayPal to WooCommerce | 30 minutes |
| Migrate blog | Export from Shopify and import to WordPress | 1 hour |
Stage 4: Preserving Your SEO After Migration
This is the stage most people underestimate and the one that causes the most damage when skipped. Moving to a new platform changes your URLs. Changed URLs mean Google loses track of your pages. Lost tracking means lost rankings. Lost rankings mean lost traffic.
Doing this stage correctly protects everything you have built on Google before the migration. Our SEO Features of Popular Website Builders guide explains in detail why URL structure, redirects, and sitemaps matter so much for search rankings.
Step 1: Record all your current URLs
Before you touch anything, make a list of every URL on your current site. Include every blog post, every page, every product URL, every category URL.
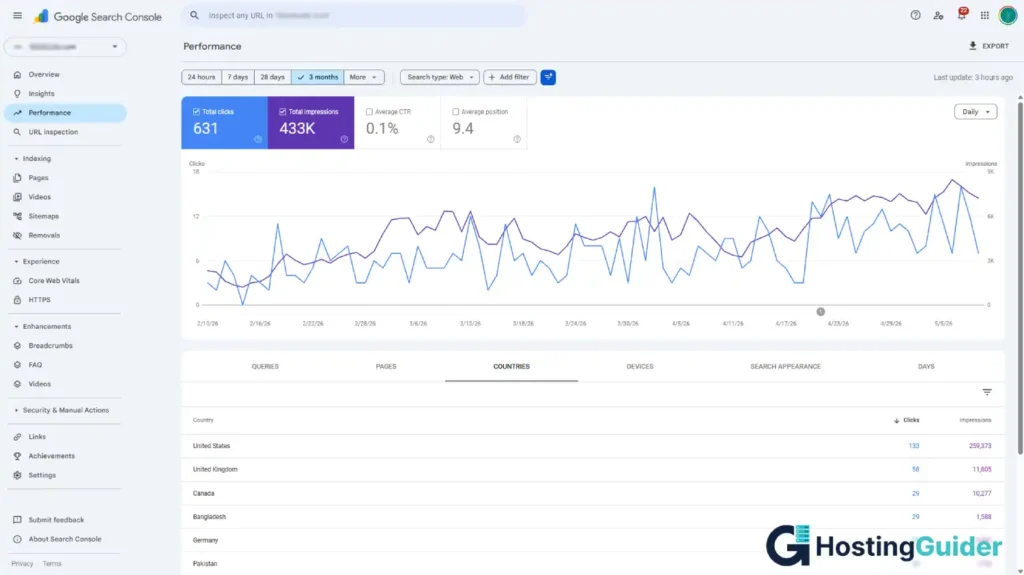
In Google Search Console, go to the Index section and click Pages. This shows you every URL Google has indexed on your site. Export this list or copy it into a spreadsheet. You need it to set up redirects after migration.
If you are not connected to Google Search Console yet, do that now at Google Search Console and verify ownership.
Step 2: Try to match your URL structure
When you set up pages and posts in WordPress, try to match your old URL structure as closely as possible. The closer your new URLs are to your old ones, the fewer redirects you need.
Set your WordPress permalink structure before you create any content. Go to Settings in your WordPress dashboard, click Permalinks, and choose the structure that best matches your old URLs.
The most common and SEO-friendly structure is: yourdomain.com/post-name. Set this as your permalink structure from the start. If you change it later, all your internal links break again.
Step 3: Set up 301 redirects
For every URL that has changed between your old site and your new WordPress site, you need a 301 redirect. A 301 redirect tells Google and browsers that a page has permanently moved to a new address. Google transfers the ranking value of the old URL to the new one.
Install the Redirection plugin on your WordPress site. It is free. Go to Tools and then Redirection in your WordPress dashboard.
In the Source URL field, enter your old URL. In the Target URL field, enter the new WordPress URL where that page now lives. Click Add Redirect.
Do this for every URL that has changed. For a small site, this takes 30 to 60 minutes. For a large site, it may take several hours.
Format of a 301 redirect entry:
| Old URL (Source) | New URL (Target) |
|---|---|
| yourdomain.com/blog/my-first-post | yourdomain.com/my-first-post |
| yourdomain.com/about-us | yourdomain.com/about |
| yourdomain.com/shop/product-name | yourdomain.com/product/product-name |
Step 4: Submit your new sitemap to Google
Once your WordPress site is live, submit your new sitemap to Google Search Console. Your WordPress sitemap is automatically generated at yourdomain.com/sitemap.xml if you have an SEO plugin like Yoast SEO installed. Some themes and WordPress itself also generate sitemaps.
In Google Search Console, click Sitemaps in the left menu. Enter your sitemap URL and click Submit.
Google will begin crawling your new site and updating its index to reflect the new URLs. This process takes anywhere from a few days to a few weeks for large sites.
Step 5: Use Google Search Console to monitor your migration
After going live, check Google Search Console daily for the first two weeks. Look for:
- Coverage errors showing pages that Google cannot find
- Crawl errors on specific URLs
- Traffic drops in the Performance report
If you see a significant traffic drop and you have your redirects in place, it is usually temporary. Google is recrawling and re-evaluating your site. Most traffic recovers within four to twelve weeks if your redirects are correctly set up and your content quality is the same or better than before.
Stage 5: What to Do After Your New WordPress Site Is Live
Going live is not the finish line. There are several tasks to complete in the first week after launch that make a real difference to how quickly your site recovers its rankings and how well it performs going forward.
| Task | Why It Matters | When to Do It |
|---|---|---|
| Verify 301 redirects are working | Broken redirects lose SEO value permanently | Day 1 |
| Test every page and link | Find and fix broken links before Google finds them | Day 1 |
| Connect Google Analytics | Track your traffic and user behavior | Day 1 |
| Submit new sitemap to Google Search Console | Helps Google find and index your new pages faster | Day 1 |
| Set page titles and meta descriptions | Essential SEO settings for every page | First week |
| Test mobile layout on multiple devices | More than half your visitors are on phones | First week |
| Test checkout if you have a store | Make sure payments work before customers arrive | Day 1 |
| Cancel your old platform plan | Only after you confirm everything is working on WordPress | Week 2 or later |
| Set up automatic backups | Protect your new site from data loss | First week |
| Monitor Search Console for errors | Catch and fix crawl issues early | First two weeks daily |
One important note on cancelling your old platform: do not cancel it the day your WordPress site goes live. Keep it running for at least two weeks. During that time, use it as a reference for any content you may have missed during migration. If you discover a missing page or image, you can still access it on the old platform. Once you cancel, that access is gone.
Common Mistakes to Avoid
Not setting up 301 redirects before cancelling the old platform is the single most damaging mistake you can make. When visitors and Google land on a URL that no longer exists and there is no redirect sending them to the right page, all the ranking value built up on that URL is gone. This is very difficult to recover. Set up every redirect before you switch your domain to WordPress.
Migrating before the new site is ready is a close second. Some people get excited and point their domain at a half-built WordPress site before the content, design, and settings are properly configured. This means real visitors land on an incomplete site. Work in a staging environment or on a temporary URL until the site is genuinely ready. If you need help building your pages in WordPress before going live, our How to Create a Website with a Drag-and-Drop Builder guide walks through the full process step by step. A useful plugin for moving a completed staging site to live is the All-in-One WP Migration plugin, which packages your entire site into a single file you can restore on any WordPress install.
Ignoring image optimization is another common issue. WordPress.org does not automatically compress your images the way some hosted platforms do. Large uncompressed images make your pages load slowly. Install a free image optimization plugin like ShortPixel or Smush before you upload your media files. These plugins automatically compress images as you upload them without visible quality loss.
Changing too many things at once makes it impossible to understand what affected your traffic after migration. Some people migrate platforms, change their URL structure, redesign every page, and rewrite all their content at the same time. When traffic drops, they have no idea what caused it. Migrate your content first. Stabilize your rankings. Then make design and content improvements.
Forgetting to update internal links is a detail that causes long-term SEO issues. After migration, your old platform URLs might be referenced throughout your content as links from one post to another. These internal links still point to the old URLs. If you have redirects in place, the links will work but they will be slower and add unnecessary redirects. Go through your most important posts and pages and update internal links to point directly to the new WordPress URLs.
Frequently Asked Questions
How long does a migration from a website builder to WordPress take?
The time depends on the size of your site and which platform you are moving from. A small site with five to ten pages and a basic blog takes most people a full day of focused work. A medium site with fifty posts and several key pages takes two to five days. A large e-commerce store with hundreds of products can take one to three weeks depending on catalog size and whether you have someone helping. Squarespace to WordPress is generally faster than Wix to WordPress because of Squarespace’s XML export tool. Shopify to WooCommerce takes the longest because of the complexity of migrating an entire store operation.
Will I lose my Google rankings when I migrate to WordPress?
You will likely see a temporary dip in rankings and traffic after migration. This is normal. Google needs time to discover your new URLs, process your redirects, and re-evaluate your content. If you set up 301 redirects correctly for every changed URL, submit your new sitemap to Google Search Console, and maintain the same or better content quality, most of your rankings recover within four to twelve weeks. The sites that lose rankings permanently are those that skip redirects, change too much content during the migration, or experience significant downtime during the switch.
Can I migrate my Wix site to WordPress automatically?
There is no official automatic tool that migrates a full Wix site to WordPress. Third-party migration services exist that claim to do this, with prices ranging from $50 to $500 depending on site size. The results vary and manual review is always needed afterward. For most small to medium sites, doing the migration manually following the steps in this guide gives you more control and a better result than relying on an automated tool. The manual process ensures you review every piece of content and know exactly what has been moved.
Do I need a developer to migrate to WordPress?
Not necessarily. This guide is written specifically so someone without developer experience can follow the process. However, certain parts of the migration are more complex than others. If you have a large e-commerce store, a very large content library, or complex custom functionality on your current platform, hiring a WordPress developer for the migration is worth considering. A developer can handle the technical aspects, set up redirects programmatically, and do the migration faster than most beginners can do it manually. Expect to pay between $200 and $1,500 for a professional migration depending on site complexity.
What happens to my old website during the migration?
Your old website stays completely live and untouched throughout the migration process. You are building your new WordPress site on a separate hosting account with a separate URL until you are ready to switch. When your new WordPress site is finished and tested, you point your domain name from the old platform to your new WordPress hosting. At that point, your domain shows the new site. Your old platform account still exists and you can still log in to it until you cancel your subscription. This safety net is why you should not cancel your old platform plan until you have confirmed the new site is working correctly.
Should I hire a migration service or do it myself?
For a simple blog or small business site with under twenty pages and a modest content library, doing it yourself following a structured guide is absolutely achievable and saves money. For a medium site with a large blog archive, do it yourself but budget two to four days of work. For a large e-commerce store with hundreds of products, customer accounts, and a high volume of ongoing orders, hiring a professional migration service or a WordPress developer is the safer choice. Mistakes during an e-commerce migration can mean lost orders, broken checkout flows, and unhappy customers. The cost of professional help is usually less than the cost of fixing migration mistakes on a live store.
How do I make sure my forms and contact submissions still work after migration?
Forms from your old platform do not transfer to WordPress. You need to recreate every form in WordPress using a form plugin. The most popular free option is WPForms Lite. Install it, recreate each form, and embed it on the relevant page using a shortcode or block. Before you launch your new site, test every form by submitting a test entry and confirming you receive the email notification. Also check that the from address on your form emails is correctly configured. Many new WordPress setups have email delivery issues that cause form submissions to land in spam or not arrive at all. Install a plugin like WP Mail SMTP to ensure reliable email delivery from your WordPress site.