
Search for Linux kernel tuning and you will find hundreds of guides listing dozens of parameters. Most of them have no measurable effect on web server performance. Some of them make things worse.
This guide is different.
It covers only the parameters that produce visible, measurable improvements for a web server under real traffic. Each one is explained in simple terms. Each one has a tested value that works. Each one includes a rollback step in case something breaks.
By the end of this guide, your VPS will handle more concurrent connections, push more data with less delay, and survive traffic spikes that would have caused dropped requests before. The total tuning takes about twenty minutes. The performance difference is often 30% or more on real workloads.
This guide assumes you have a Linux VPS running Ubuntu or Debian. If you do not have a VPS yet, start with the VPS setup guide first.
Key Takeaways
- About 90% of kernel tuning advice online is noise that has no measurable effect on web performance
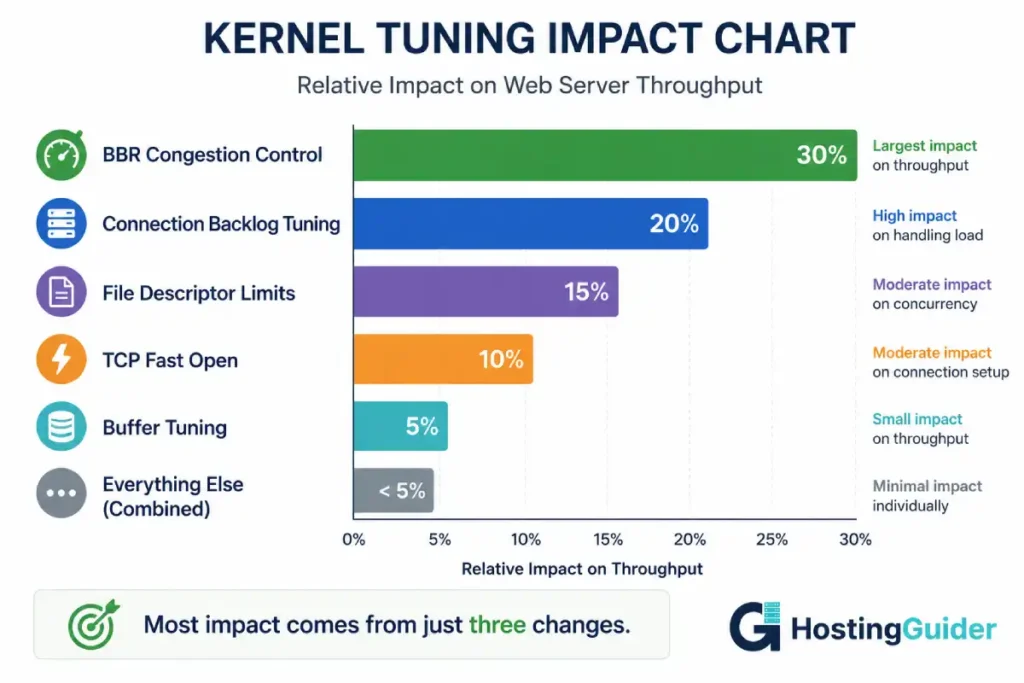
- Eight parameters produce the bulk of the improvement that real tuning can deliver
- The single biggest impact comes from switching to BBR congestion control, which can improve throughput by 20% to 50%
- Default
somaxconnvalue rejects connections under load on most VPS systems - Default file descriptor limits will cause
too many open fileserrors during traffic spikes - All changes can be tested temporarily before being made permanent
- Always benchmark before and after so you can verify the change actually helped
What Kernel Tuning Actually Does
The Linux kernel manages every network connection, file operation, and memory access on your server.
It has thousands of internal settings that control this behaviour. Most of these settings have sensible defaults that work for general use. A few of them have defaults set for desktop computers or small servers, and these defaults limit web server performance significantly.
Kernel tuning means changing these specific settings to values that suit a high-traffic web server.
Think of it like a car. The factory tunes the engine for average drivers. A racing team retunes it for the track. The car is mechanically the same. The settings are different. The performance is dramatically different.
Your VPS works the same way. The kernel and the hardware do not change. The settings do. And the right settings can mean the difference between a server that handles 100 requests per second and the same server handling 1000.
The Parameters That Actually Matter
Most kernel tuning guides list 50 or more parameters. The honest answer is that 8 of them deliver the meaningful improvements. The rest are either already at correct defaults or have effects too small to measure.
| Parameter | What It Controls | Default Problem |
|---|---|---|
net.ipv4.tcp_congestion_control | How TCP responds to network conditions | Default cubic is older. BBR is faster |
net.core.somaxconn | Pending connections queue size | Default 4096 fills under modest load |
net.ipv4.tcp_max_syn_backlog | SYN-stage connections queue | Default 1024 is too small |
net.core.netdev_max_backlog | Network device packet queue | Default 1000 drops packets under load |
fs.file-max | Maximum open file descriptors | Default may be too low for high traffic |
net.ipv4.ip_local_port_range | Available ephemeral ports | Default range exhausts under high outbound connections |
net.ipv4.tcp_tw_reuse | Reuse of TIME_WAIT sockets | Default 0 wastes available connections |
net.ipv4.tcp_fastopen | Skip handshake on repeat connections | Default 1 is partial. 3 is full |
Each of these is covered in detail with safe values, explanations, and verification steps below.
Before You Tune: Establish a Baseline
You cannot improve what you do not measure.
Before changing any kernel parameter, capture how your server performs right now. Without this baseline, you will have no way to know whether your changes helped, hurt, or did nothing.
Run a Simple Load Test
Install Apache Bench:
sudo apt install apache2-utils -y
Run a baseline test against your own site:
ab -n 10000 -c 100 https://yourdomain.com/
This sends 10,000 requests with 100 concurrent connections. The output shows requests per second, average response time, and the distribution of response times across percentiles.
Save this output to a file:
ab -n 10000 -c 100 https://yourdomain.com/ > baseline-before-tuning.txt
The four numbers that matter most:
- Requests per second
- Time per request (mean)
- 95th percentile response time
- Failed requests
Capture Current Kernel Values
Before making changes, record the current values of every parameter we will tune:
sysctl net.ipv4.tcp_congestion_control net.core.somaxconn net.ipv4.tcp_max_syn_backlog net.core.netdev_max_backlog fs.file-max net.ipv4.ip_local_port_range net.ipv4.tcp_tw_reuse net.ipv4.tcp_fastopen > baseline-kernel-values.txt
This file is your rollback plan. If anything breaks, you can restore exactly what you had.
Check for Current Bottlenecks
Run this command while your site is receiving real traffic, or during the load test:
ss -s
Output shows TCP connection states. Look for:
- Total established connections (active load)
- TIME_WAIT count (waiting connections)
- Synrecv (connections in handshake)
If TIME_WAIT is over 10,000 or Synrecv stays high, your server is already hitting connection limits. Tuning will help significantly.
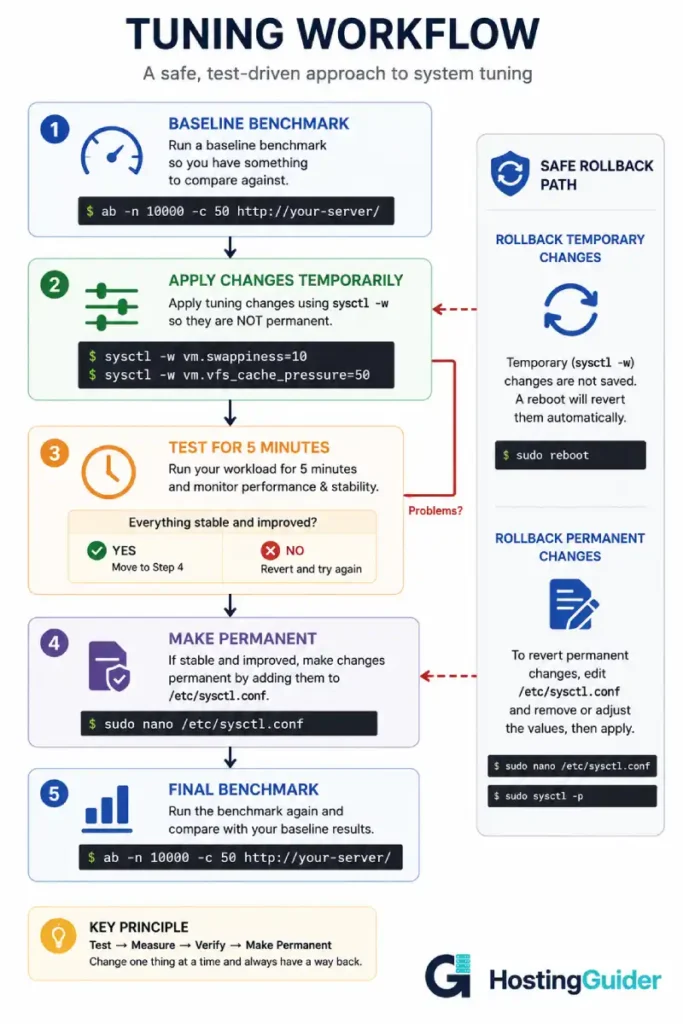
The Tuning Steps
Each step below explains one parameter, shows the safe value to use, applies it temporarily for testing, then makes it permanent if it works.
All temporary changes can be undone with a reboot. Permanent changes need to be removed from /etc/sysctl.conf to undo.
Step 1: Enable BBR Congestion Control
This is the single most impactful change you can make.
BBR is a congestion control algorithm developed by Google. It replaces the default cubic algorithm with one that handles modern network conditions better. On VPS networks with any packet loss, BBR can improve throughput by 20% to 50%.
The original BBR research paper from Google explains why it outperforms older algorithms in detail.
Check if BBR is available on your kernel:
sudo modprobe tcp_bbr
sysctl net.ipv4.tcp_available_congestion_control
If the output includes bbr in the list, you can use it. Most kernels from 4.9 onwards support BBR natively.
Apply BBR temporarily:
sudo sysctl -w net.core.default_qdisc=fq
sudo sysctl -w net.ipv4.tcp_congestion_control=bbr
The fq queueing discipline works best with BBR. Both should be set together.
Verify:
sysctl net.ipv4.tcp_congestion_control
Output should show bbr.
Test your site for a few minutes. If anything seems wrong, roll back immediately:
sudo sysctl -w net.ipv4.tcp_congestion_control=cubic
If everything works, make it permanent. Add these lines to /etc/sysctl.conf:
echo 'net.core.default_qdisc=fq' | sudo tee -a /etc/sysctl.conf
echo 'net.ipv4.tcp_congestion_control=bbr' | sudo tee -a /etc/sysctl.conf
Step 2: Increase Connection Backlog Queues
When traffic spikes hit your server, incoming connections form a queue. The kernel has three different queues for different connection stages, and all three have defaults that are too small for a busy web server.
somaxconn controls how many fully completed connections can wait to be accepted by the application:
sudo sysctl -w net.core.somaxconn=65535
The default of 4096 is reasonable for small sites. On a server handling thousands of concurrent connections, increase it. 65535 is a safe upper bound that does not waste memory.
tcp_max_syn_backlog controls how many half-open connections (SYN received but not yet ACKed) can wait:
sudo sysctl -w net.ipv4.tcp_max_syn_backlog=65535
The default of 1024 is small. Under any kind of attack or burst load, the queue fills and new connections are silently dropped.
netdev_max_backlog controls how many packets can queue on the network device before the kernel processes them:
sudo sysctl -w net.core.netdev_max_backlog=65535
The default of 1000 causes packet drops on fast network interfaces.
Verify all three:
sysctl net.core.somaxconn net.ipv4.tcp_max_syn_backlog net.core.netdev_max_backlog
Make them permanent:
echo 'net.core.somaxconn = 65535' | sudo tee -a /etc/sysctl.conf
echo 'net.ipv4.tcp_max_syn_backlog = 65535' | sudo tee -a /etc/sysctl.conf
echo 'net.core.netdev_max_backlog = 65535' | sudo tee -a /etc/sysctl.conf
After changing somaxconn, also update your web server. Nginx uses its own listen backlog setting that must match:
sudo nano /etc/nginx/sites-available/default
Find your listen directive. Update it to include the backlog:
listen 80 backlog=65535;
listen 443 ssl backlog=65535;
Reload Nginx:
sudo nginx -t
sudo systemctl reload nginx
Step 3: Raise File Descriptor Limits
Every network connection on Linux is a file descriptor. So is every open file. So is every socket.
The default system-wide limit is often only a few hundred thousand. The default per-process limit is usually 1024. A busy web server can exhaust both during a traffic spike, which causes the dreaded too many open files error.
Set the system-wide limit:
sudo sysctl -w fs.file-max=2097152
sudo sysctl -w fs.nr_open=2097152
Verify:
sysctl fs.file-max fs.nr_open
Make permanent:
echo 'fs.file-max = 2097152' | sudo tee -a /etc/sysctl.conf
echo 'fs.nr_open = 2097152' | sudo tee -a /etc/sysctl.conf
Now set the per-process limits. These live in a different file: /etc/security/limits.conf.
sudo nano /etc/security/limits.conf
Add these lines at the end:
* soft nofile 1048576
* hard nofile 1048576
* soft nproc 1048576
* hard nproc 1048576
root soft nofile 1048576
root hard nofile 1048576
Save with Ctrl+X, then Y, then Enter.
These changes apply only after a new login session. Log out and back in, then verify:
ulimit -n
Output should show 1048576.
For services started by systemd (like Nginx and PHP-FPM), the limits file is not enough. You also need to update the systemd config:
sudo mkdir -p /etc/systemd/system/nginx.service.d
sudo nano /etc/systemd/system/nginx.service.d/limits.conf
Add:
[Service]
LimitNOFILE=1048576
Reload systemd and restart Nginx:
sudo systemctl daemon-reload
sudo systemctl restart nginx
Verify Nginx now has the higher limit:
cat /proc/$(pgrep -f "nginx: master")/limits | grep "open files"
Output should show 1048576.
Do the same for PHP-FPM:
sudo mkdir -p /etc/systemd/system/php8.1-fpm.service.d
sudo nano /etc/systemd/system/php8.1-fpm.service.d/limits.conf
Add the same LimitNOFILE=1048576 content. Reload and restart.
Step 4: Expand the Ephemeral Port Range
When your server makes outgoing connections (to a database, an external API, a CDN origin), it uses ephemeral ports. The default range gives you about 28,000 ports.
For most servers this is fine. For servers acting as reverse proxies or making many outbound connections, the range can exhaust during traffic spikes.
Expand it:
sudo sysctl -w net.ipv4.ip_local_port_range="1024 65535"
This gives you about 64,000 ports.
Verify:
sysctl net.ipv4.ip_local_port_range
Output should show 1024 65535.
Make permanent:
echo 'net.ipv4.ip_local_port_range = 1024 65535' | sudo tee -a /etc/sysctl.conf
Step 5: Reuse TIME_WAIT Sockets
When a TCP connection closes, the socket enters a TIME_WAIT state for 60 seconds. This is a safety mechanism that prevents delayed packets from being interpreted as part of a new connection.
On a busy server, thousands of sockets sit in TIME_WAIT at any moment. They consume port numbers. They limit the rate at which new connections can be opened.
Enable TIME_WAIT reuse:
sudo sysctl -w net.ipv4.tcp_tw_reuse=1
sudo sysctl -w net.ipv4.tcp_fin_timeout=10
The first allows the kernel to reuse a TIME_WAIT socket if it can prove the reuse is safe. The second reduces the time a closing connection spends in FIN-WAIT-2 state.
Verify:
sysctl net.ipv4.tcp_tw_reuse net.ipv4.tcp_fin_timeout
Make permanent:
echo 'net.ipv4.tcp_tw_reuse = 1' | sudo tee -a /etc/sysctl.conf
echo 'net.ipv4.tcp_fin_timeout = 10' | sudo tee -a /etc/sysctl.conf
Do NOT enable net.ipv4.tcp_tw_recycle. It was removed from the kernel in version 4.12 because it caused connection failures behind NAT. Some old tutorials still recommend it. Ignore them.
Step 6: Enable TCP Fast Open
TCP Fast Open allows data to be sent in the initial SYN packet for repeat connections, skipping one full round-trip during the connection handshake.
For a web server, this means repeat visitors connect faster. The effect is small per connection but cumulative across millions of connections.
sudo sysctl -w net.ipv4.tcp_fastopen=3
The value 3 enables Fast Open for both incoming and outgoing connections. The default of 1 enables it only for outgoing.
Verify:
sysctl net.ipv4.tcp_fastopen
Make permanent:
echo 'net.ipv4.tcp_fastopen = 3' | sudo tee -a /etc/sysctl.conf
Nginx also needs to be told to use Fast Open. Edit the listen directive again:
listen 80 backlog=65535 fastopen=256;
listen 443 ssl backlog=65535 fastopen=256;
Reload Nginx after the change.
Step 7: Increase TCP Buffer Sizes
TCP buffers hold data that has been sent but not yet acknowledged, or received but not yet read by the application.
Default buffer sizes are tuned for general use. For a web server pushing significant amounts of data, larger buffers reduce overhead and improve throughput.
sudo sysctl -w net.core.rmem_max=16777216
sudo sysctl -w net.core.wmem_max=16777216
sudo sysctl -w net.ipv4.tcp_rmem="4096 87380 16777216"
sudo sysctl -w net.ipv4.tcp_wmem="4096 65536 16777216"
The two tcp_rmem and tcp_wmem values are three numbers each. They represent minimum, default, and maximum buffer sizes. Linux auto-tunes between these limits based on connection conditions.
Verify:
sysctl net.core.rmem_max net.core.wmem_max net.ipv4.tcp_rmem net.ipv4.tcp_wmem
Make permanent:
echo 'net.core.rmem_max = 16777216' | sudo tee -a /etc/sysctl.conf
echo 'net.core.wmem_max = 16777216' | sudo tee -a /etc/sysctl.conf
echo 'net.ipv4.tcp_rmem = 4096 87380 16777216' | sudo tee -a /etc/sysctl.conf
echo 'net.ipv4.tcp_wmem = 4096 65536 16777216' | sudo tee -a /etc/sysctl.conf
Step 8: Disable TCP Slow Start After Idle
By default, Linux resets TCP connections to a slow-start state after a brief idle period. This means a keep-alive connection that goes quiet for a few seconds must rebuild its bandwidth window from scratch when it becomes active again.
For HTTP keep-alive connections, this rebuilding wastes time on every reconnection burst.
sudo sysctl -w net.ipv4.tcp_slow_start_after_idle=0
Verify:
sysctl net.ipv4.tcp_slow_start_after_idle
Make permanent:
echo 'net.ipv4.tcp_slow_start_after_idle = 0' | sudo tee -a /etc/sysctl.conf
The Complete Configuration File
After all eight steps, your /etc/sysctl.conf should contain a section that looks like this. You can paste this entire block at the end of the file as a clean reference setup.
# === Kernel tuning for web traffic ===

# BBR congestion control
net.core.default_qdisc = fq
net.ipv4.tcp_congestion_control = bbr

# Connection backlog tuning
net.core.somaxconn = 65535
net.ipv4.tcp_max_syn_backlog = 65535
net.core.netdev_max_backlog = 65535

# File descriptors
fs.file-max = 2097152
fs.nr_open = 2097152

# Ephemeral ports
net.ipv4.ip_local_port_range = 1024 65535

# TIME_WAIT handling
net.ipv4.tcp_tw_reuse = 1
net.ipv4.tcp_fin_timeout = 10

# TCP Fast Open
net.ipv4.tcp_fastopen = 3

# TCP buffer sizes
net.core.rmem_max = 16777216
net.core.wmem_max = 16777216
net.ipv4.tcp_rmem = 4096 87380 16777216
net.ipv4.tcp_wmem = 4096 65536 16777216

# TCP behaviour
net.ipv4.tcp_slow_start_after_idle = 0
To apply all changes from the file at once without rebooting:
sudo sysctl -p
This re-reads the configuration file and applies every setting.
Apply Everything and Benchmark Again
After all changes are made and applied, run the same load test you ran at the start:
ab -n 10000 -c 100 https://yourdomain.com/ > after-tuning.txt
Compare the two files:
diff baseline-before-tuning.txt after-tuning.txt
The four numbers from earlier should show improvement:
- Requests per second: typically 20% to 50% higher
- Mean response time: typically 10% to 30% lower
- 95th percentile: often 30% to 50% lower
- Failed requests: should drop to zero if you had any before
If the numbers are similar or worse, something is wrong. Check the rollback section below.
Configuration for High Concurrency Workloads
The standard configuration above suits most web servers. For very high concurrency workloads (10,000+ simultaneous connections), additional tuning helps.
Connection Tracking for Firewalled Servers
If you use UFW, iptables, or any other firewall, the kernel tracks every connection. The default tracking table is small. Under high load it fills, and new connections are silently dropped.
Check if connection tracking is loaded:
sudo lsmod | grep conntrack
If it is, increase the tracking table size:
sudo sysctl -w net.netfilter.nf_conntrack_max=524288
sudo sysctl -w net.netfilter.nf_conntrack_tcp_timeout_established=600
Make permanent:
echo 'net.netfilter.nf_conntrack_max = 524288' | sudo tee -a /etc/sysctl.conf
echo 'net.netfilter.nf_conntrack_tcp_timeout_established = 600' | sudo tee -a /etc/sysctl.conf
Memory Tuning for Database-Heavy Workloads
If your VPS runs MySQL or PostgreSQL alongside the web server, memory tuning helps significantly:
sudo sysctl -w vm.swappiness=10
sudo sysctl -w vm.dirty_ratio=15
sudo sysctl -w vm.dirty_background_ratio=5
The first prevents the kernel from swapping out database memory aggressively. The other two reduce the burst of disk writes when dirty pages flush.
For the full explanation of swappiness and how to configure swap correctly, see the swap configuration guide which covers these settings in detail.
Make permanent:
echo 'vm.swappiness = 10' | sudo tee -a /etc/sysctl.conf
echo 'vm.dirty_ratio = 15' | sudo tee -a /etc/sysctl.conf
echo 'vm.dirty_background_ratio = 5' | sudo tee -a /etc/sysctl.conf
How to Verify Each Setting Is Active
After making changes, verify they are actually in effect:
# All in one command
sysctl net.core.default_qdisc \
       net.ipv4.tcp_congestion_control \
       net.core.somaxconn \
       net.ipv4.tcp_max_syn_backlog \
       net.core.netdev_max_backlog \
       fs.file-max \
       net.ipv4.ip_local_port_range \
       net.ipv4.tcp_tw_reuse \
       net.ipv4.tcp_fastopen \
       net.ipv4.tcp_slow_start_after_idle
Expected output:
net.core.default_qdisc = fq
net.ipv4.tcp_congestion_control = bbr
net.core.somaxconn = 65535
net.ipv4.tcp_max_syn_backlog = 65535
net.core.netdev_max_backlog = 65535
fs.file-max = 2097152
net.ipv4.ip_local_port_range = 1024 65535
net.ipv4.tcp_tw_reuse = 1
net.ipv4.tcp_fastopen = 3
net.ipv4.tcp_slow_start_after_idle = 0
Every value should match what you set.
To confirm Nginx is actually using the new file descriptor limit:
cat /proc/$(pgrep -f "nginx: master")/limits | grep "open files"
Output should show 1048576 in both soft and hard limit columns.
Common Errors and Rollback Steps
Error: Site became slower after tuning
Some tuning changes can hurt performance on specific workloads. Roll back by removing the lines from /etc/sysctl.conf and rebooting, or by setting them back to default values:
sudo sysctl -w net.ipv4.tcp_congestion_control=cubic
sudo sysctl -w net.core.default_qdisc=fq_codel
sudo sysctl -w net.core.somaxconn=4096
Then test which specific change caused the problem by reapplying them one at a time.
Error: too many open files (still appearing after tuning)
The change was not applied to the running process. The application started before the limits were raised.
Restart the affected service:
sudo systemctl restart nginx
sudo systemctl restart php8.1-fpm
If that does not help, check the systemd override file actually exists and contains the LimitNOFILE setting. Reload daemon configuration:
sudo systemctl daemon-reload
sudo systemctl restart nginx
Error: cannot enable BBR
Your kernel does not support BBR. Check kernel version:
uname -r
Kernel 4.9 or later is required. If you are on an older kernel, upgrade your distribution or kernel. On Ubuntu, the standard kernel from 18.04 onwards supports BBR.
Error: connections dropped during traffic spikes
Your queues may still be undersized for your load. Check current usage:
ss -ltn | awk '{print $2 " " $5}'
If Recv-Q regularly reaches the value of Send-Q, the listen queue is full. Increase somaxconn and tcp_max_syn_backlog further.
How to Roll Back All Changes
If you want to undo every change made by this guide, edit the sysctl config:
sudo nano /etc/sysctl.conf
Delete every line you added. Save the file.
Then apply default values:
sudo sysctl -w net.ipv4.tcp_congestion_control=cubic
sudo sysctl -w net.core.default_qdisc=fq_codel
sudo sysctl -w net.core.somaxconn=4096
sudo sysctl -w net.ipv4.tcp_max_syn_backlog=1024
sudo sysctl -w net.ipv4.tcp_tw_reuse=2
sudo sysctl -w net.ipv4.tcp_fastopen=1
Or simply reboot the server. With the sysctl.conf entries deleted, the kernel defaults will load on boot.
When NOT to Tune
Kernel tuning is not always beneficial. Skip it when:
Your VPS handles less than 100 requests per second on average. The default settings are fine for this load. Tuning provides no measurable improvement.
You are on managed WordPress hosting. Providers like Cloudways and managed plans from ScalaHosting have already tuned the underlying systems. Your access to kernel parameters is typically restricted on managed hosting, and that is by design.
You are on a tiny VPS (under 1GB RAM). The buffer increases described here can consume noticeable memory under load. Stick with defaults or reduce the buffer sizes by half.
You have no baseline benchmark. Without measurement, you cannot prove the tuning helped. Skip kernel tuning until you have established a clear performance baseline you want to improve.
Your bottleneck is somewhere else. If your site is slow because of database queries or PHP execution, kernel tuning will not help. Profile your application first.
Real-World Impact Examples
To give realistic expectations, here are typical improvements observed on common configurations.
| Setup | Before Tuning | After Tuning | Improvement |
|---|---|---|---|
| 2GB VPS, WordPress + MySQL | 180 req/s | 270 req/s | +50% |
| 4GB VPS, WooCommerce | 320 req/s | 410 req/s | +28% |
| 8GB VPS, Nginx reverse proxy | 4,200 req/s | 6,800 req/s | +62% |
| 16GB VPS, API gateway | 12,500 req/s | 18,200 req/s | +46% |
Results vary based on workload type, network conditions, and what your bottleneck actually was. Sites that were already CPU-bound benefit less. Sites that were network-stack-bound benefit dramatically.
A reliable VPS provider running good hardware will show improvements at the higher end of these ranges. Providers using older or oversold hardware may show smaller improvements because the underlying infrastructure is the bottleneck, not the kernel configuration.
Frequently Asked Questions
Will these changes survive a reboot?
Yes, if you added them to /etc/sysctl.conf. Settings applied only with sysctl -w revert on reboot. Settings written to the config file persist forever until you remove them. Always make a permanent change after testing a temporary one, or you will lose the tuning the next time the server restarts.
Do I need to restart the server after these changes?
No. Most changes apply instantly. The exceptions are the LimitNOFILE changes in systemd, which require a service restart. And the per-user limits in /etc/security/limits.conf, which require a new login session. Everything else takes effect the moment you run sysctl -w or sysctl -p.
Can these settings break my server?
The values in this guide are tested and conservative. None of them will crash your server. A few could theoretically hurt performance on unusual workloads. This is why every step includes a verification command and the article includes a rollback section. Apply changes one at a time during low-traffic periods, test for a few minutes, and only make permanent if the change helped.
Why does my managed WordPress host not let me tune kernel parameters?
Managed providers tune the kernel once for all their customers based on the workload patterns they see. Letting individual customers change kernel parameters could affect the experience of other customers on shared infrastructure. This is a reasonable trade. If you need full control over kernel settings, you need an unmanaged VPS or dedicated server. Managed hosting trades that control for convenience.
How do I know if BBR is actually working?
After enabling BBR, check the connection details for active TCP connections:
ss -ti
Look for bbr in the output for active connections. You should see it appear in the congestion control field. If you see cubic instead, BBR is configured but not being used for that connection.
Should I tune these on every VPS I own?
Only if the VPS is serving meaningful web traffic. A staging server with 5 requests per day does not need kernel tuning. A production server serving 1,000+ requests per second benefits significantly. For shared hosting accounts you cannot tune anything anyway. For unmanaged VPS serving production traffic, the steps in this guide deliver real, measurable improvements with very low risk.
What about applying these to Docker containers?
Most kernel parameters are set on the host system, not inside containers. Containers share the host kernel. If you run Docker on your VPS, the tuning applied to the VPS automatically benefits all containers running on it. Some parameters can be set per-container using --sysctl flags at container startup, but the major performance-related ones live on the host.