
This tutorial sets up a real production WordPress server.
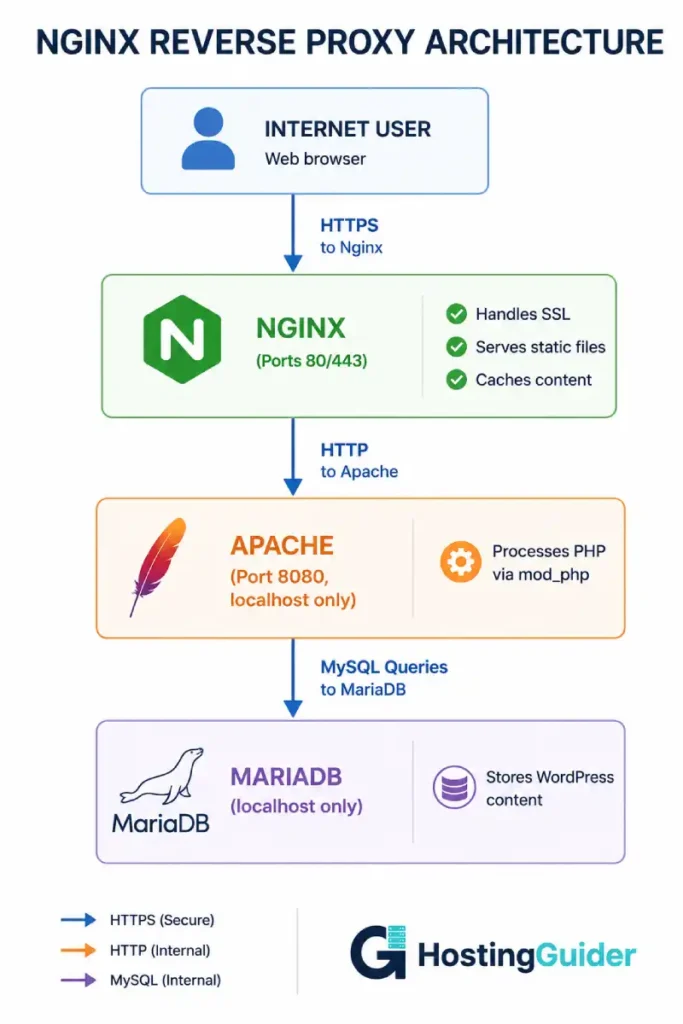
The architecture uses Nginx as a reverse proxy in front of Apache. Nginx handles incoming connections, terminates SSL, serves static files directly, and forwards dynamic requests to Apache. Apache handles WordPress through mod_php and benefits from WordPress’s native .htaccess support.
This combination delivers the speed of Nginx for static content with the WordPress compatibility of Apache. It is the setup that powers many high-traffic WordPress sites in production.
Every command in this tutorial is verified. Every configuration file is shown in full. Every step includes a verification check. If you follow this guide in order, you will end with a fast, secure, production-ready WordPress server.
This tutorial assumes Ubuntu 22.04 LTS. If you have not set up a VPS yet, start with the VPS setup tutorial first.
What You Will Build
By the end of this guide, your server will run this architecture:
Internet
   ↓
Nginx (ports 80/443) — handles SSL, static files, caching
   ↓
Apache (port 8080, localhost only) — handles PHP via mod_php
   ↓
PHP (mod_php) — executes WordPress
   ↓
MariaDB (port 3306, localhost only) — stores WordPress data
What You Will Need
- A VPS running Ubuntu 22.04 LTS (other versions work with minor adjustments)
- Root or sudo access via SSH
- A domain name pointing to your VPS IP address
- At least 2GB RAM (4GB recommended for production)
- At least 20GB storage
This setup runs well on most VPS plans. Hostinger VPS, Contabo, and ScalaHosting all provide infrastructure suitable for this setup at reasonable prices.
Key Takeaways
- This architecture combines Nginx speed with Apache WordPress compatibility
- Nginx handles all incoming traffic on ports 80 and 443
- Apache runs on a different port (8080) accessible only from localhost
- Static files (images, CSS, JS) are served directly by Nginx without touching Apache
- Dynamic requests pass through to Apache for PHP processing
- Real visitor IPs are correctly forwarded through the proxy chain
- The full setup takes about two hours to complete properly
Phase 1: Prerequisites and Server Preparation
Step 1.1: Connect to Your VPS
Open a terminal on your computer. Connect via SSH:
ssh root@YOUR.VPS.IP.ADDRESS
Replace YOUR.VPS.IP.ADDRESS with your actual server IP.
Step 1.2: Update the System
Always start with a fully updated system:
sudo apt update && sudo apt upgrade -y
This downloads the latest package information and upgrades all installed packages. Wait for it to complete.
Step 1.3: Set the Hostname
Set a meaningful hostname for your server:
sudo hostnamectl set-hostname wordpress-prod
Replace wordpress-prod with whatever name you prefer.
Verify:
hostname
Step 1.4: Set the Timezone
Setting the correct timezone matters for log timestamps and scheduled tasks:
sudo timedatectl set-timezone UTC
Use UTC unless you have a specific reason for a different timezone. UTC simplifies log analysis across servers.
Verify:
timedatectl
Step 1.5: Configure the Firewall
Install and enable UFW (Uncomplicated Firewall):
sudo apt install ufw -y
Allow SSH so you do not lock yourself out:
sudo ufw allow OpenSSH
Allow HTTP and HTTPS for web traffic:
sudo ufw allow 80
sudo ufw allow 443
Enable the firewall:
sudo ufw enable
Type y and press Enter when prompted.
Verify rules:
sudo ufw status
Expected output:
Status: active

To                         Action      From
--                         ------      ----
OpenSSH                    ALLOW       Anywhere
80                         ALLOW       Anywhere
443                        ALLOW       Anywhere
Apache port 8080 and MariaDB port 3306 are intentionally NOT opened. They will only be accessible from localhost.
Step 1.6: Create a Non-Root User
Working as root all the time is risky. Create a regular user:
sudo adduser webadmin
Enter a strong password when prompted. Press Enter to skip the optional fields.
Add the user to the sudo group:
sudo usermod -aG sudo webadmin
Now switch to this user for the rest of the tutorial:
su - webadmin
You will use sudo for commands that need root privileges.
Phase 2: Install Apache (The Backend)
Apache will run on port 8080, listening only on localhost. Nginx will forward dynamic requests to it.
Step 2.1: Install Apache
sudo apt install apache2 -y
Verify it is running:
sudo systemctl status apache2
Look for Active: active (running). Press q to exit.
Step 2.2: Reconfigure Apache for Port 8080
Apache normally listens on port 80. We need it on 8080 because Nginx will use port 80.
Edit the ports configuration:
sudo nano /etc/apache2/ports.conf
Replace the entire content with:
Listen 127.0.0.1:8080

<IfModule ssl_module>
    Listen 127.0.0.1:8443
</IfModule>

<IfModule mod_gnutls.c>
    Listen 127.0.0.1:8443
</IfModule>
The 127.0.0.1: prefix is critical. It binds Apache to localhost only. External traffic cannot reach Apache directly. This is a security best practice.
Save with Ctrl+X, then Y, then Enter.
Step 2.3: Update the Default Site
Edit the default virtual host:
sudo nano /etc/apache2/sites-available/000-default.conf
Change the first line from <VirtualHost *:80> to:
<VirtualHost 127.0.0.1:8080>
Save and exit.
Step 2.4: Install mod_rpaf for Real IP Forwarding
Apache needs to know the real visitor IP, not the Nginx server IP. The mod_rpaf module handles this.
sudo apt install libapache2-mod-rpaf -y
Configure it:
sudo nano /etc/apache2/mods-available/rpaf.conf
Replace the entire content with:
<IfModule rpaf_module>
    RPAF_Enable             On
    RPAF_ProxyIPs           127.0.0.1
    RPAF_SetHostName        On
    RPAF_SetHTTPS           On
    RPAF_SetPort            On
    RPAF_ForbidIfNotProxy   Off
    RPAF_Header             X-Forwarded-For
</IfModule>
Save and exit.
Step 2.5: Enable Required Apache Modules
sudo a2enmod rpaf
sudo a2enmod rewrite
sudo a2enmod headers
sudo a2enmod expires
Step 2.6: Restart Apache
sudo systemctl restart apache2
Verify Apache is now listening only on localhost:
sudo ss -tlnp | grep apache2
Expected output:
LISTEN 0 511 127.0.0.1:8080 0.0.0.0:* users:(("apache2",pid=...))
The 127.0.0.1:8080 confirms Apache is correctly bound to localhost only.
Phase 3: Install MariaDB (The Database)
Step 3.1: Install MariaDB
sudo apt install mariadb-server -y
Step 3.2: Secure the Installation
Run the security setup wizard:
sudo mysql_secure_installation
Answer the prompts:
| Prompt | Answer |
|---|---|
| Enter current password for root | Press Enter (no password set yet) |
| Switch to unix_socket authentication | n |
| Change the root password | Y |
| New password | Enter a strong password and write it down |
| Re-enter new password | Re-enter the password |
| Remove anonymous users | Y |
| Disallow root login remotely | Y |
| Remove test database | Y |
| Reload privilege tables | Y |
Step 3.3: Create the WordPress Database
Log into MariaDB:
sudo mariadb
Create the database:
CREATE DATABASE wordpress_db CHARACTER SET utf8mb4 COLLATE utf8mb4_unicode_ci;
Create a database user. Replace your_strong_password with a real strong password:
CREATE USER 'wp_user'@'localhost' IDENTIFIED BY 'your_strong_password';
Grant permissions:
GRANT ALL PRIVILEGES ON wordpress_db.* TO 'wp_user'@'localhost';
Apply changes:
FLUSH PRIVILEGES;
Exit:
EXIT;
Write down these three values. You will need them for WordPress installation:
- Database name:
wordpress_db - Database user:
wp_user - Database password: the password you just set
Phase 4: Install PHP and Required Modules
Step 4.1: Install PHP
sudo apt install php php-mysql libapache2-mod-php php-curl php-gd php-mbstring php-xml php-xmlrpc php-soap php-intl php-zip php-imagick php-bcmath -y
This installs PHP plus every module WordPress and most plugins require.
Step 4.2: Configure PHP for Production
Find your PHP version:
php -v
The first line shows your version (likely PHP 8.1 or 8.2). Use this version number in the next command.
Edit php.ini:
sudo nano /etc/php/8.1/apache2/php.ini
Find and update these settings (use Ctrl+W to search for each):
| Setting | Production Value |
|---|---|
upload_max_filesize | 64M |
post_max_size | 64M |
memory_limit | 256M |
max_execution_time | 300 |
max_input_time | 300 |
max_input_vars | 3000 |
display_errors | Off |
log_errors | On |
error_log | /var/log/php_errors.log |
Save and exit.
Create the error log file:
sudo touch /var/log/php_errors.log
sudo chown www-data:www-data /var/log/php_errors.log
Step 4.3: Enable PHP OPcache
OPcache stores compiled PHP code in memory. It significantly improves WordPress performance.
sudo nano /etc/php/8.1/apache2/conf.d/10-opcache.ini
Add or update these lines:
opcache.enable=1
opcache.memory_consumption=256
opcache.max_accelerated_files=20000
opcache.validate_timestamps=1
opcache.revalidate_freq=60
opcache.fast_shutdown=1
opcache.enable_cli=0
Save and exit.
Step 4.4: Restart Apache
sudo systemctl restart apache2
Step 4.5: Verify PHP
Create a test file:
sudo nano /var/www/html/info.php
Add:
<?php
phpinfo();
?>
Save and exit.
Test from the server itself (because Apache only listens on localhost):
curl http://127.0.0.1:8080/info.php | head -50
You should see PHP information output. If you do, PHP is working correctly.
Delete the test file immediately (it exposes server information):
sudo rm /var/www/html/info.php
Phase 5: Install Nginx (The Reverse Proxy)
Step 5.1: Install Nginx
sudo apt install nginx -y
Nginx starts automatically. Verify:
sudo systemctl status nginx
Look for Active: active (running). Press q to exit.
Step 5.2: Remove the Default Configuration
sudo rm /etc/nginx/sites-enabled/default
Step 5.3: Create the WordPress Site Configuration
Create a new configuration file. Replace yourdomain.com with your actual domain throughout:
sudo nano /etc/nginx/sites-available/yourdomain.com.conf
Paste this complete configuration:
# Upstream Apache backend
upstream apache_backend {
    server 127.0.0.1:8080;
    keepalive 32;
}

# Redirect HTTP to HTTPS (will be enabled after SSL setup)
server {
    listen 80;
    listen [::]:80;
    server_name yourdomain.com www.yourdomain.com;

    # Allow Let's Encrypt verification
    location /.well-known/acme-challenge/ {
        root /var/www/html;
    }

    location / {
        return 301 https://$host$request_uri;
    }
}

# Main HTTPS server (will be activated after SSL setup)
server {
    listen 443 ssl http2;
    listen [::]:443 ssl http2;
    server_name yourdomain.com www.yourdomain.com;

    # SSL certificates (Certbot will fill these in)
    # ssl_certificate /etc/letsencrypt/live/yourdomain.com/fullchain.pem;
    # ssl_certificate_key /etc/letsencrypt/live/yourdomain.com/privkey.pem;

    # SSL settings (modern profile)
    ssl_protocols TLSv1.2 TLSv1.3;
    ssl_ciphers ECDHE-ECDSA-AES128-GCM-SHA256:ECDHE-RSA-AES128-GCM-SHA256:ECDHE-ECDSA-AES256-GCM-SHA384:ECDHE-RSA-AES256-GCM-SHA384:ECDHE-ECDSA-CHACHA20-POLY1305:ECDHE-RSA-CHACHA20-POLY1305:DHE-RSA-AES128-GCM-SHA256:DHE-RSA-AES256-GCM-SHA384;
    ssl_prefer_server_ciphers off;
    ssl_session_cache shared:SSL:10m;
    ssl_session_timeout 1d;
    ssl_session_tickets off;

    # Document root for static file serving
    root /var/www/yourdomain.com;
    index index.php index.html;

    # Logging
    access_log /var/log/nginx/yourdomain.com-access.log;
    error_log /var/log/nginx/yourdomain.com-error.log warn;

    # Security headers
    add_header X-Frame-Options "SAMEORIGIN" always;
    add_header X-Content-Type-Options "nosniff" always;
    add_header X-XSS-Protection "1; mode=block" always;
    add_header Referrer-Policy "strict-origin-when-cross-origin" always;
    add_header Strict-Transport-Security "max-age=31536000; includeSubDomains" always;

    # Block access to sensitive files
    location ~ /\.(?!well-known) {
        deny all;
        access_log off;
        log_not_found off;
    }

    location = /wp-config.php {
        deny all;
    }

    location ~* \.(log|sql|conf|bak)$ {
        deny all;
    }

    # Serve static files directly from Nginx (bypass Apache)
    location ~* \.(jpg|jpeg|png|gif|ico|css|js|woff|woff2|ttf|svg|webp|avif)$ {
        expires 1y;
        add_header Cache-Control "public, immutable";
        access_log off;
        try_files $uri @apache;
    }

    # Limit upload size
    client_max_body_size 64M;

    # Proxy all dynamic requests to Apache
    location / {
        try_files $uri $uri/ @apache;
    }

    location @apache {
        proxy_pass http://apache_backend;
        proxy_http_version 1.1;
        proxy_set_header Connection "";
        proxy_set_header Host $host;
        proxy_set_header X-Real-IP $remote_addr;
        proxy_set_header X-Forwarded-For $proxy_add_x_forwarded_for;
        proxy_set_header X-Forwarded-Proto $scheme;
        proxy_set_header X-Forwarded-Host $host;
        proxy_set_header X-Forwarded-Port $server_port;

        proxy_read_timeout 300s;
        proxy_connect_timeout 75s;
        proxy_buffering on;
        proxy_buffer_size 16k;
        proxy_buffers 8 16k;
    }

    # Handle PHP files that should be processed by Apache
    location ~ \.php$ {
        proxy_pass http://apache_backend;
        proxy_http_version 1.1;
        proxy_set_header Connection "";
        proxy_set_header Host $host;
        proxy_set_header X-Real-IP $remote_addr;
        proxy_set_header X-Forwarded-For $proxy_add_x_forwarded_for;
        proxy_set_header X-Forwarded-Proto $scheme;
        proxy_read_timeout 300s;
    }
}
Save and exit.
Step 5.4: Create the WordPress Directory
sudo mkdir -p /var/www/yourdomain.com
sudo chown -R www-data:www-data /var/www/yourdomain.com
Step 5.5: Temporarily Comment Out the HTTPS Server
Until you have an SSL certificate, the HTTPS server block will fail. Comment it out for now.
Edit the configuration:
sudo nano /etc/nginx/sites-available/yourdomain.com.conf
Add a # at the start of every line in the HTTPS server block (the one starting with server { listen 443 ssl http2;). You can also temporarily delete it and add it back after SSL setup.
A faster way using sed:
sudo sed -i 's/^server {$/#server {/g' /etc/nginx/sites-available/yourdomain.com.conf
Actually, the cleaner approach is to comment out just the HTTPS block. Use nano and manually add # at the start of each line in the HTTPS server block.
Also temporarily change the HTTP block to serve content directly:
In the HTTP server block, replace:
location / {
    return 301 https://$host$request_uri;
}
With:
location / {
    try_files $uri $uri/ @apache;
}

location @apache {
    proxy_pass http://apache_backend;
    proxy_http_version 1.1;
    proxy_set_header Host $host;
    proxy_set_header X-Real-IP $remote_addr;
    proxy_set_header X-Forwarded-For $proxy_add_x_forwarded_for;
}

root /var/www/yourdomain.com;
index index.php index.html;
After SSL is set up later, you will revert this to the HTTPS redirect.
Step 5.6: Enable the Site
Create the symlink:
sudo ln -s /etc/nginx/sites-available/yourdomain.com.conf /etc/nginx/sites-enabled/
Step 5.7: Test and Reload Nginx
Always test before reloading:
sudo nginx -t
Expected output:
nginx: the configuration file /etc/nginx/nginx.conf syntax is ok
nginx: configuration file /etc/nginx/nginx.conf test is successful
If there are errors, fix them before continuing. The error message tells you the file and line number.
Reload Nginx:
sudo systemctl reload nginx
Phase 6: Install WordPress
Step 6.1: Download WordPress
Move to a temporary directory:
cd /tmp
Download the latest WordPress:
wget https://wordpress.org/latest.tar.gz
Extract:
tar -xzf latest.tar.gz
Step 6.2: Move WordPress Files
sudo cp -r wordpress/. /var/www/yourdomain.com/
Set correct ownership:
sudo chown -R www-data:www-data /var/www/yourdomain.com
Set correct permissions:
sudo find /var/www/yourdomain.com -type d -exec chmod 755 {} \;
sudo find /var/www/yourdomain.com -type f -exec chmod 644 {} \;
Step 6.3: Create wp-config.php
cd /var/www/yourdomain.com
sudo cp wp-config-sample.php wp-config.php
sudo nano wp-config.php
Find these three lines and update with your database details from Phase 3:
define('DB_NAME', 'wordpress_db');
define('DB_USER', 'wp_user');
define('DB_PASSWORD', 'your_strong_password');
Step 6.4: Generate Secure Salts
Find the section that says:
define('AUTH_KEY', 'put your unique phrase here');
Visit the WordPress salt generator from a browser:
https://api.wordpress.org/secret-key/1.1/salt/
Copy the generated keys. Replace the entire put your unique phrase here block in wp-config.php with the copied content.
Step 6.5: Add Reverse Proxy Configuration to WordPress
WordPress needs to know it is behind a reverse proxy. Add these lines to wp-config.php just before the line that says /* That's all, stop editing! Happy publishing. */:
/* Reverse Proxy Configuration */
if (!empty($_SERVER['HTTP_X_FORWARDED_PROTO']) && $_SERVER['HTTP_X_FORWARDED_PROTO'] === 'https') {
    $_SERVER['HTTPS'] = 'on';
}

if (!empty($_SERVER['HTTP_X_FORWARDED_FOR'])) {
    $_SERVER['REMOTE_ADDR'] = $_SERVER['HTTP_X_FORWARDED_FOR'];
}

/* Force SSL for admin */
define('FORCE_SSL_ADMIN', true);

/* Disable file editing in admin */
define('DISALLOW_FILE_EDIT', true);

/* WordPress automatic updates */
define('WP_AUTO_UPDATE_CORE', 'minor');
Save and exit.
Step 6.6: Set Final Permissions
sudo chown -R www-data:www-data /var/www/yourdomain.com
sudo chmod 640 /var/www/yourdomain.com/wp-config.php
The 640 permission for wp-config.php is stricter than other files because it contains database credentials.
Step 6.7: Complete WordPress Installation in Browser
Open your domain in a browser:
http://yourdomain.com
You should see the WordPress installation screen. If you do not:
- Check Nginx error log:
sudo tail -50 /var/log/nginx/yourdomain.com-error.log - Check Apache error log:
sudo tail -50 /var/log/apache2/error.log - Verify DNS is pointing to your VPS:
dig +short yourdomain.com
Fill in the WordPress setup form. Create your admin user with a strong password. Click Install WordPress.
You can now log in at http://yourdomain.com/wp-admin.
Phase 7: SSL/TLS Certificate with Let’s Encrypt
Step 7.1: Install Certbot
sudo apt install certbot python3-certbot-nginx -y
Step 7.2: Generate the Certificate
sudo certbot --nginx -d yourdomain.com -d www.yourdomain.com
Certbot asks for an email address (for renewal notifications) and asks you to agree to the terms of service.
When asked about redirecting HTTP to HTTPS, choose option 2 (redirect). This automatically configures the redirect.
Certbot updates your Nginx configuration with the SSL certificate paths and reloads Nginx.
Step 7.3: Update Nginx Configuration
Certbot’s automatic modifications may not include all the optimizations from the earlier configuration. Verify the configuration still includes everything:
sudo nano /etc/nginx/sites-available/yourdomain.com.conf
Ensure both the HTTP-to-HTTPS redirect and the full HTTPS server block from Step 5.3 are present. Restore any commented sections from Step 5.5.
The final HTTP block should look like this:
server {
    listen 80;
    listen [::]:80;
    server_name yourdomain.com www.yourdomain.com;

    location /.well-known/acme-challenge/ {
        root /var/www/html;
    }

    location / {
        return 301 https://$host$request_uri;
    }
}
The HTTPS block needs the SSL certificate lines added by Certbot (or you can add them manually):
ssl_certificate /etc/letsencrypt/live/yourdomain.com/fullchain.pem;
ssl_certificate_key /etc/letsencrypt/live/yourdomain.com/privkey.pem;
Test and reload:
sudo nginx -t
sudo systemctl reload nginx
Step 7.4: Update WordPress Site URLs to HTTPS
Log into WordPress admin. Go to Settings then General. Change:
- WordPress Address (URL) from
http://yourdomain.comtohttps://yourdomain.com - Site Address (URL) from
http://yourdomain.comtohttps://yourdomain.com
Save changes. WordPress logs you out. Log back in at the new HTTPS URL.
Step 7.5: Test SSL Auto-Renewal
Let’s Encrypt certificates expire every 90 days. Certbot installs a systemd timer that renews them automatically. Test the renewal process:
sudo certbot renew --dry-run
You should see Congratulations, all simulated renewals succeeded.
Step 7.6: Verify SSL Quality
Run an external SSL test against your domain at SSL Labs. You should achieve at least an A grade. The configuration in this tutorial typically scores A+.
Phase 8: Performance Optimization
Step 8.1: Configure Nginx Worker Processes
Edit the main Nginx configuration:
sudo nano /etc/nginx/nginx.conf
In the events block, set:
events {
    worker_connections 4096;
    use epoll;
    multi_accept on;
}
Set worker_processes to match your CPU cores. Find them:
nproc
In the top-level config (outside any block), update:
worker_processes auto;
worker_rlimit_nofile 65535;
In the http block, add or update:
http {
    # Existing settings...

    keepalive_timeout 65;
    keepalive_requests 100;

    client_body_timeout 12;
    client_header_timeout 12;
    send_timeout 10;

    # Buffer sizes
    client_body_buffer_size 16K;
    client_header_buffer_size 1k;
    large_client_header_buffers 4 8k;

    # Compression
    gzip on;
    gzip_vary on;
    gzip_proxied any;
    gzip_comp_level 6;
    gzip_min_length 256;
    gzip_types text/plain text/css text/xml application/json application/javascript application/xml+rss application/atom+xml image/svg+xml;

    # File cache
    open_file_cache max=10000 inactive=30s;
    open_file_cache_valid 60s;
    open_file_cache_min_uses 2;
    open_file_cache_errors on;
}
Save and exit.
Test and reload:
sudo nginx -t
sudo systemctl reload nginx
Step 8.2: Configure Apache MPM
Apache’s prefork MPM is inefficient. Switch to event MPM:
sudo a2dismod mpm_prefork
sudo a2dismod php8.1
sudo a2enmod mpm_event
sudo apt install libapache2-mod-fcgid -y
Configure event MPM:
sudo nano /etc/apache2/mods-available/mpm_event.conf
Replace the content with values suited for production:
<IfModule mpm_event_module>
    StartServers             2
    MinSpareThreads          25
    MaxSpareThreads          75
    ThreadLimit              64
    ThreadsPerChild          25
    MaxRequestWorkers        150
    MaxConnectionsPerChild   1000
</IfModule>
Step 8.3: Configure PHP-FPM for Apache
Switch Apache from mod_php to PHP-FPM for better performance:
sudo apt install php8.1-fpm -y
sudo a2enmod proxy_fcgi setenvif
sudo a2enconf php8.1-fpm
Configure PHP-FPM pool:
sudo nano /etc/php/8.1/fpm/pool.d/www.conf
Update these values:
pm = dynamic
pm.max_children = 50
pm.start_servers = 5
pm.min_spare_servers = 5
pm.max_spare_servers = 35
pm.max_requests = 500
Restart services:
sudo systemctl restart php8.1-fpm
sudo systemctl restart apache2
Step 8.4: Install and Configure Redis Object Cache
Redis caches WordPress objects in memory. This dramatically reduces database queries.
sudo apt install redis-server -y
Edit Redis configuration:
sudo nano /etc/redis/redis.conf
Find and update:
maxmemory 256mb
maxmemory-policy allkeys-lru
Restart Redis:
sudo systemctl restart redis-server
sudo systemctl enable redis-server
Install the WordPress Redis plugin from the admin dashboard: Plugins, Add New, search for Redis Object Cache, install and activate.
In the plugin settings, click Enable Object Cache.
Verify Redis is working:
redis-cli ping
Expected response: PONG
Step 8.5: Tune the Kernel for Web Traffic
Several kernel parameters affect web server performance significantly. The kernel parameters that actually move the needle cover this in detail.
The key changes for this setup:
sudo nano /etc/sysctl.conf
Add at the end:
# Web server tuning
net.core.somaxconn = 65535
net.ipv4.tcp_max_syn_backlog = 65535
net.core.netdev_max_backlog = 65535
fs.file-max = 2097152
net.ipv4.tcp_fastopen = 3
net.ipv4.tcp_tw_reuse = 1
net.core.default_qdisc = fq
net.ipv4.tcp_congestion_control = bbr
Apply:
sudo sysctl -p
Phase 9: Security Hardening
Step 9.1: Hide Server Version Information
Stop Nginx from showing its version:
sudo nano /etc/nginx/nginx.conf
In the http block, add:
server_tokens off;
Stop Apache from showing version:
sudo nano /etc/apache2/conf-available/security.conf
Find and update:
ServerTokens Prod
ServerSignature Off
Enable:
sudo a2enconf security
sudo systemctl restart apache2
sudo systemctl reload nginx
Step 9.2: Install Fail2Ban
Fail2Ban blocks IPs that repeatedly fail login attempts.
sudo apt install fail2ban -y
Create a configuration for SSH and Nginx:
sudo nano /etc/fail2ban/jail.local
Add:
[DEFAULT]
bantime = 3600
findtime = 600
maxretry = 5
[sshd]
enabled = true port = ssh logpath = %(sshd_log)s
[nginx-http-auth]
enabled = true logpath = /var/log/nginx/yourdomain.com-error.log
[nginx-noscript]
enabled = true port = http,https logpath = /var/log/nginx/yourdomain.com-access.log maxretry = 6
[nginx-badbots]
enabled = true port = http,https logpath = /var/log/nginx/yourdomain.com-access.log maxretry = 2
Start and enable:
sudo systemctl start fail2ban
sudo systemctl enable fail2ban
Verify:
sudo fail2ban-client status
Step 9.3: Configure Automatic Security Updates
sudo apt install unattended-upgrades -y
sudo dpkg-reconfigure -plow unattended-upgrades
Select Yes when prompted.
Edit the configuration:
sudo nano /etc/apt/apt.conf.d/50unattended-upgrades
Ensure these lines are enabled (not commented):
"${distro_id}:${distro_codename}-security";
Unattended-Upgrade::Mail "your@email.com";
Unattended-Upgrade::Automatic-Reboot "false";
Step 9.4: Protect WordPress Login
Add basic authentication to wp-login.php at the Nginx level:
sudo apt install apache2-utils -y
sudo htpasswd -c /etc/nginx/.htpasswd admin
Enter a password when prompted.
Edit your Nginx config:
sudo nano /etc/nginx/sites-available/yourdomain.com.conf
Add this location block inside the HTTPS server block:
location ~ /wp-login\.php$ {
    auth_basic "Restricted Access";
    auth_basic_user_file /etc/nginx/.htpasswd;
    try_files $uri @apache;
}
This adds a second password prompt before users can reach the WordPress login page. Brute force attacks now need to crack two passwords.
Reload Nginx:
sudo nginx -t
sudo systemctl reload nginx
Phase 10: Testing and Verification
Step 10.1: Test the Full Stack
Visit your site in a browser:
https://yourdomain.com
Verify:
- Site loads over HTTPS
- Padlock icon appears
- No mixed content warnings
- Pages load quickly
Step 10.2: Verify Real IPs Are Forwarded
Check Nginx access log:
sudo tail -20 /var/log/nginx/yourdomain.com-access.log
The first column shows the visitor IP. If it shows your real IP and not 127.0.0.1, the proxy chain is forwarding correctly.
Step 10.3: Run a Performance Test
Install testing tools:
sudo apt install apache2-utils wrk -y
Test with Apache Bench:
ab -n 1000 -c 50 https://yourdomain.com/
Test with wrk for more accurate results:
wrk -t4 -c50 -d30s --latency https://yourdomain.com/
A well-configured server on a 4GB VPS should handle:
- 500+ requests per second for cached pages
- 100+ requests per second for uncached dynamic pages
- p99 latency under 1 second
Step 10.4: Verify SSL Configuration
Test SSL externally at SSL Labs. You should score A or A+.
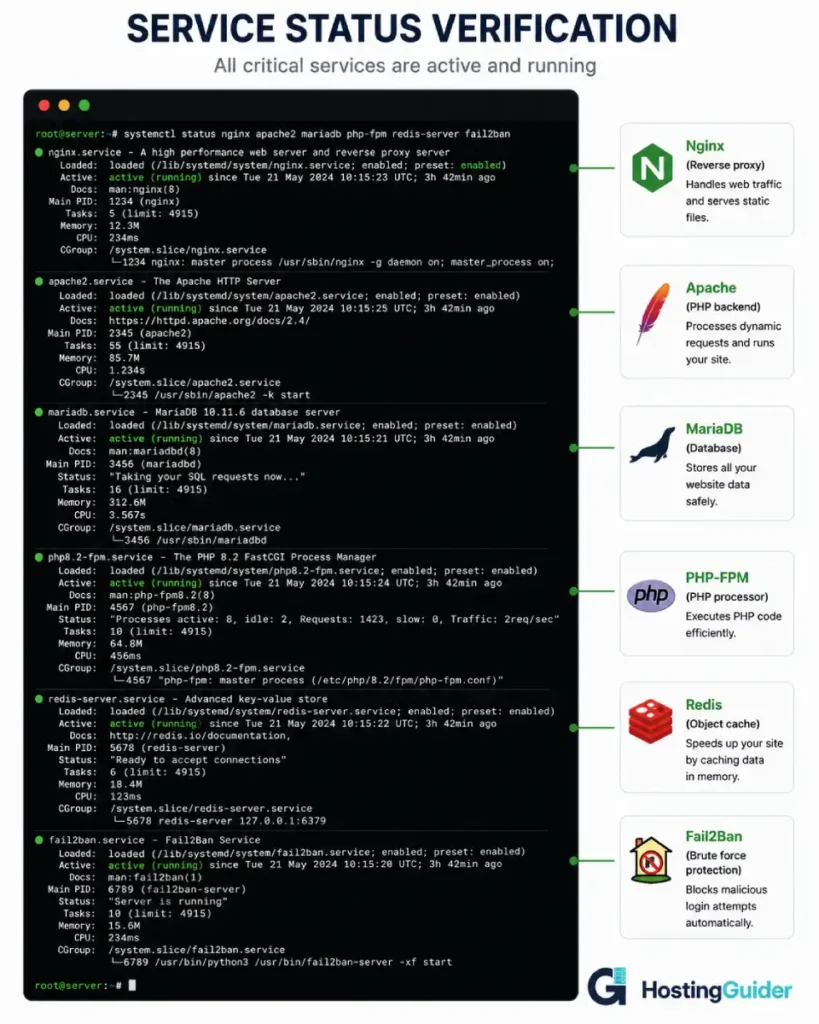
Step 10.5: Check All Services Are Running
sudo systemctl status nginx apache2 mariadb php8.1-fpm redis-server fail2ban
All should show active (running).
Phase 11: Backups and Monitoring
Step 11.1: Set Up Automated Backups
Create a backup script:
sudo nano /usr/local/bin/wordpress-backup.sh
Paste:
#!/bin/bash
DATE=$(date +%Y%m%d-%H%M%S)
BACKUP_DIR="/var/backups/wordpress"
SITE_DIR="/var/www/yourdomain.com"
DB_NAME="wordpress_db"
DB_USER="wp_user"
DB_PASS="your_strong_password"

mkdir -p $BACKUP_DIR

# Backup files
tar -czf $BACKUP_DIR/files-$DATE.tar.gz -C $SITE_DIR .

# Backup database
mysqldump -u $DB_USER -p$DB_PASS $DB_NAME | gzip > $BACKUP_DIR/db-$DATE.sql.gz

# Keep only last 14 days
find $BACKUP_DIR -name "*.gz" -mtime +14 -delete

echo "Backup completed: $DATE"
Make it executable:
sudo chmod +x /usr/local/bin/wordpress-backup.sh
Add to crontab:
sudo crontab -e
Add this line at the bottom:
0 3 * * * /usr/local/bin/wordpress-backup.sh > /var/log/wordpress-backup.log 2>&1
This runs the backup every day at 3am.
Step 11.2: Set Up Log Rotation
WordPress and Nginx logs grow over time. Configure log rotation:
sudo nano /etc/logrotate.d/yourdomain.com
Add:
/var/log/nginx/yourdomain.com-*.log {
    daily
    missingok
    rotate 14
    compress
    delaycompress
    notifempty
    create 644 www-data adm
    sharedscripts
    postrotate
        nginx -s reload
    endscript
}
Step 11.3: External Monitoring
Set up free external monitoring at UptimeRobot. Monitor your domain every 5 minutes. Set up email alerts for downtime.
Phase 12: Maintenance Checklist
Production servers need regular attention. Run through this checklist weekly.
| Task | Command |
|---|---|
| Check disk space | df -h |
| Check memory | free -m |
| Check service status | sudo systemctl status nginx apache2 mariadb php8.1-fpm |
| Review error logs | sudo tail -100 /var/log/nginx/yourdomain.com-error.log |
| Check Fail2Ban bans | sudo fail2ban-client status sshd |
| Update packages | sudo apt update && sudo apt upgrade -y |
| Test backups exist | ls -lh /var/backups/wordpress/ |
| Verify SSL is valid | sudo certbot certificates |
| Check WordPress updates | Visit /wp-admin/update-core.php |
For deeper troubleshooting when problems occur, the VPS troubleshooting guide covers the most common production issues with exact fix commands.
Common Issues and Solutions
WordPress shows wrong URLs
If WordPress shows http:// instead of https:// after the SSL setup, the database may contain http URLs.
Install WP-CLI:
curl -O https://raw.githubusercontent.com/wp-cli/builds/gh-pages/phar/wp-cli.phar
chmod +x wp-cli.phar
sudo mv wp-cli.phar /usr/local/bin/wp
Run a search-replace:
cd /var/www/yourdomain.com
sudo -u www-data wp search-replace 'http://yourdomain.com' 'https://yourdomain.com'
502 Bad Gateway error
This means Nginx cannot reach Apache. Check that Apache is running and listening on 127.0.0.1:8080:
sudo systemctl status apache2
sudo ss -tlnp | grep apache2
Check Nginx error log:
sudo tail -50 /var/log/nginx/yourdomain.com-error.log
Real IP not appearing in WordPress
Verify mod_rpaf is loaded:
sudo a2enmod rpaf
sudo systemctl restart apache2
Check the rpaf config has 127.0.0.1 listed in RPAF_ProxyIPs.
Mixed content warnings
If your site shows mixed content warnings after SSL setup, the WordPress database may still reference http:// URLs in posts. Use WP-CLI search-replace as shown above.
Plugin or theme upload fails with permission error
Check the wp-content folder is writable by www-data:
sudo chown -R www-data:www-data /var/www/yourdomain.com/wp-content
sudo find /var/www/yourdomain.com/wp-content -type d -exec chmod 755 {} \;
sudo find /var/www/yourdomain.com/wp-content -type f -exec chmod 644 {} \;
Frequently Asked Questions
Why use Nginx as a reverse proxy instead of just running Nginx alone?
Nginx alone can serve WordPress through PHP-FPM, and many production sites do exactly that. The reverse proxy setup is preferred when you want WordPress’s full .htaccess support (which only works in Apache), need to host applications that require Apache-specific modules, or want to migrate gradually from a pure Apache setup. The hybrid approach gives you Nginx’s static file performance with Apache’s WordPress compatibility.
Will this setup work for multiple WordPress sites?
Yes, with adjustments. Each site needs its own Nginx server block, its own Apache virtual host on a unique port (or using ServerName), its own database, and its own document root. The general architecture stays the same but the configuration files multiply. For more than two or three sites, consider managed multi-site hosting from Cloudways or similar managed providers where this orchestration is handled for you.
How much traffic can this setup handle?
A 4GB RAM VPS configured according to this tutorial typically handles 500 to 1000 concurrent users for cached WordPress pages, and 100 to 200 concurrent users for uncached dynamic pages. WooCommerce stores or sites with heavy database queries reduce these numbers. Adding a CDN like Cloudflare in front of this setup typically doubles or triples the effective capacity by offloading static asset delivery to edge servers.
Do I really need both Nginx and Apache?
For most production WordPress sites, the answer depends on your needs. If you need .htaccess support for specific plugins, hosting integrations, or migration compatibility, the dual setup makes sense. If you are starting fresh and have control over all WordPress configuration, a pure Nginx with PHP-FPM setup is simpler and equally fast for most workloads. The pure Nginx setup uses about 30% less memory than the dual setup but requires translating any .htaccess rules into Nginx configuration manually.
Should I use Apache or PHP-FPM for the backend?
This tutorial uses Apache with mod_php for compatibility reasons. For higher performance, switch Apache to use PHP-FPM as shown in Phase 8 Step 8.3. PHP-FPM gives you better process control, more efficient memory usage, and the ability to tune workers independently from web server connections. The downside is slightly more complex configuration. For sites above 50,000 monthly visitors, PHP-FPM is worth the setup effort.
How do I add more WordPress sites to this server?
For each new site: create a new Nginx server block in /etc/nginx/sites-available/, create a new Apache virtual host in /etc/apache2/sites-available/ on a different port (8081, 8082, etc.) or using ServerName directives on port 8080, create a new database and user in MariaDB, create a new document root, install WordPress in that root, and configure SSL through Certbot for the new domain. Symlink the configurations to sites-enabled and reload both web servers.
How do I move an existing WordPress site to this server?
Export the existing site as a complete backup (files plus database). Set up this server completely first using a placeholder site or a test domain. Then copy the WordPress files to /var/www/yourdomain.com/ and import the database. Update wp-config.php with the new database credentials. Run WP-CLI search-replace to update URLs if the domain changes. Test thoroughly before switching DNS. Allow 24 hours for DNS propagation before considering the migration complete.
What if my hosting provider does not allow installing all these packages?
This typically means you are on managed hosting rather than unmanaged VPS. Managed providers handle this kind of stack configuration for you and do not allow customer-level installation of system packages. If you need the customization this tutorial provides, you need unmanaged VPS access. VPS hosting providers like Hostinger, Contabo, and ScalaHosting all provide unmanaged VPS plans where this tutorial works completely.