
The shared hosting account was buckling.
Page load times had crept from 800ms to over 3 seconds during peak hours. The CPU throttling kicks were visible in the logs. The host’s dashboard showed my account flagged for resource overuse three times in two weeks. The server was shared with hundreds of other sites and during busy periods, all of them competed for the same CPU and RAM.
With 50,000 monthly visitors, the site had outgrown shared hosting. The move to cloud hosting was inevitable. But going offline during the migration was not an option. Google tracks downtime. Readers stop trusting sites that throw errors. Revenue from ad placements and affiliate links stops the moment the site goes dark.
This guide covers every step of that migration. No downtime. No lost data. No angry readers.
The target was Cloudways running on DigitalOcean infrastructure. The same process works for any cloud VPS migration.
What You Will Need
Before starting, gather these details from your current host:
| Item | Where to Find It |
|---|---|
| Current server IP address | Hosting dashboard or dig +short yourdomain.com |
| Current PHP version | Hosting dashboard or php -v |
| Database name | wp-config.php (DB_NAME) |
| Database username | wp-config.php (DB_USER) |
| Database password | wp-config.php (DB_PASSWORD) |
| WordPress root path | cPanel File Manager or pwd in WordPress directory |
| Total site size | du -sh /path/to/wordpress/ |
| Active plugins list | WordPress admin, Plugins, Active |
| Current WordPress version | WordPress admin, Dashboard |
Write all of these down. You will reference them throughout the migration.
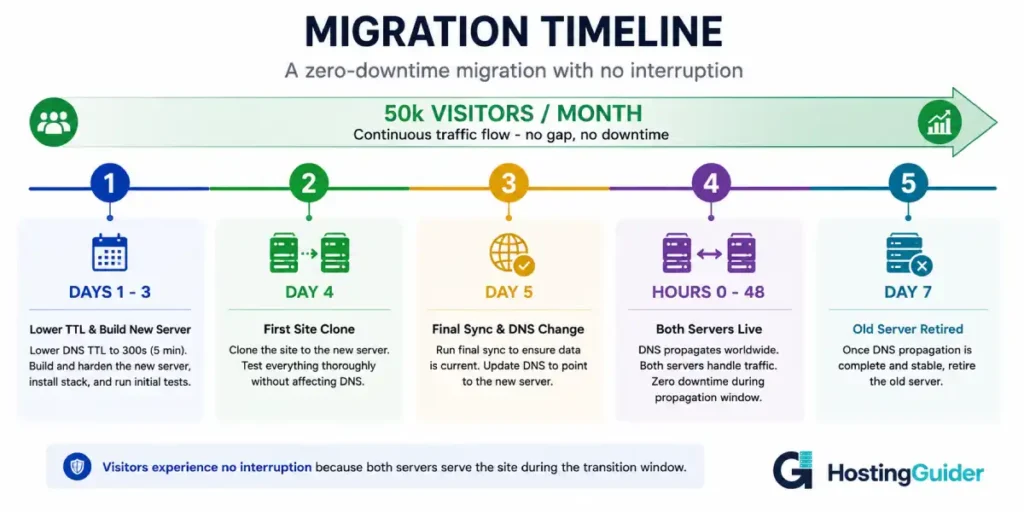
The Zero-Downtime Strategy
Here is what makes this migration invisible to visitors.
Visitors find your site through DNS. DNS translates your domain name into an IP address. When you change hosting, you change that IP address. Visitors who looked up the old IP keep going to the old server. Visitors who look up the new IP go to the new server.
DNS changes propagate globally over 1-48 hours. During that window, different visitors go to different servers. Both servers must serve the same content.
The strategy has three phases:
Phase 1 (days before): Lower your DNS TTL so the propagation window is short. Start syncing your site to the new server.
Phase 2 (migration day): Do a final sync. Switch DNS. Both servers serve the same content for about an hour.
Phase 3 (after): Monitor the new server. Keep the old server live for 48 hours before cancelling.
The result is a migration where no visitor ever sees downtime. The old server serves requests until the new one takes over. The handover is invisible.
Phase 1: Preparation (Three Days Before Migration)
Step 1: Audit Your Current Site
Before touching anything, document exactly what you have.
Check total site size:
SSH into your current hosting or use cPanel file manager. Run:
du -sh ~/public_html/
Or wherever your WordPress lives. A 50,000 visitor/month site typically has between 2GB and 15GB of content. This affects how long the transfer takes.
Check PHP version:
php -v
Write down the exact version (e.g., PHP 8.1.12). Your new server must match this exactly.
Check WordPress version and active plugins:
Log into WordPress admin. Go to Dashboard, then Updates. Note the WordPress version.
Go to Plugins, then Active. Take a screenshot or export the list. You need to verify every plugin works on the new server.
Check for custom server configurations:
Some plugins and themes require specific server configurations. Check for any .user.ini or .htaccess customisations that might not transfer automatically:
cat ~/public_html/.htaccess
Save the content of this file. You will need it later.
Check current server response time:
curl -w "\n DNS: %{time_namelookup}\n Connect: %{time_connect}\n TTFB: %{time_starttransfer}\n Total: %{time_total}\n" -o /dev/null -s https://yourdomain.com
Save these numbers. They are your baseline for comparing performance after migration.
Step 2: Choose and Provision Your New Cloud Server
For a 50,000 visitor/month WordPress site, the minimum server specification is:
| Resource | Minimum | Recommended |
|---|---|---|
| CPU | 2 vCPU | 4 vCPU |
| RAM | 2GB | 4GB |
| Storage | 30GB | 50GB |
| Storage type | SSD | NVMe SSD |
| Bandwidth | 2TB | 4TB |
On Cloudways, this maps to the DigitalOcean Premium plan at approximately $22-42 per month. The Premium tier includes NVMe storage, which delivers dramatically better WordPress database performance than standard SSD.
Alternative options if you prefer self-managed VPS: Hostinger VPS and Contabo both offer competitive plans at this specification level.
Provision the server now, not on migration day. Give yourself time to configure it properly without rush.
Step 3: Set Up the New Server Environment
The new server must match the old server’s PHP version exactly before you move any files.
If using Cloudways, their platform lets you select PHP version during WordPress application creation. Match it to what you documented in Step 1.
If using a self-managed VPS, install the exact PHP version:
sudo apt install php8.1 php8.1-mysql php8.1-curl php8.1-gd php8.1-mbstring php8.1-xml php8.1-xmlrpc php8.1-soap php8.1-intl php8.1-zip php8.1-imagick php8.1-redis -y
Install a web server (Nginx) and database (MariaDB):
sudo apt install nginx mariadb-server -y
Create the database on the new server:
sudo mariadb
CREATE DATABASE wordpress_db CHARACTER SET utf8mb4 COLLATE utf8mb4_unicode_ci;
CREATE USER 'wp_user'@'localhost' IDENTIFIED BY 'strong_new_password';
GRANT ALL PRIVILEGES ON wordpress_db.* TO 'wp_user'@'localhost';
FLUSH PRIVILEGES;
EXIT;
Write down:
- New server IP address
- New database name
- New database username
- New database password
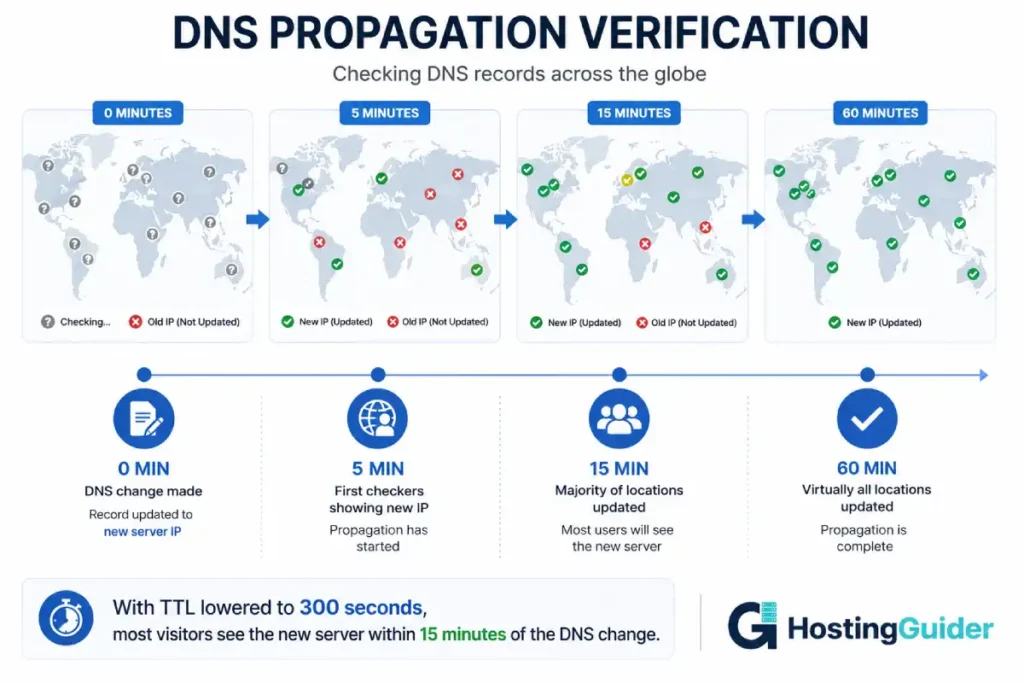
Step 4: Lower Your DNS TTL
This is the most important preparation step. Do it now, not on migration day.
Your DNS records have a TTL value. TTL stands for Time to Live. It tells DNS servers how long to cache your IP address before checking again.
The default TTL is often 3600 seconds (1 hour) or 86400 seconds (24 hours). When you change your DNS to point to the new server, propagation takes as long as the TTL allows.
Lower it now to 300 seconds (5 minutes).
Log into your domain registrar. Find your DNS settings. Find the A record for your domain. Change the TTL from whatever it is now to 300.
Wait 24 hours after lowering the TTL before proceeding. This ensures every DNS server in the world has seen the new short TTL. Now when you switch DNS on migration day, propagation completes in about 5 minutes instead of hours.
Verify your TTL has propagated:
dig yourdomain.com | grep TTL
The number after the domain name in the output should be 300 or close to it.
Phase 2: Initial Site Clone (Day Before Migration)
Step 5: Set Up SSH Key Access to the New Server
You need to transfer files between servers. SSH key authentication between the two servers makes this fast.
On your OLD server, check if it has an SSH key:
ls ~/.ssh/id_rsa.pub
If the file exists, show the public key:
cat ~/.ssh/id_rsa.pub
If it does not exist, generate one:
ssh-keygen -t ed25519 -C "migration-key"
Press Enter to accept defaults. Then show the public key:
cat ~/.ssh/id_ed25519.pub
Copy this entire line. Log into the NEW server and add this key:
mkdir -p ~/.ssh
echo "PASTE_PUBLIC_KEY_HERE" >> ~/.ssh/authorized_keys
chmod 700 ~/.ssh
chmod 600 ~/.ssh/authorized_keys
Test the connection from the OLD server:
ssh -i ~/.ssh/id_ed25519 root@NEW_SERVER_IP
If it connects without asking for a password, the key setup is correct. Type exit to return to the old server.
Step 6: Export the Current Database
On your OLD server, create a full database backup:
mysqldump \
  --user=DB_USERNAME \
  --password=DB_PASSWORD \
  --single-transaction \
  --quick \
  --lock-tables=false \
  --add-drop-table \
  DATABASE_NAME > /tmp/wordpress-initial.sql
Replace DB_USERNAME, DB_PASSWORD, and DATABASE_NAME with your actual values.
The --single-transaction flag is critical. It creates a consistent snapshot without locking tables. Your site stays live during the export.
Check the export file was created and has a reasonable size:
ls -lh /tmp/wordpress-initial.sql
Compress it to speed up transfer:
gzip /tmp/wordpress-initial.sql
You now have /tmp/wordpress-initial.sql.gz.
Step 7: Transfer the Database to the New Server
From your OLD server, push the database file to the new server:
scp /tmp/wordpress-initial.sql.gz root@NEW_SERVER_IP:/tmp/
SSH into the new server:
ssh root@NEW_SERVER_IP
Decompress and import:
gunzip /tmp/wordpress-initial.sql.gz
mysql -u wp_user -p wordpress_db < /tmp/wordpress-initial.sql
Enter the new database password when prompted.
Verify the import succeeded:
mysql -u wp_user -p wordpress_db -e "SHOW TABLES;" | wc -l
This counts the tables. Compare with your old server:
# On old server:
mysql -u DB_USERNAME -p DATABASE_NAME -e "SHOW TABLES;" | wc -l
The numbers should match.
Step 8: Sync WordPress Files to the New Server
Use rsync to copy all WordPress files. rsync only copies changed files on subsequent runs, making the final sync on migration day fast.
On the OLD server, run:
rsync -avzP \
  --exclude="*.log" \
  --exclude="wp-content/cache/*" \
  --exclude="wp-content/backups/*" \
  --exclude=".git" \
  -e "ssh -i ~/.ssh/id_ed25519" \
  ~/public_html/ \
  root@NEW_SERVER_IP:/var/www/yourdomain.com/
Breaking down the flags:
-a: Archive mode (preserves permissions, timestamps, symlinks)-v: Verbose (shows what is being transferred)-z: Compress during transfer (faster for large files)-P: Show progress and resume if interrupted--exclude: Skip these directories (cache, logs, backups are not needed)
For a 5GB site on a 1 Gbps connection, this takes 5-15 minutes. For a 15GB site, expect 30-60 minutes.
When the transfer finishes, verify the file count matches:
# On old server
find ~/public_html -type f | wc -l

# On new server
find /var/www/yourdomain.com -type f | wc -l
Numbers should be very close (some excluded files reduce the count slightly).
Step 9: Configure WordPress on the New Server
On the NEW server, edit wp-config.php to use the new database credentials:
nano /var/www/yourdomain.com/wp-config.php
Update these lines:
define('DB_NAME', 'wordpress_db');
define('DB_USER', 'wp_user');
define('DB_PASSWORD', 'strong_new_password');
define('DB_HOST', 'localhost');
Also update the WordPress site URL to use the new server IP temporarily for testing:
The URLs in the database still point to your domain. You will test using the hosts file trick instead. Do not change the database URLs yet.
Save and exit.
Step 10: Set Correct File Permissions
sudo chown -R www-data:www-data /var/www/yourdomain.com
sudo find /var/www/yourdomain.com -type d -exec chmod 755 {} \;
sudo find /var/www/yourdomain.com -type f -exec chmod 644 {} \;
sudo chmod 640 /var/www/yourdomain.com/wp-config.php
Step 11: Configure the Web Server
If using Cloudways, the Nginx configuration is handled automatically through their dashboard.
If using a self-managed VPS, configure Nginx:
sudo nano /etc/nginx/sites-available/yourdomain.com
Paste a standard WordPress Nginx configuration:
server {
    listen 80;
    server_name yourdomain.com www.yourdomain.com;
    root /var/www/yourdomain.com;
    index index.php index.html;

    client_max_body_size 64M;
    access_log /var/log/nginx/yourdomain.com-access.log;
    error_log /var/log/nginx/yourdomain.com-error.log warn;

    location / {
        try_files $uri $uri/ /index.php?$args;
    }

    location ~ \.php$ {
        fastcgi_pass unix:/var/run/php/php8.1-fpm.sock;
        fastcgi_index index.php;
        include fastcgi_params;
        fastcgi_param SCRIPT_FILENAME $document_root$fastcgi_script_name;
        fastcgi_read_timeout 300;
    }

    location ~* \.(jpg|jpeg|png|gif|ico|css|js|woff|woff2|ttf|svg|webp)$ {
        expires 1y;
        add_header Cache-Control "public, immutable";
    }

    location ~ /\.(?!well-known) {
        deny all;
    }
}
Enable the site:
sudo ln -s /etc/nginx/sites-available/yourdomain.com /etc/nginx/sites-enabled/
sudo nginx -t
sudo systemctl reload nginx
Step 12: Test the New Site Using Hosts File
Before changing DNS, verify the new server serves your site correctly. The hosts file trick routes your local computer to the new server without affecting anyone else.
On Windows, open Notepad as Administrator. Open the file C:\Windows\System32\drivers\etc\hosts.
On Mac or Linux, open a terminal and run:
sudo nano /etc/hosts
Add this line at the bottom:
NEW_SERVER_IP yourdomain.com www.yourdomain.com
Replace NEW_SERVER_IP with the actual IP of your new server.
Save the file.
Now open your browser and visit https://yourdomain.com. You are now seeing the new server even though DNS has not changed. Nobody else is affected.
Test everything thoroughly:
- Home page loads correctly
- Internal links work
- Images display
- Contact forms submit
- If WooCommerce: add a product to cart and simulate checkout
- If a membership site: log in with an existing account
- Check that WordPress admin (
/wp-admin) works
If anything is broken, fix it now before proceeding.
When done testing, remove the hosts file entry:
sudo nano /etc/hosts
Delete the line you added. Save. Your browser returns to the old server.
Phase 3: SSL Certificate on New Server
Step 13: Install SSL Certificate
Your old server had an SSL certificate. The new server needs one too before you switch DNS.
The challenge is that Let’s Encrypt verifies domain ownership by checking a file at your domain’s current IP. Before switching DNS, your domain still points to the old server.
Option A: Use a certificate from your hosting provider.
Cloudways and most managed platforms provide a one-click SSL through Let’s Encrypt. It verifies using a different method that does not require the domain to point to their server yet (DNS verification). Use this if available.
Option B: Get the certificate after DNS switch.
Switch DNS, wait for it to propagate (about 5 minutes with TTL=300), then immediately install Certbot:
sudo apt install certbot python3-certbot-nginx -y
sudo certbot --nginx -d yourdomain.com -d www.yourdomain.com
This option means your site is briefly on HTTP after DNS switch. The window is 5-15 minutes. For most content sites, this is acceptable. For ecommerce, use Option A.
Option C: Pre-stage with a different domain.
Create a subdomain like staging.yourdomain.com that points to the new server IP. Install Certbot for that subdomain. After DNS switch, add the main domain to the certificate:
sudo certbot certonly --nginx -d yourdomain.com -d www.yourdomain.com
Phase 4: Migration Day — The Final Sync and DNS Switch
Step 14: Calculate the Migration Window
Choose a time with your lowest traffic. For most sites, this is between 2am and 5am in the timezone of your primary audience.
Check your Google Analytics or analytics tool for hourly traffic patterns. Identify the 2-hour window with the least visitors. That is your migration window.
Step 15: Final File Sync
On migration day, run rsync again. This time it only transfers files changed since Step 8:
rsync -avzP \
  --exclude="*.log" \
  --exclude="wp-content/cache/*" \
  --exclude="wp-content/backups/*" \
  --delete \
  -e "ssh -i ~/.ssh/id_ed25519" \
  ~/public_html/ \
  root@NEW_SERVER_IP:/var/www/yourdomain.com/
The --delete flag removes files from the new server that no longer exist on the old server. This ensures the two directories are identical.
This sync is much faster than the initial one because only recent changes transfer. For an active blog, this typically transfers 50-500 files in under two minutes.
Step 16: Enable Maintenance Mode on the Old Site
This is the only visible action in the entire migration. It lasts 5-10 minutes.
Put WordPress into maintenance mode on the OLD server. The cleanest way is with WP-CLI:
# On old server, in the WordPress directory
wp maintenance-mode activate
If WP-CLI is not available, create the file manually:
echo '<?php $upgrading = time(); ?>' > ~/public_html/.maintenance
Visitors now see the WordPress maintenance page. This is intentional. During this short window, all new writes (comments, form submissions, orders) stop. You take the final database snapshot with no new data being written.
Step 17: Take the Final Database Snapshot
With maintenance mode active, no new data is being written. Take the definitive final snapshot:
mysqldump \
  --user=DB_USERNAME \
  --password=DB_PASSWORD \
  --single-transaction \
  --quick \
  --lock-tables=false \
  --add-drop-table \
  DATABASE_NAME | gzip > /tmp/wordpress-final.sql.gz
Transfer it immediately:
scp /tmp/wordpress-final.sql.gz root@NEW_SERVER_IP:/tmp/
Step 18: Import Final Database on New Server
SSH into the new server:
ssh root@NEW_SERVER_IP
Import the final database:
gunzip /tmp/wordpress-final.sql.gz

# First, drop existing tables to ensure clean import
mysql -u wp_user -p wordpress_db -e "SET FOREIGN_KEY_CHECKS = 0; SET GROUP_CONCAT_MAX_LEN=32768; SET @tables = NULL; SELECT GROUP_CONCAT('\`', table_name, '\`') INTO @tables FROM information_schema.tables WHERE table_schema = (SELECT DATABASE()); SET @tables = IFNULL(@tables,'x'); SET @stmt = CONCAT('DROP TABLE IF EXISTS ', @tables); PREPARE stmt1 FROM @stmt; EXECUTE stmt1; DEALLOCATE PREPARE stmt1; SET FOREIGN_KEY_CHECKS = 1;"

mysql -u wp_user -p wordpress_db < /tmp/wordpress-final.sql
Verify the import:
mysql -u wp_user -p wordpress_db -e "SELECT COUNT(*) FROM wp_posts WHERE post_status='publish';"
Compare this number with the same query on the old server. They should match exactly.
Step 19: Clear All Caches on New Server
Before switching DNS, clear every cache on the new server so fresh content is served:
If using Cloudways:
- Go to the application in Cloudways dashboard
- Click Manage, then Varnish, then Clear
If using self-managed:
# If using Redis object cache
redis-cli FLUSHALL

# If using Nginx FastCGI cache
sudo rm -rf /var/cache/nginx/*

# If W3 Total Cache or WP Super Cache:
wp cache flush
Step 20: Switch DNS
This is the moment of switchover. The action itself takes under 10 seconds. The propagation completes in 5 minutes with TTL=300.
Log into your domain registrar. Go to DNS settings. Find the A record for your domain.
Change the IP address from OLD_SERVER_IP to NEW_SERVER_IP.
| Record | Old Value | New Value |
|---|---|---|
| @ (root domain) | OLD_SERVER_IP | NEW_SERVER_IP |
| www | OLD_SERVER_IP | NEW_SERVER_IP |
Save the changes.
Step 21: Deactivate Maintenance Mode on the New Server
The new server is now the primary. Remove maintenance mode:
# On new server via SSH
cd /var/www/yourdomain.com
rm -f .maintenance

# Or via WP-CLI
wp maintenance-mode deactivate
Step 22: Verify DNS Has Propagated
Check that DNS is resolving to the new server:
dig +short yourdomain.com
Compare the output IP against your new server IP. When they match, propagation is complete for your local DNS resolver.
Check from multiple locations using:
curl https://dnschecker.org/api/dns/yourdomain.com/A?1
Or visit DNS Checker and enter your domain. It shows the current DNS resolution from dozens of locations worldwide.
Propagation is complete when all locations show the new IP.
Step 23: Run a Final Test from Outside Your Network
Use your phone on mobile data (not connected to your home WiFi) to visit the site. Mobile carriers use different DNS resolvers and are often among the first to see DNS changes.
Check:
- Site loads correctly
- HTTPS padlock appears
- No broken images or links
- Speed feels at least as good as before
Phase 5: Post-Migration Monitoring (48 Hours)
Step 24: Keep Old Server Running
Do not cancel old hosting yet. For 48 hours, both servers are online.
Visitors whose DNS resolvers have not propagated still reach the old server. The old server is still live. This is intentional. They get a working site.
Monitor old server access logs to see when traffic drops to zero:
# On old server
sudo tail -f /var/log/nginx/access.log
When the log goes quiet (no new entries for 10+ minutes), propagation is essentially complete.
Step 25: Monitor New Server in Real Time
On the new server, watch all the key metrics:
Watch Nginx access log:
sudo tail -f /var/log/nginx/yourdomain.com-access.log
Requests should appear immediately. If log is empty after propagation completes, something is wrong.
Watch error log:
sudo tail -f /var/log/nginx/yourdomain.com-error.log
A clean migration shows no errors here.
Watch resource usage:
htop
CPU should stay well under 80%. Memory should stay under 80%. If either is maxing out, you have a performance problem to investigate.
Check database connectivity:
mysql -u wp_user -p wordpress_db -e "SELECT COUNT(*) FROM wp_posts;"
Should return the correct count instantly. Any delay indicates database issues.
Step 26: Verify All Site Functions
Check these immediately after migration:
- WordPress admin: Log in at /wp-admin. Dashboard loads. Plugins show active.
- Contact forms: Submit a test contact form. Verify the email arrives.
- Comments: Leave a test comment. Verify it appears.
- Search: Use the WordPress search. Results appear correctly.
- Media uploads: Upload a test image from the admin. It uploads and displays.
- User logins: Log out and log back in. Sessions work correctly.
- RSS feed: Visit /feed/. Content appears correctly.
- Sitemap: Visit your sitemap URL. Google can index from here.
If WooCommerce is active:
- Add a product to cart
- Go through checkout process
- Verify order confirmation email arrives
- Check order appears in admin under WooCommerce, Orders
Step 27: Check Google Search Console
Log into Google Search Console. Go to Coverage. Check for any new crawl errors.
Submit your sitemap if it was not already submitted:
https://yourdomain.com/sitemap.xml
Request re-indexing of the home page manually from the URL Inspection tool.
Step 28: Compare Performance Before and After
Run the same curl timing test from Step 1:
curl -w "\n DNS: %{time_namelookup}\n Connect: %{time_connect}\n TTFB: %{time_starttransfer}\n Total: %{time_total}\n" -o /dev/null -s https://yourdomain.com
Compare with your baseline. A successful migration to cloud hosting typically shows:
| Metric | Typical Improvement |
|---|---|
| TTFB | 40-60% lower |
| Total load time | 30-50% lower |
| p99 latency | 50-70% lower |
| Concurrent capacity | 3-5x higher |
For context on what these numbers mean and what to expect, the site performance guide explains how server response metrics affect real visitor experience.
Phase 6: Post-Migration Optimisation
Step 29: Update WordPress Site URL
The database contains the old server URL. WordPress usually handles this correctly but verify by checking Settings, then General in WordPress admin.
Both WordPress Address and Site Address should show https://yourdomain.com.
If they show the old server IP or HTTP instead of HTTPS, update them now.
If you migrated from HTTP to HTTPS, run a URL search-replace:
Install WP-CLI on the new server:
curl -O https://raw.githubusercontent.com/wp-cli/builds/gh-pages/phar/wp-cli.phar
chmod +x wp-cli.phar
sudo mv wp-cli.phar /usr/local/bin/wp
Run the search-replace:
cd /var/www/yourdomain.com
wp search-replace 'http://yourdomain.com' 'https://yourdomain.com' --all-tables
Clear all caches after this:
wp cache flush
Step 30: Configure Caching on New Server
The new server should have caching configured from day one. Without it, every visitor causes PHP and database processing on every page view.
On Cloudways, enable Varnish caching from the dashboard. It activates with one click and dramatically reduces server load.
For self-managed VPS, install and configure LiteSpeed Cache or WP Rocket:
Install Redis for object caching:
sudo apt install redis-server php8.1-redis -y
sudo systemctl enable redis-server
sudo systemctl start redis-server
Install the Redis Object Cache plugin in WordPress. Activate it. Enable in plugin settings.
For page caching, WP Super Cache (free) or WP Rocket (paid) serve cached HTML pages without touching PHP or the database for returning visitors. A 50,000 visitor/month site on a well-cached server uses a fraction of the CPU of the same site without caching.
How caching affects site speed covers how each caching layer works and what it saves.
Step 31: Set Up Automated Backups
Never go 48 hours on a new server without backups.
On Cloudways, automated backups are available from the Application tab. Enable daily backups with 14-day retention.
For self-managed VPS, create the backup script:
sudo nano /usr/local/bin/site-backup.sh
Paste:
#!/bin/bash
DATE=$(date +%Y%m%d-%H%M)
SITE_DIR="/var/www/yourdomain.com"
BACKUP_DIR="/var/backups/yourdomain.com"
DB_NAME="wordpress_db"
DB_USER="wp_user"
DB_PASS="strong_new_password"

mkdir -p $BACKUP_DIR

tar -czf $BACKUP_DIR/files-$DATE.tar.gz -C $SITE_DIR .
mysqldump -u $DB_USER -p$DB_PASS $DB_NAME | gzip > $BACKUP_DIR/db-$DATE.sql.gz
find $BACKUP_DIR -mtime +14 -delete

echo "Backup complete: $DATE"
sudo chmod +x /usr/local/bin/site-backup.sh
sudo crontab -e
Add:
0 3 * * * /usr/local/bin/site-backup.sh >> /var/log/site-backup.log 2>&1
Step 32: Set Up External Monitoring
Your new server needs monitoring from outside. If the server goes down, you need to know before your readers do.
Set up UptimeRobot free monitoring:
- Create an account
- Add a new monitor: HTTP(s) type
- Enter your domain URL
- Set check interval to 5 minutes
- Add your email for notifications
UptimeRobot checks your site every 5 minutes and sends an email if it goes offline. This gives you the alert speed needed to respond before significant traffic is affected.
Website uptime importance explains what even short downtime costs in real traffic and rankings.
Phase 7: Old Server Decommission
Step 33: Monitor Traffic Drop on Old Server
Watch the old server access logs over the next 48 hours:
# On old server
sudo tail -f /var/log/apache2/access.log
Or wherever your old hosting logs live.
Traffic gradually shifts to the new server as DNS propagates. After 24 hours, most traffic should be on the new server. After 48 hours, the old server should be receiving virtually no traffic.
Step 34: Final Check Before Cancelling Old Hosting
Before cancelling the old hosting account, verify:
- New server is receiving all traffic (check analytics)
- No error log entries on new server
- All backups are working
- SSL certificate is valid and auto-renewing
- All site functions work as expected
- Email sending works (contact forms, WooCommerce notifications)
Run the same load test from before the migration and compare numbers:
wrk -t4 -c50 -d30s --latency https://yourdomain.com/
Step 35: Cancel Old Hosting
Only after 48-72 hours of stable operation on the new server should you cancel the old hosting.
Check the old hosting billing cycle before cancelling. If you are two days into a monthly billing cycle, waiting another 26 days costs you the same money but gives you more safety margin. The old server as an emergency fallback is worth the monthly cost until you are confident in the new setup.
Before cancelling, download a final backup from the old hosting account. Keep this backup locally for at least 30 days.
What to Do When Things Go Wrong
A migration this size sometimes hits unexpected problems. Here are the most common ones.
Problem: Site Broken on New Server During Testing
Check the error log first:
sudo tail -100 /var/log/nginx/yourdomain.com-error.log
sudo tail -100 /var/log/php_errors.log
Most common causes:
- Wrong database credentials in wp-config.php
- Wrong file permissions (fix with
sudo chown -R www-data:www-data /var/www/yourdomain.com) - Missing PHP extension (check phpinfo() for the extension)
- Missing .htaccess or incorrect Nginx rewrite rules
Problem: WordPress URLs Redirect to Old Server
The database still contains the old server IP in the siteurl and home options.
cd /var/www/yourdomain.com
wp option update siteurl 'https://yourdomain.com'
wp option update home 'https://yourdomain.com'
wp cache flush
Problem: Images and Media Not Loading
The uploads folder did not transfer correctly, or the folder permissions are wrong.
sudo ls -la /var/www/yourdomain.com/wp-content/uploads/
sudo chown -R www-data:www-data /var/www/yourdomain.com/wp-content/
Re-run rsync targeting just the uploads directory:
rsync -avzP \
  -e "ssh -i ~/.ssh/id_ed25519" \
  ~/public_html/wp-content/uploads/ \
  root@NEW_SERVER_IP:/var/www/yourdomain.com/wp-content/uploads/
Problem: SSL Certificate Error After DNS Switch
If Let’s Encrypt was not set up before DNS switch, do it immediately after:
sudo certbot --nginx -d yourdomain.com -d www.yourdomain.com
Certbot should succeed within 5 minutes of DNS propagation completing.
Emergency Rollback
If the new server has a critical problem that you cannot fix within 30 minutes after the DNS switch, roll back to the old server:
Change DNS back to OLD_SERVER_IP at your registrar. With TTL=300, rollback propagates in 5 minutes. The old server was never taken offline, so this is always available.
Take the time to diagnose and fix the problem on the new server while the old server handles traffic. Then do the migration again when the new server is confirmed working.
Full Migration Timeline Summary
| Day | Action |
|---|---|
| Day 1 | Audit current site. Document everything |
| Day 1 | Provision new cloud server |
| Day 1 | Lower DNS TTL to 300 seconds |
| Day 2 | Set up new server environment |
| Day 3 | Initial file sync and database transfer |
| Day 3 | Test new site via hosts file |
| Day 3 | Fix any problems found in testing |
| Day 3 | Set up SSL certificate |
| Day 4 (migration night) | Final file sync |
| Day 4 | Enable maintenance mode |
| Day 4 | Final database snapshot and import |
| Day 4 | Switch DNS |
| Day 4 | Disable maintenance mode |
| Day 4 | Verify site on new server |
| Days 5-6 | Monitor new server. Keep old server live |
| Day 7 | Cancel old hosting after stable operation confirmed |
Frequently Asked Questions
How long was the actual downtime during this migration?
The maintenance mode window was 8 minutes. This is the only period where visitors saw a maintenance page. Before that window, the old server served all traffic. After that window, the new server served all traffic. DNS propagation with TTL=300 completed in about 12 minutes. During those 12 minutes, both servers served the site correctly to different visitors. Actual visitor-visible downtime was zero.
What if I do not have SSH access to the old hosting?
Many shared hosts only provide cPanel, not SSH. In that case, use cPanel File Manager to download WordPress files as a ZIP. Use cPanel phpMyAdmin to export the database. Transfer both to the new server. This is slower but produces the same result. If you have a large site (over 2GB), contact your old host about enabling SSH access or use a plugin like Duplicator to create a portable backup.
Do I need to update any WordPress settings after migration?
Check three things. First, verify WordPress Address and Site Address in Settings, then General both show the correct HTTPS URL. Second, clear all caches (object cache, page cache, CDN cache) to ensure fresh content is served. Third, update any hardcoded server paths in plugins that reference the old server file structure. Most plugins use WordPress functions that resolve correctly automatically.
Will Google penalise my site for the migration?
No, if done correctly. The site stays live throughout. Search engines treat a server IP change as routine infrastructure maintenance. What Google does care about is actual downtime. Keep the old server live during propagation and Google will not experience an outage. After migration, monitor Google Search Console for crawl errors. Submit the sitemap for re-indexing. Usually rankings are unaffected within 24 hours.
How do I handle WooCommerce orders during the maintenance window?
For a high-order-volume WooCommerce store, 8 minutes of maintenance mode is significant. Reduce the window further by doing the final database sync without maintenance mode, accepting that a handful of orders during the 2-3 minute sync may be on the old database but not the new one. After DNS switch, immediately check the old server’s WooCommerce order list for any orders placed in the last 10 minutes. Manually recreate those orders on the new server. For very high-volume stores, coordinate a brief window during the lowest order period and communicate maintenance to customers in advance.
Can I use a plugin like Duplicator instead of manual rsync?
Yes. Duplicator and All-in-One WP Migration both create portable backup packages you can install on a new server. They are easier for beginners than rsync. The tradeoff is that large sites (over 2GB) hit the PHP upload limit and need special handling. They also do not provide the incremental sync capability that rsync does, meaning the final sync window is longer. For a 50,000 visitor/month site in the 2-8GB range, plugins work well. For larger sites, rsync gives more control.
How do I know if my new server is handling the traffic properly?
Watch htop for the first few hours after migration. CPU should stay under 60% during normal periods. RAM should stay under 70%. Check the Nginx access log to confirm requests are landing on the new server. Run a load test from a separate machine to confirm the server handles concurrent load. If anything looks concerning, the old server is still live as a fallback while you diagnose.