To connect a domain bought elsewhere to your host, change its nameservers to the host’s, or keep DNS at your registrar and add an A record with the host’s IP.
Changing nameservers hands all DNS, including email records, to the host. An A record changes only where the website lives.
Either way, copy your existing email records first so mail keeps working.
Connecting is one job among many in the domain name guides hub, and the steps below assume you already own the domain.
If you don’t, start with the steps to register a domain, then come back.
What you need before you start
You need three things: a login for your registrar, a hosting account that’s already active, and the connection details your host gives you.
Gather these before you touch any settings:
- Registrar login. The company where you bought the domain. Your renewal invoice names it if you’ve forgotten.
- Host’s nameservers. Usually two or more names such as ns1 and ns2 at the host’s domain. They’re in the welcome email or the hosting dashboard.
- Host’s IP address. Needed only for the A record method. Look for “server IP” or “shared IP” in the panel.
- A note of your current DNS records. Covered in step 2, and it’s the step most people skip.
If you’re unsure why the domain and hosting sit at different companies, the case for why registrar and host stay separate explains it.
Step 1: Choose nameservers or an A record
Pick nameservers if you want the host to manage everything, and pick an A record if you want to keep DNS, especially email, exactly where it is now.
Two terms first. A nameserver is the server that answers “where is this domain?” for the whole domain.
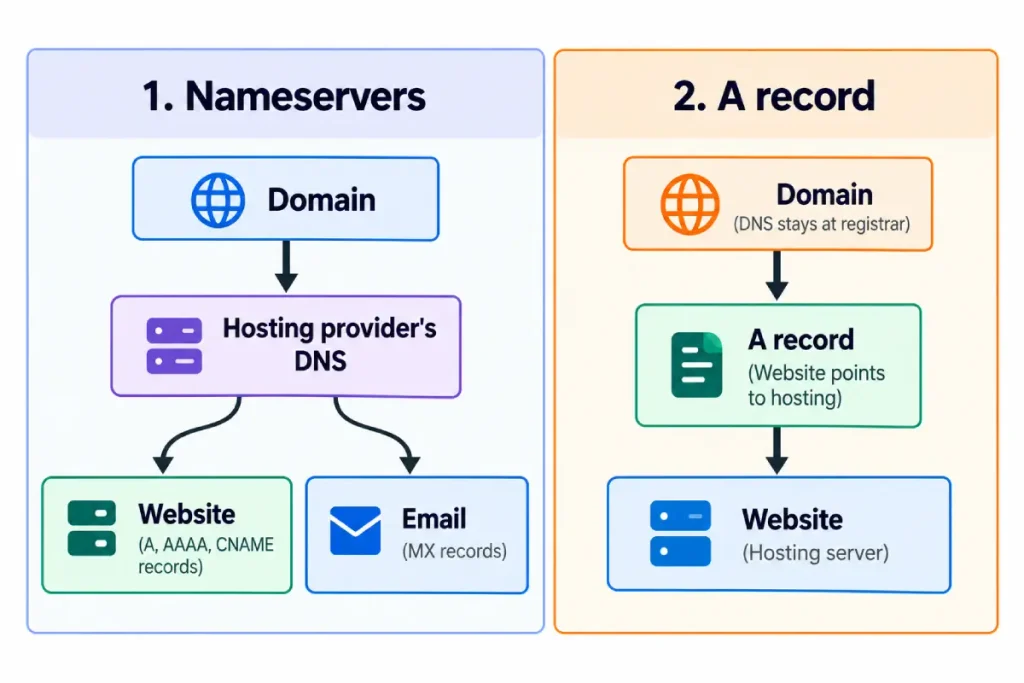
An A record is one answer inside that zone: it maps a name to an IPv4 address, per Cloudflare’s DNS record types reference.
| Change nameservers | Keep registrar DNS, add A record | |
|---|---|---|
| Who manages DNS | Your host | Your registrar (or current DNS provider) |
| What moves | Every record: website, email, verification | Only the website records you change |
| Email risk | High if you forget to copy MX and TXT records | Low, email records stay untouched |
| Effort | One change, then rebuild records at the host | A few record edits |
| Moving hosts later | Change nameservers again | Edit the A record again |
| Good fit | A new domain with no email yet, or email at the same host | A domain that already runs email, or uses Google or Microsoft verification |
Scenario: a new blog with no email yet. Nameservers are simpler. Nothing is live to break, and the host’s panel then controls DNS, SSL, and any mailboxes you create later.
Scenario: a small shop with staff email on Google Workspace or Microsoft 365. Use the A record method.
Your MX records (the ones that route email) never move, so inboxes keep working while only the website changes address.
There’s a third option some people use: point the domain at a separate DNS provider. The logic is the same as the A record method, just in a different dashboard.
Step 2: Copy your existing DNS records before you change anything
Before you switch, write down or export every current DNS record, because a nameserver change replaces the whole zone and any record you didn’t copy stops working.
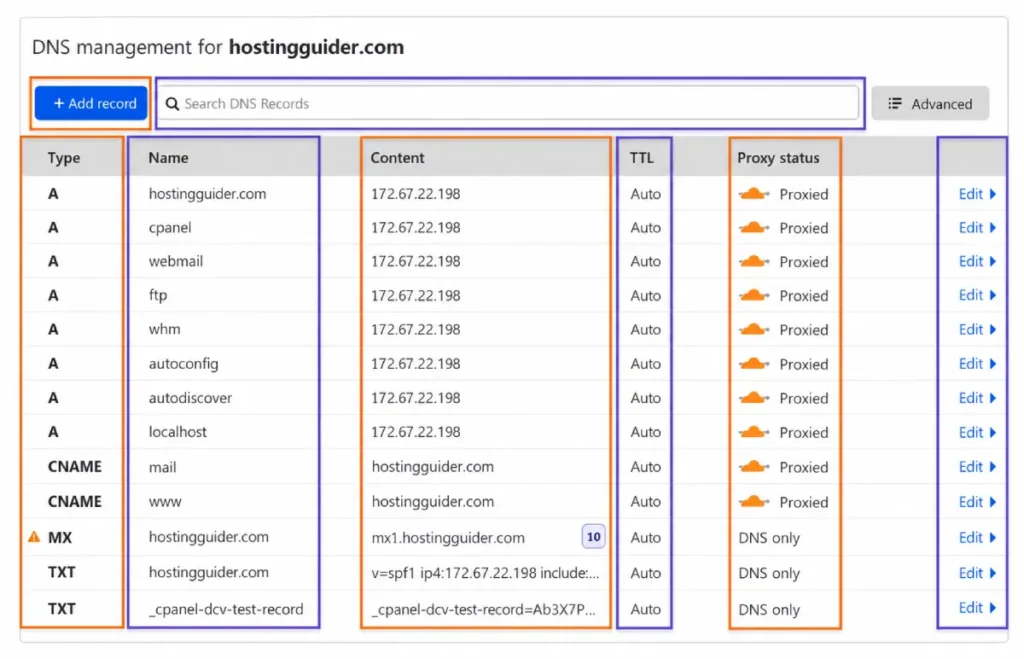
Open your registrar’s DNS page and save a screenshot or export.
Pay attention to:
- MX records. They route incoming email. Lose them and mail bounces.
- TXT records. They hold domain verification codes and email sender rules (SPF, DKIM, DMARC).
- CNAME records. Aliases, often for email setup or third-party tools.
- Any A records on subdomains, such as shop. or mail.
For this step, copying email records exactly as they are is enough.
Building them from scratch is covered in HostingGuider’s SPF, DKIM and DMARC Setup guide, which walks through email authentication records step by step.
If a record type on your list is unfamiliar, the DNS Records Explained guide shows what A, MX and TXT records do, along with the rarer types.
If you plan to change nameservers, you’ll recreate these records in the host’s DNS editor in step 4.
If you use the A record method, you leave them where they are.
Lower the TTL a day ahead (optional). TTL is how long other servers cache a record. Cloudflare’s TTL documentation says its “Auto” setting is 300 seconds.
A short TTL makes later fixes show up faster.
Step 3: Add the domain in your hosting panel
Add the domain to your hosting account before or at the same time as the DNS change, so the server knows which website to show when visitors arrive.
The menu name varies by panel: “Domains”, “Addon Domains”, “Add Website”, or similar.
Without this step, the domain can point at the right server and still show a default or error page.
If this is your first site on the account, many hosts ask for the domain during signup and handle this for you.
Check the domain list in the panel to be sure.
If you want the site on a subdomain instead, such as blog.yourdomain.com, the trade-offs are covered in subdomain versus root domain choices.
Step 4: Make the change at your registrar
Log in to the registrar, open the domain’s settings, and either replace the nameservers or edit the A and www records, then save.
Method A: Change nameservers
- Open the domain in the registrar dashboard and find “Nameservers” or “DNS servers”.
- Switch from the registrar’s default to “Custom” nameservers.
- Paste the host’s nameservers exactly, one per line. Remove old ones you don’t need.
- Save. Then open the host’s DNS editor and recreate the MX, TXT, and CNAME records you copied in step 2.
That last line matters. The host’s default zone usually covers the website, not your third-party email.
Method B: Keep registrar DNS and add records
- Open the registrar’s DNS or “Advanced DNS” page for the domain.
- Edit the A record for the root domain (often shown as @) to the host’s IPv4 address.
- If the host gives an IPv6 address, add an AAAA record too, the IPv6 version of the A record.
- Set www as a CNAME pointing to the root domain, or as a second A record if your host asks for that.
- Delete any old A or AAAA records for the same name that point to a previous host. Two answers for one name send some visitors to the wrong server.
Leave MX and TXT records alone in this method.
The Cloudflare Registrar exception
If your domain is registered with Cloudflare Registrar, Method A isn’t available.
Its registrar FAQ says all domains on Cloudflare Registrar use Cloudflare nameservers, and you’d have to transfer the domain away to use others.
So with Cloudflare Registrar, you always use Method B in Cloudflare’s DNS dashboard.
Moving to a registrar that allows custom nameservers is a separate job, covered in the domain transfer walkthrough.
Step 5: Let the host issue your SSL certificate
Turn on the free SSL certificate once the domain points at the host, because most certificate checks can only pass after DNS reaches the new server.
Here’s the fine print. Let’s Encrypt’s challenge types documentation says its HTTP-01 check reads a file from your domain over port 80.
If the domain still points at the old server, the check fails.
That’s why HTTPS often shows a certificate warning for a short while after a switch. It isn’t a hacked site.
It’s the host waiting for DNS before it can prove you control the domain.
Scenario: you run a booking page and can’t afford a warning. Ask the host about DNS-01 validation.
It uses a TXT record and, per Let’s Encrypt, works even when the web server isn’t reachable yet. Not every panel offers it.
What certificates do and how to read one is in the guide to SSL certificates for websites.
From our own testing: an SSL issue on our Namecheap Stellar Plus test site needed a support ticket. The working fix arrived in under 40 minutes.
The full account notes are in the Namecheap shared plan test.
Step 6: Verify the connection
Check the change with a DNS lookup rather than your browser, because a lookup shows exactly which records the world sees while your browser may show a cached copy.
On macOS or Linux (Terminal):
dig yourdomain.com NS +short
dig yourdomain.com A +short
dig www.yourdomain.com +short
dig yourdomain.com MX +short
On Windows (Command Prompt):
nslookup -type=ns yourdomain.com
nslookup yourdomain.com
nslookup -type=mx yourdomain.com
What a good result looks like:
- The NS lookup shows the host’s nameservers (Method A) or your registrar’s (Method B).
- The A lookup returns the host’s IP address.
- The MX lookup returns the same mail servers you copied in step 2.
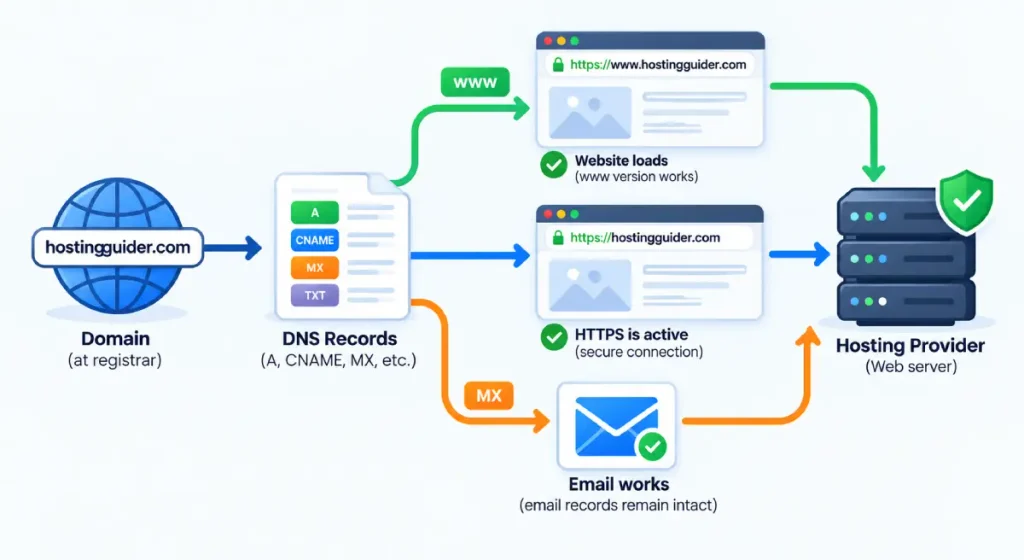
Online DNS checkers that query from several countries are useful too. Different results in different places usually mean caches haven’t refreshed yet.
How long that takes depends on TTLs and caching, which the post on why DNS changes take time explains in depth.
Troubleshooting: what the symptom tells you
Most connection problems have one of five causes: a domain missing from the panel, a leftover record, a nameserver typo, missing email records, or SSL not issued yet.
| Symptom | Likely cause | Fix |
|---|---|---|
| Host’s default or “domain not configured” page | Domain not added in the hosting panel | Add it (step 3) |
| Site loads sometimes, old site other times | Old A or AAAA record still present, or caches still refreshing | Delete the old record; recheck with dig after the TTL passes |
| Email stopped arriving after the switch | MX records not recreated at the new DNS host | Re-add the MX and TXT records you copied |
| Certificate warning on HTTPS | SSL not issued yet, or issued before DNS pointed here | Reissue SSL in the panel once dig shows the host’s IP |
| www works, root domain doesn’t (or the reverse) | Only one of the two records was set | Add the missing A record or www CNAME |
| Registrar rejects the nameservers | Typo, or a registrar that requires its own nameservers | Copy them again; on Cloudflare Registrar use Method B |
Scenario to watch for: you change nameservers on a Friday, email goes quiet over the weekend, and Monday’s customer replies bounce.
Recreating MX records before saving the nameserver change prevents exactly this.
After it works: tidy up
Once the site loads over HTTPS everywhere and email flows, set any lowered TTLs back to normal and keep your record export somewhere safe.
That export is your rollback plan the next time you switch hosts.
If you’re still choosing where the site should live, the shared hosting shortlist for small sites compares plans we’ve tested or researched.
New to the parts of a web address (root domain, www, extension)? The beginner’s guide to domain names covers that background.
Frequently asked questions
Should I use nameservers or an A record to connect my domain?
Use nameservers if you want the host to manage all DNS and you have no email set up elsewhere.
Use an A record if the domain already runs email or other services you want to keep untouched.
Will changing nameservers break my email?
It can. A nameserver change replaces your whole DNS zone, so any MX and TXT records not recreated at the host stop working.
Copy them before the change and add them in the host’s DNS editor.
How long does it take for a domain to connect to hosting?
Often minutes to a few hours, but it can take longer while caches refresh.
The timing depends on TTL values and on which resolver a visitor uses, so results can differ by location for a while.
Do I need to add the domain in my hosting account as well?
Yes. Pointing DNS sends visitors to the server, but the server also needs the domain listed in your account to know which site to show.
Without it you’ll see a default or error page.
What should the www record be?
Most hosts want www as a CNAME pointing to the root domain, or as an A record with the same IP.
Follow your host’s instructions, and make sure both the root and www versions resolve.
Can I connect a Cloudflare Registrar domain to another host’s nameservers?
No. Cloudflare Registrar keeps every domain it registers on Cloudflare’s own nameservers. You can still point the website anywhere by adding A, AAAA, or CNAME records in Cloudflare’s DNS.
How we researched this
Sadia Akther wrote the guide from the domain owner’s side: what you need to collect, what can break, and in what order to act.
Each step was checked against official documentation on October 11, 2026.
Record definitions come from Cloudflare’s DNS reference. The Cloudflare Registrar nameserver rule comes from its registrar FAQ. SSL timing comes from Let’s Encrypt’s challenge documentation.
Our own experience comes from connecting our test domain, hostingguider.online (bought August 23, 2026), to the hosts we review.
The Namecheap SSL ticket figure comes from our Stellar Plus account, which we bought on August 25, 2026.
We don’t name a single “right” method, because it depends on where your email lives. The standards behind HostingGuider’s account testing explain how we buy accounts and record results.