
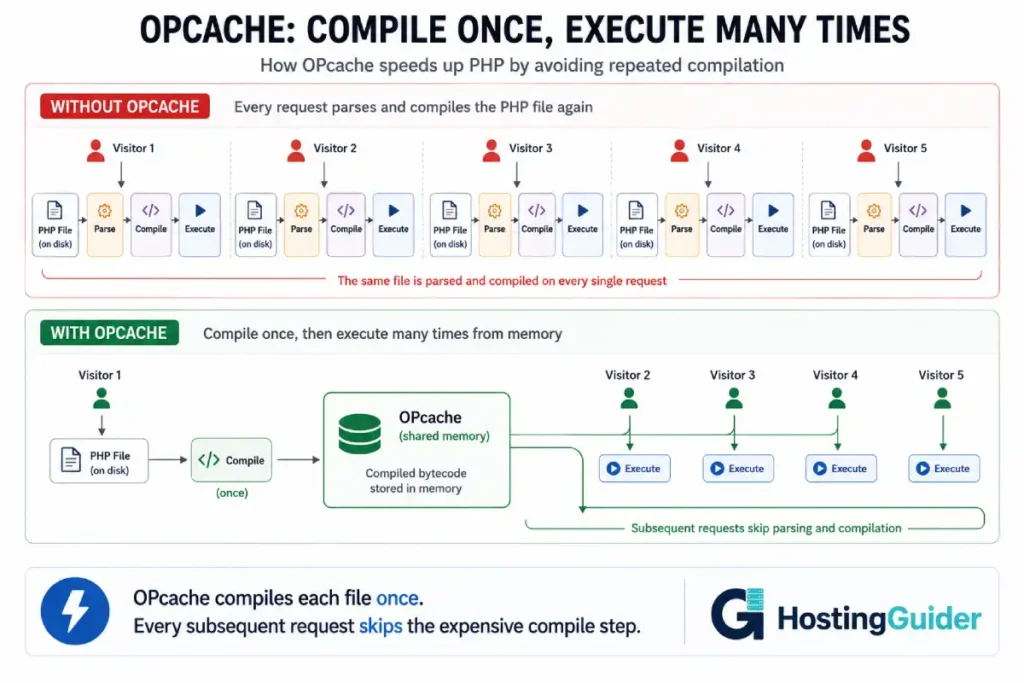
Every time PHP runs a WordPress page, it reads your PHP files from disk, parses them, compiles them into bytecode, and then executes that bytecode. On a site with 20 active plugins, that means parsing and compiling thousands of PHP files on every single request.
OPcache eliminates most of that work. It compiles each PHP file once, stores the result in shared memory, and on every subsequent request reads the precompiled bytecode directly from memory instead of recompiling from scratch. No disk read. No parsing. No compilation. Just execution.
The speed gain is significant. PHP execution time on a WordPress site drops by 30 to 70 percent with OPcache compared to without it. Most hosting companies enable OPcache by default. Almost none of them configure it correctly for WordPress.
The default settings were sized for small applications. A standard WordPress install with active plugins can easily exceed the default file limit and memory allocation. When OPcache silently runs out of space, it stops caching new files. You get no error. No warning. Just slower PHP for every file that did not fit.
This guide configures OPcache correctly for WordPress, verifies it is actually working, and shows you how to keep it healthy.
Key Takeaways
- OPcache compiles PHP files once and serves cached bytecode on every subsequent request
- The default
opcache.max_accelerated_filesof 10000 is frequently too low for WordPress with plugins - The default
opcache.memory_consumptionof 128MB runs out on busy sites with many plugins opcache.save_commentsmust stay enabled for WordPress or some plugins break silently- PHP 8.x includes JIT compilation on top of OPcache, which adds another performance layer
- You must clear OPcache after every file deployment or WordPress will serve stale compiled code
- Verification matters. OPcache can appear enabled while silently failing to cache files
What OPcache Actually Does
PHP is an interpreted language. Normally it reads your code as text, converts it to an intermediate form called bytecode, and then executes that bytecode. It does this every time a page loads.
OPcache breaks this into two separate stages. The first time a PHP file runs, OPcache compiles it to bytecode and stores that bytecode in shared memory. Every time the same file runs again, OPcache skips straight to the stored bytecode. The file is never read from disk again until it changes.
For WordPress, this matters enormously. A typical WordPress page load touches hundreds of PHP files: WordPress core files, active plugin files, theme files, and autoloaded class files. Without OPcache, all of them compile on every request. With OPcache properly configured, they compile once and stay in memory.
Before You Start: Check the Current OPcache State
Run this command to see whether OPcache is currently enabled and what its settings are:
php -i | grep -i opcache
Look for two key lines in the output:
opcache.enable => On => On
opcache.memory_consumption => 128 => 128
The first confirms OPcache is enabled. The second shows the current memory allocation. If opcache.enable shows Off, OPcache is disabled and needs to be enabled. If memory shows 128, the default is in place and needs updating.
For a more detailed picture, check which php.ini controls your web server PHP:
php -i | grep "Loaded Configuration File"
Note this path. It is the file you will edit.
Also create a temporary PHP info page to see what the web server PHP is using. The CLI and web server versions can differ:
sudo nano /var/www/yourdomain.com/opcache-check.php
Paste:
<?php phpinfo(INFO_MODULES); ?>
Visit http://yourdomain.com/opcache-check.php in a browser. Search the page for opcache. Confirm it shows Enabled. Note the configuration values.
Delete the file immediately after checking:
sudo rm /var/www/yourdomain.com/opcache-check.php
Step 1: Find the Correct php.ini File
OPcache needs to be configured in the php.ini file that your web server actually loads. There are usually multiple php.ini files on a server: one for CLI, one for PHP-FPM, one for Apache mod_php.
Find your PHP version:
php -v
Note the major.minor version (for example 8.1 or 8.2).
Find all php.ini files for that version:
find /etc/php -name "php.ini" 2>/dev/null
The paths look like this:
/etc/php/8.1/cli/php.ini
/etc/php/8.1/fpm/php.ini
/etc/php/8.1/apache2/php.ini
Edit the one matching your web server setup. For Nginx with PHP-FPM:
sudo nano /etc/php/8.1/fpm/php.ini
For Apache with mod_php:
sudo nano /etc/php/8.1/apache2/php.ini
If you are unsure which is active, check your web server configuration for fastcgi_pass (Nginx) or mod_php module (Apache) to confirm which PHP SAPI is running.
Alternatively, create a dedicated OPcache configuration file in the conf.d directory. This is the cleaner approach because it survives php.ini replacements during package upgrades:
sudo nano /etc/php/8.1/fpm/conf.d/10-opcache.ini
Settings in this file override the defaults in php.ini. Use this file for all changes in the steps below.
Step 2: Count Your WordPress PHP Files
The max_accelerated_files setting must be higher than the total number of PHP files in your WordPress installation. Set it too low and OPcache silently stops caching files once the limit is reached.
Count the PHP files in your WordPress directory:
find /var/www/yourdomain.com -name "*.php" -type f | wc -l
Replace /var/www/yourdomain.com with your actual WordPress path.
Run this and note the number. Common ranges:
| WordPress Configuration | Typical PHP File Count |
|---|---|
| WordPress core only | 2,500 to 3,000 |
| Core plus 10 plugins | 5,000 to 8,000 |
| Core plus 20 plugins | 8,000 to 15,000 |
| Core plus 30+ plugins | 15,000 to 30,000 |
| WooCommerce with extensions | 20,000 to 50,000 |
Set max_accelerated_files to a number higher than your count. Use the next step up in the following series: 10000, 20000, 40000, 100000. Always set it higher than your actual count to leave headroom for future plugins.
Step 3: Configure OPcache Memory Allocation
Open your OPcache configuration file:
sudo nano /etc/php/8.1/fpm/conf.d/10-opcache.ini
Set the memory allocation based on your server RAM:
opcache.memory_consumption=256
The value is in megabytes. Use these as your reference:
| Server RAM | WordPress Plugins | Recommended opcache.memory_consumption |
|---|---|---|
| 2GB | Under 15 plugins | 128 |
| 4GB | Under 20 plugins | 256 |
| 4GB | 20 to 30 plugins | 512 |
| 8GB | Any count | 256 to 512 |
| 16GB and above | Any count | 512 to 1024 |
If OPcache memory fills up, new files are compiled every request and not cached. You get no error and no warning. Monitoring (covered in Step 10) catches this.
Step 4: Set max_accelerated_files
Add the setting to your configuration file using the count from Step 2:
opcache.max_accelerated_files=20000
Replace 20000 with a number higher than your actual file count. This value must exceed the number of PHP files or OPcache silently stops caching once it fills up.
Step 5: Configure interned_strings_buffer
PHP stores repeated string literals — hook names, option keys, class names — in a shared interned strings buffer. The default is 8MB. WordPress uses thousands of unique strings across core and plugins.
Set it higher:
opcache.interned_strings_buffer=16
For sites with many plugins or high traffic, increase to 32. The value is in megabytes.
Step 6: Configure validate_timestamps and revalidate_freq
These two settings control how OPcache decides whether a cached file is still valid or whether the original PHP file changed and needs recompiling.
validate_timestamps set to 1 means OPcache checks the file modification time. Set to 0 means it never checks and always serves the cached version until you manually clear the cache.
revalidate_freq controls how often in seconds OPcache checks whether a file changed, when validate_timestamps is 1. The default is 2 seconds, meaning OPcache checks every file every 2 seconds. For a busy server, this is unnecessary overhead.
For production WordPress sites:
opcache.validate_timestamps=1
opcache.revalidate_freq=60
This checks files every 60 seconds. Plugin and theme updates trigger a file change detection within a minute of the change. This is the right balance for most production sites.
For maximum performance on a controlled server:
opcache.validate_timestamps=0
With this setting, OPcache never checks for file changes. Bytecode stays cached until you explicitly clear it. Any code change — plugin update, theme edit, WordPress core update — requires a manual cache clear or visitors get stale PHP until the server restarts.
For sites that update plugins regularly through the WordPress admin, stick with validate_timestamps=1 and revalidate_freq=60. The performance difference is small and the operational simplicity is worth it.
Step 7: Keep save_comments Enabled
This setting controls whether PHP preserves code comments in the compiled bytecode.
It must stay enabled for WordPress:
opcache.save_comments=1
Some WordPress plugins and components use PHP docblock annotations. Doctrine-based code, some REST API extensions, and specific caching plugins read these comments at runtime. Setting save_comments=0 silently breaks these plugins in ways that are difficult to diagnose.
Always keep this at 1 for WordPress regardless of what optimisation guides suggest.
Step 8: Configure the Remaining Production Settings
Add these to your configuration file:
opcache.max_wasted_percentage=10
When PHP files change and their cached bytecode becomes stale, OPcache marks that memory as wasted rather than immediately freeing it. When wasted memory exceeds this percentage of the total allocation, OPcache automatically restarts and cleans up. Setting 10 percent is the right balance for WordPress deployments.
opcache.consistency_checks=0
When enabled, OPcache verifies bytecode integrity on every request. This adds overhead and is not needed for normal production use. Keep it at 0.
opcache.huge_code_pages=1
This enables huge memory pages for OPcache storage, improving performance on servers with enough memory. It requires the operating system to support huge pages. On modern Linux systems it works without additional configuration.
Step 9: Configure JIT for PHP 8.x
If your server runs PHP 8.0 or higher, JIT (Just-In-Time) compilation is available. JIT takes OPcache’s stored bytecode one step further and compiles it to native machine code at runtime.
Check your PHP version to confirm JIT is available:
php -v
PHP 8.x shows in the first line. If you see PHP 7.x, skip this step.
Add JIT settings to your configuration file:
opcache.jit=1255
opcache.jit_buffer_size=128m
The value 1255 for opcache.jit is the recommended setting for web server workloads. It breaks down as a four-digit code:
| Digit Position | Meaning | Value 1255 Choice |
|---|---|---|
| First digit | CPU-specific optimisations | 1 = enabled |
| Second digit | Trigger for JIT | 2 = on function entry |
| Third digit | Optimisation level | 5 = maximum |
| Fourth digit | Register allocation | 5 = maximum |
For jit_buffer_size, 128MB is appropriate for most servers. For smaller servers (2GB RAM), use 64m instead.
JIT benefits WordPress most for computation-heavy operations: complex WooCommerce calculations, bulk processing, image manipulation. For simple blog page loads, the gain is smaller. Enable it regardless because the overhead of keeping it enabled is negligible.
Step 10: The Complete Configuration File
Here is the complete configuration for a WordPress production site on a 4GB server with PHP 8.1 and approximately 15,000 PHP files:
; OPcache configuration for WordPress production
; Adjust memory values based on server RAM and file count

opcache.enable=1
opcache.enable_cli=0

; Memory
opcache.memory_consumption=256
opcache.interned_strings_buffer=16
opcache.max_accelerated_files=20000
opcache.max_wasted_percentage=10

; File validation
opcache.validate_timestamps=1
opcache.revalidate_freq=60
opcache.save_comments=1

; Performance
opcache.consistency_checks=0
opcache.huge_code_pages=1
opcache.fast_shutdown=1

; JIT (PHP 8.x only - remove these two lines on PHP 7.x)
opcache.jit=1255
opcache.jit_buffer_size=128m
Save this file. Every setting has a comment explaining its purpose so future you or a colleague can understand the configuration without looking everything up.
Step 11: Restart PHP and Apply the Configuration
Apply the new configuration by restarting PHP.
For PHP-FPM:
sudo systemctl restart php8.1-fpm
For Apache mod_php:
sudo systemctl restart apache2
Confirm the new settings are active:
php -i | grep -E "opcache.memory_consumption|opcache.max_accelerated_files|opcache.jit\b"
The output should show your new values. If it still shows the old values, the wrong php.ini file was edited. Re-check Step 1.
Also verify through the web server. Create the phpinfo page again briefly:
sudo nano /var/www/yourdomain.com/opcache-check.php
Paste <?php phpinfo(INFO_MODULES); ?> and visit it in a browser. Find the OPcache section. All your configured values should appear under the Local Value column.
Delete it:
sudo rm /var/www/yourdomain.com/opcache-check.php
Step 12: Verify OPcache Is Actually Caching Files
OPcache can appear enabled while silently failing to cache files. This happens when max_accelerated_files is too low or when memory fills up. The configuration looks correct but performance is no better than without OPcache.
Create a proper status page. This gives you real-time data on what OPcache is doing:
sudo nano /var/www/yourdomain.com/opcache-status.php
Paste:
<?php
$status = opcache_get_status(false);
$config = opcache_get_configuration();

echo "<pre>";
echo "OPcache Enabled: " . ($status['opcache_enabled'] ? 'YES' : 'NO') . "\n\n";

echo "=== Memory ===\n";
$mem = $status['memory_usage'];
$used = round($mem['used_memory'] / 1048576, 2);
$free = round($mem['free_memory'] / 1048576, 2);
$wasted = round($mem['wasted_memory'] / 1048576, 2);
echo "Used: {$used}MB\n";
echo "Free: {$free}MB\n";
echo "Wasted: {$wasted}MB\n";
echo "Wasted %: " . round($status['memory_usage']['current_wasted_percentage'], 2) . "%\n\n";

echo "=== Files ===\n";
echo "Cached scripts: " . $status['opcache_statistics']['num_cached_scripts'] . "\n";
echo "Max files: " . $config['directives']['opcache.max_accelerated_files'] . "\n";
echo "Cache full: " . ($status['cache_full'] ? 'YES - INCREASE LIMIT' : 'No') . "\n\n";

echo "=== Hit Rate ===\n";
echo "Hits: " . $status['opcache_statistics']['hits'] . "\n";
echo "Misses: " . $status['opcache_statistics']['misses'] . "\n";
$hitRate = round($status['opcache_statistics']['opcache_hit_rate'], 2);
echo "Hit rate: {$hitRate}%\n\n";

echo "=== JIT ===\n";
if (isset($status['jit'])) {
    echo "JIT enabled: " . ($status['jit']['enabled'] ? 'YES' : 'NO') . "\n";
    echo "JIT kind: " . $status['jit']['kind'] . "\n";
} else {
    echo "JIT not available (PHP 7.x)\n";
}
echo "</pre>";
?>
Save it. Browse your WordPress site in a separate browser window, visiting five to ten different pages. Then visit the status page:
http://yourdomain.com/opcache-status.php
Read the output:
Cached scripts should be growing. After visiting several pages it should be in the hundreds or thousands. If it stays at zero, OPcache is not caching anything.
Cache full should show No. If it shows YES, either max_accelerated_files or memory_consumption is too low. Increase whichever is the binding constraint.
Hit rate should be above 90 percent after warming up with real traffic. A rate below 50 percent during normal traffic means the cache is not effective.
Free memory should not be near zero. If free memory is under 10 percent of your configured limit, increase memory_consumption.
Delete the status page when you are done checking:
sudo rm /var/www/yourdomain.com/opcache-status.php
Do not leave this file accessible on a production site. It exposes internal server configuration.
Step 13: Measure the Performance Improvement
Confirm OPcache actually made a difference. This step is worth doing once after configuration to validate the results.
Install Query Monitor temporarily from the WordPress plugin directory. Activate it.
Without OPcache (test on a staging server or temporarily disable OPcache):
opcache.enable=0
Restart PHP and load a WordPress page. Note in the Query Monitor toolbar: total PHP time, query count, page generation time.
Re-enable OPcache:
opcache.enable=1
Restart PHP, load the same page. Compare the numbers.
Typical results on a plugin-heavy WordPress site:
| Metric | Without OPcache | With OPcache | Improvement |
|---|---|---|---|
| PHP execution time | 250ms | 80ms | 68% faster |
| Time to first byte | 350ms | 160ms | 54% faster |
| Page generation time | 400ms | 180ms | 55% faster |
Deactivate Query Monitor after testing. It is a development tool and adds overhead to every request.
Step 14: Set Up a Cron Job to Monitor OPcache Health
OPcache health can degrade silently over time. Adding plugins increases file count. Traffic growth means more cache evictions. A monitoring cron job alerts you before the cache degrades enough to affect performance.
Create a monitoring script:
sudo nano /usr/local/bin/check-opcache.sh
Paste:
#!/bin/bash

STATUS=$(php -r "
\$s = opcache_get_status(false);
if (!\$s['opcache_enabled']) {
    echo 'DISABLED';
    exit;
}
if (\$s['cache_full']) {
    echo 'FULL';
    exit;
}
\$hitRate = \$s['opcache_statistics']['opcache_hit_rate'];
if (\$hitRate < 80) {
    echo 'LOW_HIT_RATE:' . round(\$hitRate, 1);
    exit;
}
\$wasted = \$s['memory_usage']['current_wasted_percentage'];
if (\$wasted > 15) {
    echo 'HIGH_WASTE:' . round(\$wasted, 1);
    exit;
}
echo 'OK';
")

if [ "$STATUS" != "OK" ]; then
    echo "OPcache alert on $(hostname): $STATUS" | mail -s "OPcache Warning" your@email.com
fi
Replace your@email.com with your actual email address. Make it executable:
sudo chmod +x /usr/local/bin/check-opcache.sh
Add to cron:
sudo crontab -e
Add:
*/30 * * * * /usr/local/bin/check-opcache.sh
This checks OPcache health every 30 minutes and emails you if anything is wrong.
Step 15: Clear OPcache After WordPress Updates
When you update a plugin, theme, or WordPress core, the PHP files change on disk. If validate_timestamps=1 with revalidate_freq=60, OPcache detects the changes within a minute automatically.
If you set validate_timestamps=0 for maximum performance, you must clear OPcache manually after every file change. OPcache serves the old compiled bytecode indefinitely otherwise.
Clear via WP-CLI:
wp --allow-root eval 'opcache_reset();' --path=/var/www/yourdomain.com
Clear via PHP-FPM restart (forces recompilation of everything):
sudo systemctl restart php8.1-fpm
Clear via script (useful after automated deployments):
php -r "opcache_reset();"
Note that opcache_reset() called from CLI only affects the CLI OPcache, not the web server OPcache. For the web server, you must restart PHP-FPM or call opcache_reset() through a web request.
For managed deployments, create a reset endpoint:
sudo nano /var/www/yourdomain.com/opcache-reset.php
Paste:
<?php
$secret = 'your_long_random_secret_here';
if (!isset($_GET['secret']) || $_GET['secret'] !== $secret) {
    http_response_code(403);
    exit('Forbidden');
}
if (function_exists('opcache_reset')) {
    opcache_reset();
    echo 'OPcache cleared';
} else {
    echo 'OPcache not available';
}
Call it from your deployment script:
curl "https://yourdomain.com/opcache-reset.php?secret=your_long_random_secret_here"
Use a long random secret to prevent unauthorised cache resets:
openssl rand -hex 32
Common Problems and Solutions
Problem: OPcache is enabled but hit rate stays below 50 percent
The file limit or memory limit is too low. Check the status page from Step 12. If cache_full shows YES, increase max_accelerated_files or memory_consumption. Restart PHP and let the cache warm up with real traffic before checking the hit rate again.
Problem: OPcache enabled but cached scripts count stays at zero
The web server PHP is not using the php.ini you edited. CLI PHP and web server PHP use different configuration files. Create the status page from Step 12 and check which php.ini the web server loads. Edit that file or its corresponding conf.d directory.
Problem: Plugins behaving strangely after enabling OPcache
Check that save_comments is set to 1. Annotation-dependent plugins fail silently with save_comments=0. If the problem persists with save_comments=1, temporarily disable OPcache to confirm it is the cause, then re-enable and investigate which plugin is affected.
Problem: Changes to PHP files do not take effect immediately
validate_timestamps=1 with revalidate_freq=60 means changes appear within 60 seconds. If you need immediate effect, drop the revalidate_freq to 2 for development, or manually clear OPcache using the methods in Step 15.
Problem: High wasted memory percentage
If wasted memory consistently exceeds 15 percent, your site has frequent file changes causing bytecode invalidation. This commonly happens on busy sites running WordPress auto-updates during peak traffic. Set a lower max_wasted_percentage (try 5) to trigger automatic cleanup more aggressively.
Problem: JIT not enabled despite configuration
Confirm you are running PHP 8.x:
php -v
PHP 7.x does not support JIT. Also confirm the extension is compiled with JIT support:
php -i | grep "JIT"
If JIT shows as not enabled, the PHP build your server uses may not include JIT support. Check with your hosting provider or rebuild PHP from source with JIT enabled.
OPcache on Managed WordPress Hosting
On managed hosting, OPcache is usually already enabled and partially configured. What varies is whether the settings are tuned for WordPress specifically.
Hosts that configure OPcache well for WordPress typically set memory above 256MB, file limits above 20000, and have monitoring for cache saturation. Hosts that leave defaults in place provide the 128MB memory and 10000 file limit, which saturates quickly on plugin-heavy sites.
A typical WordPress site running 20 active plugins generates more than 10000 PHP files once WooCommerce and its extensions are included, which means the default file limit fills immediately and OPcache stops helping for a significant portion of the codebase.
On Cloudways, OPcache settings are accessible from the server management panel under PHP settings. You can adjust memory and file limits without editing php.ini directly. On Kinsta, OPcache is configured as part of their Google Cloud C2 infrastructure and is tuned at the platform level. On ScalaHosting managed VPS, SPanel exposes PHP configuration including OPcache through the control panel.
Even on managed hosting, verify your OPcache settings using the status page in Step 12. A visual Enabled status in a control panel does not tell you whether the memory limit and file limit are appropriate for your specific install.
Frequently Asked Questions
Does OPcache conflict with Redis object caching?
No. They operate at completely different layers. OPcache caches compiled PHP bytecode, eliminating PHP compilation time. Redis caches database query results, eliminating repeated MySQL queries. Running both together removes two separate bottlenecks. A WordPress site with OPcache handling PHP compilation and Redis handling database queries processes pages significantly faster than one using either alone. The two tools do not overlap or interfere.
How much memory should I give OPcache on a 2GB server?
On a 2GB server, 128MB to 256MB for OPcache is reasonable. The server needs to leave enough RAM for MySQL (typically 256 to 512MB), PHP-FPM workers (each uses 30 to 80MB), Nginx (minimal), and the operating system. For a 2GB server running WordPress, MySQL, and PHP-FPM, 256MB for OPcache is the upper practical limit. If memory pressure becomes an issue, reduce to 128MB and monitor for cache saturation.
Does OPcache need to be cleared after every WordPress plugin update?
With validate_timestamps=1 and revalidate_freq=60, OPcache detects file changes within 60 seconds of a plugin update and recompiles automatically. You do not need to clear it manually. With validate_timestamps=0, you must clear manually after every file change or WordPress serves stale compiled bytecode. For most sites, validate_timestamps=1 with revalidate_freq=60 is the right setting because it handles updates automatically without requiring a deployment step.
What is the difference between OPcache and a full-page cache?
OPcache speeds up PHP execution by caching compiled code. It still runs PHP and queries the database for every request. A full-page cache stores the complete HTML output of a page and serves it to visitors without running PHP or touching the database at all. Page caching is faster for static content served to anonymous visitors. OPcache is the foundation that makes dynamic PHP execution fast for content that cannot be page-cached, such as logged-in user pages, cart operations, and admin tasks. Both are needed on a well-configured WordPress server.
Can I use OPcache on shared hosting?
On shared hosting, you typically cannot edit php.ini or configure OPcache settings. The host manages these settings for all accounts on the shared server. If your shared host has OPcache enabled, your WordPress site benefits from it automatically. If the settings are poorly tuned, you cannot change them without upgrading to a VPS or managed hosting where you have configuration access.
How do I know if OPcache is causing a problem on my site?
The fastest diagnostic is to disable OPcache temporarily and see if the problem goes away. Set opcache.enable=0, restart PHP, and test the site. If the issue disappears, OPcache is involved. Common OPcache-related issues include stale code being served after updates (fix with cache clear or lower revalidate_freq), plugin failures due to save_comments being disabled (fix by setting save_comments=1), and memory exhaustion causing erratic performance (fix by increasing memory_consumption).