
Every WordPress page load runs database queries. Lots of them.
A typical page loads options, post data, user data, term relationships, and dozens of other records from MySQL. A page with many plugins can run 50 to 200 database queries before it renders. Each query takes time. Each query adds load to your database server.
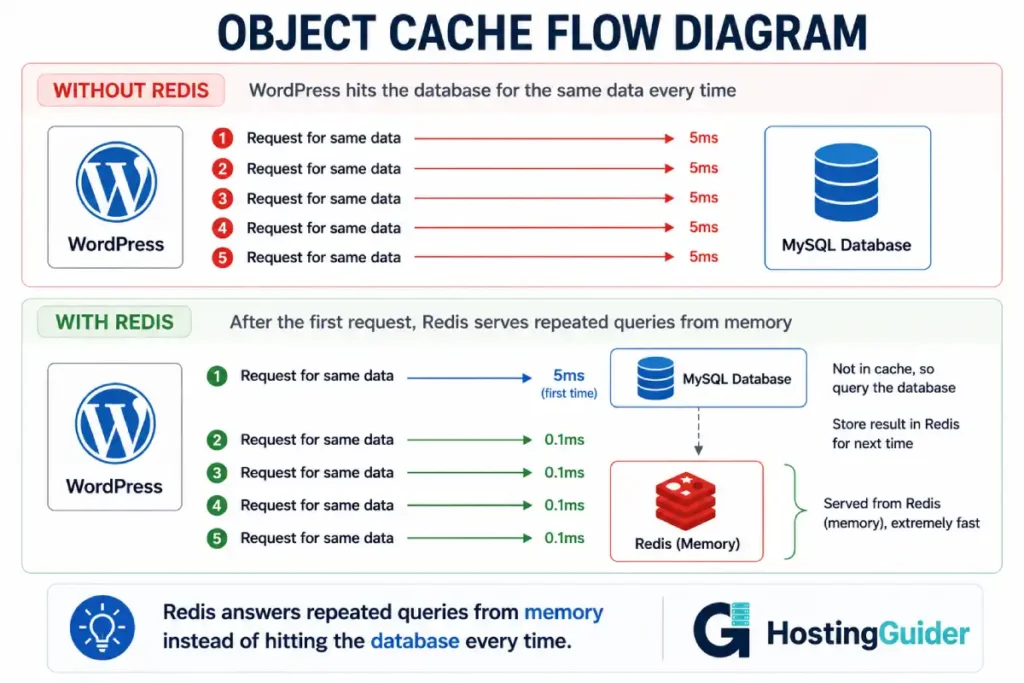
Object caching fixes this. It stores the results of database queries in memory. The next time WordPress needs the same data, it reads from memory instead of querying the database. Memory is far faster than disk. A query that took 5 milliseconds from MySQL takes 0.1 milliseconds from Redis.
This guide sets up Redis object caching for WordPress correctly. Not the quick version that breaks under load. The proper version with memory limits, security, persistence settings, and verification that it actually works.
This guide assumes you have a VPS or dedicated server running WordPress with root or sudo access. If you do not have a server set up yet, start with the VPS setup tutorial first.
Key Takeaways
- Redis stores database query results in memory, eliminating repeated queries to MySQL
- A correctly configured Redis setup reduces database load by 50 to 90 percent on plugin-heavy sites
- Redis must have a memory limit and eviction policy set, or it can consume all server RAM
- Redis should listen only on localhost, never on a public network interface
- The Redis Object Cache plugin connects WordPress to Redis with one click after server setup
- Always verify the cache is actually working. A misconfigured setup silently does nothing
What Object Caching Actually Does
WordPress has a built-in object cache. By default, it is non-persistent. It holds data only for the duration of a single page load. When the page finishes rendering, the cache is discarded. The next visitor triggers all the same database queries again.
A persistent object cache like Redis keeps that cached data in memory across page loads. The first visitor triggers the database queries. Redis stores the results. Every subsequent visitor reads from Redis. The database is barely touched.
Think of it like this. Without object caching, every customer who walks into a shop asks the same question and a worker walks to the storeroom to check each time. With object caching, the worker checks once, writes the answer on a board, and points to the board for every customer after that.
The difference is dramatic on busy sites. A WooCommerce store or a membership site with many logged-in users sees the largest improvement, because those sites cannot use full-page caching for logged-in users and rely heavily on the database.
How caching affects site speed covers the different caching layers and how object caching fits alongside page caching.
Before You Start: Check Your Server
Confirm your server has enough RAM to dedicate some to Redis.
Check available memory:
free -m
Look at the total memory. Redis needs a reasonable allocation to be useful. The guidance:
| Server RAM | Recommended Redis Memory |
|---|---|
| 1GB | Skip Redis, too little RAM |
| 2GB | 128MB to 256MB |
| 4GB | 256MB to 512MB |
| 8GB | 512MB to 1GB |
| 16GB and above | 1GB to 2GB |
On a 1GB server, Redis competes with MySQL and PHP for memory. The object cache benefit is outweighed by the memory pressure. For servers with 2GB or more, Redis is worth setting up.
Also confirm which PHP version you run, because you need the matching PHP Redis extension:
php -v
Note the version. You will use it in the extension install step.
Step 1: Install the Redis Server
Update your package list and install Redis:
sudo apt update
sudo apt install redis-server -y
Confirm Redis installed and is running:
sudo systemctl status redis-server
Look for Active: active (running). Press q to exit.
Test that Redis responds:
redis-cli ping
The expected response is:
PONG
If you see PONG, the Redis server is installed and responding. If you see a connection error, Redis is not running. Start it:
sudo systemctl start redis-server
Step 2: Configure Redis Memory Limit and Eviction Policy
This step is critical and is the one most tutorials skip. Without a memory limit, Redis keeps storing data until it consumes all available RAM. When the server runs out of memory, the kernel starts killing processes, often MySQL, which takes your site offline.
Open the Redis configuration file:
sudo nano /etc/redis/redis.conf
Find the maxmemory setting. Use Ctrl+W to search for maxmemory. It is usually commented out with a # at the start.
Set a memory limit appropriate for your server. For a 4GB server, 512MB is reasonable:
maxmemory 512mb
Just below it, set the eviction policy:
maxmemory-policy allkeys-lru
The allkeys-lru policy means: when Redis hits the memory limit, it removes the least recently used keys to make room for new ones. This is the correct policy for a cache. The cache stays within its memory budget and automatically discards old, unused data.
Here is what each common eviction policy does:
| Policy | Behaviour | Use For |
|---|---|---|
| noeviction | Rejects new writes when full | Never use for a cache |
| allkeys-lru | Evicts least recently used keys | Correct for WordPress object cache |
| volatile-lru | Evicts LRU keys with an expiry set | When mixing cache and persistent data |
| allkeys-random | Evicts random keys | Rarely useful |
Use allkeys-lru for WordPress object caching. It is the right choice in almost every case.
Save the file with Ctrl+X, then Y, then Enter.
Step 3: Secure Redis to Localhost Only
By default, Redis on Ubuntu binds to localhost only. But you must verify this, because a Redis server exposed to the internet is a serious security risk. Attackers scan for open Redis ports constantly. An exposed Redis with no password lets anyone read and write your cache, and in some configurations, execute commands on your server.
Open the configuration file again if you closed it:
sudo nano /etc/redis/redis.conf
Search for the bind directive with Ctrl+W typing bind. Confirm it reads:
bind 127.0.0.1 -::1
This binds Redis to the local loopback interface only. Redis is reachable from the server itself but not from any external network.
Next, confirm protected mode is on. Search for protected-mode:
protected-mode yes
For an extra layer of security, set a password. Search for requirepass:
requirepass your_strong_redis_password_here
Replace the placeholder with a long random password. Generate one:
openssl rand -base64 32
Copy the output and use it as your Redis password. Write it down. You need it for the WordPress configuration later.
Save and exit.
Step 4: Restart Redis to Apply Configuration
Apply all the configuration changes:
sudo systemctl restart redis-server
Verify Redis is still running after the restart:
sudo systemctl status redis-server
If you set a password, the basic ping now requires authentication:
redis-cli -a your_strong_redis_password_here ping
Expected response:
PONG
You may see a warning about using a password on the command line. That warning is normal and safe in this context.
Confirm the memory limit applied:
redis-cli -a your_strong_redis_password_here CONFIG GET maxmemory
The output should show your configured limit in bytes. For 512mb, it shows 536870912.
Step 5: Enable Redis to Start on Boot
Make sure Redis starts automatically when the server reboots:
sudo systemctl enable redis-server
Verify it is enabled:
sudo systemctl is-enabled redis-server
Expected output:
enabled
Without this step, Redis would not start after a server reboot, and WordPress would silently fall back to the slow non-persistent cache.
Step 6: Install the PHP Redis Extension
WordPress talks to Redis through a PHP extension. Without this extension, the Redis plugin cannot connect, no matter how well Redis itself is configured.
Install the extension matching your PHP version. For PHP 8.1:
sudo apt install php8.1-redis -y
Adjust the version number to match what you found in the pre-check. For PHP 8.2, use php8.2-redis. For PHP 7.4, use php7.4-redis.
Restart your PHP processor to load the new extension. If you use PHP-FPM:
sudo systemctl restart php8.1-fpm
If you use Apache with mod_php:
sudo systemctl restart apache2
Verify the extension is loaded:
php -m | grep redis
The expected output is:
redis
If redis appears, the extension is installed and active. If nothing appears, the extension did not load. Confirm you installed the version matching your active PHP version, and that you restarted the PHP processor.
Step 7: Install the Redis Object Cache Plugin
Now connect WordPress to Redis. Log into your WordPress admin dashboard.
Go to Plugins, then Add New. Search for Redis Object Cache by Till Krüss. This is the most widely used and well-maintained Redis plugin for WordPress.
Click Install Now. After it installs, click Activate.
Step 8: Configure WordPress to Connect to Redis
If you set a Redis password in Step 3, WordPress needs to know it. Add the connection details to wp-config.php.
Connect to your server and edit wp-config.php:
sudo nano /var/www/yourdomain.com/wp-config.php
Add these lines just before the line that says /* That's all, stop editing! Happy publishing. */:
define('WP_REDIS_HOST', '127.0.0.1');
define('WP_REDIS_PORT', 6379);
define('WP_REDIS_PASSWORD', 'your_strong_redis_password_here');
define('WP_REDIS_TIMEOUT', 1);
define('WP_REDIS_READ_TIMEOUT', 1);
define('WP_REDIS_DATABASE', 0);
Replace the password with the one you set in Step 3. If you did not set a password, omit the WP_REDIS_PASSWORD line.
The WP_REDIS_DATABASE value of 0 tells Redis which logical database to use. If you run multiple WordPress sites on the same server, give each one a different database number (0, 1, 2, and so on) so their caches do not collide.
Save and exit.
Step 9: Enable the Object Cache
Return to the WordPress admin dashboard. Go to Settings, then Redis.
You see the Redis Object Cache status page. It shows the connection details and a status indicator.
Click the Enable Object Cache button.
The plugin writes a file called object-cache.php to your wp-content directory. This file is the drop-in that routes all WordPress cache operations through Redis.
After enabling, the status should change to Connected. The page shows:
- Status: Connected
- Redis: Reachable
- The Redis version
- Connection details
If the status shows Connected, WordPress is now using Redis for object caching.
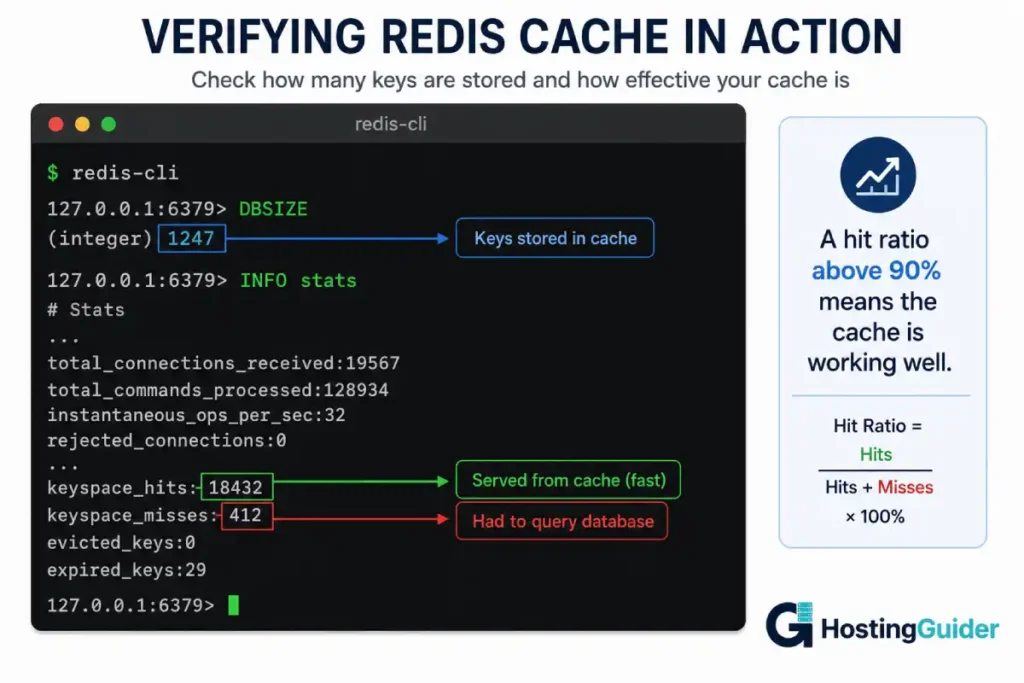
Step 10: Verify the Cache Is Actually Working
A connected status is good, but verify that data is actually flowing through the cache. Many setups show connected but cache nothing due to misconfiguration.
Check Redis is receiving keys. From your server command line:
redis-cli -a your_strong_redis_password_here
Once in the Redis console, check how many keys exist:
DBSIZE
Browse your WordPress site in a browser, visiting several pages. Then run DBSIZE again:
DBSIZE
The number should increase. WordPress is writing cache keys to Redis as pages load. If the number stays at 0 after browsing the site, the cache is not working.
Check the cache hit rate. Still in the Redis console:
INFO stats
Look for two values:
keyspace_hits
keyspace_misses
A hit is when WordPress requested data and Redis had it. A miss is when Redis did not have the data and WordPress had to query the database. As your site receives traffic, the hit count should grow much faster than the miss count. A healthy cache shows a hit rate above 90 percent after warming up.
Exit the Redis console:
exit
You can also check the hit rate from the WordPress admin. On the Settings, Redis page, the plugin displays the hit ratio and other metrics in a dashboard.
Step 11: Measure the Performance Improvement
Confirm the cache made a real difference. Check the database query count before and after.
Install the Query Monitor plugin temporarily. Go to Plugins, Add New, search Query Monitor, install and activate.
Query Monitor shows the number of database queries and total query time for each page in the admin toolbar.
Load a page and note the query count and time. On a plugin-heavy site with object caching working, you typically see:
- Query count drop from 100 to 200 down to 20 to 50
- Total query time drop significantly
- Page generation time decrease
After confirming the improvement, you can deactivate Query Monitor. It is a development tool and adds slight overhead, so it is best left off on production once you have your measurements.
How to Flush the Cache When Needed
Sometimes you need to clear the cache. After a major site change, a plugin update, or if you suspect stale data is being served.
Flush from the WordPress admin: go to Settings, Redis, and click Flush Cache.
Flush from the command line using WP-CLI:
cd /var/www/yourdomain.com
wp cache flush
Flush the entire Redis database directly:
redis-cli -a your_strong_redis_password_here FLUSHDB
Use FLUSHDB carefully. It removes all keys in the current Redis database. WordPress rebuilds the cache automatically as pages are loaded again, so a flush causes a brief period of slower performance while the cache warms back up.
Running Multiple WordPress Sites on One Redis Server
If you host several WordPress sites on the same server, they can share one Redis server safely by using separate logical databases.
For site one, in its wp-config.php:
define('WP_REDIS_DATABASE', 0);
For site two:
define('WP_REDIS_DATABASE', 1);
For site three:
define('WP_REDIS_DATABASE', 2);
Redis supports 16 logical databases by default (0 through 15). Each site uses its own database number, so flushing one site’s cache does not affect the others.
You can also set a unique key prefix for each site as an alternative:
define('WP_REDIS_PREFIX', 'site1:');
The database separation method is cleaner and is the recommended approach for most multi-site setups.
Common Problems and Solutions
Problem: Plugin shows Connected but DBSIZE stays at zero
The object-cache.php drop-in may not have been created. Check it exists:
ls -la /var/www/yourdomain.com/wp-content/object-cache.php
If it is missing, go to Settings, Redis in the admin and click Enable Object Cache again. If the file cannot be created, check that wp-content is writable by the web server user:
sudo chown www-data:www-data /var/www/yourdomain.com/wp-content
Problem: Connection refused error in the plugin
Redis is not running or not reachable. Confirm it is running:
sudo systemctl status redis-server
redis-cli -a your_password ping
If ping fails, restart Redis and check the bind address in redis.conf is 127.0.0.1.
Problem: NOAUTH Authentication required error
You set a Redis password but did not add it to wp-config.php, or the password does not match. Confirm the WP_REDIS_PASSWORD value in wp-config.php exactly matches the requirepass value in redis.conf.
Problem: Redis using too much memory
The maxmemory limit was not set or not applied. Confirm it:
redis-cli -a your_password CONFIG GET maxmemory
If it returns 0, the limit is not set. Edit redis.conf, set maxmemory, and restart Redis.
Problem: Site broke after enabling cache
Disable the cache quickly by removing the drop-in:
sudo rm /var/www/yourdomain.com/wp-content/object-cache.php
WordPress immediately falls back to the default non-persistent cache. The site works again. Then investigate the Redis configuration before re-enabling.
Problem: Cache not surviving server reboot
Redis was not enabled to start on boot. Fix it:
sudo systemctl enable redis-server
When Redis Object Caching Helps Most
Redis object caching delivers the biggest improvement for specific site types.
WooCommerce stores benefit enormously. Product pages, cart operations, and checkout all involve heavy database activity that cannot be full-page cached. Object caching speeds up these dynamic operations.
Membership and community sites benefit because logged-in users bypass page caching entirely. Every page they load hits the database. Object caching reduces that database load dramatically.
Plugin-heavy sites benefit because each plugin adds database queries. A site with 30 active plugins running 150 queries per page sees object caching cut that query load substantially.
For a simple blog with light traffic and strong full-page caching, Redis object caching provides a smaller benefit. Most visitors hit the page cache and never trigger database queries. The object cache still helps for the admin area and uncached requests, but the improvement is less dramatic.
If you run managed WordPress hosting, object caching is often already configured. Kinsta includes Redis as an add-on with one-click activation. Cloudways offers Redis on their managed cloud servers through the platform dashboard. ScalaHosting supports Redis on their managed VPS plans. On managed hosting, you skip the server setup steps and enable the cache through the provider dashboard or the plugin.
Frequently Asked Questions
What is the difference between object caching and page caching?
Page caching stores the complete HTML output of a page and serves it to visitors without running PHP or querying the database at all. It is the fastest form of caching but only works for content that is the same for every visitor. Object caching stores individual database query results in memory. It speeds up dynamic operations that page caching cannot handle, like logged-in user pages, cart operations, and admin actions. The two work together. Page caching handles anonymous visitors. Object caching handles everything that cannot be page cached.
How much faster will my site be with Redis object caching?
The improvement depends on how database-heavy your site is. A plugin-heavy WordPress site or a WooCommerce store often sees database query counts drop by 50 to 90 percent and meaningful improvements in time to first byte for dynamic pages. A simple blog with strong page caching sees a smaller improvement because most visitors never trigger database queries. The clearest way to measure your specific gain is to compare query counts before and after using the Query Monitor plugin.
Does Redis object caching use a lot of memory?
It uses as much memory as you allow it to, up to the maxmemory limit you set. For most WordPress sites, 256MB to 512MB is plenty. The eviction policy ensures Redis never exceeds the limit. It automatically removes the least recently used cached data to stay within budget. This is why setting the memory limit and eviction policy in Step 2 is essential. Without them, Redis could grow until it consumes all server RAM.
Is Redis safe to run on a public server?
Redis is safe when configured correctly. The key requirements are binding it to localhost only so it is not reachable from the internet, enabling protected mode, and optionally setting a password. A Redis server exposed to the public internet without a password is a serious security risk that attackers actively scan for. As long as you follow Step 3 and keep Redis bound to 127.0.0.1, it is safe.
What happens to my site if Redis crashes?
WordPress handles a Redis failure gracefully. If Redis becomes unavailable, the Redis Object Cache plugin falls back to the default non-persistent object cache. Your site continues working, just without the persistent cache speed benefit. Database query load increases back to normal levels during the outage. Once Redis comes back, the plugin reconnects automatically and resumes caching. This means a Redis failure slows your site but does not take it down.
Do I need to clear the Redis cache when I publish content?
The Redis Object Cache plugin handles cache invalidation automatically for most WordPress operations. When you update a post, the relevant cached objects are cleared automatically. You generally do not need to flush manually during normal content publishing. Manual flushing is mainly needed after major changes like switching themes, bulk-updating plugins, or if you suspect stale data is being served. WordPress and the plugin manage routine cache invalidation for you.
Should I use Redis or Memcached for WordPress object caching?
Both work well for WordPress object caching. Redis is generally preferred today because it supports more data types, offers persistence options, handles larger datasets more gracefully, and has a more actively maintained WordPress plugin ecosystem. Memcached is simpler and slightly faster for pure key-value caching but lacks persistence and advanced features. For a new setup, Redis is the recommended choice. The performance difference for typical WordPress workloads is small, and Redis gives you more flexibility.