
Most swap tutorials online were written for an era that no longer exists.
They tell you to use twice your RAM. They suggest leaving swappiness at the default value. They use dd to create the swap file. They skip the permissions step. Some of them give advice that is actively harmful on modern cloud infrastructure.
This guide does not repeat those mistakes.
You will learn what swap actually is, when you genuinely need it, when you do not, and how to configure it correctly for a modern Linux VPS. Every command is explained before you type it. Every default is questioned. By the end, you will have a properly configured swap setup that improves stability without harming performance.
This guide assumes you have an Ubuntu or Debian VPS already running. If you do not, start with our VPS setup guide first.
Key Takeaways
- Swap is an emergency buffer, not a substitute for real RAM
- The 2x RAM rule is from an earlier Linux era and does not apply to modern VPS systems
- Default swappiness of 60 is configured for desktops and is wrong for servers
- Most tutorials use slow and outdated commands like
ddwhen faster modern tools exist - Cloud providers like AWS recommend against swap on EBS-backed instances
- Properly configured swap improves stability. Misconfigured swap can degrade performance significantly
Quick Answer
For most VPS servers with 1-8GB of RAM, the correct approach is:
- Create a swap file half the size of your RAM (1GB swap for 2GB RAM, 4GB swap for 8GB RAM)
- Use
fallocatenotddto create the file - Set permissions to 600 before formatting it as swap
- Set
vm.swappinessto 10 instead of the default 60 - Add the entry to
/etc/fstabso it persists after reboot
The detailed step-by-step instructions follow below.
What Swap Actually Is
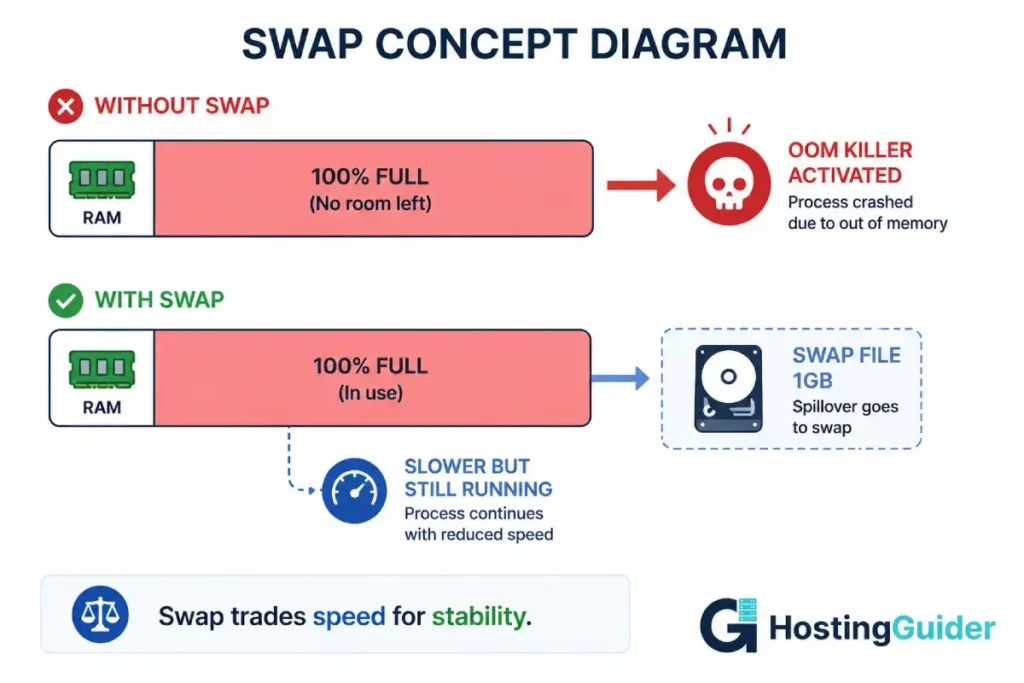
Swap is disk space that Linux uses when physical RAM gets full.
When your server needs more memory than is physically available, the kernel moves the least-used data from RAM onto disk. This frees up RAM for active processes. The data on disk is called swap.
Swap is slower than RAM. Significantly slower. RAM responds in nanoseconds. SSD responds in microseconds. Spinning disks respond in milliseconds. Reading from swap can be hundreds of times slower than reading from RAM.
This is why swap is an emergency buffer, not a performance feature. The goal is to prevent your server from crashing when memory is exhausted. The goal is not to expand your usable memory by adding swap.
Without swap, when your server runs out of RAM, the Linux kernel kills processes to recover memory. This is the Out of Memory (OOM) killer. It often kills MySQL or PHP-FPM, which takes your website offline.
Swap gives the kernel another option. Instead of killing a process, it can move some of that process’s data to disk. The process slows down, but it keeps running. Your site stays online.
What Most Tutorials Get Wrong
Before the step-by-step guide, here are the specific mistakes you will see repeated everywhere online.
Mistake 1: The 2x RAM Rule
This rule comes from an early Linux era when servers had 256MB of RAM. Doubling it gave you a useful buffer.
Today a basic VPS has 2GB to 8GB of RAM. Following the 2x rule means creating 16GB of swap on an 8GB server. That swap will almost never be used. It consumes disk space you paid for. And if it does get used heavily, your server is in serious trouble that more swap will not fix.
The correct modern guidance:
| RAM Size | Recommended Swap |
|---|---|
| Under 2GB | Equal to RAM |
| 2GB to 8GB | Half of RAM |
| 8GB to 16GB | 2GB to 4GB |
| 16GB and above | 1GB to 4GB |
Mistake 2: Leaving Swappiness at 60
Linux uses a kernel parameter called vm.swappiness to decide when to move data from RAM to swap. Higher values mean swap is used sooner. Lower values mean swap is used as a last resort.
The default value is 60 on Ubuntu. This default was chosen for desktop systems, where occasional swapping creates a smoother user experience.
For a server, 60 is wrong. The server should use swap only when there is no other option. The correct value for a VPS server is 10. Some workloads benefit from lowering it further to 1.
Mistake 3: Using dd Instead of fallocate
The classic command shown in old tutorials:
sudo dd if=/dev/zero of=/swapfile bs=1M count=2048
This works but is slow. On a 2GB swap file, it takes several minutes. It also wastes write cycles on your SSD.
The modern command:
sudo fallocate -l 2G /swapfile
This finishes in under a second. It does not write data unnecessarily. It uses the filesystem’s ability to allocate space without writing zeros.
There is one edge case where fallocate does not work. On the older ext3 filesystem and on some XFS configurations, fallocate creates a swap file that the kernel rejects. If you encounter this, fall back to dd. For ext4 (the default on modern Ubuntu and Debian), fallocate always works.
Mistake 4: Wrong Permissions Order
The swap file must be readable only by root. If anyone else can read it, they can read memory contents that were swapped out, which is a serious security problem.
The permissions must be set to 600 (read and write by owner only) before running mkswap. Modern Linux kernels refuse to enable a swap file with insecure permissions.
The correct order:
- Create the file
- Set permissions to 600
- Format it as swap
- Enable it
Most tutorials get steps 2 and 3 in the wrong order. The kernel may forgive this, but it is not guaranteed.
Mistake 5: Forgetting /etc/fstab
A swap file enabled with swapon works immediately. It also disappears when the server reboots.
To make swap persist across reboots, you must add an entry to /etc/fstab. This file tells Linux what to mount automatically at boot. Forgetting this step is one of the most common mistakes in published tutorials.
Mistake 6: Adding Swap on Cloud VPS Without Checking
AWS recommends against swap on EBS-backed instances for two reasons. First, EBS I/O has a cost per operation. Heavy swap use can produce surprising bills. Second, EBS performance characteristics can make swap perform worse than the OOM killer would have.
DigitalOcean, Linode, Vultr, Contabo, and Hostinger all use local SSD storage where swap files perform reasonably. Standard advice applies on these platforms.
Always check your provider’s documentation before adding swap to a cloud VPS. The recommendation differs by provider.
When You Need Swap (And When You Do Not)
Swap is not always the right answer. Here is the honest decision matrix.
You Need Swap If
- Your VPS has 4GB RAM or less
- You run memory-intensive applications like MySQL, ElasticSearch, or build processes
- You have experienced OOM kills in the past
- You want a safety net for unexpected traffic spikes
- Your provider supports swap without performance penalties
You Do Not Need Swap If
- Your VPS has 8GB RAM or more and your workload uses under 60% of it consistently
- You run a single-purpose container or microservice with bounded memory
- You are on a cloud provider that charges per I/O operation (like default AWS EBS)
- Your application uses memory locking (databases like Redis with
disable-thp) - You actively monitor memory and respond to alerts before exhaustion
For most WordPress sites on a typical VPS with 2-4GB RAM, swap is worth configuring as a safety buffer. It will rarely be used. When it is needed, it prevents site outages.
Step-by-Step: Configure Swap Correctly
Each step below has a purpose. The command is shown, then explained, then verified.
Step 1: Check If Swap Already Exists
Before adding swap, confirm none is already configured.
sudo swapon --show
If the output is empty, no swap is configured. Proceed to Step 2.
If the output shows an existing swap file or partition, your VPS already has swap. Decide whether to keep it or remove it. To remove existing swap, see the section on removing swap properly later in this guide.
You can also check using:
free -h
This shows total memory and swap. A line that reads Swap: 0B 0B 0B confirms no swap exists.
Step 2: Check Your Available Disk Space
A swap file consumes disk space. Verify you have room before creating one.
df -h
Look at the row for /. The Avail column shows free space on your root filesystem. You need at least 4GB free for a 2GB swap file plus normal system operations.
If disk space is tight, do not add a large swap file. Either expand your VPS storage or skip swap entirely.
Step 3: Check Your RAM Size
free -h
Look at the Mem row. The total column shows your physical RAM.
Use this value to calculate the right swap size based on the table earlier in this guide.
For example, on a server with 2GB of RAM, the right swap size is 1GB. On a server with 4GB of RAM, the right swap size is 2GB.
Step 4: Create the Swap File
For most modern VPS servers running ext4, use fallocate:
sudo fallocate -l 2G /swapfile
Replace 2G with the size you calculated in Step 3.
Verify the file was created:
ls -lh /swapfile
The output should show a file 2.0G in size at /swapfile.
If fallocate returns an error like fallocate: fallocate failed: Operation not supported, your filesystem does not support it. Use dd instead:
sudo dd if=/dev/zero of=/swapfile bs=1M count=2048 status=progress
This creates a 2GB file. Adjust the count value to your size in MB. The status=progress flag shows progress so you can see it is working.
Step 5: Set Correct Permissions
The swap file must be readable and writable only by root. Set permissions to 600.
sudo chmod 600 /swapfile
This is not optional. Modern Linux kernels reject swap files with permissive permissions.
Verify:
ls -lh /swapfile
The first column of the output should read -rw-------. The leading dash means it is a regular file. The rw------- means only the owner (root) can read and write it.
Step 6: Format the File as Swap
Linux needs to know this file is a swap file, not a regular file. The mkswap command writes the swap-specific structure to it.
sudo mkswap /swapfile
Expected output:
Setting up swapspace version 1, size = 2 GiB (2147479552 bytes)
no label, UUID=a1b2c3d4-e5f6-7890-abcd-ef1234567890
Note the UUID. You will not need it for the file-based approach, but it confirms the formatting succeeded.
Step 7: Enable Swap
The file is created and formatted. Now activate it.
sudo swapon /swapfile
There is no output if it succeeds. Verify swap is now active:
sudo swapon --show
Expected output:
NAME      TYPE SIZE USED PRIO
/swapfile file   2G   0B   -2
The USED value shows 0B because nothing has been moved to swap yet. The PRIO value of -2 is the default priority for swap files.
Also check with free -h:
free -h
The Swap row should now show 2.0G total.
Step 8: Make Swap Permanent
Right now, swap will disappear if the server reboots. To make it permanent, add it to /etc/fstab.
First, back up the current fstab in case something goes wrong:
sudo cp /etc/fstab /etc/fstab.backup
Then append the swap entry to fstab:
echo '/swapfile none swap sw 0 0' | sudo tee -a /etc/fstab
The tee -a command appends to a file with sudo permissions. The format of the fstab entry breaks down as follows:
| Field | Value | Meaning |
|---|---|---|
| Source | /swapfile | The file to mount |
| Mount point | none | Swap has no mount point |
| Filesystem type | swap | Tells the kernel this is swap |
| Options | sw | Standard swap options |
| Dump | 0 | Do not include in dump |
| Pass | 0 | Do not check on boot |
Verify the line was added correctly:
cat /etc/fstab | grep swapfile
You should see your new swap line.
Step 9: Configure Swappiness Correctly
The default vm.swappiness of 60 is for desktops. For a server, set it to 10.
Check the current value:
cat /proc/sys/vm/swappiness
Most systems show 60.
Change it immediately (this takes effect right now but does not persist on reboot):
sudo sysctl vm.swappiness=10
To make this permanent, add it to /etc/sysctl.conf:
echo 'vm.swappiness=10' | sudo tee -a /etc/sysctl.conf
Verify the change:
cat /proc/sys/vm/swappiness
Should now show 10.
Step 10: Configure VFS Cache Pressure
This is an advanced step that improves performance further but is optional for most users.
The vm.vfs_cache_pressure value controls how aggressively Linux reclaims memory used for filesystem caching. The default is 100. For most servers, 50 produces better cache retention without negative effects.
sudo sysctl vm.vfs_cache_pressure=50
echo 'vm.vfs_cache_pressure=50' | sudo tee -a /etc/sysctl.conf
This keeps filesystem metadata cached longer, which improves performance for common operations like directory listings and file lookups.
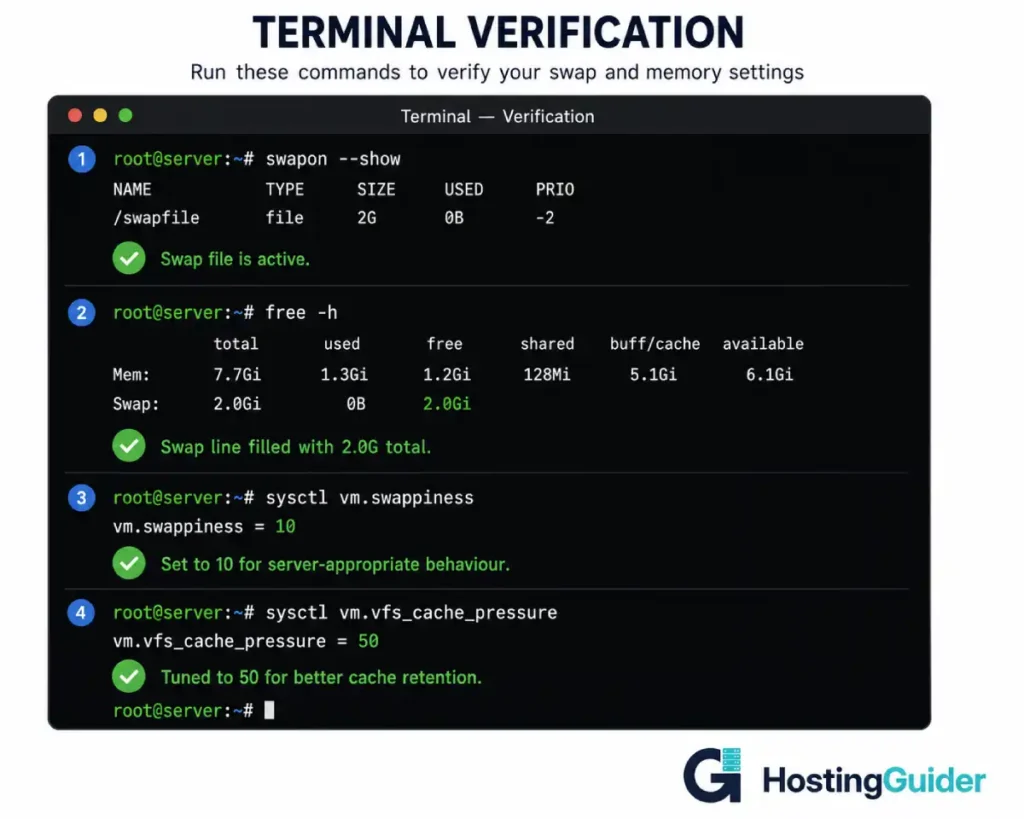
Step 11: Verify the Final Configuration
Run all four verification commands one final time:
sudo swapon --show
free -h
cat /proc/sys/vm/swappiness
cat /proc/sys/vm/vfs_cache_pressure
Expected output:
NAME      TYPE SIZE USED PRIO
/swapfile file   2G   0B   -2

              total        used        free      shared  buff/cache   available
Mem:           2.0G        500M        700M         50M        800M        1.2G
Swap:          2.0G          0B        2.0G

10

50
Your swap is now correctly configured and tuned for server workloads.
Monitoring Swap Usage
Swap should rarely be heavily used on a well-sized server. When it is, that is a signal worth investigating.
Check Current Swap Usage
free -h
Look at the Swap row. If used is more than 50% of total, the server is under memory pressure.
Monitor Over Time
Install sysstat to track historical patterns:
sudo apt install sysstat -y
Enable data collection:
sudo sed -i 's/ENABLED="false"/ENABLED="true"/' /etc/default/sysstat
sudo systemctl enable sysstat
sudo systemctl start sysstat
After 24 hours, check swap usage history:
sar -S
This shows swap usage at 10-minute intervals.
Find Processes Using Swap Memory
If swap is in heavy use, find which processes are responsible:
for file in /proc/*/status; do
  awk '/VmSwap|Name/{printf $2 " " $3}END{print ""}' $file
done | sort -k 2 -n -r | head -10
This lists the top ten processes by swap usage. The output looks like:
mysqld 524288
php-fpm 102400
nginx 51200
The numbers are in kilobytes. The largest swap users are at the top.
When to Use zram Instead of Swap Files
zram is a modern alternative to swap files. It compresses memory in RAM rather than moving it to disk.
The benefit: it is much faster than disk-based swap because there is no disk I/O. The cost: it uses CPU to compress and decompress data.
For VPS servers with limited disk I/O performance, zram often performs better than a swap file. For servers with fast NVMe storage, the difference is smaller.
Configure zram on Ubuntu
Install the zram-tools package:
sudo apt install zram-tools -y
Configure the size in /etc/default/zramswap:
sudo nano /etc/default/zramswap
Set the percentage of RAM to use for compressed swap:
PERCENT=25
This uses 25% of your RAM as compressed swap. For a 2GB VPS, this creates a 500MB compressed swap area that effectively holds 1GB or more of compressed data.
Enable and start zram:
sudo systemctl enable zramswap
sudo systemctl start zramswap
Verify:
sudo swapon --show
You should now see both your file-based swap and the zram swap, with zram having higher priority (5 instead of -2).
For most VPS servers, the combination of a small swap file plus zram delivers better results than either approach alone. zram handles common memory pressure with no disk impact. The swap file remains as an emergency overflow if even compressed memory fills.
How to Remove Swap Properly
If you decide swap is not right for your server, remove it correctly.
Step 1: Turn Off Swap
sudo swapoff /swapfile
This may take a few seconds while the kernel moves swapped data back to RAM. If RAM is not available, this command will fail. Free up memory first if needed.
Step 2: Remove the fstab Entry
Open /etc/fstab:
sudo nano /etc/fstab
Find the line that starts with /swapfile and delete it.
Save with Ctrl+X, then Y, then Enter.
Step 3: Delete the Swap File
sudo rm /swapfile
The file is now gone. Verify:
sudo swapon --show
The output should be empty.
free -h
The Swap row should show 0B across all columns.
Common Errors and Their Fixes
Error: swapon insecure permissions 0644
The permissions are wrong. The file must be 600.
Fix:
sudo chmod 600 /swapfile
Then re-enable swap:
sudo swapon /swapfile
Error: swapon read swap header failed
The file was not formatted as swap. Run mkswap first:
sudo mkswap /swapfile
sudo swapon /swapfile
Error: fallocate operation not supported
The filesystem does not support fallocate. Use dd instead:
sudo rm /swapfile
sudo dd if=/dev/zero of=/swapfile bs=1M count=2048 status=progress
sudo chmod 600 /swapfile
sudo mkswap /swapfile
sudo swapon /swapfile
Error: Server slowed down after enabling swap
Swap is being used too aggressively. Lower swappiness:
sudo sysctl vm.swappiness=1
Test for a few hours. If performance improves, make it permanent:
sudo sed -i 's/vm.swappiness=.*/vm.swappiness=1/' /etc/sysctl.conf
Error: Swap not active after reboot
The fstab entry is missing or incorrect. Check it:
cat /etc/fstab | grep swapfile
The line should read exactly:
/swapfile none swap sw 0 0
If it differs, fix it and reboot to verify.
Performance Tuning for Specific Workloads
Different workloads benefit from different swap configurations. Here are tested settings for common scenarios.
WordPress with MySQL
vm.swappiness=10
vm.vfs_cache_pressure=50
vm.dirty_ratio=15
vm.dirty_background_ratio=5
These reduce write amplification on the SSD while keeping MySQL responsive under typical WordPress load. If you need a refresher on what makes WordPress hosting different, our overview of VPS hosting covers the foundations.
Static Sites and Light WordPress
vm.swappiness=5
vm.vfs_cache_pressure=50
Static sites use very little memory dynamically. Aggressive avoidance of swap keeps response times minimal.
Build Servers and Development Environments
vm.swappiness=30
vm.vfs_cache_pressure=100
Build processes have unpredictable memory spikes. Higher swappiness allows the kernel to handle these gracefully without OOM kills.
Database-Heavy Workloads
vm.swappiness=1
vm.vfs_cache_pressure=50
Databases manage their own memory caching. Letting the kernel swap database memory is almost always counterproductive. Set swappiness as low as possible without disabling it entirely.
Comparing Swap Options Side by Side
| Option | Best For | Speed | Disk Impact | Complexity |
|---|---|---|---|---|
| Swap file | General-purpose VPS | Slow (disk) | Uses disk space | Low |
| Swap partition | Dedicated servers | Slow (disk) | Requires repartitioning | High |
| zram only | Low-disk-I/O VPS | Fast (RAM) | None | Low |
| Swap file + zram | Most modern VPS | Tiered | Some disk use | Moderate |
| No swap | High-RAM systems | Best | None | None |
For most readers on a typical VPS hosting plan, the swap file plus zram combination is the most robust choice.
Frequently Asked Questions
Does my VPS actually need swap?
Most VPS servers with 4GB RAM or less benefit from at least a small swap file as a safety buffer. Servers with 8GB or more RAM may not need it if they have predictable workloads. The honest answer is: configure swap if you have ever experienced an out-of-memory crash, if you run unpredictable workloads, or if you want a safety margin during traffic spikes. Skip it if you have bounded memory workloads and active monitoring that lets you respond to memory pressure before exhaustion.
Why is the default swappiness value wrong for servers?
Linux default vm.swappiness is 60. This was chosen for desktop systems where occasional swapping creates a smoother user experience. Servers have different priorities. They need consistent response times for active requests. Swapping active data to disk introduces delays that hurt user-visible performance. Lower swappiness (10 for general servers, 1 for databases) tells the kernel to use swap only as a last resort. This preserves response time predictability.
Can I add swap to a running production server without downtime?
Yes. All steps in this guide run on a live system without restarting any services. Creating the file, formatting it as swap, and enabling it with swapon take effect immediately. The sysctl changes apply without service restarts. The only operation that requires a reboot is verifying the fstab entry persists, and you can defer that reboot to a maintenance window. For production servers, schedule the reboot test for a low-traffic period.
How do I know if my swap configuration is working correctly?
Three indicators show correct configuration. First, sudo swapon --show displays your swap file with the right size and priority. Second, free -h shows the Swap row with the expected total and minimal used value. Third, after running the server for a week, sar -S should show swap usage staying below 20% of total swap space during normal operation. If usage is consistently higher, you need more RAM, not more swap.
Is it safe to delete the swap file while the server is running?
Only after running swapoff /swapfile first. The swapoff command moves swapped data back into RAM. If insufficient RAM is available, the command fails. After successful swapoff, deleting the file with rm is safe. Never delete a swap file while it is active. This will corrupt active processes and likely crash the server.
Should I use a swap partition instead of a swap file?
Swap partitions were preferred historically because they were slightly faster. On modern Linux kernels with modern filesystems, the performance difference is negligible. Swap files are far easier to manage. They can be resized, deleted, and recreated without repartitioning. For 99% of VPS use cases, a swap file is the right choice. Swap partitions only make sense on dedicated servers where you have full disk layout control before installation.
Why does AWS recommend against swap on EBS-backed instances?
EBS volumes charge per I/O operation. Heavy swap use generates significant I/O that produces a noticeable cost on the AWS bill. Additionally, EBS performance has variability that makes swap less predictable than on local SSD. Other cloud providers like DigitalOcean, Hostinger, Contabo, and ScalaHosting use local NVMe or SSD storage where swap performs predictably and does not incur per-operation costs. Always check your provider’s documentation before adding swap on cloud infrastructure.
What is the difference between swap and zram?
Swap moves memory data to disk. zram compresses memory data in RAM. Swap is unlimited (up to disk space) but slow. zram is fast but limited by available RAM and CPU. For most VPS servers, the optimal setup uses both. zram handles routine memory pressure with no disk impact. The swap file remains as an emergency overflow for severe memory exhaustion. This tiered approach provides both speed and safety.