
Every week, someone buys an unmanaged VPS, logs in for the first time, stares at a blinking cursor, and immediately regrets the decision.
The hosting provider gave them a root password and an IP address. That is it. No control panel. No WordPress installer. No support ticket for configuration help. Just a blank Linux server waiting for someone who knows what to do with it.
More businesses are moving to VPS as shared hosting loses ground. Our web hosting market data documents the shift across hosting segments and the growth figures behind it.
This guide is not a sales pitch for VPS hosting. It is the honest conversation about what you are actually getting into. Some people are completely ready for self-managed VPS.
Some people should stay on shared hosting or managed VPS for another year. A few minutes of reading this now saves you hours of frustration later.
Key Takeaways
- Self-managed VPS means you are the system administrator. The hosting provider manages the hardware. You manage everything else
- You need a minimum viable skill set before the server is useful. Below that threshold, it is just an expensive empty machine
- The setup is a one-time task. The maintenance is ongoing forever
- Being comfortable reading error messages is as important as knowing commands
- Managed VPS is not a compromise. For many workloads, it is the smarter choice
- You can learn every skill on this list for free. The question is whether you have or want to
What Self-Managed VPS Actually Means
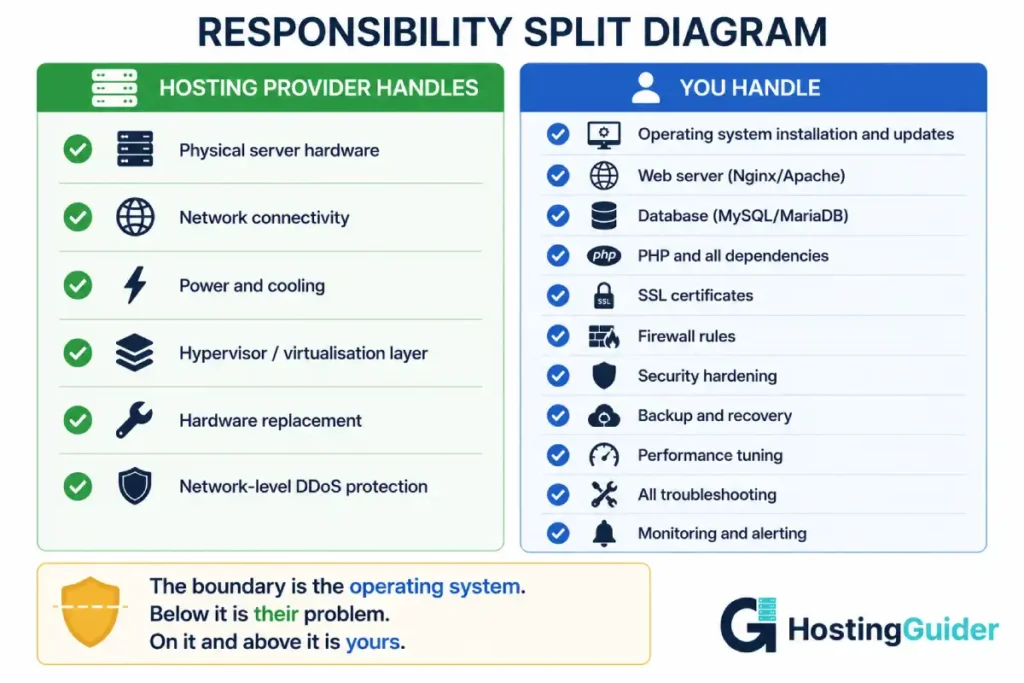
Self-managed VPS is also called unmanaged VPS. The names describe the same thing from two angles.
From the hosting provider’s side, they manage the physical hardware, the hypervisor, the network, and the power. They guarantee the server boots, stays connected, and has the resources you paid for. They do not configure software, update packages, set up firewalls, or troubleshoot anything above the hardware layer.
From your side: everything else. Operating system configuration. Web server installation. Database setup. Security updates. SSL certificates. Backups. Monitoring. Debugging at 2 am when something breaks.
Think of it like renting an empty commercial kitchen. The landlord provides the building, the utilities, and the equipment. They do not cook your food, train your staff, or manage your menu. That is your job.
Understanding what VPS hosting is at the infrastructure level helps establish the right mental model before evaluating whether self-managed is the right choice.
The Two Types of Tasks
Understanding that self-managed VPS involves two completely different types of work helps set expectations.
Setup tasks happen once. Installing Nginx. Creating databases. Configuring PHP. Setting up SSL. These are finite, learnable, and documented in thousands of tutorials. If you follow a good tutorial carefully, you can complete setup tasks even with limited experience.
Operational tasks happen forever. Applying security updates every week. Reviewing logs when errors appear. Renewing SSL certificates. Investigate when the site slows down. Fixing things when they break. Responding to alerts at 3 am.
Most beginners research setup tasks and forget about operational tasks. The server looks easy in the setup tutorial. It looks harder three months later when MySQL crashed at midnight, and you are trying to remember what you know about database recovery.
Be honest with yourself about both categories before you buy.
The Skills: Broken Into Tiers
Not all skills are equally critical. Some you must have before day one. Some you can learn on the job. Some are advanced and only matter at scale.
| Tier | Description | When You Need It |
|---|---|---|
| Must Have | Without these, the server is unusable | Before you buy |
| Should Have | Without these, the server is fragile | Within the first month |
| Good to Have | Without these, the server is less efficient | Within six months |
| Advanced | Required only for complex setups | When your needs grow |
Must-Have Skills
These are not optional. If you do not have all of them, get them before purchasing an unmanaged VPS.
1. Basic Linux Command Line
You will spend most of your time in a terminal. There is no GUI. There is no drag-and-drop.
What you specifically need to know:
Navigation:
pwd           # Show current directory
ls -la        # List files including hidden ones with details
cd /var/log   # Change to a directory
cd ..         # Go up one level
File management:
cp file.txt /destination/     # Copy a file
mv file.txt /new/path/        # Move or rename a file
rm file.txt                   # Delete a file
mkdir -p /path/to/new/folder  # Create folders including parents
Viewing and editing files:
cat filename.txt              # Print entire file to screen
less filename.txt             # View file with scroll (q to quit)
tail -f /var/log/nginx/error.log  # Follow a log in real time
nano filename.txt             # Open file in simple text editor
Text editing with nano:
- Ctrl+X to exit
- Y to confirm save
- Ctrl+W to search
- Ctrl+K to cut a line
- Ctrl+U to paste a line
File permissions:
ls -la            # Shows permissions as -rwxr-xr-x format
chmod 644 file    # Sets read/write for owner, read for others
chmod 755 folder  # Sets read/write/execute for owner, read/execute for others
chown user:group file  # Changes file ownership
Understanding what rwxr-xr-x means and why it matters is not optional. Wrong permissions are the most common cause of web server errors for beginners.
Searching:
grep "error" /var/log/nginx/error.log    # Find lines containing error
grep -r "yourdomain.com" /etc/nginx/     # Search recursively
find /var/www -name "*.php" -type f      # Find files by name
Why it matters: Every action on your server happens through the command line. If you cannot navigate, edit, and search files comfortably, you cannot manage the server.
Where to learn it: The Linux Command Line by William Shotts is free online and comprehensive. DigitalOcean’s Linux command tutorials are also excellent and free.
2. SSH: Connecting and Staying Connected
SSH is your only way into the server. If SSH breaks and you do not know what you are doing, you are locked out.
What you specifically need to know:
Basic connection:
ssh username@server.ip.address
ssh -p 2222 username@server.ip.address     # On a non-standard port
ssh -i ~/.ssh/mykey username@server.ip     # Using a specific SSH key
SSH key generation:
ssh-keygen -t ed25519 -C "your@email.com" # Generate a key pair
This creates two files:
id_ed25519— your private key (never share this)id_ed25519.pub— your public key (this goes on the server)
Copying your key to the server:
ssh-copy-id username@server.ip.address
SSH config file for shortcut connections (~/.ssh/config):
Host myvps
    HostName 203.0.113.50
    User webadmin
    IdentityFile ~/.ssh/id_ed25519
    Port 22
After this, you can connect with just ssh myvps.
File transfer:
scp localfile.txt user@server:/destination/       # Copy to server
scp user@server:/path/file.txt ./localfolder/     # Copy from server
scp -r localfolder/ user@server:/destination/     # Copy a folder
Why it matters: SSH is your only door into the server. Locking yourself out by misconfiguring SSH keys or firewall rules before you know how to fix it remotely requires either using your provider’s emergency console or a full rebuild. Both are stressful and avoidable.
3. Package Management
Every piece of software on your server gets installed through the package manager. On Ubuntu and Debian, this is apt.
What you specifically need to know:
sudo apt update                     # Refresh package lists
sudo apt upgrade -y                 # Install available updates
sudo apt install nginx -y           # Install a package
sudo apt remove nginx               # Remove a package
sudo apt autoremove                 # Remove unused packages
sudo apt search nginx               # Search available packages
dpkg -l | grep nginx                # Check if a package is installed
Why it matters: Security updates are released constantly. Running apt update && apt upgrade every week is the single most important security practice on a self-managed server. A VPS running months-old packages is significantly more exposed to attacks.
4. Running and Managing Services
Your web server, database, and PHP-FPM are all services managed by systemd. You need to start, stop, restart, check, and enable them.
sudo systemctl status nginx          # Check if running
sudo systemctl start nginx           # Start a stopped service
sudo systemctl stop nginx            # Stop a running service
sudo systemctl restart nginx         # Restart (stop and start)
sudo systemctl reload nginx          # Reload config without downtime
sudo systemctl enable nginx          # Start automatically on boot
sudo systemctl disable nginx         # Disable auto-start
sudo systemctl list-units --type=service --state=failed   # See what broke
Why it matters: Services crash. The OOM killer kills MySQL. PHP-FPM exhausts workers. When your site goes down at 2am, the first thing you do is check service status. If you do not know these commands, you cannot begin diagnosing.
5. Firewall Management
A server without a firewall is exposed on every port to the entire internet. A misconfigured firewall locks you out of your own server.
UFW (Uncomplicated Firewall) is the standard tool on Ubuntu:
sudo ufw status                      # Check current rules
sudo ufw allow 22                    # Allow SSH (do this before enabling)
sudo ufw allow 80                    # Allow HTTP
sudo ufw allow 443                   # Allow HTTPS
sudo ufw deny 3306                   # Explicitly block MySQL from outside
sudo ufw enable                      # Enable the firewall
sudo ufw disable                     # Disable the firewall
sudo ufw delete allow 80             # Remove a rule
The critical rule beginners miss: Always run sudo ufw allow 22 before running sudo ufw enable. If you enable the firewall without allowing SSH first, you lock yourself out of the server immediately.
Why it matters: An open server gets found by automated scanners within minutes. Open ports attract brute force attacks, exploit attempts, and bandwidth abuse.
6. Reading Error Logs
When something breaks, the answer is almost always in the logs. The ability to read logs and understand what they are telling you is the most underrated skill in server management.
The main log files you will use daily:
| Log File | What It Tells You |
|---|---|
/var/log/nginx/error.log | Nginx errors, failed proxy connections, config problems |
/var/log/apache2/error.log | Apache errors, PHP issues, permission problems |
/var/log/mysql/error.log | Database crashes, connection errors, corrupt tables |
/var/log/php_errors.log | PHP errors from your application |
/var/log/auth.log | SSH login attempts, sudo usage |
/var/log/syslog | System-level events |
Useful commands for reading logs:
sudo tail -50 /var/log/nginx/error.log         # Last 50 lines
sudo tail -f /var/log/nginx/error.log          # Follow live as it writes
sudo journalctl -p err -n 100                  # Last 100 system errors
sudo journalctl -u nginx --since "1 hour ago"  # Nginx logs from last hour
grep "crit\|emerg\|alert" /var/log/nginx/error.log  # Only critical errors
Why it matters: Every error has a message. The message usually tells you exactly what went wrong and where. Beginners who panic when something breaks and start changing random settings often make things worse. Beginners who read the error log and understand what it says fix things quickly.
You do not need to understand every line in every log. You need to recognise the pattern of an error and use it to search for a solution.
Should-Have Skills
You can run a VPS without these for a short time. But without them, your server is fragile, insecure, and difficult to debug.
7. Web Server Configuration
You need to know Nginx, Apache, or both at a basic level. Understanding the concept of server blocks (Nginx) or virtual hosts (Apache) is essential for hosting any website.
Nginx server block basics:
server {
    listen 80;
    server_name yourdomain.com www.yourdomain.com;
    root /var/www/yourdomain.com;
    index index.php index.html;

    location / {
        try_files $uri $uri/ /index.php?$args;
    }
}
What you need to understand:
listen 80: the port Nginx listens onserver_name: the domain this block responds toroot: where the website files livetry_files: how Nginx looks for files to servelocationblocks: rules for different URL patterns
Testing configuration before reloading:
sudo nginx -t
Always run this before reloading Nginx. It catches configuration errors that would otherwise take the entire web server offline.
Enabling a site in Nginx:
sudo ln -s /etc/nginx/sites-available/yourdomain.com /etc/nginx/sites-enabled/
sudo nginx -t
sudo systemctl reload nginx
Why it matters: The web server is the layer your visitors interact with first. Misconfigured web servers produce 502 errors, 404 errors, redirect loops, and SSL failures. Understanding how to read and edit configuration solves the majority of these.
8. Database Basics
WordPress and almost every web application use a database. You need to perform basic database tasks without breaking anything.
What you specifically need to know:
Connecting to MariaDB/MySQL:
sudo mysql                           # Connect as root
mysql -u wp_user -p wordpress_db    # Connect as specific user
Basic database operations:
SHOW DATABASES;                      # List all databases
USE wordpress_db;                    # Select a database
SHOW TABLES;                         # List tables in current database
SHOW PROCESSLIST;                    # Show running queries
EXIT;                                # Disconnect
Creating databases and users:
CREATE DATABASE sitename CHARACTER SET utf8mb4 COLLATE utf8mb4_unicode_ci;
CREATE USER 'dbuser'@'localhost' IDENTIFIED BY 'strongpassword';
GRANT ALL PRIVILEGES ON sitename.* TO 'dbuser'@'localhost';
FLUSH PRIVILEGES;
Backing up and restoring:
mysqldump -u root wordpress_db > backup.sql         # Export
mysql -u root wordpress_db < backup.sql             # Import
mysqldump -u root --all-databases > full-backup.sql # Export all databases
Why it matters: Databases crash. Tables get corrupted. Someone accidentally deletes data. Without knowing how to access, backup, and restore the database, you have no recovery path when these things happen.
9. SSL Certificate Management
Every production website needs HTTPS. Let’s Encrypt provides free certificates. Certbot automates the process.
What you specifically need to know:
Installing Certbot:
sudo apt install certbot python3-certbot-nginx -y
Getting a certificate:
sudo certbot --nginx -d yourdomain.com -d www.yourdomain.com
Testing auto-renewal:
sudo certbot renew --dry-run
Checking certificate expiry:
sudo certbot certificates
Why it matters: SSL certificates expire every 90 days. Auto-renewal should handle this automatically but sometimes fails due to firewall rules, DNS changes, or Certbot bugs. If renewal fails and you do not notice, your site shows a security warning to every visitor. Google may penalise it in search rankings. Knowing how to check and manually renew prevents this.
10. Backup Creation and Restoration
Backups are what you have left after a catastrophic failure. Many beginners set up servers, skip backups, and then learn their importance the hard way.
What you specifically need to know:
A basic website backup script:
#!/bin/bash
DATE=$(date +%Y%m%d)
SITE_DIR="/var/www/yourdomain.com"
BACKUP_DIR="/var/backups/sites"

mkdir -p $BACKUP_DIR
tar -czf $BACKUP_DIR/site-$DATE.tar.gz -C $SITE_DIR .
mysqldump -u root wordpress_db | gzip > $BACKUP_DIR/db-$DATE.sql.gz
find $BACKUP_DIR -mtime +14 -delete
Automating with cron:
crontab -e
# Add:
0 2 * * * /usr/local/bin/backup.sh
Testing restoration. A backup you have never tested is a backup you cannot trust. Before you need it in an emergency, practice restoring from a backup at least once.
Off-server backups. A backup stored on the same server it protects is not a real backup. If the server is compromised or destroyed, the backup is too. Use a second server, a cloud storage bucket (S3, Backblaze B2), or at minimum your local computer.
Good-to-Have Skills
These do not block your initial setup. They become important as your site grows or encounters specific problems.
11. Performance Monitoring
You cannot improve what you do not measure.
Basic monitoring commands:
htop                           # Interactive CPU/memory view
vmstat 5 10                    # System stats every 5 seconds, 10 times
iostat -x 5                    # Disk I/O statistics
ss -s                          # Network socket summary
df -h                          # Disk space
free -m                        # Memory and swap usage
sar -u 1 10                    # CPU usage history
Understanding what to look for:
- CPU steal above 5%: your provider is overselling the hardware
- Memory consistently above 80%: you need more RAM
- Swap being used heavily: memory is exhausted, performance degrading
- Disk above 90%: logs or uploads are consuming space
Setting up external monitoring: UptimeRobot checks your site every 5 minutes for free and sends email or SMS when it goes down. Set this up on day one.
12. Understanding DNS
DNS translates domain names into IP addresses. When something does not work after a domain change, DNS is almost always the cause.
What you specifically need to know:
| Record Type | What It Does | Example |
|---|---|---|
| A | Points domain to an IPv4 address | yourdomain.com → 203.0.113.50 |
| AAAA | Points domain to an IPv6 address | yourdomain.com → 2001:db8::1 |
| CNAME | Aliases one domain to another | www → yourdomain.com |
| MX | Points to mail server | yourdomain.com → mail.provider.com |
| TXT | Stores text data | SPF records, site verification |
Useful DNS commands:
dig yourdomain.com                  # Check A record
dig +short yourdomain.com           # Just the IP
dig yourdomain.com MX               # Check mail records
nslookup yourdomain.com 8.8.8.8     # Query Google DNS specifically
TTL and propagation: When you change a DNS record, the change takes time to spread across DNS servers worldwide. This time is controlled by TTL (Time to Live). Most changes are visible within an hour. Some take up to 48 hours. You cannot speed this up. Understanding this prevents a lot of panic when changes do not appear immediately.
13. Cron Jobs and Automation
Repetitive tasks should be automated. Backups, updates, log rotation, and cache clearing all belong in cron.
crontab -e          # Edit cron jobs for current user
sudo crontab -e     # Edit cron jobs for root
crontab -l          # List current cron jobs
Cron schedule format:
* * * * * command
│ │ │ │ │
│ │ │ │ └── Day of week (0-7, 0=Sunday)
│ │ │ └──── Month (1-12)
│ │ └────── Day of month (1-31)
│ └──────── Hour (0-23)
└────────── Minute (0-59)
Common examples:
0 3 * * * /usr/local/bin/backup.sh          # Daily at 3am
0 */6 * * * /usr/bin/certbot renew --quiet  # Every 6 hours
*/5 * * * * /usr/local/bin/health-check.sh  # Every 5 minutes
Always redirect cron output to a log file:
0 3 * * * /usr/local/bin/backup.sh >> /var/log/backup.log 2>&1
14. Security Awareness
Self-managed servers are targets. You are responsible for keeping yours hardened.
The minimum security baseline:
- Change the SSH port from 22 to a non-standard port (reduces automated scans significantly)
- Disable root SSH login
- Use SSH key authentication, not passwords
- Enable Fail2Ban to block brute force attacks
- Apply security updates every week without exception
- Review auth.log regularly for suspicious activity
sudo tail -100 /var/log/auth.log | grep "Failed password"
If you see hundreds of failed login attempts from external IPs, you are being brute-forced. Fail2Ban should block these automatically if configured.
File permissions as security:
WordPress files should be:
- Folders: 755 (owner can write, others can only read)
- Files: 644 (owner can write, others can only read)
- wp-config.php: 640 (only owner can read)
Advanced Skills (For Later)
These are not needed to run a basic WordPress VPS. They become relevant as you scale.
Nginx Reverse Proxy Configuration
Using Nginx as a front-end proxy in front of Apache or another backend. The production-ready Nginx reverse proxy guide covers this in detail when you are ready.
Load Balancing and High Availability
Running multiple servers behind a load balancer. Required only when one server cannot handle your traffic or when 99.99% uptime becomes a requirement.
Container Management (Docker)
Running applications in isolated containers. Increasingly common for modern applications. Not required for WordPress but valuable for other workloads.
Kernel Tuning
Adjusting kernel parameters for web traffic. Provides measurable performance improvements once your server is stable and serving real load.
Database Replication
Running a replica database for read queries and failover. Required only for very high-traffic database-heavy applications.
The Self-Assessment Test
Honest answers only. Read each scenario and decide whether you could handle it right now.
| Scenario | What Skill It Tests |
|---|---|
| Your site returns 502 errors. You cannot see any obvious cause. Where do you start? | Log reading, service management |
| You accidentally deleted the nginx.conf file. How do you recover? | Package management, config management |
| MySQL stopped working at 3am. No obvious error on screen. What do you do? | Service management, database diagnostics |
| Your site was loading in 300ms last week. Now it takes 4 seconds. What do you investigate? | Performance monitoring, log analysis |
| You pushed a bad plugin that broke the WordPress database. How do you recover? | Database restoration, backup management |
| You got an email saying your SSL certificate expires in 10 days. What do you do? | SSL certificate management |
| Your disk is at 98% full. You need to find and free space urgently. How? | File management, log management |
| A new WordPress vulnerability is disclosed. How do you handle it? | Security updates, patch management |
If you answered along the lines of searching online for more than three of these, you have preparation to do before buying an unmanaged VPS. That is not a criticism. It is information.
The Hidden Costs Nobody Talks About
Time commitment. A well-run VPS takes about 2-4 hours per month of maintenance attention. This includes applying updates, reviewing logs, checking backups, and handling occasional issues. This is not optional. A neglected server accumulates security debt that eventually becomes a compromised server.
The 2am problem. Your server does not observe business hours. When MySQL crashes during a peak traffic moment at 11pm on a Saturday, you are the one who gets the alert and fixes it. If you are not comfortable with that reality, managed hosting exists for this reason.
Learning curve tax. Your first few months with self-managed VPS will be slower and more frustrating than you expect. Tasks that take an experienced sysadmin 10 minutes take you 2 hours. This time investment is real and unavoidable. It becomes smaller as your experience grows.
The compounding knowledge problem. Self-managed VPS requires many skills that build on each other. Debugging a Nginx 502 error requires understanding Nginx configuration, understanding PHP-FPM, and understanding how to read error logs. If any one of these is missing, the debugging chain breaks.
When You Should Not Buy an Unmanaged VPS
Be honest with yourself about these situations:
You are running a business-critical website that must stay online. An outage that you cannot fix because you do not know how costs you real money and real customers. Managed hosting is insurance.
You have very limited time for server maintenance. If you cannot commit 2-4 hours per month to keeping the server updated and monitored, the server will degrade over time.
You are uncomfortable with the idea of being responsible when things break. Some people find this motivating. Others find it stressful. Know which you are.
You primarily need WordPress and do not need custom server configuration. Managed WordPress hosting from Kinsta or Cloudways provides everything WordPress needs, handles all the maintenance, and costs a predictable monthly fee. The tradeoff is less control but dramatically less operational burden.
The two most popular unmanaged European providers are compared in our Contabo vs Hetzner test.
The Middle Path: Managed VPS
Managed VPS is worth serious consideration before defaulting to unmanaged.
A managed VPS provider handles operating system updates, security patching, firewall configuration, monitoring, and usually backups. You get the performance and isolation of a VPS without most of the operational burden.
ScalaHosting managed VPS includes SPanel (their custom control panel), automatic updates, SShield security monitoring, and daily backups. You can install WordPress, configure domains, and manage most server functions through a graphical interface.
Cloudways provides managed cloud VPS across multiple infrastructure providers. Their team handles server security and updates. You manage applications through their dashboard.
The managed vs unmanaged VPS comparison breaks down the decision in detail. The short version: if your goal is running a website rather than learning server administration, managed VPS often delivers better outcomes for less total time investment.
How to Build the Skills If You Do Not Have Them Yet
These skills are all learnable. None require formal education.
The fastest practical path:
- Sign up for a cheap VPS (Contabo or Hostinger offer plans under $5 per month). Use it as a practice server, not production.
- Work through our VPS setup tutorial step by step. Do not copy-paste commands blindly. Type each one manually and understand what it does before pressing Enter.
- When something breaks (it will), resist the impulse to reinstall. Read the error logs. Search for the specific error message. Fix it. This is where the real learning happens.
- After successfully setting up one WordPress site, break it intentionally and practice fixing each type of failure.
- DigitalOcean’s community tutorials cover virtually every server administration topic for free and in excellent detail. They are the most comprehensive free resource for this skill set.
- Bookmark ExplainShell. Paste any command you do not understand and it explains each part.
Realistic timeline: Most motivated people reach a basic competency level in 60 to 90 days of consistent practice. At that point, you can set up a production server, handle common failures, and know when to search for help on the ones you cannot solve.
Frequently Asked Questions
How much Linux knowledge do I need before buying a VPS?
You need comfort with the command line at a basic level. Specifically: navigate directories, create and edit files, understand file permissions, install packages with apt, manage services with systemctl, and read log files. If any of these feel unfamiliar, spend two to four weeks with a free practice environment before buying a production VPS. Practice on a $5 per month VPS that you do not mind rebuilding.
Can I manage a VPS without knowing Linux?
Not effectively. Every meaningful action on an unmanaged VPS happens through the Linux command line. A control panel adds a graphical layer for common tasks, but when problems occur, you need the command line to diagnose and fix them. Managed VPS is the right choice if you want a control panel to handle your needs without command line access.
What is the most common mistake beginners make with their first VPS?
Skipping security hardening. A fresh Ubuntu server with a weak root password and no firewall rules gets found by automated scanners within minutes. The second most common mistake is skipping backups until after a data loss incident. Set up UFW, change the default SSH port, disable root SSH login, and configure automated backups before you do anything else. The VPS setup and troubleshooting guide covers what to do when things go wrong.
How long does it take to set up a basic WordPress VPS?
With a good tutorial and no previous experience, expect 4-8 hours for a first setup including troubleshooting the problems you will inevitably encounter. An experienced sysadmin completes the same setup in under an hour. The time gap closes with practice. Your second VPS setup is always significantly faster than your first.
Is managed VPS worth the extra cost for beginners?
Often, yes. Managed VPS costs more per month but saves significant time and stress. For someone whose primary goal is a fast, secure WordPress site rather than learning server administration, the managed option frequently delivers better total outcomes. The key question is: do you want to run a website or learn server administration? Both are valid goals. They lead to different product choices.
What happens if I buy an unmanaged VPS and realise I am not ready?
You have two options. First, migrate to a managed VPS or managed WordPress host. Most providers allow you to cancel and receive a prorated refund. Second, stay with the unmanaged VPS but work through the skill gaps before your site goes live in production. Use the server as a learning environment while keeping your current hosting running in parallel. Many people do this successfully and arrive at their unmanaged VPS skills faster than they expected.
How do I know when I am ready to move from managed to self-managed?
You are ready when you can answer yes to all of these: you can SSH into a fresh server and set up Nginx, PHP, and MySQL without a tutorial, you have diagnosed and fixed a production server problem independently at least twice, you are comfortable reading error logs and using them to trace a problem to its source, you have a working backup and recovery procedure that you have actually tested, and you are prepared to respond to alerts outside business hours. If any of these feel uncertain, keep developing the skills before making the switch.