You just clicked “Deploy” on an unmanaged VPS. You have a fresh server, a root password, and an IP address. Nothing else.
No firewall. No non-root user. No web server. No SSL. The default SSH configuration accepts password logins as root from anywhere on the internet, which means automated bots are already trying to log in, often within minutes of the server going live.
This is the gap between managed and unmanaged hosting. On managed hosting, all of this is done for you before you ever log in. On an unmanaged VPS, every one of these decisions is yours, and skipping any of them creates a specific, known risk.
This guide is the exact sequence: 30 steps, in order, with the real commands for each one, covering access security, system hardening, the web stack, reliability, and ongoing maintenance. Follow it in order on a fresh Ubuntu 22.04 or 24.04 server (the most common choice for an unmanaged VPS) and you go from “nothing” to “production ready” without skipping the steps that matter.
If reading through this list makes the time commitment feel significant, that is the honest picture of what self-managed VPS hosting actually requires. This guide is the practical version of that commitment, broken into a sequence you can complete in an afternoon.
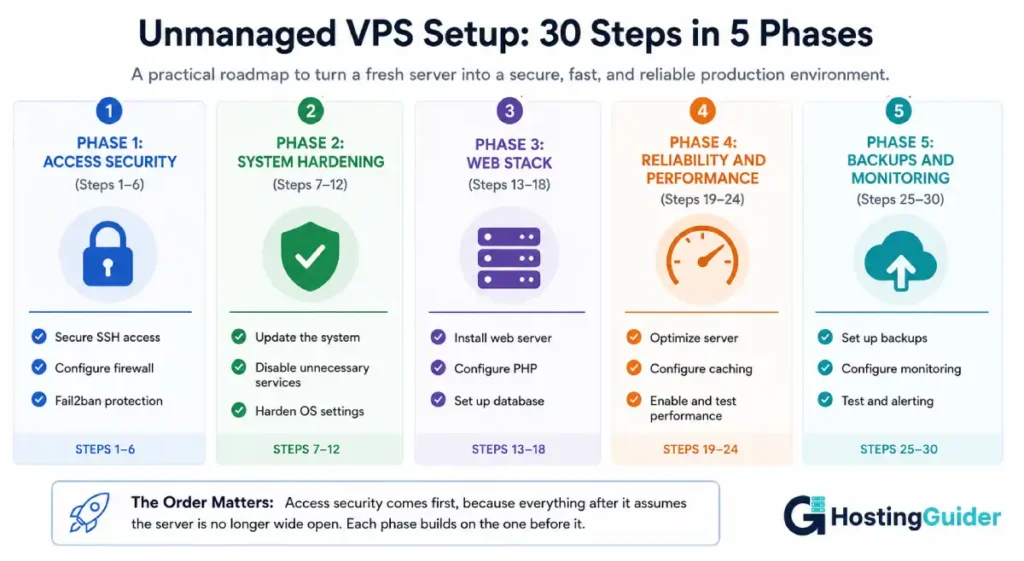
Unmanaged VPS Phase 1: Access Security (Steps 1 to 6)
These six steps close the most immediate risks. Do these before anything else, ideally within the first few minutes of having access to the server.
Step 1: Update the System
Before touching anything else, update the package lists and installed packages.
sudo apt update && sudo apt upgrade -y
A freshly provisioned VPS image can be weeks or months old by the time you receive it. Starting from an updated base means every subsequent step installs current versions with current security patches.
Step 2: Create a Non-Root Sudo User
Working as root for daily tasks is unnecessary risk: a single mistaken command run as root has no safety net. Create a new user and grant it sudo privileges.
adduser yourusername
usermod -aG sudo yourusername
Follow the prompts to set a password. From this point forward, log in as this user and use sudo for administrative commands.
Step 3: Set Up SSH Key Authentication
Password-based SSH login is the single most targeted attack surface on any unmanaged VPS. SSH keys are dramatically more secure: a key pair cannot be guessed through brute force the way a password can.
On your local computer, generate a key pair if you do not already have one:
ssh-keygen -t ed25519 -C "your_email@example.com"
Copy the public key to your server:
ssh-copy-id yourusername@your_server_ip
Test that you can log in using the key before proceeding:
ssh yourusername@your_server_ip
Do not proceed to Step 4 until this works. Step 4 disables password login, and if key authentication is not working, you will lock yourself out.
Step 4: Disable Root Login and Password Authentication
With key-based login confirmed working, edit the SSH configuration:
sudo nano /etc/ssh/sshd_config
Set the following values:
PermitRootLogin no
PasswordAuthentication no
Restart SSH to apply the changes:
sudo systemctl restart ssh
From this point, the server only accepts SSH connections using a key, and never as root directly. This single change eliminates the vast majority of automated SSH attacks, which overwhelmingly target root with password guessing.
Step 5: Configure the Firewall
Install and enable ufw (Uncomplicated Firewall), allowing only the ports your server needs.
sudo apt install ufw -y
sudo ufw allow OpenSSH
sudo ufw allow 80/tcp
sudo ufw allow 443/tcp
sudo ufw enable
Check the status to confirm:
sudo ufw status
This allows SSH (so you do not lock yourself out), HTTP, and HTTPS, and denies everything else by default. Add additional rules later only as specific services require them.
Step 6: Change the Default SSH Port (Optional but Recommended)
This step is debated, but it meaningfully reduces the volume of automated scanning traffic your server receives, even though it does not stop a targeted attacker. Edit the SSH configuration:
sudo nano /etc/ssh/sshd_config
Change the Port line to a non-standard port, for example:
Port 2222
Update the firewall to allow the new port and remove the old rule:
sudo ufw allow 2222/tcp
sudo ufw delete allow OpenSSH
sudo systemctl restart ssh
Test the new port from a separate terminal before closing your current session, using the same lockout-prevention logic as Step 4:
ssh -p 2222 yourusername@your_server_ip
Phase 2: System Hardening (Steps 7 to 12)
With access secured, these next steps reduce the server’s attack surface and prepare it for reliable operation.
Step 7: Install Fail2ban
Fail2ban monitors log files for repeated failed login attempts and temporarily bans the offending IP address.
sudo apt install fail2ban -y
sudo systemctl enable fail2ban
sudo systemctl start fail2ban
The default configuration covers SSH out of the box. As you install other services later (a web application with a login form, for example), fail2ban can be extended to monitor those logs too. Check the status of active jails:
sudo fail2ban-client status
Step 8: Enable Automatic Security Updates
Step 1 updated the system once. Automatic security updates keep it updated going forward without requiring you to remember.
sudo apt install unattended-upgrades -y
sudo dpkg-reconfigure --priority=low unattended-upgrades
Select “Yes” when prompted. This configures the server to automatically install security patches as they are released, which closes the gap between a vulnerability being disclosed and your server being patched, without requiring manual intervention for every update.
Step 9: Set Hostname and Timezone
Set a meaningful hostname (useful for identifying the server in logs, especially if you run multiple servers):
sudo hostnamectl set-hostname your-server-name
Set the timezone, typically UTC for consistency across logs and scheduled tasks regardless of where the server is physically located:
sudo timedatectl set-timezone UTC
Step 10: Set Up Swap Space
Many budget VPS plans have limited RAM. A swap file provides a safety margin: if memory usage spikes temporarily, the system has somewhere to go instead of immediately killing processes.
Check if swap already exists:
sudo swapon --show
If nothing is returned, create a swap file (2GB is a reasonable default for most small to medium VPS instances):
sudo fallocate -l 2G /swapfile
sudo chmod 600 /swapfile
sudo mkswap /swapfile
sudo swapon /swapfile
Make it permanent by adding it to /etc/fstab:
echo '/swapfile none swap sw 0 0' | sudo tee -a /etc/fstab
Swap is not a substitute for adequate RAM under sustained load, but it is a meaningful buffer against short-lived spikes, and its absence is a common reason an unmanaged VPS that “should” have enough memory still experiences sudden process kills under load.
Step 11: Configure NTP Time Sync
Accurate system time matters for log timestamps, SSL certificate validation, and any scheduled task. Ubuntu typically has systemd-timesyncd enabled by default, but confirm it:
timedatectl
Look for “System clock synchronized: yes” in the output. If it shows “no,” enable the service:
sudo systemctl enable systemd-timesyncd
sudo systemctl start systemd-timesyncd
Step 12: Disable Unused Services
A fresh VPS image sometimes includes services you do not need, each one representing additional attack surface and resource usage. List active services:
sudo systemctl list-units --type=service --state=running
Common candidates for disabling on a server that will not need them: any pre-installed mail server (sendmail, postfix, if not needed for outbound application email), and any pre-installed database or application server you do not intend to use. Disable anything unnecessary:
sudo systemctl disable [service-name]
sudo systemctl stop [service-name]
Be deliberate here. Disabling something you actually need (like the SSH service itself) locks you out. When in doubt, leave it and revisit later once you know your full stack.
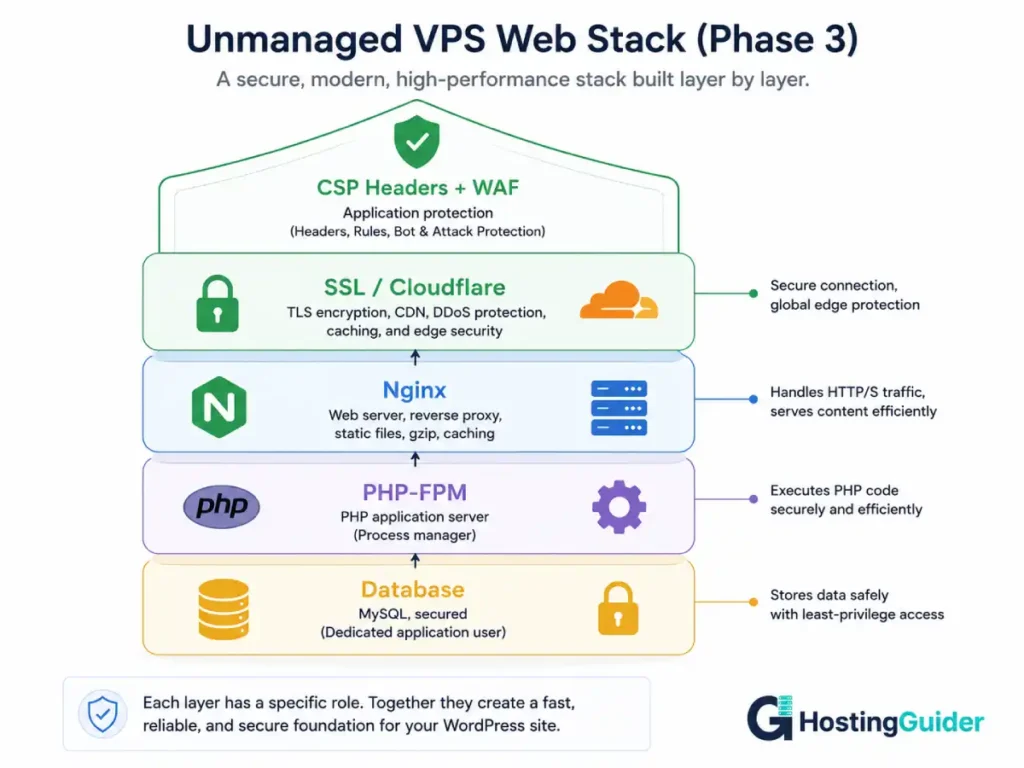
Phase 3: Web Stack Setup (Steps 13 to 18)
With the server hardened, these steps install and secure the actual software that will serve your site or application.
Step 13: Install Nginx
sudo apt install nginx -y
sudo systemctl enable nginx
sudo systemctl start nginx
Verify it is running by visiting http://your_server_ip in a browser. You should see the default Nginx welcome page.
Step 14: Install PHP-FPM (Not mod_php)
If your application is PHP-based (WordPress, most common CMS platforms), install PHP-FPM rather than the Apache-bundled mod_php alternative.
sudo apt install php8.2-fpm php8.2-mysql php8.2-curl php8.2-gd php8.2-xml php8.2-mbstring -y
The architectural difference between these two approaches has a measurable performance impact under concurrent load, particularly relevant for an unmanaged VPS where you do not have a hosting provider’s pre-tuned configuration to fall back on. The full explanation, including the memory math and configuration tuning, is covered in our guide on PHP-FPM vs mod_php.
Step 15: Install and Secure the Database
sudo apt install mysql-server -y
sudo mysql_secure_installation
The secure installation script walks through setting a root password, removing anonymous users, disabling remote root login, and removing the test database. Answer “yes” to each prompt unless you have a specific reason not to.
Create a dedicated database and user for your application rather than using the MySQL root account:
CREATE DATABASE yourappdb;
CREATE USER 'yourappuser'@'localhost' IDENTIFIED BY 'a_strong_password';
GRANT ALL PRIVILEGES ON yourappdb.* TO 'yourappuser'@'localhost';
FLUSH PRIVILEGES;
Step 16: Set Up SSL
Every production site needs HTTPS. The most common approach for an unmanaged VPS combines a CDN (commonly Cloudflare, which provides a free SSL certificate and global edge network) with an origin certificate on the server itself, ensuring the connection is encrypted end to end, not just from the visitor to the edge.
sudo nano /etc/ssl/cloudflare-origin.pem
sudo nano /etc/ssl/cloudflare-origin-key.pem
sudo chmod 600 /etc/ssl/cloudflare-origin-key.pem
The complete walkthrough, including the Nginx configuration, the correct Cloudflare SSL mode (a step that causes redirect loops when configured incorrectly), and locking the origin server to only accept Cloudflare’s traffic, is covered in detail in our CDN cloud hosting configuration guide. If you are not using a CDN, Let’s Encrypt’s Certbot tool provides free certificates directly:
sudo apt install certbot python3-certbot-nginx -y
sudo certbot --nginx -d yourdomain.com -d www.yourdomain.com
Step 17: Configure Content Security Policy Headers
This is the step most unmanaged VPS setups skip fully, and it is one of the most consequential security headers available. A Content Security Policy header tells browsers which sources of scripts, styles, fonts, and frames your site is allowed to load from. If a plugin or application vulnerability ever allows script injection, a correctly configured CSP header stops the injected script from running or sending data anywhere, even after the injection has already happened.
add_header Content-Security-Policy "default-src 'self'; script-src 'self' 'unsafe-inline'; style-src 'self' 'unsafe-inline'; img-src 'self'; frame-ancestors 'self';" always;
This starting policy is deliberately restrictive and will need adjustment for any external resources your specific application loads (fonts, analytics, embedded video, payment processors). Building this policy correctly, without breaking your site, requires an audit step and a report-only testing phase before enforcement. The full step-by-step process, including how to audit what your site loads and how to test without breaking anything, is covered in our guide on Content Security Policy headers for WordPress hosting, which applies the same way to any application running on this server.
Step 18: Set Up a Basic WAF Layer
A web application firewall filters malicious requests before they reach your application: SQL injection attempts, common exploit patterns targeting known vulnerabilities, and basic bot traffic.
If you are using Cloudflare as covered in Step 16, its free tier includes basic WAF rules that can be enabled from the dashboard with no server-side configuration. For server-level protection independent of any CDN, ModSecurity with the OWASP Core Rule Set can be installed directly on Nginx, though this requires more configuration than the CDN-based approach.
The trade-offs between server-side and application-level (plugin-based) WAF protection, and which is more appropriate for an unmanaged VPS running a CMS like WordPress, are covered in our comparison of server-side WAF versus plugin WAF.
Phase 4: Reliability and Performance (Steps 19 to 24)
The server now works. These steps make sure it keeps working as load increases and as time passes.
Step 19: Install Monitoring Tools
Install sysstat, which records historical performance data in the background, so that when something feels slow later, you have a baseline to compare against rather than only a current snapshot.
sudo apt install sysstat -y
sudo systemctl enable sysstat
sudo systemctl start sysstat
After a day or two of normal operation, sar -u shows CPU usage history, free -h shows memory, and iostat -x shows disk I/O. If your server ever feels slow, our systematic VPS slow diagnosis guide walks through exactly which commands to run, in what order, to find the cause: CPU, memory, disk I/O, network, or a specific process.
Step 20: Configure Log Rotation
Logs grow continuously. Without rotation, log files eventually consume all available disk space, which causes its own set of failures (a full disk behaves very differently from a slow server, and is often more disruptive). Ubuntu includes logrotate by default, but verify the configuration covers your application’s logs:
cat /etc/logrotate.d/nginx
If your application writes logs to a location not covered by an existing logrotate configuration, add a new file in /etc/logrotate.d/ specifying the log path, rotation frequency, and retention period.
Step 21: Set Resource Limits
Default system limits on open files and processes are sometimes too low for a server running a web application with a database. Check current limits:
ulimit -n
If this returns a low number (1024 is a common default) and your application logs show “too many open files” errors under load, increase the limit in /etc/security/limits.conf:
* soft nofile 65536
* hard nofile 65536
This requires a new login session to take effect.
Step 22: Set Up a Staging Subdomain
Testing changes directly on a production unmanaged VPS, with no separate environment, means every update carries the risk of breaking the live site with no safety net. A staging subdomain (a subdomain pointing to a copy of your application, with its own database) lets you test updates before they reach visitors.
sudo mkdir /var/www/staging.yourdomain.com
Configure a separate Nginx server block for the staging subdomain, pointing to this directory, with its own database. The broader reasoning for why this matters, common mistakes (forgetting to block search engines from indexing the staging copy, accidentally overwriting live data when pushing changes), and how this compares across different hosting setups is covered in our overview of hosting providers with staging environments, which applies the same principles to a self-managed setup.
Step 23: Review and Document Cron Jobs
Check what scheduled tasks already exist on the system:
sudo crontab -l
crontab -l
As you add your own scheduled tasks (backups, log cleanup, application-specific maintenance), keep them documented somewhere outside the crontab itself (a simple text file in your server documentation, covered in Step 29), because a crontab with a dozen undocumented entries six months from now is a maintenance burden, not a convenience.
Step 24: Tune PHP-FPM Pool Settings
The default PHP-FPM pool configuration is rarely correct for your specific server’s RAM and your specific application’s behaviour. Check current worker memory usage:
ps -ylC php-fpm8.2 --sort:rss
Calculate pm.max_children based on available RAM divided by average worker memory, and adjust /etc/php/8.2/fpm/pool.d/www.conf accordingly. The full calculation method, with worked numbers, is covered in the tuning section of our PHP-FPM vs mod_php guide. Getting this number right is one of the highest-impact configuration changes available on a small unmanaged VPS, because it directly determines how many concurrent requests the server can handle before running out of memory.
Phase 5: Backups, Monitoring, and Documentation (Steps 25 to 30)
The final six steps are the ones most often deferred indefinitely, and the ones whose absence causes the most damage when something eventually goes wrong.
Step 25: Set Up Automated Backups
At minimum, back up your database and application files on a schedule. A simple cron-based approach:
sudo nano /usr/local/bin/backup.sh
#!/bin/bash
DATE=$(date +%Y-%m-%d)
mysqldump -u yourappuser -p'a_strong_password' yourappdb > /home/yourusername/backups/db-$DATE.sql
tar -czf /home/yourusername/backups/files-$DATE.tar.gz /var/www/yourdomain.com
find /home/yourusername/backups/ -mtime +7 -delete
Make it executable and schedule it:
chmod +x /usr/local/bin/backup.sh
crontab -e
Add a line to run it daily:
0 2 * * * /usr/local/bin/backup.sh
This script also deletes backups older than seven days, preventing unbounded disk growth. Critically, store a copy off the server itself: a backup that lives only on the same VPS does not protect against the VPS itself failing or being compromised. Sync the backup directory to object storage (covered conceptually in our guide on object, block, and file storage for cloud hosting) using a tool like rclone, or to a separate server fully.
Step 26: Test Backup Restoration
A backup that has never been restored is not a verified backup. Pick a quiet moment, and actually restore your most recent database backup to a test database:
mysql -u yourappuser -p -e "CREATE DATABASE restoretest;"
mysql -u yourappuser -p restoretest < /home/yourusername/backups/db-2026-06-15.sql
Confirm the restored database contains the expected tables and data, then drop the test database:
mysql -u yourappuser -p -e "DROP DATABASE restoretest;"
Backup failures are most often discovered at the worst possible moment, precisely because the backup process appeared to be working right up until the moment a restoration was actually needed. Testing restoration once, now, while there is no emergency, is the only way to know the backup process genuinely works.
Step 27: Set Up External Uptime Monitoring
Install a free or low-cost external uptime monitor (a service that checks your site from outside your server, every few minutes, and alerts you if it stops responding). This is not something you install on the server itself; it is a separate service that watches the server from the outside, which matters because if the server itself goes down completely, anything monitoring from inside it goes down too.
Configure the monitor to check your site’s homepage on an interval of one to five minutes, with email or SMS alerting. This ensures you find out about an outage from a monitor within minutes, rather than from a customer or visitor hours later.
Step 28: Set Up Resource Threshold Alerting
Beyond simple uptime, configure alerting for resource thresholds: disk space above 80%, memory usage sustained above a threshold, or CPU load consistently above your core count. A simple approach uses a script checking these values, run via cron, that sends an alert (email, or a webhook to a messaging service) when a threshold is crossed.
df -h | awk '$5 > "80%" {print $0}'
This kind of proactive alerting is what turns the diagnostic process in our VPS slow diagnosis guide from something you do reactively after a complaint into something that flags a developing problem before it becomes one.
Step 29: Document Your Server Configuration
Write down, in a simple text file or shared document, what you have configured and why: the SSH port if changed in Step 6, the database credentials and where they are stored, the cron jobs from Step 23, the backup schedule and where backups are stored, and the SSL certificate renewal process and expiry date.
Six months from now, when something needs to change or when a second person needs to help manage the server, this document is the difference between a quick fix and a lengthy investigation to rediscover decisions that were made and then forgotten.
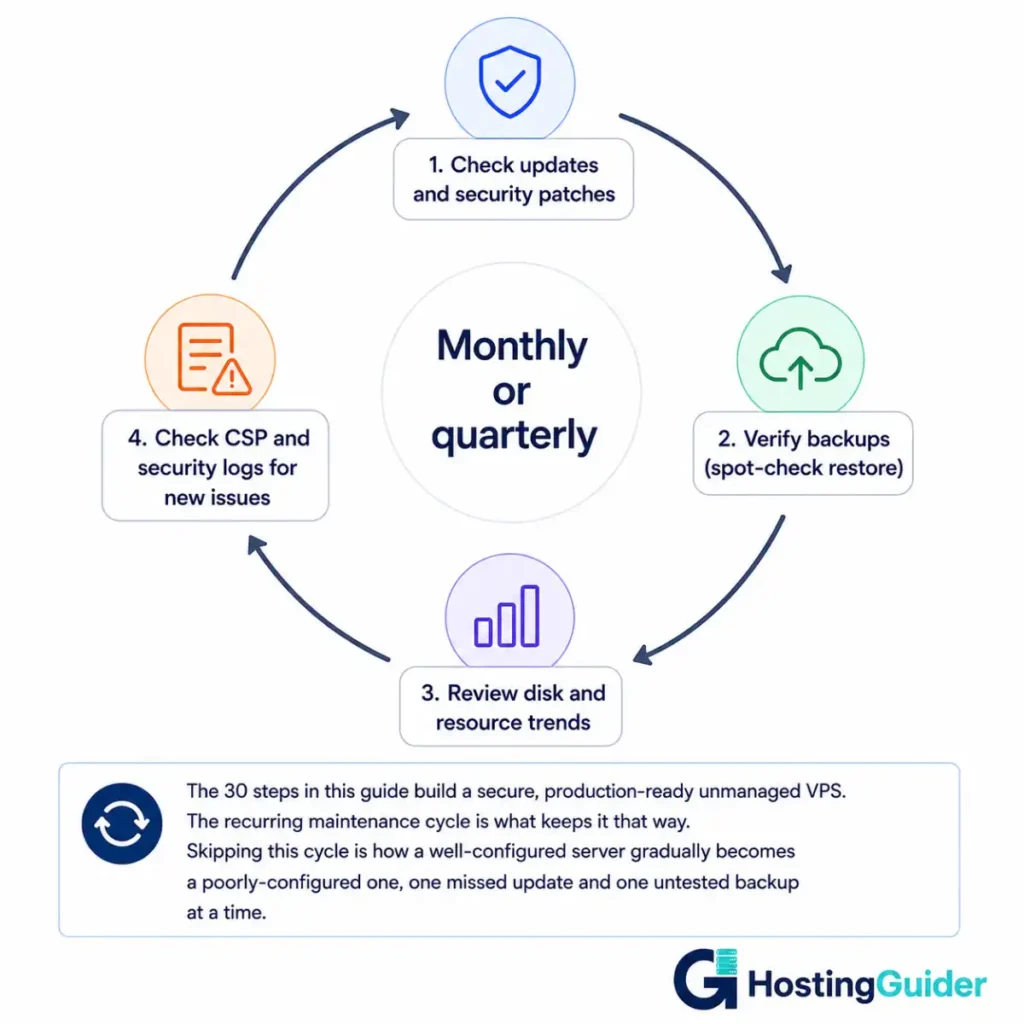
Step 30: Schedule a Recurring Maintenance Review
Set a recurring calendar reminder, monthly or quarterly, to review: whether automatic updates have been applying successfully, whether backups are still running and have been spot-checked, whether disk usage is trending upward in a way that needs attention, whether the CSP policy from Step 17 has accumulated new violations from application updates, and whether any new services have been installed that need firewall rules or fail2ban coverage.
An unmanaged VPS that received this 30-step setup and was never touched again gradually drifts: updates stop applying cleanly, a new plugin introduces a CSP violation nobody notices, disk fills slowly with logs and old backups. The setup in this guide is the foundation. The recurring review is what keeps that foundation solid.
Frequently Asked Questions
How long does it take to complete all 30 steps on an unmanaged VPS?
Setting up a new unmanaged VPS with all 30 steps usually takes two to four hours if you are comfortable with the command line. Phases 1 and 2 (access security and system hardening) go fastest, often under 30 minutes together. Phase 3 (the web stack) takes the longest because you install and configure several services. Later servers go faster once you have the documented process from Step 29 to follow.
Do I need to do all 30 steps, or can I skip some on an unmanaged VPS?
Never skip Steps 1 to 6, but some later steps depend on what you run. Steps 1 to 6 close the risks attackers target most often. Steps 7 to 12 are strongly recommended for any production server. Steps 13 to 18 depend on your stack: Step 14 (PHP-FPM) only applies to PHP apps, while SSL and CSP headers apply to almost every website. Skipping Steps 19 to 30 won’t cause problems right away, but those gaps are what usually cause outages months later.
What is the difference between an unmanaged VPS and managed hosting in terms of this checklist?
With managed hosting, the provider does much of this checklist for you. On an unmanaged VPS, you do all 30 steps yourself. Managed hosts usually set up the firewall, automatic updates, backups, monitoring, and often SSL and PHP-FPM tuning before your account goes live. An unmanaged VPS usually costs less and gives you full control. In return, you are fully responsible for the initial setup and all ongoing maintenance.
Can I automate this entire setup so I do not have to do it manually each time?
Yes. You can automate the setup with a configuration management tool like Ansible, or with a startup script that your cloud provider runs when it creates a new server. Do the checklist by hand at least once first so you understand each step. Automation takes real effort to build, so it pays off most when you manage several servers or need every rebuild to match a known-good setup.
Is it safe to leave the default SSH port (22) if I have already disabled password authentication?
Yes. Disabling password login and using SSH keys is the control that actually protects your server, and it works on port 22 too. Without your private key, an attacker can’t log in on any port. Changing the port (Step 6) doesn’t make encryption stronger. What it does is greatly cut the number of automated login attempts in your logs, so real security events are easier to spot. Treat it as a way to reduce noise, never as a replacement for key authentication.
What happens if I make a mistake during this setup and lock myself out of my unmanaged VPS?
If you lock yourself out, you can usually get back in through your provider’s web console. It’s often called a recovery console or VNC console. It connects to the server directly without SSH, so you can undo a bad SSH or firewall setting. Before you change anything in Steps 4, 5, or 6, find out how to open this console with your provider. Keep a second SSH session open while you test each change.
Should I do this 30-step setup before or after pointing my domain to the server?
Finish at least Phases 1 and 2 before you point your domain to the server. Once the IP is linked to a live domain, the server gets real traffic and more scanning attempts. Complete Phase 3 (the web stack) before or while you point the domain, because the web server has to be running to answer requests. You can finish Phases 4 and 5 soon after launch, but the longer you wait, the more risk builds up.