A plugin vulnerability gets exploited. An attacker injects a script into your WordPress site that quietly sends every visitor’s keystrokes, including login forms and credit card fields, to a server in another country. Your SSL certificate is valid. Your firewall did not flag anything, because the malicious script loads over HTTPS just like everything else on your site.
This is exactly the scenario Content Security Policy headers exist to stop, and it is exactly the scenario most WordPress sites have no defence against, because almost no WordPress site has Content Security Policy headers configured at all.
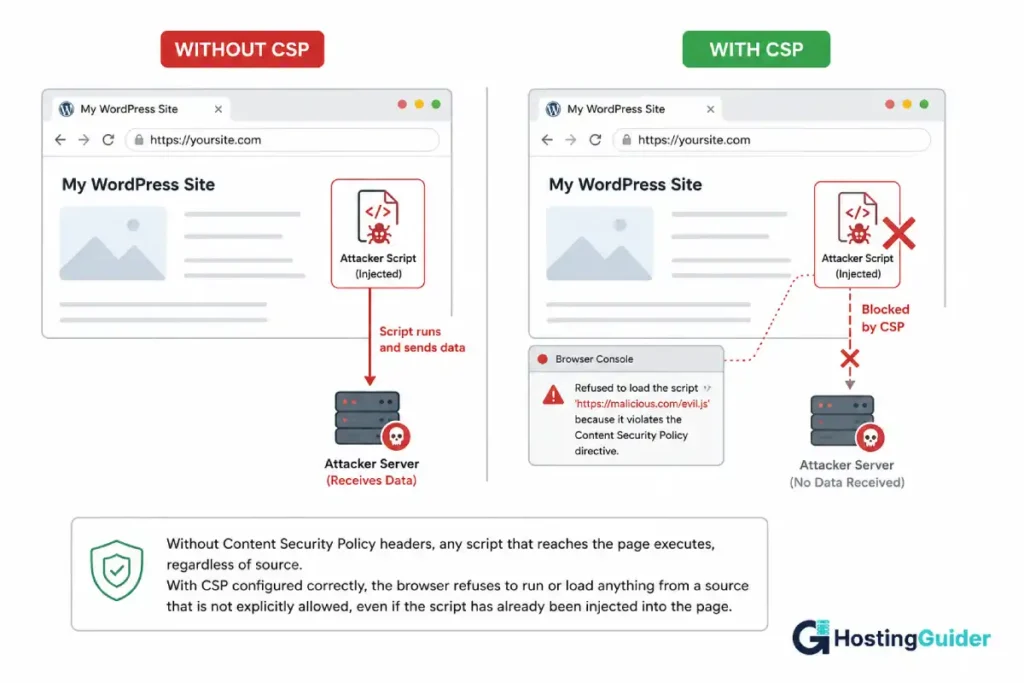
Content Security Policy, usually shortened to CSP, is a browser-enforced rule that tells visitors’ browsers which sources of content (scripts, styles, images, fonts, frames) your site is allowed to load from. Without CSP, a browser will execute any script that arrives in your page’s HTML, regardless of where it came from. With CSP correctly configured, a malicious script injected through a vulnerability simply will not run, because the browser refuses to load or execute anything from a source not on the approved list.
The reason most WordPress sites do not have CSP is not that it is unimportant. It is that WordPress sites load resources from many different sources by default (Google Fonts, embedded YouTube videos, Google Analytics, payment processors, CDN-hosted scripts), and a CSP policy that does not account for all of them breaks the site rather than securing it. This guide builds a working CSP policy for WordPress step by step, in a way that does not break things along the way.
What Content Security Policy Headers Actually Do for WordPress Sites
A Content Security Policy header is an HTTP response header. Your server sends it along with every page, and the visitor’s browser reads it and enforces it for that page.
The header looks something like this:
Content-Security-Policy: default-src 'self'; script-src 'self' https://www.googletagmanager.com; style-src 'self' https://fonts.googleapis.com
Each part after Content-Security-Policy: is a directive. A directive has a name (script-src, style-src, img-src, and others) followed by a list of allowed sources for that type of content. 'self' means “this same domain.” A specific URL means content from that exact source is allowed.
When the browser loads your page, it checks every script, stylesheet, image, font, frame, and other resource against the relevant directive. If a resource’s source is not on the allowed list, the browser refuses to load or execute it, and logs a violation in the browser console (and optionally reports it to a URL you specify, covered later in this guide).
This matters specifically for cross-site scripting (XSS) attacks, one of the most common vulnerability types in WordPress plugins and themes. A cross-site scripting (XSS) vulnerability lets an attacker get their own script onto your page, typically by injecting it into a comment field, a form input, or a database value that gets rendered without proper escaping. Without CSP, that injected script runs exactly like any script you wrote yourself: it can read cookies, capture form input, redirect visitors, or load additional malicious code. With CSP, that injected script tries to run, the browser checks its source (often an inline script with no source URL at all, or a URL pointing to an attacker’s server), finds it is not on the allowed list, and blocks it.
CSP does not prevent the vulnerability that allowed the injection in the first place. It limits what an attacker can do once they have found one. This is why CSP is described as defence in depth: one layer among several, not a replacement for keeping plugins updated or for the broader set of security layers that sit alongside HTTPS.
Why WordPress Makes Content Security Policy Headers Harder Than They Sound
A static website with no third-party embeds could implement a strict CSP policy in minutes. WordPress sites are rarely this simple, and that is the entire reason CSP adoption on WordPress is low.
A typical WordPress site loads resources from many origins simultaneously: the WordPress core and theme files from your own domain, Google Fonts from fonts.googleapis.com and fonts.gstatic.com, Google Analytics or Google Tag Manager from googletagmanager.com and google-analytics.com, embedded YouTube videos from youtube.com, Gravatar profile images from gravatar.com, jQuery or other libraries sometimes loaded from a CDN like cdnjs.cloudflare.com, payment processor scripts from Stripe or PayPal if running WooCommerce, reCAPTCHA from Google if a contact form uses it, and potentially dozens of plugin-specific scripts and styles, each with their own sources.
Every one of these needs to appear in your CSP policy, or the browser blocks it, and the corresponding feature breaks. A CSP policy that blocks Google Fonts means your site falls back to a default system font. A CSP policy that blocks Stripe’s script means your checkout page stops working. A CSP policy that blocks an inline script (many WordPress plugins inject small inline <script> blocks directly into the page) means that script does not run at all, which can break anything from a mobile menu toggle to an entire page builder’s interactive elements.
This is why a CSP policy cannot simply be copied from a generic template and applied to a WordPress site. It has to be built specifically for what that site actually loads, which requires an audit step before any policy is written.
Step 1: Audit What Your Site Actually Loads
Before writing any policy, find out what your site currently loads and from where. This audit determines every entry your CSP policy will need.
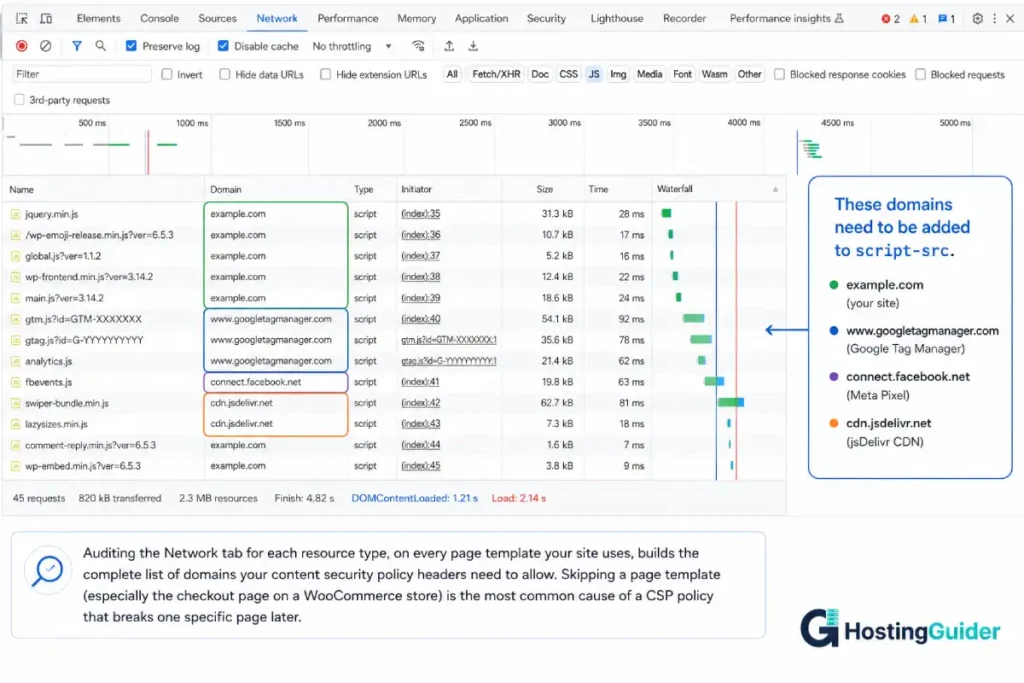
The most reliable method is the browser’s developer tools. Open your site in Chrome or Firefox, open Developer Tools (F12 or right-click, Inspect), and go to the Network tab. Reload the page with the Network tab open and “Disable cache” checked, so every resource loads fresh.
Filter the Network tab by resource type, one type at a time:
For scripts, filter by “JS” and note every distinct domain shown in the Domain column. You will typically see your own domain, plus entries like googletagmanager.com, google-analytics.com, and possibly others depending on your plugins.
For stylesheets, filter by “CSS” and do the same. Google Fonts almost always appears here as fonts.googleapis.com.
For fonts specifically, filter by “Font.” Google Fonts typically loads the actual font files from fonts.gstatic.com, a different domain from the CSS that references them.
For images, filter by “Img.” Gravatar (gravatar.com or secure.gravatar.com) is extremely common on WordPress sites because it provides the default avatar images for comments, even if you do not use Gravatar deliberately.
For frames (embedded content), filter by “Doc” or look for iframe elements in the Elements tab. YouTube embeds (youtube.com or youtube-nocookie.com), Google Maps embeds, and payment provider iframes (Stripe’s js.stripe.com checkout elements, for example) commonly appear here.
Repeat this audit on every distinct page template your site uses: the homepage, a blog post, a page with a contact form, and, if running WooCommerce, a product page and the checkout page specifically, since checkout pages often load additional scripts (payment processors, fraud detection) not present elsewhere on the site.
Write down every distinct domain you find, grouped by resource type (script, style, font, image, frame, connect for any AJAX/fetch destinations). This list is the foundation of your CSP policy.
Step 2: Start with Report-Only Mode
This is the step that prevents CSP from breaking your site, and skipping it is the single most common reason people abandon CSP after one bad experience.
CSP supports a report-only mode, set with a different header name:
Content-Security-Policy-Report-Only: default-src 'self'; script-src 'self'
In report-only mode, the browser does not block anything. It evaluates your policy against everything the page loads, and for anything that would have been blocked under an enforced policy, it logs a violation, either to the browser console or to a reporting URL you configure (covered in Step 7). Nothing on the site actually breaks.
This means you can write a draft policy based on your audit, deploy it in report-only mode, then browse your site as a normal visitor would (and as a WordPress administrator, since the admin area has its own set of scripts and styles that need to be accounted for separately if you want CSP to apply there too). Every violation that would have occurred under the real policy shows up in the browser console without affecting any visitor.
Open the browser console (F12, Console tab) while browsing your site with the report-only header active. Each violation looks something like:
Refused to load the script 'https://example-cdn.com/script.js' because it violates the following Content Security Policy directive: "script-src 'self'"
Each such message tells you exactly which domain needs to be added to which directive. Work through your site’s main pages this way, adding entries to your draft policy as violations appear, until browsing normally produces no more violations.
Only once the report-only policy produces no violations across your main page templates should you move to Step 6 and switch to an enforced policy.
Step 3: Build Your Policy Directive by Directive
CSP directives correspond to types of content. Here are the directives most relevant to a WordPress site, with plain-language explanations.
default-src is the fallback for any directive you do not specify explicitly. Setting default-src 'self' means “by default, only load content from this same domain,” and then you add specific exceptions with other directives.
script-src controls where JavaScript can load from, and also controls whether inline scripts (<script> blocks directly in the HTML, without a src attribute) and inline event handlers (onclick="..." attributes) are allowed. This is usually the most consequential directive for WordPress, because many plugins use inline scripts.
style-src controls stylesheets, both linked (<link rel="stylesheet">) and inline (<style> blocks and style="..." attributes). WordPress themes and page builders frequently use inline styles for dynamic styling, which has similar implications to inline scripts.
img-src controls where images can load from. This is usually the easiest directive to get right and rarely causes problems beyond remembering Gravatar.
font-src controls where fonts load from. Google Fonts requires an entry here for fonts.gstatic.com (the actual font files), separate from style-src which needs fonts.googleapis.com (the CSS that references the fonts).
frame-src controls what can be embedded in <iframe> elements on your page. YouTube embeds, Google Maps, and payment iframes need entries here.
connect-src controls where the page can send requests via JavaScript (fetch, XMLHttpRequest, WebSocket). Analytics tools, some form plugins, and any AJAX functionality that calls external services need entries here, separate from where the script itself was loaded from.
frame-ancestors controls which sites are allowed to embed your site in an iframe. This is the modern replacement for the older X-Frame-Options header and is worth setting to 'self' (or 'none' if your site should never be embedded anywhere) as a defence against clickjacking.
A starting policy structure, before adding the specific sources your audit identified, looks like this:
default-src 'self';
script-src 'self';
style-src 'self';
img-src 'self';
font-src 'self';
frame-src 'self';
connect-src 'self';
frame-ancestors 'self';
This is deliberately restrictive. Every subsequent step adds the specific exceptions your site genuinely needs, based on the audit from Step 1 and the violations observed in Step 2.
Step 4: Common WordPress Sources You Will Need to Allow
Based on the audit process, most WordPress sites need some combination of the following additions. This is not a copy-paste policy (your audit determines what you actually need), but it is a reference for the most common entries.
Google Fonts:
style-src 'self' https://fonts.googleapis.com;
font-src 'self' https://fonts.gstatic.com;
Google Analytics and Google Tag Manager:
script-src 'self' https://www.googletagmanager.com https://www.google-analytics.com;
connect-src 'self' https://www.google-analytics.com https://analytics.google.com;
img-src 'self' https://www.google-analytics.com;
Gravatar (active by default on most WordPress sites with comments enabled):
img-src 'self' https://secure.gravatar.com https://*.gravatar.com;
YouTube embeds:
frame-src 'self' https://www.youtube.com https://www.youtube-nocookie.com;
Google reCAPTCHA (common on contact forms):
script-src 'self' https://www.google.com https://www.gstatic.com;
frame-src 'self' https://www.google.com;
Stripe (for WooCommerce or other checkout integrations):
script-src 'self' https://js.stripe.com;
frame-src 'self' https://js.stripe.com https://hooks.stripe.com;
connect-src 'self' https://api.stripe.com;
Inline scripts and styles: This is the entry that causes the most difficulty. Many WordPress plugins and themes inject inline <script> and <style> blocks. The strict, secure approach uses a nonce or hash for each inline block, which requires either a plugin that generates these automatically or custom code to add them dynamically. The less strict but far more practical approach for most WordPress sites, especially when starting out, is:
script-src 'self' 'unsafe-inline' [other sources];
style-src 'self' 'unsafe-inline' [other sources];
'unsafe-inline' permits inline scripts and styles, which significantly reduces CSP’s protection against XSS (since an injected inline script would now be permitted), but it is the difference between having a CSP policy that covers external resource loading (still a meaningful security improvement) and having no CSP policy at all because the site breaks without it. Sites that want the stronger protection without 'unsafe-inline' need a nonce-based approach, which is more involved and is covered briefly in the FAQ.
Step 5: Implement Content Security Policy Headers on Your Server
There are several ways to add the CSP header to a WordPress site. The right method depends on your hosting access level.
Method 1: Server-level configuration (Nginx). If you have access to your Nginx server configuration, add the header in your site’s server block:
add_header Content-Security-Policy "default-src 'self'; script-src 'self' 'unsafe-inline' https://www.googletagmanager.com; style-src 'self' 'unsafe-inline' https://fonts.googleapis.com; font-src 'self' https://fonts.gstatic.com; img-src 'self' https://secure.gravatar.com; frame-src 'self' https://www.youtube.com; frame-ancestors 'self';" always;
The always flag ensures the header is sent even for error responses (4xx, 5xx), which matters for consistent policy application. Test and reload Nginx:
sudo nginx -t
sudo systemctl reload nginx
Method 2: Server-level configuration (Apache via .htaccess). If you are on Apache and have .htaccess access (common on shared hosting), add to your site’s .htaccess:
<IfModule mod_headers.c>
    Header set Content-Security-Policy "default-src 'self'; script-src 'self' 'unsafe-inline' https://www.googletagmanager.com; style-src 'self' 'unsafe-inline' https://fonts.googleapis.com; font-src 'self' https://fonts.gstatic.com; img-src 'self' https://secure.gravatar.com; frame-src 'self' https://www.youtube.com; frame-ancestors 'self'"
</IfModule>
This requires mod_headers to be enabled on the server, which it is on most hosting environments by default.
Method 3: WordPress plugin. Several WordPress security plugins (including general security suites and CSP-specific plugins) allow setting CSP headers through the WordPress admin interface without server access. This is the most accessible method for site owners on shared hosting without server configuration access, though it is worth confirming the plugin applies the header to all response types (including non-HTML responses where relevant) and not just standard page loads.
Method 4: functions.php. A basic implementation can be added to your theme’s functions.php (or, better, a site-specific plugin to avoid losing the change on theme updates):
add_action('send_headers', function() {
    header("Content-Security-Policy: default-src 'self'; script-src 'self' 'unsafe-inline' https://www.googletagmanager.com; style-src 'self' 'unsafe-inline' https://fonts.googleapis.com; font-src 'self' https://fonts.gstatic.com; img-src 'self' https://secure.gravatar.com; frame-src 'self' https://www.youtube.com; frame-ancestors 'self'");
});
For the report-only phase, use Content-Security-Policy-Report-Only as the header name in any of these methods, with the same directive content.
Server-level configuration (Methods 1 and 2) is generally preferable to PHP-based implementation (Method 4) because it applies consistently to all requests, including cached pages served without WordPress executing PHP at all, and any static assets. A CSP header set only through functions.php will not apply to a fully cached HTML page served directly by a caching layer, which is relevant given how caching affects WordPress performance and is increasingly the normal state for a well-optimised WordPress site.
Step 6: Move from Report-Only to Enforced
Once your report-only policy produces no console violations across your main page templates, including any forms, embeds, and (if applicable) the WooCommerce checkout flow, you are ready to enforce the policy.
Change the header name from Content-Security-Policy-Report-Only to Content-Security-Policy using whichever implementation method you chose in Step 5. Keep the directive content identical at first.
After switching, browse the site again as both a visitor and as a logged-in administrator. The WordPress admin area (/wp-admin/) often has its own set of inline scripts and styles, particularly from plugins that add admin-area functionality, and a policy that works perfectly for front-end visitors can still break the admin dashboard if the admin area was not included in your audit.
If you find the admin area breaks under your policy, a practical approach is to apply the CSP header only to front-end requests, leaving the admin area unrestricted, since the admin area is access-controlled by login in a way the public-facing site is not, and is a lower priority for CSP’s specific protections. This can be done by checking the request path in your implementation:
location / {
    add_header Content-Security-Policy "..." always;
}
location /wp-admin/ {
    # CSP header not added here
}
Adjust this structure based on your specific Nginx configuration.
Step 7: Set Up Violation Reporting for Content Security Policy Headers
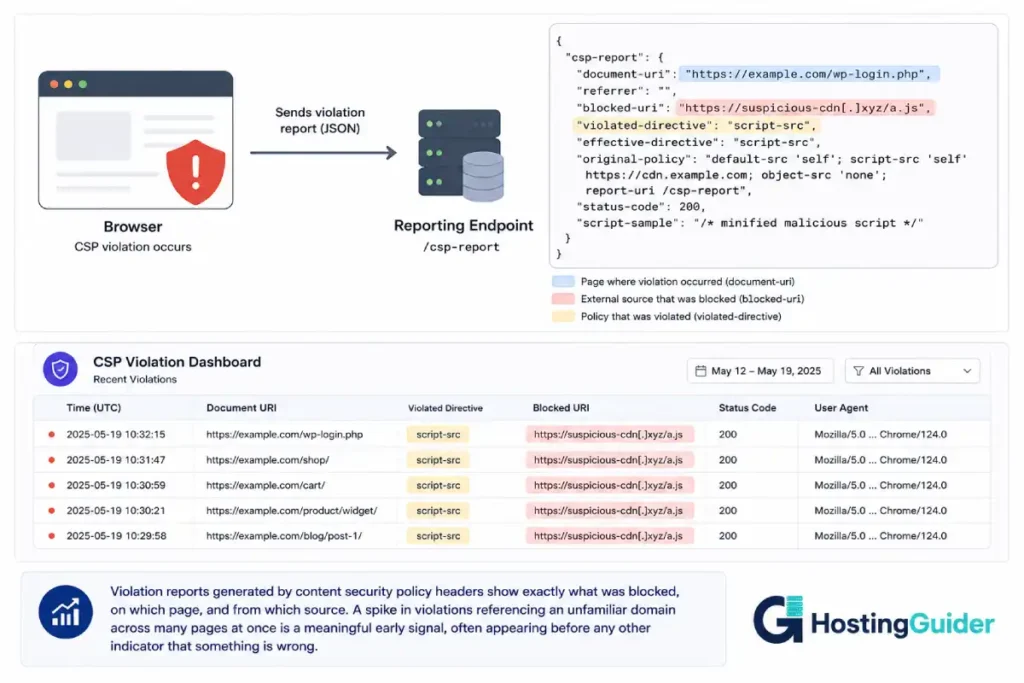
Once your policy is enforced, ongoing violation reporting tells you about two things: attempted attacks that CSP successfully blocked, and legitimate site changes (a new plugin, a new embed) that need a policy update.
CSP supports a reporting mechanism through the report-to directive (modern) or the older report-uri directive, which sends a JSON report to a URL you specify whenever a violation occurs.
Content-Security-Policy: [your policy]; report-uri https://your-reporting-endpoint.com/csp-reports
Setting up your own reporting endpoint requires a small amount of server-side code to receive and log the JSON reports. For site owners who do not want to build this, third-party services like Report URI exist specifically for collecting CSP violation reports, providing a dashboard of violations without requiring custom infrastructure.
Without a reporting endpoint, you still benefit from CSP’s blocking behaviour, but you only find out about violations if you happen to check the browser console, or if a legitimate feature breaks and someone reports it. A reporting endpoint turns CSP from a silent protection into one that surfaces useful information over time, including early warning of attack attempts against your site.
Common Mistakes That Break Sites
Skipping the audit and copying a generic policy. A CSP policy for a different site, or a generic “secure WordPress CSP” template found online, will not match what your specific theme and plugins load. It will either be too permissive (defeating much of CSP’s purpose) or too restrictive (breaking your site) because it was not built from your site’s actual resource list.
Forgetting the checkout page. On WooCommerce sites, the checkout page loads payment processor scripts and iframes that do not appear anywhere else on the site. A CSP policy tested only on the homepage and a blog post can pass every check and still break checkout, which is the worst possible page for something to break silently.
Forgetting the admin area. As covered in Step 6, /wp-admin/ has its own resource requirements. A policy that works for the public site can still lock administrators out of parts of the dashboard if applied without testing there.
Going straight to enforced mode. Skipping report-only mode means the first time you discover a problem is when a visitor reports a broken page, or worse, when nobody reports it and a feature is silently broken for everyone.
Setting frame-ancestors to 'none' without checking for legitimate embeds. If your site is ever legitimately embedded elsewhere (a widget, a syndicated content partnership), frame-ancestors 'none' would block that. 'self' is a safer default unless you specifically need to prevent all embedding, including your own.
Not retesting after plugin updates. A plugin update can introduce a new external script or change how an existing one loads. A CSP policy that was correct last month can start generating violations after an update, breaking the corresponding feature. This is addressed in the next section.
Maintaining Content Security Policy Headers Over Time
CSP is not a one-time setup. WordPress sites change: plugins update, new plugins get installed, themes change, and marketing adds a new tracking script. Each of these can introduce a new resource that your policy does not yet allow.
The most practical maintenance approach: keep a copy of your policy in report-only mode running alongside your enforced policy (most implementations support sending both headers simultaneously, with slightly different directive content, to preview a future policy change without affecting current visitors). When you plan to install a new plugin or add a new embed, temporarily add the new resource to your report-only policy, test the change, then add it to the enforced policy once confirmed.
For ongoing monitoring without per-change manual review, the violation reporting set up in Step 7 surfaces new violations as they occur, which often happens after a plugin update introduces a new script source. Reviewing violation reports periodically, even monthly, catches these before they accumulate into a confusing list of “things that are broken and nobody knows why.”
A CSP policy that is six months out of date and generates dozens of violations on every page load provides practically no protection, because the volume of expected violations makes it impossible to spot the one violation that represents an actual attack. Treating CSP maintenance as part of routine site maintenance, alongside plugin updates and backup verification, keeps the policy meaningful. Backup and security maintenance habits that get skipped tend to fail at the worst possible time, and an unmaintained CSP policy follows the same pattern: technically present, practically useless.
Frequently Asked Questions
Do Content Security Policy Headers Replace a WordPress Security Plugin?
No. Content Security Policy headers are one layer of defence that limits what an attacker can do if they manage to inject a script into your page, typically through an XSS vulnerability. A security plugin (or server-level protection like a WAF) aims to prevent the injection from happening in the first place, scans for malware, and handles other security functions CSP does not address. Server-side WAF protection and plugin-based security operate at different levels, and CSP headers complement both rather than replacing either.
Will Content Security Policy Headers Slow Down My WordPress Site?
No. CSP headers are a small amount of additional text in the HTTP response headers, processed by the browser as part of normal page loading. The performance impact is negligible, effectively unmeasurable compared to other factors like image sizes, script execution time, or server response time. CSP is a security feature with no meaningful performance cost.
Content Security Policy Headers and ‘unsafe-inline’: What Does It Mean?
'unsafe-inline' is a CSP keyword that permits inline scripts and styles (code written directly in the HTML rather than loaded from a separate file) to execute. Without it, many WordPress plugins and themes that inject inline <script> or <style> blocks would stop working, because CSP would block them along with any malicious inline scripts. Including 'unsafe-inline' reduces CSP’s protection against certain XSS attacks (since an injected inline script would now be permitted to run) but still provides protection against externally-loaded malicious scripts, which is a meaningful improvement over no policy at all. The stronger alternative is a nonce-based policy, where each legitimate inline script is given a unique, server-generated token that changes on every page load, and only scripts with a matching token execute. This requires either a plugin that generates nonces for WordPress’s own inline scripts and integrates with theme and plugin output, or custom development work, and is a reasonable next step once a basic CSP policy with 'unsafe-inline' is working and stable.
How Do I Test if My Content Security Policy Headers Are Working?
After implementing the header, check the response headers using your browser’s developer tools (Network tab, select the main document request, view Response Headers) or using a command-line tool: curl -I https://yourdomain.com and look for the Content-Security-Policy header in the output. Online header-checking tools like securityheaders.com also exist that show your CSP policy alongside other security headers and flag common issues. To verify enforcement is actually working, you can temporarily and deliberately add a script tag pointing to a domain not in your policy (in a test environment, not production) and confirm the browser console shows it being blocked.
Can Content Security Policy Headers Break Google Analytics or Other Tracking?
Yes, if the relevant domains are not included in the policy. Google Analytics and Google Tag Manager require entries in script-src (for the tracking script itself), connect-src (for the data being sent to Google’s servers), and sometimes img-src (for certain tracking implementations that use image pixels). The audit process in this guide, performed on a page where tracking is active, identifies these domains. A common symptom of a CSP policy breaking analytics is that the website continues to function normally for visitors, but analytics data stops appearing, which can go unnoticed for a long time if nobody is actively checking analytics dashboards against expected traffic.
Content Security Policy Headers: Plugin or Manual Implementation?
Both are valid depending on your access level and comfort with configuration. A CSP-specific plugin or a security suite with CSP functionality is more accessible for site owners without server configuration access, particularly on shared hosting, and often includes a user interface for building the policy and sometimes for managing report-only mode. Manual implementation at the server level (Nginx or Apache configuration) is preferable when available because it applies more consistently, including to cached pages, and does not depend on WordPress executing PHP for every request. If your hosting provides server access, server-level implementation is the more reliable long-term approach. If it does not, a well-reviewed plugin is a reasonable and common starting point.
Content Security Policy Headers: What if My Policy Is Too Strict?
If an enforced CSP policy is too strict, the affected resources simply do not load or execute. Depending on what is blocked, this can range from a minor visual issue (a font not loading, falling back to a system font) to a significant functional problem (a checkout button that does not work because its script was blocked). This is precisely why Step 2 (report-only mode) exists: testing the policy without enforcement means mistakes are visible in the browser console without affecting any visitor. If a mistake reaches an enforced policy, the fix is to identify the blocked resource (browser console, or a violation report if configured), add it to the appropriate directive, and redeploy. Keeping the previous working policy available makes it straightforward to revert quickly while the corrected policy is prepared.