The most expensive WordPress mistake is testing changes on a live site.
A plugin update conflicts with your theme. A CSS change breaks the mobile layout. A WooCommerce settings change makes the checkout stop working. You catch it immediately, but “immediately” is still after two hundred visitors saw a broken site, and after the Google bot cached an error page.
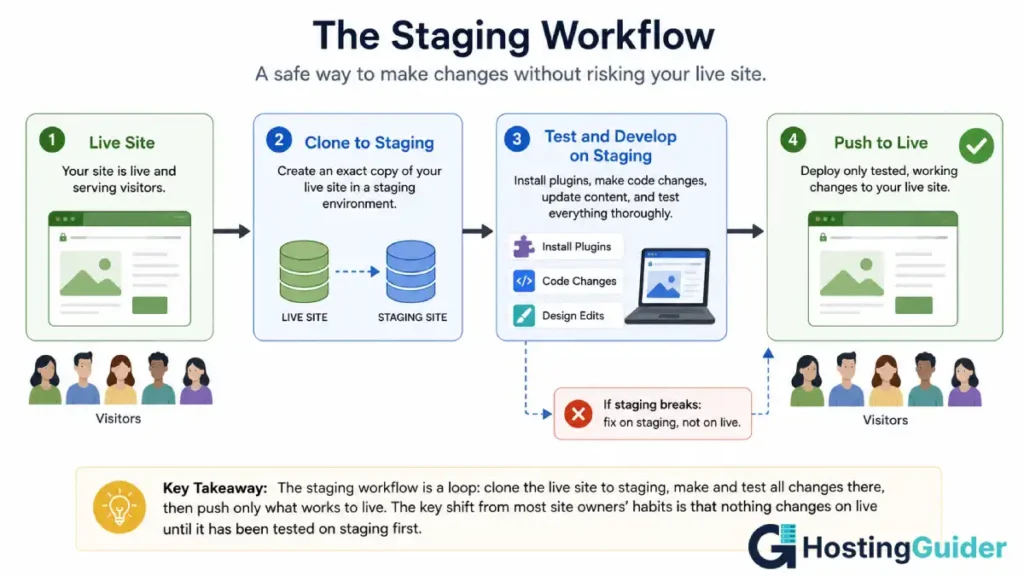
Managed WordPress hosting staging environments exist to prevent this specific failure. A staging environment is a private, separate copy of your site where you can install plugins, test updates, break things, fix them, and only push the working version to live visitors once you know it works.
Every professional developer working on a production WordPress site uses some version of this workflow. Most site owners on managed WordPress hosting have staging available in their hosting panel and never use it at all.
This guide is the full developer workflow, translated into terms that apply to whatever managed WordPress hosting staging environment your hosting panel provides, whether that is WP Engine, Kinsta, Cloudways, SiteGround, or any other provider that includes staging.
What a Managed WordPress Hosting Staging Environment Actually Is
A staging environment is a second installation of your website, running on a separate URL (typically a subdomain like staging.yoursite.com or a provider-generated URL like yoursite.wpenginesites.com), using a separate database, and completely isolated from your live site.
Changes you make on staging do not affect live visitors at all. The live site continues running as normal while you install, configure, break, and fix things on staging. When you are satisfied that a change works correctly on staging, you push it to the live environment, and the change appears for real visitors.
The isolation is the entire point. On a live site, the cost of a mistake is a broken site in front of real visitors. On staging, the cost of a mistake is a broken staging environment, which you fix before anyone sees it.
Most managed WordPress hosting providers create the staging environment from a clone of your live site, which means staging starts as an exact copy: same database content, same plugins, same theme, same media files, same settings. This is important because it means tests on staging reflect what will actually happen when the same change is applied to the same live site, rather than a clean install that may behave differently.
Why Managed WordPress Hosting Staging Environments Beat Manual Setups
You can create a staging environment manually on any WordPress hosting: install a second WordPress instance in a subdirectory or subdomain, copy your database, and configure the staging site to point at the copy. Developers have been doing this for years.
What managed WordPress hosting staging environments add is integration: the clone, the push, and the sync are handled through the hosting panel rather than requiring command-line database exports, wp-config.php editing, and manual file synchronisation. For site owners who are not comfortable with the command-line workflow, this integration is what makes staging practically usable rather than theoretically available.
Managed staging also typically handles URL replacement automatically. When you clone a live site to staging, every URL stored in the database (which includes image paths, internal links, and theme settings) still points to the live domain. A correct staging setup replaces these with the staging domain automatically, so the staging site works correctly without manual search-and-replace. When you push staging back to live, the reverse happens. Without this automated URL replacement, staging environments silently serve the wrong content or break in ways that are difficult to diagnose.
Some providers also handle SSL certificates for the staging subdomain, search engine blocking (the staging site should never be indexed by Google, which creates duplicate content issues and can affect your live site’s rankings), and access protection (staging sites should not be publicly browsable by anyone who happens to discover the URL). These are details that a manual staging setup requires you to handle explicitly, and that managed hosting staging environments often handle by default.
The Core Developer Workflow for Managed WordPress Hosting Staging Environments
Developers who build WordPress sites professionally follow a consistent workflow regardless of which hosting provider, panel, or tool they use. Here is that workflow described in terms of what you do in a managed WordPress hosting panel.
Before any change to live:
Pull a fresh clone of live to staging. Not a days-old clone from the last time you used staging. A fresh clone taken immediately before you begin work, so that staging reflects the current live site, including any content, orders, or user registrations that have happened since you last synced.
Make all changes on staging, not on live. This sounds obvious once you have adopted the habit, but the habitual instinct for most site owners is to “just quickly” make a change on live because it seems faster. It is faster, right up until it breaks something.
Test the changed staging site thoroughly, in the way a visitor would actually use it. This is a separate point from “make changes,” because developers often make the mistake of testing only the thing they changed, rather than testing the site as a whole after the change is applied, which is when you catch that the plugin you installed conflicted with something else.
Push staging to live only after testing is complete. Not before. Not “push it and see.” After.
After pushing to live:
Verify the live site immediately. Open an incognito window (to bypass any browser cache) and check the pages most likely to be affected by the change. If something is wrong on live, you need to know within minutes, not after visitors start reporting it.
If something is wrong on live that was not caught on staging, assess quickly: is the problem on live only (meaning the push had an unintended effect), or did staging already have the problem and you did not test thoroughly enough. The answer determines whether you roll back (if the push caused it) or fix forward on staging and push again (if the problem pre-existed on staging).
Cloning in Managed WordPress Hosting Staging Environments: What to Check
Most managed WordPress hosting providers make cloning as simple as a button in the hosting panel. Before you click it and start working, a few checks make the process more reliable.
Confirm the clone includes the database, not just the files. A staging environment that has current theme files but a weeks-old database is not an accurate reflection of your live site. If a customer registered yesterday, or you published a post this morning, those should be on staging too. Most panel-based cloning tools handle this automatically, but it is worth confirming, especially if the panel shows a “files only” or “files and database” option.
Check that staging URLs are correct. After cloning, visit the staging URL in a browser. Check that images load (they use database-stored URLs), that internal links go to staging URLs rather than live URLs, and that the WordPress admin login works at the staging URL. If images are broken or links redirect to the live site, URL replacement did not work correctly, which makes staging unreliable for testing purposes.
Confirm staging is not indexable. In the staging WordPress admin, go to Settings, Reading, and check “Discourage search engines from indexing this site.” This adds a noindex directive to staging pages. Also check whether your provider adds a robots.txt blocking directive or a password prompt to staging automatically, and if not, add one of these protections yourself. A staging site that gets indexed by Google is a content duplication problem that can affect your live site’s search rankings.
Note any plugins that behave differently on staging. Security plugins that check domain-specific licences may deactivate on staging, since the staging URL is different from the licensed live URL. SEO plugins that have verified your live site with Google Search Console may show warnings on staging. Caching plugins may need to be flushed or reconfigured. None of these are problems with staging itself, but they are things to be aware of so they do not confuse your testing.
What to Test in Managed WordPress Hosting Staging Environments Before Going Live
This is where most staging workflows fall short: making changes on staging but not testing them adequately before pushing. Here is a practical testing sequence.
For a plugin update or installation:
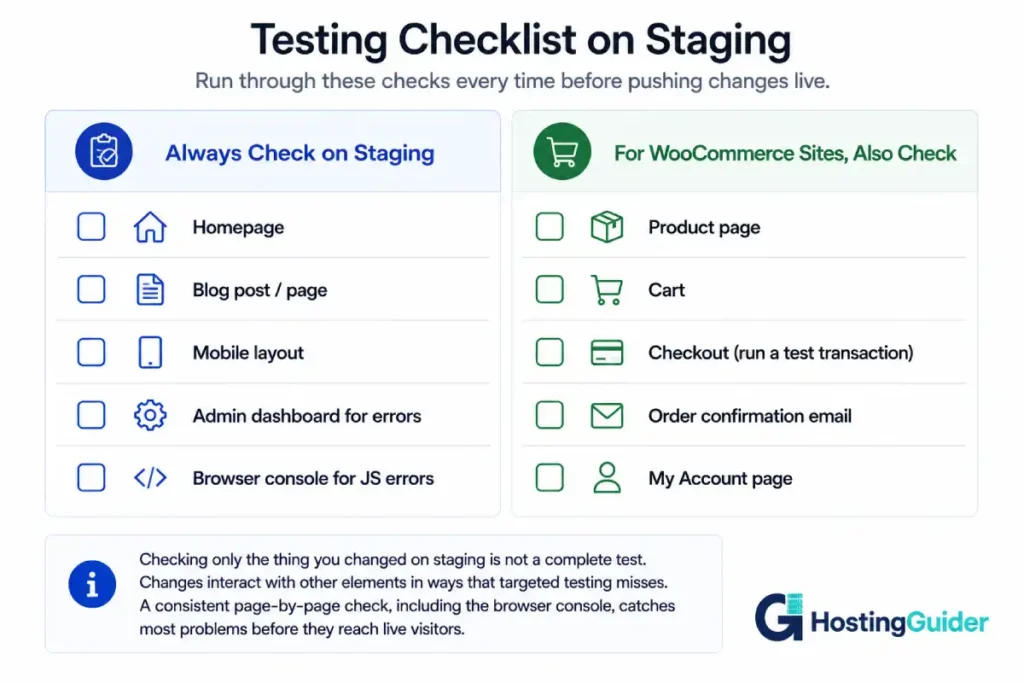
Visit the front-end pages most likely to be affected by the plugin, including the homepage, any page that uses a shortcode or block from the plugin, and (for WooCommerce sites) the product page, cart, and checkout. Confirm these pages render correctly and any plugin-specific functionality works. Check the admin area for any new notices, errors, or settings changes the update introduced.
For a theme update or customisation:
Check the homepage. Check a standard blog post or page. Check the mobile layout (browser developer tools let you simulate this without a physical mobile device: press F12, then the mobile device toggle). Check any page that uses theme-specific layout features (a custom template, a full-width page, a page with a sidebar). Check the WooCommerce shop, product, and checkout pages if applicable, since WooCommerce and theme compatibility is a common source of visual breaks.
For any WooCommerce change specifically:
Run a test transaction all the way through checkout, using a test payment method. Do not just check that the product page looks correct. Confirm the cart works, the checkout form works, payment processes correctly (most payment gateways have a test mode), and the order confirmation email is sent and formatted correctly. WooCommerce changes that look fine on the product page often break at checkout or at the email stage.
For a code change (functions.php, a custom plugin, CSS):
Check the pages the code was intended to affect. Also check several pages the code was not intended to affect, because PHP errors in functions.php affect every page on the site, not just the ones you were targeting.
In all cases:
Check the browser console (F12, Console tab) for JavaScript errors that were not there before your change. A JavaScript error on a page that “looks fine” can mean an interactive element (a menu, a form, a checkout button) that does not work, and visual inspection alone does not catch these.
Pushing Managed WordPress Hosting Staging Environments to Live: Right Way vs Wrong Way
Most managed WordPress hosting panels offer a “push staging to live” or “deploy to production” button. Using it correctly requires a few decisions and safeguards.
Take a backup of live before pushing. Every managed WordPress hosting provider that includes staging also includes backup functionality. Before pushing staging to live, create a fresh backup of the live site from the hosting panel. This takes a few minutes and means that if the push has an unintended effect on live, you have a restore point that predates the push. Some providers take an automatic backup as part of the push process; others leave this step to you. Know which behaviour your provider has, and if it does not back up automatically, do it manually.
Choose what to push selectively where available. Some managed WordPress hosting platforms (WP Engine’s staging, Cloudways) allow you to push files only, database only, or both. Understanding which option is appropriate for your specific change avoids accidentally overwriting live content with staging content. If you have been testing a plugin update (a files change), pushing only the files is safer than pushing the database, which would overwrite any orders, comments, or registrations that came in on live during your testing period. If you have been testing a settings change in the WordPress admin (a database change), you need to push the database, but then any live content since the clone is lost unless you reconcile carefully.
The general guidance: push files (plugins, themes, uploads if changed) when the change is to code or theme files. Push the database when the change is a settings configuration. Push both only when both types of changes are necessary and you have a clear plan for handling live content that was created after the clone.
Understand what “push to live” overwrites. On most managed WordPress hosting staging implementations, pushing the database from staging to live overwrites the live database completely. Any orders placed, any users registered, and any content published on the live site since the staging clone was made will be lost. This is the most dangerous aspect of the staging workflow, and the one that catches site owners by surprise most often. For sites with ongoing content and customer activity (WooCommerce stores especially), this is why pushing only files is usually safer than pushing the full database.
Keeping Managed WordPress Hosting Staging Environments in Sync With Live
A staging environment that was cloned three weeks ago is not an accurate test environment for today’s live site. The live site has had plugin updates, content additions, settings changes, and user registrations since the clone. Testing a change on a three-week-old clone may not reveal compatibility issues that exist with the current live configuration.
The practical discipline: re-clone live to staging at the start of every distinct testing session, not once when you first set up staging and then leave it. Most managed WordPress hosting panels make re-cloning as fast as the initial clone, which removes the friction of keeping staging current.
The exception is when you are mid-way through a multi-day development task, where you need staging to reflect your in-progress changes rather than live. In this case, do not re-clone (which would overwrite your work), but be aware that staging is drifting from live and factor that into your interpretation of test results.
Some providers offer automated syncing options (scheduled clones, or one-click re-sync). These reduce the discipline required to keep staging current but introduce the risk of overwriting in-progress staging work if the sync runs unexpectedly. Understand your provider’s sync options and defaults before relying on them.
Read the differences between how specific providers implement staging before assuming your provider’s implementation works the same way as another provider’s, since staging push behaviour, URL replacement, and sync options vary significantly across managed WordPress hosting providers.
What Managed WordPress Hosting Staging Environments Do Not Cover
Managed WordPress hosting staging environments solve a specific problem cleanly: testing changes before they go live. There are adjacent problems they do not solve.
Local development. A staging environment on the hosting provider’s servers requires an internet connection and produces changes visible to anyone with the staging URL. Professional developers often prefer a local development environment (software like LocalWP that runs WordPress on your own computer) for initial development work, using staging as an intermediate step between local development and live deployment. Managed staging does not replace a local development setup for the kind of active development work that involves many small iterations throughout the day.
Version control. Staging environments do not track what changed between sessions or allow you to review a diff of what will be pushed to live. A developer working on custom code would use Git for this, committing changes to a repository and reviewing them before deployment. Managed staging is a copy-paste workflow: you make changes and push them, with no record of exactly what changed. For sites where custom code is managed by a team or needs audit history, this is a meaningful limitation.
Multisite or complex architectures. Most managed WordPress hosting staging implementations are designed for single-site WordPress installations. A WordPress Multisite network, or a site with dependencies on external services (a custom API, a CRM integration, a payment gateway with environment-specific credentials), may not clone and push cleanly because the staging environment cannot fully replicate all of the production dependencies.
Catching performance problems. A staging environment running on the hosting provider’s infrastructure with minimal traffic does not reveal performance problems that only appear under real traffic loads. A plugin that adds a slow database query may perform acceptably on staging with no concurrent users, but noticeably slow checkout on the live site during a sale. For performance testing, a dedicated load testing step on the live site during a low-traffic period, or a staging environment configured to mirror live server resources, is necessary. Our guide on evaluating managed WordPress hosting performance covers performance testing methods that complement the staging workflow.
Managed WordPress Hosting Staging Environments Across Different Providers
Not all managed WordPress hosting staging implementations work the same way, and the differences affect how you use the workflow above.
WP Engine offers a staging environment on all plans. The staging environment is a separate “environment” in their panel, distinct from production. WP Engine allows selective push (files only, database only, or both). The staging URL is a subdomain of wpengine.com. Automatic backups are taken before pushing on most operations.
Kinsta provides a staging environment on all plans. Staging is accessed from the Kinsta dashboard under Environments. Kinsta allows selective push and includes a backup created automatically before pushing to live. Staging URLs are Kinsta-generated subdomains.
Cloudways implements staging differently from most managed WordPress hosting providers. Because Cloudways gives you more direct server access, staging on Cloudways is a separate application clone on the same or a different server. Push to live is available but requires more manual configuration than a one-button panel implementation.
SiteGround includes staging on their GrowBig plan and above. The staging tool is in the Site Tools panel. SiteGround’s staging implementation copies files and database and allows pushing either or both back to live. The staging URL is a SiteGround-generated subdomain.
Flywheel and Local (both owned by WP Engine) integrate staging with a local development environment, which provides a more complete developer workflow: local development on your computer, push to staging for review, push to live for deployment.
The relevant questions for any provider’s staging implementation: does it include the database or files only; can you push selectively; does it handle URL replacement automatically; does it block search engines from indexing staging by default; does it take a backup before pushing to live.
Common Mistakes That Break Managed WordPress Hosting Staging Environments
Making changes on live while staging exists. If you make changes on the live site after cloning to staging, those changes exist only on live. When you push staging to live later, they are overwritten. The discipline is: once you have cloned to staging for a testing session, all changes go to staging. Any change that must go to live immediately (an urgent content fix, a security patch) needs to be reconciled between staging and live before the next push.
Pushing the database when you have live orders or registrations. On a WooCommerce store or a site with user accounts, pushing the staging database to live overwrites real customer data with the staging copy. This is the most serious staging mistake, and it typically happens when a developer pushes the full environment without thinking through what “overwrite live database” means for a store that has had customer activity since the clone.
Not testing checkout end-to-end. Confirmed earlier in this guide, but worth repeating here: visual inspection of the product page is not a checkout test. Use your payment gateway’s sandbox or test mode to run a complete test transaction on staging before pushing any WooCommerce-related changes to live.
Using staging with plugins that have live domain licences. Some commercial plugins (SEO plugins, security plugins, certain premium plugins) validate their license against a specific domain. On the staging domain, the licence may not activate, which means the plugin appears deactivated on staging even though it is fully working on live. Be aware of which plugins in your installation do this, and factor it into your testing: a plugin that looks deactivated on staging may be working fine on live.
Never re-syncing staging with live. A staging environment that is months old does not accurately reflect live. Testing on a stale staging environment gives you false confidence: the change may appear to work on staging because it does not conflict with the old version of some plugin or database content that has since changed on live. Re-sync staging with live before every distinct testing session.
Frequently Asked Questions
Do All Managed WordPress Hosting Plans Include Staging Environments?
No. Staging environments are commonly included on mid-tier and higher plans across most managed WordPress hosting providers, but some entry-tier shared hosting plans marketed as “WordPress hosting” do not include staging at all. Providers where staging is available on all plans (including entry plans) include WP Engine and Kinsta. On SiteGround and some others, staging is available only from the second tier upward. If a staging environment is important to your workflow, confirm its availability at the specific plan level you are considering before signing up.
Can Managed WordPress Hosting Staging Environments Run Multiple at Once?
It depends on your hosting provider and plan tier. Most managed WordPress hosting providers include a single staging environment by default. Some providers (Kinsta, WP Engine on higher plans) offer multiple staging environments, which is useful when you have multiple concurrent development tasks that should not be mixed together. Multiple staging environments are also useful for having a QA or client review environment separate from an active development environment. If you regularly need multiple independent testing environments, check your specific provider’s plan limits for staging instances.
Managed WordPress Hosting Staging Environments vs Backups: What Is the Difference?
A staging environment is a live, browsable copy of your site for testing purposes. A backup is a compressed snapshot of your site’s files and database that can be used to restore a previous state. Staging is used proactively before changes. Backups are used reactively after something goes wrong. Both serve important but complementary functions: staging lets you catch problems before they reach live visitors; backups let you recover when something unexpected gets to live anyway. Backup failures are often discovered at the worst possible time precisely because backups are assumed to work without being tested. The staging workflow and a verified backup process work together as a complete safety net.
Will Managed WordPress Hosting Staging Environments Slow Down the Live Site?
On most managed WordPress hosting platforms, the staging environment runs on the same infrastructure as the live site but in a sufficiently isolated configuration that active work on staging does not affect live site performance. The main exception is providers that use a truly separate server for staging (which eliminates any possibility of resource contention between the two) versus those that run staging as a separate application on shared infrastructure. If you are concerned about this, check with your provider: most will be able to confirm whether staging workloads (a load test you are running on staging, for example) could affect live server resources.
What happens to staging if I update plugins on my live site?
Nothing automatically. The staging environment reflects the state of live at the time of the last clone and does not receive updates applied to live after that point. If you update plugins on live and then want to test something on staging, you need to re-clone live to staging to make staging reflect the current live state, including the updates. Alternatively, apply the same plugin updates on staging as well, so both environments stay in sync manually, but this approach is more error-prone than simply re-cloning.
Can Managed WordPress Hosting Staging Environments Be Used for Client Review?
Yes, and this is one of the most practical uses of managed WordPress hosting staging environments beyond testing. Because staging runs on a real URL (even if it is a provider-generated subdomain), you can share the staging URL with a client for review and approval before pushing to live. Some providers allow you to password-protect the staging environment for this purpose, restricting access to reviewers with the password rather than leaving it publicly accessible. If you use staging for client review, be aware of any provider-generated staging URLs that the client might accidentally share publicly, and keep search engine blocking active throughout the review period.
Should I test on staging or on a local development environment?
Ideally both, used for different purposes. A local development environment (running WordPress on your own computer) is faster for active development work where you are making many small changes rapidly and need immediate feedback without waiting for file uploads. Staging is more appropriate for final testing before going live, for testing with realistic hosting infrastructure (which may differ from a local environment in ways that matter, such as PHP version, caching behaviour, or server configuration), and for client review. If you are not currently using a local development environment, starting with managed staging alone is a significant improvement over testing on live, and you can add local development to your workflow later as your process matures. Our guide on what self-managed VPS hosting requires covers the skill level involved in setting up more advanced local-to-staging-to-live pipelines, which is useful context if you are considering extending your workflow beyond the panel-based staging covered in this guide.