
You decided to move your WordPress site to managed hosting. Good decision.
Now comes the part most guides skip over. The actual migration. The backup. The file transfer. The domain switch. The post-migration checks.
Getting this wrong means downtime. It means broken pages. It means lost SEO rankings.
Getting it right means a seamless switch. Your visitors notice nothing. Your site runs faster immediately.
This tutorial walks through every step. It covers three different migration methods. It includes the exact checks to run before and after the switch.
If you are still deciding which managed host to move to, read our managed vs regular WordPress hosting comparison and the pros and cons of managed WordPress hosting before continuing.
Table of Contents
What You Will Learn
- How to back up your WordPress site completely before migrating
- Three different migration methods and when to use each
- How to test your site on the new host before changing your domain
- How to switch your domain with minimal downtime
- What to check after migration to confirm everything worked
- How to cancel your old hosting safely
What You Need Before You Start
Go through this checklist. Complete every item before touching anything.
| Item | Why You Need It |
|---|---|
| Login to your current hosting account | Access your files and database |
| Login to your WordPress admin | Export content and check site details |
| Your domain registrar login | Change DNS after migration |
| Access to your email | Confirm account setups and receive alerts |
| A new managed hosting account | Your destination server |
| At least 2 hours of free time | Do not rush a migration |
| A recent full backup | Your safety net if anything goes wrong |
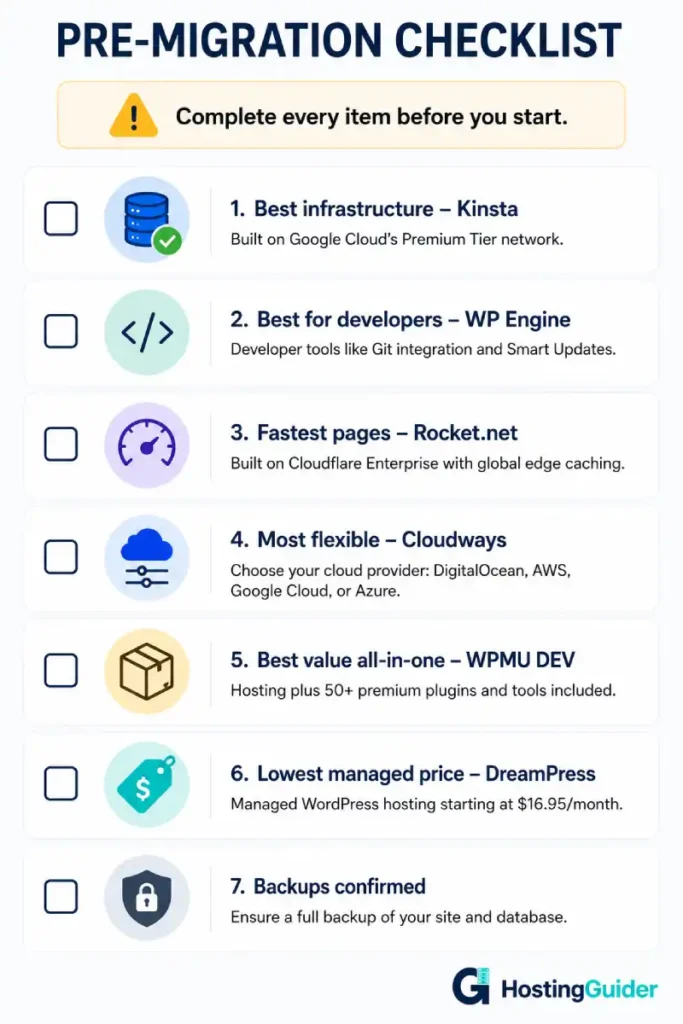
Step 1: Choose Your Managed Host
If you have not chosen a host yet, choose one now. Do not start migrating until your new account is ready.
Most managed WordPress hosts offer free migration. This means their team moves your site for you. You do nothing technical.
| Host | Free Migration | Self-Migration Option | Link |
|---|---|---|---|
| Kinsta | Yes, unlimited | Yes | Kinsta |
| WP Engine | Yes, 1 free | Yes | WP Engine |
| Cloudways | Yes, via plugin | Yes | Cloudways |
| SiteGround | Yes, via plugin | Yes | SiteGround |
| Pressable | Yes, unlimited | Yes | Pressable |
Sign up. Create your account. Do not point your domain yet. Your old site must stay live until everything on the new host is confirmed working.
Step 2: Understand the Three Migration Methods
There are three ways to migrate. Choose the one that fits your comfort level.
| Method | Best For | Technical Skill Needed | Time |
|---|---|---|---|
| Host migration service | Beginners, busy site owners | None | 24 to 48 hours |
| Plugin migration | Intermediate users, full control | Low | 1 to 3 hours |
| Manual migration | Developers, complex sites | High | 2 to 6 hours |
Method A is easiest. Your new host does all the work. You submit a request. They migrate everything. You just approve and go live.
Method B is the most popular. You use a free plugin to create a complete backup package and restore it on the new host.
Method C gives maximum control. You manually export files and database and set everything up on the new server.
This tutorial covers all three. Start with Method A. If your host does not offer it or you prefer to do it yourself, follow Method B.
Step 3: Back Up Your Current Site
This step is not optional. Back up your site before you do anything else.
If something goes wrong during migration, your backup is how you recover. Without it, you may lose data permanently.
Back Up Using Your Current Host
Log into your current hosting control panel. Find the backup section. Download a full backup.
This usually includes your website files and your database together.
Save this backup to your computer. Also save it to an external location like Google Drive or Dropbox.
Back Up Using a Plugin
- Install UpdraftPlus on your WordPress site. It is free.
- Go to Settings in your WordPress dashboard. Click UpdraftPlus Backups.
- Click Backup Now. Select both Files and Database. Click Backup Now again.
- UpdraftPlus creates a complete backup. Download all backup files to your computer.
Keep your old hosting active until migration is complete and confirmed. Do not cancel it yet.
Method A: Host Migration Service (Easiest)
Most managed hosts move your site for free when you sign up. This is the simplest option.
How It Works
You give the host access to your current site. Their technical team copies everything to your new server. They set it up on a temporary URL. You review it. When you approve, they help you switch the domain.
Step-by-Step for Host Migration
Step 1: Submit the migration request
- Log into your new managed hosting dashboard. Find the migration or site import section.
- For Kinsta, go to Sites in MyKinsta. Click Add Site. Select Migrate WordPress.
- For WP Engine, go to the Sites section. Click the migration option or contact support.
- For Pressable, go to your dashboard and click Add Site. Select the migration option.
Step 2: Provide your current hosting details
The migration team needs access to your current site. They will ask for one of these:
- cPanel login details
- SFTP credentials
- WordPress admin login
- FTP credentials
Provide what they ask for. They use this to copy your files and database.
Step 3: Wait for migration to complete
Most migrations complete within 4 to 24 hours. You receive an email when done.
Step 4: Review on the temporary URL
Your new host provides a temporary URL. It looks something like yoursitename.kinsta.cloud or similar.
Open the temporary URL in your browser. Check every page. Check every post. Test contact forms. Test any checkout process.
Write down anything that looks wrong. Fix issues on the new server before switching domains.
Step 5: Approve and switch domains
When everything looks correct, confirm to your host that you are ready to go live.
Follow the domain switching steps in Step 6 of this tutorial.

Method B: Plugin Migration with All-in-One WP Migration
This method gives you full control. You create a complete export package. You import it on the new host. No third-party access to your credentials required.
Part 1: Export from Your Current Site
Step 1: Install All-in-One WP Migration
Log into your current WordPress dashboard. Go to Plugins. Click Add New Plugin.
Search for All-in-One WP Migration. Click Install Now. Then click Activate.
Step 2: Create your export
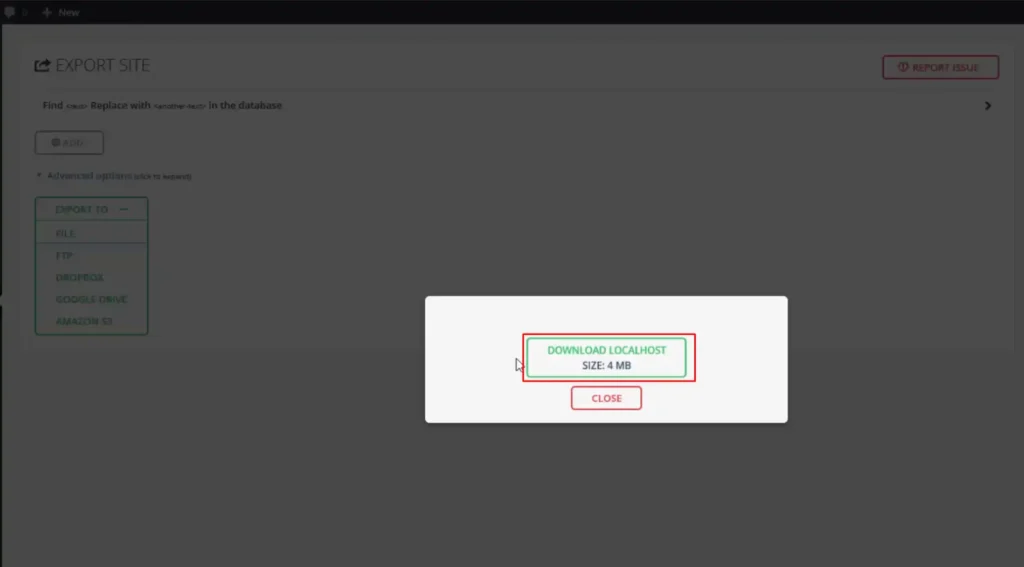
In the WordPress sidebar, click All-in-One WP Migration. Click Export.
Click Export To. Select File.
The plugin packages your entire WordPress installation. This includes all files, themes, plugins, media uploads, and the complete database.
Wait for it to finish. The time depends on your site size. A small site takes a minute. A large site takes ten to fifteen minutes.
Step 3: Download the export file
When complete, a download button appears. Click it. Save the .wpress file to your computer.
This file contains your entire site.
Part 2: Install WordPress on Your New Host
Every managed host handles WordPress installation differently.
On Kinsta: Go to MyKinsta. Click Add Site. Select Install WordPress. Fill in your site details. Click Add Site.
On Cloudways: Go to Applications. Click Add Application. Select WordPress. Choose your server. Fill in details. Click Add Application.
On WP Engine: Go to Sites. Click Add Site. Select WordPress. Complete the setup form.
Wait for WordPress to install. It takes one to two minutes.
Part 3: Install the Import Plugin on Your New Host
Log into your new WordPress installation.
The temporary URL is shown in your hosting dashboard. Go to that URL and add /wp-admin at the end.
Log in with the credentials you set during WordPress installation.
Go to Plugins. Install All-in-One WP Migration. Activate it.
Part 4: Import Your Site
In the sidebar, click All-in-One WP Migration. Click Import.
Click Import From. Select File.
Drag your .wpress file into the import window. Or click to browse and select it.
Important: The free version of All-in-One WP Migration has a 512MB file size limit for import. Most sites fit under this. Very large sites may not.
If your site is too large, use Duplicator instead. It handles large sites better.
Wait for the import to complete. This can take several minutes.
When complete, the plugin tells you that all data was imported. It reminds you to save permalinks.
Step: Save your permalinks
Go to Settings. Click Permalinks. Click Save Changes without changing anything. This rebuilds the permalink structure on the new server.
Part 5: Update Your Login Credentials
The import replaced everything including your admin username and password with the ones from your old site.
Log out. Log back in using your original WordPress admin credentials from your old site.
Method C: Manual Migration
Manual migration is for developers and technically confident users. It involves copying files via SFTP and exporting and importing the database directly.
Export Your Database
Connect to your current host via cPanel or SSH.
Via cPanel: Go to phpMyAdmin. Select your WordPress database. Click Export. Choose Quick export. Click Go. Save the .sql file.
Via SSH:
mysqldump -u your_db_user -p your_database_name > wordpress_backup.sql
Replace your_db_user and your_database_name with your actual values.
Export Your WordPress Files
Connect to your current host using an SFTP client like FileZilla.
Download the entire public_html folder or the WordPress installation folder to your computer. This includes wp-admin, wp-content, wp-includes, and all root files.
Create a Database on Your New Host
Log into your new hosting dashboard. Find the database section.
Create a new MySQL database. Create a new database user. Assign the user to the database. Note the database name, username, and password.
Upload Files to New Host
Connect to your new host via SFTP. Upload all your WordPress files to the correct public directory.
Import the Database
Log into your new host’s phpMyAdmin. Select your new empty database. Click Import. Select your .sql backup file. Click Go.
Update wp-config.php
Open wp-config.php in your uploaded files. Update these three lines with your new database credentials.
define( 'DB_NAME', 'your_new_db_name' );
define( 'DB_USER', 'your_new_db_user' );
define( 'DB_PASSWORD', 'your_new_db_password' );
Also update DB_HOST if your new host uses a different database host value. Check your hosting dashboard for the correct value.
Update the Site URL
Your site URLs still point to your old domain or temporary URL setup.
Log into your new WordPress installation. Go to Settings and then General.
Update WordPress Address and Site Address to match your domain.
Or update them directly in the database. In phpMyAdmin, go to wp_options. Find siteurl and home. Update both values.
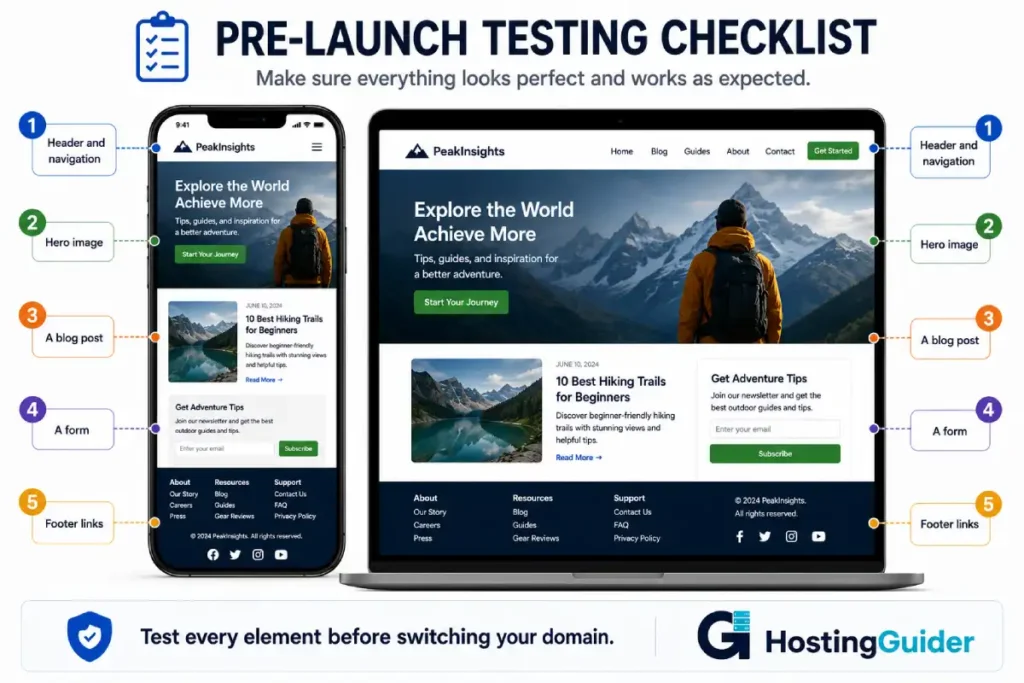
Step 6: Test on the Temporary URL
Before switching your domain, test everything thoroughly on the new host’s temporary URL.
Use this checklist.
| Test | What to Check |
|---|---|
| Homepage loads | Page loads completely with correct content |
| Internal page links | Click through several posts and pages |
| Images | All images display correctly |
| Navigation menu | All menu items link to correct pages |
| Contact form | Submit a test message, confirm email receipt |
| WordPress admin | Log in, check all settings intact |
| WooCommerce | Add to cart, proceed to checkout |
| User accounts | Log in as a non-admin user if applicable |
| Search | Site search returns relevant results |
| Mobile view | Check site on a phone or tablet |
| Page speed | Load a few pages and note speed improvement |
Fix any issues before proceeding. Do not switch your domain with known problems on the new server.
Step 7: Switch Your Domain DNS
This is the moment your site moves from the old host to the new one.
Do this during low-traffic hours. Early morning on a weekday is ideal.
Find Your New Host’s Name Servers or IP Address
Log into your new managed hosting dashboard. Find the DNS information for your site.
You need either the name servers (ns1.example.com, ns2.example.com) or the IP address of your new server.
Kinsta, WP Engine, Pressable, and most managed hosts provide this in your site settings.
Update Your Domain DNS
Log into your domain registrar. Go to DNS settings for your domain.
If your host provides name servers:
Change the nameserver fields to the new host’s name servers. Remove the old ones. Save.
If your host provides an IP address:
Find the A record for your domain. Change the value to your new server’s IP address. Save.
Also update the www A record to the same IP address.
Wait for DNS Propagation
DNS changes do not happen instantly. They spread across the internet gradually.
Most propagation completes within 15 to 60 minutes. Full global propagation can take up to 48 hours.
During propagation, some visitors may see the old site. Others may see the new site. Both are temporary. This is normal.
Check propagation progress using WhatsMyDNS. Enter your domain. Select A record. It shows which regions see your new IP address.
Step 8: Set Up SSL on Your New Host
Your new host needs an SSL certificate. Your site must load on https.
Understanding what an SSL certificate does helps you confirm this step is complete.
Most managed hosts issue SSL automatically. Kinsta, WP Engine, Cloudways, Pressable, and SiteGround all activate SSL when your domain is connected.
Confirm SSL is Active
After your DNS has propagated, type https://yourdomain.com in your browser. You should see the padlock icon.
If you see a security warning, SSL is not yet active. Check your hosting dashboard. Look for an SSL or HTTPS section. Activate or request the certificate.
Update WordPress URLs to HTTPS
Go to your WordPress dashboard. Click Settings and then General.
Make sure both WordPress Address and Site Address start with https:// not http://.
Save changes.
Fix Mixed Content Warnings
If the padlock shows a warning icon, some elements load over http.
Install Really Simple SSL plugin. Activate it. It fixes most mixed content automatically.
Or update your .htaccess file to force all traffic to https.
Step 9: Check Your SEO After Migration
A migration can affect your search rankings if done incorrectly. Run these checks after going live.
Check Google Search Console
Log into Google Search Console.
Select your property. Go to Coverage. Check for any new crawl errors.
Submit your sitemap if your URL structure changed. Go to Sitemaps. Enter yourdomain.com/sitemap.xml. Submit.
Check your page URLs
All page URLs should be identical to your old site. If any URLs changed, set up 301 redirects.
URL changes without redirects cause 404 errors. 404 errors harm rankings.
Monitor rankings for two weeks
Check your main keyword rankings for two weeks after migration. A small temporary dip is normal. A significant drop suggests a problem.
Common post-migration SEO problems include:
| Problem | Cause | Fix |
|---|---|---|
| Pages returning 404 | URLs changed without redirects | Set up 301 redirects |
| Site not indexed | robots.txt blocking search engines | Check robots.txt settings |
| Rankings dropping | Slow page speed on new host | Check speed, optimise caching |
| Sitemap not submitted | Search Console not updated | Submit sitemap again |
Read more about the importance of uptime for search rankings to understand why your hosting choice also affects SEO.
Step 10: Run Your Post-Migration Checklist
Before you declare migration complete, run through this final checklist.
| Task | Status |
|---|---|
| Homepage loads correctly | |
| All posts and pages accessible | |
| Images display on all pages | |
| Contact forms send and receive | |
| WooCommerce adds to cart and checks out | |
| SSL padlock visible in browser | |
| WordPress admin accessible | |
| User accounts work correctly | |
| Google Analytics still tracking | |
| Google Search Console updated | |
| Sitemap submitted | |
| Old hosting still active as safety net | |
| Backups running on new host |
Keep your old hosting active for at least two weeks. Do not cancel it immediately.
If you discover a problem in the first few days, your old host is your fallback. You can point the domain back while you fix the issue.
Step 11: Set Up Security and Protection on New Host
Your new managed host handles most security automatically. But some steps need your action.
Enable two-factor authentication on your WordPress admin account. Follow our two-factor authentication setup guide.
Change your WordPress admin password. Use a password manager to generate a strong, unique one.
Remove any unused admin accounts. Old team members who no longer need access should be deleted.
Read our guide on managed WordPress security to understand what your new host handles automatically and what remains your responsibility.
Follow our guide on how to protect your WordPress site for a complete security checklist.
Step 12: Cancel Your Old Hosting
Wait at least two weeks before cancelling. Ideally wait four weeks.
During this time, confirm that:
- Traffic is stable on the new host
- No pages are returning errors
- Forms and emails are working
- Rankings have not dropped significantly
- Backups are running on the new host
When you are confident everything is working, log into your old hosting account. Cancel the subscription.
Download any remaining backup files before cancelling. After cancellation, your files may be deleted within 30 days depending on the provider.
Common Migration Problems and Fixes
| Problem | Likely Cause | Fix |
|---|---|---|
| White screen of death | Plugin conflict or memory limit | Deactivate all plugins, reactivate one by one |
| Images not showing | Incorrect file paths or missing uploads folder | Re-upload media or fix paths in database |
| Database connection error | Wrong credentials in wp-config.php | Update DB_NAME, DB_USER, DB_PASSWORD |
| Admin login not working | Credentials changed during import | Use your old site credentials or reset password |
| Site shows old content | Browser cache showing old site | Clear browser cache or open in incognito mode |
| Email not sending | New host SMTP settings not configured | Install WP Mail SMTP, configure with SMTP provider |
| Broken links throughout | Site URL not updated | Update siteurl and home in wp_options |
| SSL showing warning | Certificate not yet issued | Wait 30 minutes, check hosting dashboard |
| Forms not working | reCAPTCHA or form plugin configuration | Reconfigure form settings on new domain |
| Speed not improved | Caching not configured | Enable managed host’s built-in caching |
Fix: White Screen of Death
Connect to your new host via SFTP.
Navigate to wp-content/plugins.
Rename the plugins folder to plugins_disabled.
Reload your site. If it loads, a plugin caused the problem.
Rename the folder back to plugins. Go to your WordPress admin. Deactivate all plugins. Reactivate them one by one until the problem returns. The last plugin you activated is the cause.
Fix: Database Connection Error
Connect to your new host via SFTP.
Open wp-config.php.
Check these four values match your new database credentials exactly:
define( 'DB_NAME', 'your_db_name' );
define( 'DB_USER', 'your_db_user' );
define( 'DB_PASSWORD', 'your_db_password' );
define( 'DB_HOST', 'localhost' );
DB_HOST is usually localhost. On some hosts it is a different value. Check your hosting dashboard for the correct database host.
Save the file. Reload your site.
Frequently Asked Questions
How long does migrating to managed WordPress hosting take?
The migration itself takes between 1 and 24 hours depending on your method and site size. Method A using the host’s migration service takes 4 to 24 hours. Method B using a plugin takes 1 to 3 hours. DNS propagation after switching your domain adds another 15 minutes to 48 hours. Plan for a full day from start to finish. Most of that time is waiting rather than active work.
Will my website go down during migration?
No, if done correctly. Your old site stays live on your old host throughout the entire migration process. You move everything to the new host first. You test it on a temporary URL. Only then do you switch the domain. There is typically a propagation window of 15 to 60 minutes where some visitors may see the old site and others the new one. Both work. No one sees an error.
Will migrating affect my Google rankings?
A well-executed migration with no URL changes causes minimal SEO impact. Your rankings may dip slightly during the DNS propagation window. They typically recover within one to two weeks. Moving to a faster managed host often improves rankings over time because page speed and uptime both influence rankings. The most common SEO mistake during migration is changing page URLs without setting up 301 redirects. Keep your URLs identical to avoid ranking loss.
Do I need to back up my site before migrating?
Yes, absolutely. Always create a complete backup before starting any migration. If something goes wrong during the migration process, your backup is how you restore to the last working state. Without a backup, a failed migration can result in permanent data loss. Create a backup using your current host’s backup tool or a plugin like UpdraftPlus. Download the backup to your computer. Do not rely solely on your current host’s server copy.
What if the All-in-One WP Migration plugin says my file is too large?
The free version of All-in-One WP Migration has a 512MB import limit. Large sites with many images exceed this. Use Duplicator instead. Duplicator handles larger sites well and has no file size limit on imports. Alternatively, use your new host’s free migration service which handles sites of any size. Kinsta, Pressable, and WP Engine all migrate sites for free regardless of size.
Should I migrate during peak traffic hours?
No. Always migrate during your lowest traffic period. Check your Google Analytics to find your quietest hour of the day. Early morning on a weekday is typically best. Lower traffic during migration means fewer visitors affected by the DNS propagation window. It also means less load on both servers during the transition.
How do I know if my migration was successful?
Run through the post-migration checklist in Step 10. Every item should show as working. Check your hosting dashboard to confirm backups are running on the new server. Monitor your uptime using a free tool. Check Google Search Console for crawl errors in the week after migration. Watch your page speed scores. A successful managed WordPress migration almost always results in noticeably faster page loads from day one.