
Most CDN tutorials get one critical thing wrong.
They tell you to enable Flexible SSL. This means traffic between the CDN and your origin server travels unencrypted over plain HTTP. Your visitors see a padlock in their browser. Their data is exposed between the CDN edge and your server. The padlock is real. The security is not.
That is the most dangerous mistake in CDN configuration. It is the default in many tutorials because it requires less setup. This guide does not cut that corner.
This guide covers the correct way to configure a CDN in front of cloud hosting. Every decision is explained. Every wrong setting is flagged before you make it. By the end, you have a CDN and origin server that work correctly, securely, and efficiently together.
The guide uses Cloudflare as the primary example. Cloudflare is the most widely used CDN for WordPress and cloud-hosted sites. Alternative CDN options are covered where the approach differs.
Key Takeaways
- Never use Flexible SSL. Always use Full (Strict) SSL
- The CDN sits between your visitors and your origin server. Every configuration decision must account for both sides
- WordPress requires specific cache bypass rules for logged-in users, wp-admin, and WooCommerce cart
- Real visitor IPs must be restored on the origin server or logs show the CDN IP for all traffic
- Origin lockdown is a required security step that most tutorials skip entirely
- Test every setting after applying it. Do not assume the configuration works until you verify it
How CDN + Cloud Hosting Works Together
Without a CDN, a visitor’s request travels directly to your origin server:
Visitor → DNS → Origin Server → Response
With a CDN in front:
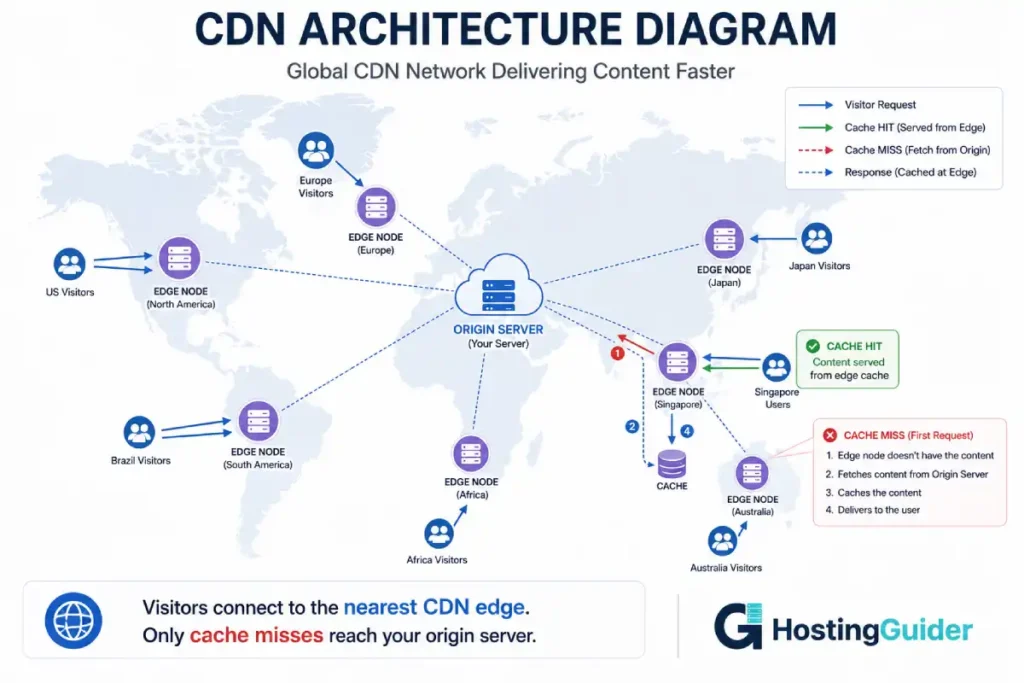
Visitor → DNS → CDN Edge (nearest PoP) → Origin Server → CDN Edge → Visitor
The CDN inserts itself into the request path. For cached content, the origin server is bypassed entirely:
Visitor → DNS → CDN Edge Cache → Visitor (origin server not contacted)
This is the performance gain. Instead of your London server responding to a visitor in Singapore (100ms+ network round trip), a CDN edge server in Singapore responds in under 10ms.
The CDN also absorbs traffic. DDoS attacks hit the CDN edge, not your origin server directly. A CDN with 200+ global data centres can absorb attack traffic that would overwhelm any single origin server.
The key principle: the CDN and origin server must be configured to trust each other correctly. Misconfiguration at either end breaks the setup. This guide covers both sides.
Phase 1: Choose Your CDN
Different CDNs suit different needs. Here is an honest comparison of the main options:
| CDN | Best For | Free Tier | Pricing Model |
|---|---|---|---|
| Cloudflare | WordPress, SMB, DDoS protection | Yes, generous | Flat fee (Pro $20/month) |
| Bunny CDN | Simple static asset delivery | No | Pay per GB ($0.005-0.01/GB) |
| AWS CloudFront | AWS ecosystem, fine-grained control | 1TB free first year | Pay per GB + requests |
| Fastly | Developer-controlled, real-time purging | No | Pay per GB |
| Rocket.net | Cloudflare Enterprise at managed WP price | No | Part of hosting plan |
| BunnyCDN Perma-Cache | Large file and media delivery | No | Pay per GB |
For most WordPress sites on cloud hosting: Cloudflare free or Pro tier is the right choice. The free tier includes CDN, DDoS protection, SSL, and basic WAF. The Pro tier adds image optimisation and more WAF rules.
For simple static asset CDN without DNS proxying: Bunny CDN at $0.005-0.01 per GB is the most cost-effective. It does not require changing your nameservers.
For sites already on AWS infrastructure: CloudFront integrates directly with other AWS services.
For fully managed setup with enterprise CDN built in: Rocket.net includes Cloudflare Enterprise as part of their managed WordPress hosting. No CDN configuration required. Kinsta includes their own CDN with 260+ global locations.
This guide focuses on the Cloudflare + cloud hosting stack. The concepts translate to other CDNs with provider-specific UI differences.
Phase 2: Add Your Site to Cloudflare
Step 2.1: Create a Cloudflare Account
Go to cloudflare.com and create an account.
Click Add a Site. Enter your domain name. Choose your plan. The Free plan covers everything this guide configures.
Step 2.2: Cloudflare Scans Your DNS
Cloudflare scans your current DNS records and imports them automatically. Review the imported records carefully.
Confirm these records are present and correct:
- A record for
@(root domain) pointing to your origin server IP - A record for
wwwpointing to your origin server IP - MX records if you use email through a third party
- Any other CNAME records for subdomains
The orange cloud icon next to a record means Cloudflare is proxying that traffic (CDN is active). The grey cloud means DNS-only (CDN is not active for that record).
For your web traffic, both the @ and www A records should show an orange cloud.
Step 2.3: Update Your Nameservers
Cloudflare gives you two nameserver addresses. They look like:
alice.ns.cloudflare.com
bob.ns.cloudflare.com
Log into your domain registrar. Find the nameserver settings. Replace your current nameservers with the two Cloudflare provides.
Nameserver changes take up to 24 hours to propagate globally. Cloudflare sends an email when your site is active on their network.
Verify nameserver propagation:
dig NS yourdomain.com +short
The output should show Cloudflare nameservers. Until it does, Cloudflare is not yet controlling your DNS.
Phase 3: SSL Configuration (The Most Critical Step)
This phase is where most setups go wrong. Read it carefully before touching any settings.
The SSL Modes Explained
Cloudflare has four SSL modes. Three of them are suitable for production. One of them is dangerous.
| Mode | Visitor to Cloudflare | Cloudflare to Origin | Use Case |
|---|---|---|---|
| Off | HTTP only | HTTP | Never. Exposes all data |
| Flexible | HTTPS | HTTP | Never. False sense of security |
| Full | HTTPS | HTTPS (any cert) | Acceptable but not ideal |
| Full (Strict) | HTTPS | HTTPS (valid cert only) | Always use this |
Flexible SSL is the wrong choice. Traffic between Cloudflare and your origin server is plain HTTP. An attacker with access to the network path between Cloudflare and your origin can intercept all traffic. Your visitors see HTTPS and trust the connection. Their data is not protected end-to-end.
SSL certificates and what they actually protect explains the full encryption chain.
Full (Strict) is the right choice. Traffic is encrypted with a valid certificate all the way from the visitor to your origin server. This is true end-to-end encryption.
Step 3.1: Get an Origin Certificate
For Full (Strict) mode, your origin server needs a valid SSL certificate. You have two options.
Option A: Cloudflare Origin Certificate (recommended)
Cloudflare provides free origin certificates that are trusted by their edge servers for up to 15 years. They are not trusted by browsers directly but they do not need to be. Only Cloudflare needs to trust them.
In your Cloudflare dashboard:
- Go to SSL/TLS
- Click Origin Server
- Click Create Certificate
- Choose RSA 2048 or ECDSA P-256
- Add your domain and www.yourdomain.com
- Choose validity period (15 years is fine for origin certificates)
- Click Create
Download both the Certificate and the Private Key. You need both on your origin server.
On your origin server, create the certificate files:
sudo nano /etc/ssl/cloudflare-origin.pem
Paste the certificate content. Save.
sudo nano /etc/ssl/cloudflare-origin.key
Paste the private key. Save.
Set correct permissions:
sudo chmod 644 /etc/ssl/cloudflare-origin.pem
sudo chmod 600 /etc/ssl/cloudflare-origin.key
sudo chown root:root /etc/ssl/cloudflare-origin.pem /etc/ssl/cloudflare-origin.key
Configure Nginx to use the origin certificate:
sudo nano /etc/nginx/sites-available/yourdomain.com
Update the server block:
server {
    listen 443 ssl http2;
    listen [::]:443 ssl http2;
    server_name yourdomain.com www.yourdomain.com;

    ssl_certificate /etc/ssl/cloudflare-origin.pem;
    ssl_certificate_key /etc/ssl/cloudflare-origin.key;

    ssl_protocols TLSv1.2 TLSv1.3;
    ssl_ciphers ECDHE-ECDSA-AES128-GCM-SHA256:ECDHE-RSA-AES128-GCM-SHA256:ECDHE-ECDSA-AES256-GCM-SHA384:ECDHE-RSA-AES256-GCM-SHA384;
    ssl_prefer_server_ciphers off;

    # rest of your configuration...
}
Test and reload:
sudo nginx -t
sudo systemctl reload nginx
Option B: Let’s Encrypt Certificate
A standard Let’s Encrypt certificate also works for Full (Strict) mode. If you already have Let’s Encrypt configured, this option requires no additional setup.
Step 3.2: Set SSL Mode to Full (Strict)
In Cloudflare dashboard:
- Go to SSL/TLS
- Click Overview
- Choose Full (Strict)
This takes effect immediately. Verify your site still loads:
curl -I https://yourdomain.com
You should see HTTP/2 200 and response headers. If you see an SSL error, your origin certificate is misconfigured. Check the Nginx error log:
sudo tail -50 /var/log/nginx/error.log
Step 3.3: Enable HSTS
HSTS (HTTP Strict Transport Security) tells browsers to always use HTTPS for your domain. It prevents SSL stripping attacks.
In Cloudflare dashboard:
- Go to SSL/TLS
- Click Edge Certificates
- Find HTTP Strict Transport Security (HSTS)
- Enable HSTS with these settings:
- Status: Enabled
- Max Age: 6 months (or 12 months once confirmed working)
- Include subdomains: Yes (if all subdomains use HTTPS)
- Preload: No (start without this, add later)
Phase 4: Real IP Restoration on the Origin Server
With CDN active, every request your origin server receives comes from a Cloudflare IP address, not the visitor’s IP. Your logs fill with Cloudflare IP addresses. WordPress security plugins ban the wrong IPs. GeoIP features stop working.
You must configure the origin server to restore real visitor IPs from the request headers Cloudflare provides.
The Headers Cloudflare Sends
Cloudflare adds these headers to every forwarded request:
| Header | Contains |
|---|---|
| CF-Connecting-IP | Real visitor IP address |
| X-Forwarded-For | Chain of IP addresses |
| CF-IPCountry | Visitor country code |
| CF-Ray | Unique request identifier |
| CF-Visitor | JSON with scheme (http or https) |
Your origin server must read the real IP from CF-Connecting-IP instead of the connection source.
Step 4.1: Configure Nginx for Real IP Restoration
Edit your Nginx configuration:
sudo nano /etc/nginx/nginx.conf
In the http block, add:
# Cloudflare IP ranges - restore real visitor IPs
set_real_ip_from 173.245.48.0/20;
set_real_ip_from 103.21.244.0/22;
set_real_ip_from 103.22.200.0/22;
set_real_ip_from 103.31.4.0/22;
set_real_ip_from 141.101.64.0/18;
set_real_ip_from 108.162.192.0/18;
set_real_ip_from 190.93.240.0/20;
set_real_ip_from 188.114.96.0/20;
set_real_ip_from 197.234.240.0/22;
set_real_ip_from 198.41.128.0/17;
set_real_ip_from 162.158.0.0/15;
set_real_ip_from 104.16.0.0/13;
set_real_ip_from 104.24.0.0/14;
set_real_ip_from 172.64.0.0/13;
set_real_ip_from 131.0.72.0/22;
set_real_ip_from 2400:cb00::/32;
set_real_ip_from 2606:4700::/32;
set_real_ip_from 2803:f800::/32;
set_real_ip_from 2405:b500::/32;
set_real_ip_from 2405:8100::/32;
set_real_ip_from 2a06:98c0::/29;
set_real_ip_from 2c0f:f248::/32;

real_ip_header CF-Connecting-IP;
These are Cloudflare’s published IP ranges. Update them periodically as Cloudflare occasionally adds new ranges.
Reload Nginx:
sudo nginx -t
sudo systemctl reload nginx
Verify real IPs appear in the access log after your next visitor:
sudo tail -10 /var/log/nginx/access.log
Real visitor IPs should now appear instead of Cloudflare IPs.
Step 4.2: Configure WordPress for Real IPs
WordPress also needs to know about the forwarded IP. Add to wp-config.php:
/* Trust Cloudflare IP forwarding */
if (isset($_SERVER['HTTP_CF_CONNECTING_IP'])) {
    $_SERVER['REMOTE_ADDR'] = $_SERVER['HTTP_CF_CONNECTING_IP'];
}
Install and activate the Cloudflare WordPress plugin. It handles IP restoration, cache purging integration, and more.
Phase 5: Cache Configuration
This phase determines what Cloudflare caches and for how long. Wrong cache rules mean either no performance benefit or cached versions of pages that should be dynamic.
What Should Be Cached
Content that is the same for every visitor and changes rarely:
- Images (JPG, PNG, GIF, WebP, SVG, ICO)
- CSS files
- JavaScript files
- Web fonts (WOFF, WOFF2, TTF)
- PDF files
- Static HTML (if your site is static)
What Must Not Be Cached
Content that varies per visitor or changes on every request:
- WordPress admin (
/wp-admin/) - WordPress login page (
/wp-login.php) - WordPress API endpoints (
/wp-json/) - WooCommerce cart page
- WooCommerce checkout page
- WooCommerce account pages
- Personalised pages for logged-in users
- Search results (variable per query)
Step 5.1: Configure Caching Level
In Cloudflare dashboard:
- Go to Caching
- Click Configuration
- Set Caching Level to Standard
Standard caches all static resources and respects your origin server’s Cache-Control headers.
Step 5.2: Set Browser Cache TTL
Still in Configuration:
Set Browser Cache TTL to 1 year.
This tells browsers to cache Cloudflare-delivered assets locally for one year. Visitors returning to your site load these assets from their browser cache without any network request at all.
Your origin server or cache-busting plugin handles invalidating this cache when assets change (typically by including a version hash in the filename).
Step 5.3: Create Cache Rules for WordPress
Cache rules control what Cloudflare caches at the edge. The rules below cover the standard WordPress configuration.
In Cloudflare dashboard:
- Go to Rules
- Click Cache Rules
- Create a new rule
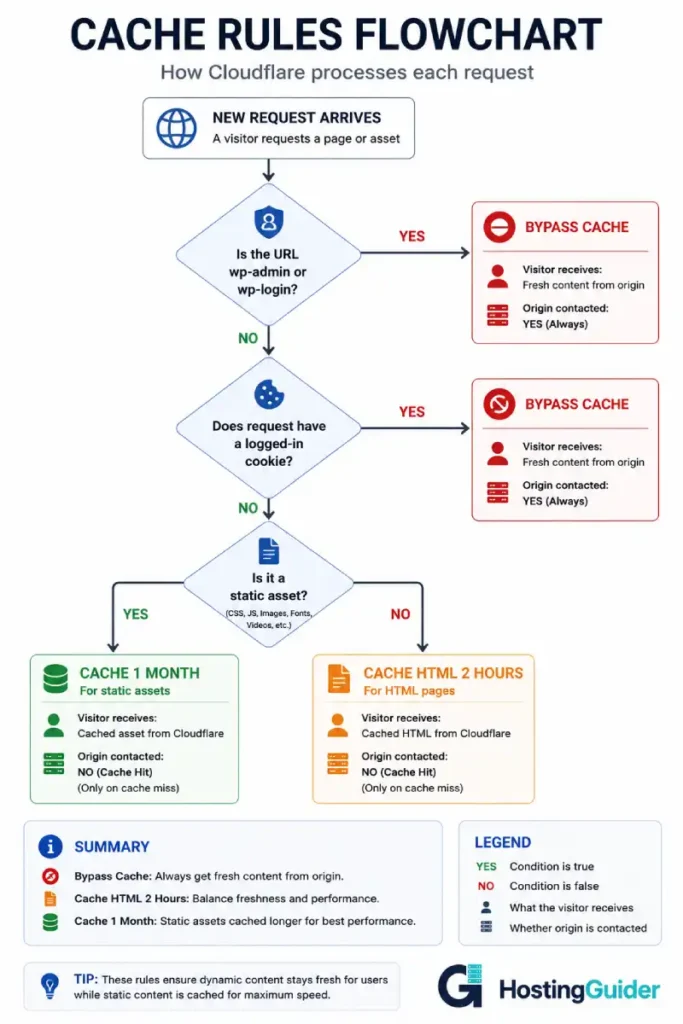
Rule 1: Bypass cache for WordPress admin
Name: Bypass WordPress Admin
When:
- URL path contains
/wp-admin - OR URL path contains
/wp-login.php - OR URL contains
?wc-ajax - OR Cookie name contains
wordpress_logged_in - OR Cookie name contains
woocommerce_cart_hash - OR Cookie name contains
woocommerce_items_in_cart - OR Cookie name contains
wc_session
Then:
- Set Cache Status to Bypass
This single rule ensures logged-in users, admin pages, and WooCommerce sessions never hit the cache.
Rule 2: Cache static assets aggressively
Name: Cache Static Assets
When:
- File extension equals jpg, jpeg, png, gif, webp, svg, ico, css, js, woff, woff2, ttf, pdf
Then:
- Set Edge Cache TTL to 1 month
- Set Browser Cache TTL to 1 year
Rule 3: Set edge cache TTL for HTML pages
Name: Cache HTML Pages
When:
- URL path does not contain
/wp-admin - AND URL does not contain
/wp-login.php - AND Cookie name does not contain
wordpress_logged_in - AND Cookie name does not contain
woocommerce
Then:
- Set Edge Cache TTL to 2 hours (adjust based on how frequently your content changes)
Step 5.4: Understand Cache Status Headers
After configuring cache rules, verify they work by checking the response headers:
curl -I https://yourdomain.com/wp-content/themes/yourtheme/style.css
Look for the CF-Cache-Status header in the output:
| CF-Cache-Status Value | Meaning |
|---|---|
| HIT | Served from Cloudflare cache. Origin not contacted |
| MISS | Not in cache. Fetched from origin. Will be cached |
| BYPASS | Cache intentionally bypassed (matched a bypass rule) |
| EXPIRED | Was in cache but TTL expired. Refreshed from origin |
| DYNAMIC | Cloudflare never caches this content type |
| REVALIDATED | Cached but revalidated with origin |
Your static assets should show HIT on the second request. Your admin pages should show BYPASS. Your logged-in user pages should show BYPASS.
If static assets show DYNAMIC, Cloudflare is not caching them. Check your cache rules and caching level settings.
Phase 6: Origin Server Lockdown
This is the security step most tutorials skip.
Right now, anyone who knows your origin server IP address can bypass Cloudflare entirely. They connect directly to your server, bypassing DDoS protection, WAF, and your SSL configuration. Your site’s security depends on hiding the origin IP.
But even if your IP becomes known, you can lock the origin server to accept connections only from Cloudflare IP ranges.
Step 6.1: Configure UFW to Allow Only Cloudflare IPs
Remove the current broad HTTP/HTTPS rules:
sudo ufw delete allow 80
sudo ufw delete allow 443
Add rules for Cloudflare IPv4 ranges only:
for ip in \
  173.245.48.0/20 \
  103.21.244.0/22 \
  103.22.200.0/22 \
  103.31.4.0/22 \
  141.101.64.0/18 \
  108.162.192.0/18 \
  190.93.240.0/20 \
  188.114.96.0/20 \
  197.234.240.0/22 \
  198.41.128.0/17 \
  162.158.0.0/15 \
  104.16.0.0/13 \
  104.24.0.0/14 \
  172.64.0.0/13 \
  131.0.72.0/22; do
    sudo ufw allow proto tcp from $ip to any port 80,443
done
Also allow your own IP for direct server management:
sudo ufw allow from YOUR.OWN.IP.ADDRESS
Apply changes:
sudo ufw reload
Verify:
sudo ufw status numbered
Your server now refuses HTTP/HTTPS connections from any IP that is not a Cloudflare range or your own IP. Direct attacks on your origin IP fail at the firewall level.
Step 6.2: Configure Cloudflare Authenticated Origin Pulls
Authenticated Origin Pulls adds a client certificate to Cloudflare’s requests to your origin server. Your origin verifies this certificate and rejects requests that do not have it. This ensures only legitimate Cloudflare traffic reaches your origin even if someone spoofs a Cloudflare IP.
In Cloudflare dashboard:
- Go to SSL/TLS
- Click Origin Server
- Enable Authenticated Origin Pulls
- Download the Cloudflare CA certificate from the same page
Save the CA certificate to your server:
sudo nano /etc/ssl/cloudflare-origin-pull-ca.pem
Paste the certificate content. Save.
Update your Nginx server block to require this certificate:
ssl_client_certificate /etc/ssl/cloudflare-origin-pull-ca.pem;
ssl_verify_client on;
Test and reload Nginx:
sudo nginx -t
sudo systemctl reload nginx
Now requests to your origin server without the Cloudflare client certificate receive a 400 Bad Request response. The origin is locked to Cloudflare only.
Phase 7: Performance Settings
Step 7.1: Enable HTTP/3 (QUIC)
HTTP/3 uses UDP instead of TCP. It handles packet loss better and establishes connections faster. Enable it in Cloudflare:
- Go to Network
- Enable HTTP/3 (with QUIC)
Your origin server does not need to support HTTP/3. Cloudflare terminates HTTP/3 at the edge and connects to your origin over HTTP/2.
Step 7.2: Enable Brotli Compression
Brotli compresses text content more efficiently than gzip. Enable it in Cloudflare:
- Go to Speed
- Click Optimization
- Enable Brotli
Your origin server sends uncompressed responses to Cloudflare. Cloudflare compresses them with Brotli before sending to the visitor. This is handled transparently.
Step 7.3: Enable Minification
Cloudflare can minify JavaScript, CSS, and HTML on the fly without modifying your source files.
- Go to Speed
- Click Optimization
- Under Auto Minify, enable JavaScript, CSS, and HTML
For WordPress sites: if you already use a plugin that minifies (WP Rocket, LiteSpeed Cache), turn off Cloudflare’s minification to avoid double-processing. Use one or the other, not both.
Step 7.4: Configure Polish (Image Optimisation)
Available on Cloudflare Pro and above:
- Go to Speed
- Click Optimization
- Set Polish to Lossless or Lossy depending on your image quality requirements
Polish converts images to WebP for browsers that support it and compresses them without you changing anything on the origin.
Phase 8: Security Settings
Step 8.1: Set Security Level
In Cloudflare dashboard:
- Go to Security
- Click Settings
- Set Security Level to Medium
Medium blocks requests with known malicious patterns. Essentially No Threats is too permissive. High generates too many false positives. Medium is the right production starting point.
Step 8.2: Enable Bot Fight Mode
- Go to Security
- Click Bots
- Enable Bot Fight Mode
This blocks simple bots that do not follow standard bot protocols. Malicious crawlers, scraping bots, and credential stuffers get blocked at the edge.
Step 8.3: Configure WAF Rules for WordPress
The Cloudflare WAF (Web Application Firewall) has pre-built rulesets for WordPress. Enable them:
- Go to Security
- Click WAF
- Click Managed Rulesets
- Enable Cloudflare Managed Ruleset
- Enable Cloudflare OWASP Core Ruleset
For the WordPress-specific ruleset (free tier):
Create a WAF custom rule blocking common WordPress attacks:
- Go to Security, WAF, Custom Rules
- Create a rule
Rule name: Block wp-xmlrpc.php
Expression: http.request.uri.path eq "/xmlrpc.php"
Action: Block
This blocks XML-RPC abuse, a common WordPress attack vector.
The DDoS protection article covers what CDN-level protection actually stops and what requires additional configuration.
Phase 9: WordPress-Specific Integration
Step 9.1: Install the Cloudflare WordPress Plugin
The official Cloudflare plugin automatically:
- Purges Cloudflare cache when you publish or update content
- Configures Automatic Platform Optimisation (APO) if enabled
- Provides real-time analytics in WordPress admin
- Handles IP restoration
Install from WordPress admin: Plugins, Add New, search Cloudflare, install and activate.
In the plugin settings, authenticate with your Cloudflare API key (found in your Cloudflare profile).
Step 9.2: Configure Cache Purging on Publish
Without cache purging, your CDN serves stale content after you publish new posts or update existing ones. Visitors do not see your changes until the CDN cache expires.
The Cloudflare plugin handles this automatically once authenticated. Verify it works:
- Publish a test post
- Immediately visit that post URL in a private browser window
- Check the
CF-Cache-Statusheader using browser developer tools - The header should show BYPASS or MISS on first load, then HIT on the second
Step 9.3: Configure Automatic Platform Optimisation (APO)
APO (available on Cloudflare Pro or as an add-on) caches WordPress HTML pages at the Cloudflare edge, not just static assets.
With APO enabled, Cloudflare serves the entire WordPress page from edge cache. The origin server is not contacted for most page views. For a site with 50,000 monthly visitors, this can reduce origin server load by 80% or more.
APO automatically handles:
- Cache bypass for logged-in users
- Cache bypass for WooCommerce sessions
- Cache invalidation on publish
Enable APO in the Cloudflare plugin settings after purchasing it in your Cloudflare dashboard.
Step 9.4: Configure WP Rocket for Cloudflare
If you use WP Rocket instead of or alongside the Cloudflare plugin:
- Go to WP Rocket, CDN settings
- Enable CDN
- Enter your CDN CNAME (your Cloudflare-proxied domain or a custom CDN subdomain)
WP Rocket rewrite links to point assets to the CDN URL and triggers Cloudflare cache purges on content updates.
Phase 10: Testing the Complete Setup
Do not consider the configuration done until every test passes.
Test 1: Verify CDN is Active
curl -I https://yourdomain.com/
Look for:
CF-Ray:header (confirms Cloudflare is proxying)server: cloudflareheaderCF-Cache-Status:header
Test 2: Verify SSL is Full (Strict)
Open your browser developer tools. Go to Security tab. Check that the certificate is issued to your domain and is trusted.
Also test with:
openssl s_client -connect yourdomain.com:443 -servername yourdomain.com 2>/dev/null | openssl x509 -noout -subject -dates
The certificate should be your origin certificate (Cloudflare Origin Certificate or Let’s Encrypt), not Cloudflare’s edge certificate.
Test 3: Verify Cache Behaviour
Test a static asset — it should be cached:
curl -I https://yourdomain.com/wp-content/themes/yourtheme/style.css
Expected: CF-Cache-Status: HIT (on second request)
Test the admin page — it should be bypassed:
curl -I https://yourdomain.com/wp-admin/
Expected: CF-Cache-Status: BYPASS
Test 4: Verify Real IP Restoration
After a real visitor loads the page, check the Nginx access log:
sudo tail -5 /var/log/nginx/access.log
The IP address should be a real visitor IP, not a Cloudflare IP like 103.21.244.x.
Compare the logged IP against the Cloudflare IP ranges list. If it matches Cloudflare ranges, real IP restoration is not working.
Test 5: Verify Origin Lockdown
Try to access your site directly via the origin IP:
curl -I http://YOUR.ORIGIN.IP/ -H "Host: yourdomain.com"
Expected: Connection refused (if UFW is blocking it)
If you get a response, the origin is accessible without going through Cloudflare.
Test 6: Performance Comparison
Run the curl timing test before and after CDN setup:
curl -w "DNS: %{time_namelookup}s | Connect: %{time_connect}s | TTFB: %{time_starttransfer}s | Total: %{time_total}s\n" \
  -o /dev/null -s https://yourdomain.com/
For a cache HIT from a nearby CDN edge, expect TTFB under 50ms. For an origin request, expect whatever your origin server delivers (typically 150-400ms for a well-configured cloud VPS).
The performance guide covers how TTFB and CDN caching affect real visitor experience and search rankings.
Phase 11: Common Mistakes and How to Avoid Them
| Mistake | Consequence | Fix |
|---|---|---|
| Using Flexible SSL | Data unencrypted between CDN and origin | Switch to Full (Strict). Install origin certificate |
| No cache bypass for wp-admin | Admin users see cached stale pages | Add cookie-based bypass rule for wordpress_logged_in |
| No cache bypass for WooCommerce | Cart contents shared between visitors | Add bypass rules for woocommerce cookies |
| Not restoring real IPs | Wrong IPs in logs. GeoIP broken. Security plugins malfunction | Configure set_real_ip_from in Nginx |
| No origin lockdown | Attackers bypass CDN by hitting origin IP directly | Restrict port 80/443 to Cloudflare IP ranges only |
| Double minification | Broken JavaScript or CSS | Use only one minification source: plugin or CDN |
| Caching POST requests | Form submissions return cached responses | Ensure POST requests are not cached (they should not be by default) |
| Setting Max-Age without Etag | Stale content served until TTL expires | Let cache-busting tools manage asset versioning |
| Not purging cache after deployments | Visitors see old CSS/JS after plugin updates | Purge Cloudflare cache after every code deployment |
| Enabling HSTS before confirming HTTPS works | Site becomes inaccessible if SSL breaks | Enable HSTS only after confirming Full (Strict) works |
Frequently Asked Questions
Why is Flexible SSL so bad if visitors still see HTTPS?
Flexible SSL means the connection from Cloudflare to your origin server uses plain HTTP. Traffic between the CDN edge and your server is unencrypted. An attacker between Cloudflare and your server sees login credentials, form submissions, and session cookies in plain text. Your visitors see HTTPS in the browser and assume their data is safe. It is not. Always use Full (Strict) to encrypt the entire path.
Will the CDN break my WordPress site?
A correctly configured CDN should not break anything. The most common cause of CDN-related WordPress breakage is caching pages that should not be cached. If logged-in users see the wrong content, or admin pages show stale data, your cache bypass rules are incomplete. Add bypass rules for the wordpress_logged_in cookie and verify they are working with the CF-Cache-Status header check.
How often should I purge the CDN cache?
Purging happens automatically through the Cloudflare plugin when you publish or update WordPress content. You should manually purge when you update a plugin or theme that changes CSS or JavaScript files, after editing the Nginx or origin server configuration, and after migrating or changing hosting. You should NOT need to purge manually on a regular schedule. If you do, your cache TTL settings are probably too long for how frequently your content changes.
Does a CDN affect SEO?
Positively, when configured correctly. Google uses page speed as a ranking signal. CDN improves TTFB for visitors far from your origin server, which improves Core Web Vitals scores. Google’s crawlers are based in the United States, so they may not benefit as much from a CDN as international visitors do. The CDN also provides DDoS protection, which reduces downtime — and downtime is genuinely harmful to SEO.
Should I use Cloudflare on a managed WordPress host that already has a CDN?
Check what your managed host provides before adding Cloudflare. Kinsta includes a CDN built into their platform. Rocket.net includes Cloudflare Enterprise. Adding Cloudflare in front of a host that already has CDN either doubles the CDN layer (unnecessary) or provides additional features. If your managed host CDN lacks DDoS protection or WAF, adding Cloudflare in front makes sense. If it already includes those features, the benefit is smaller.
How do I debug a 525 SSL Handshake Failed error?
Error 525 from Cloudflare means the SSL handshake between Cloudflare and your origin server failed. Common causes: the SSL certificate on your origin has expired, you are using a self-signed certificate with Full (Strict) mode (which requires a valid certificate), or Nginx is not configured to listen on port 443. Check the origin certificate expiry date: openssl x509 -enddate -noout -in /path/to/cert.pem. Check that Nginx is listening on 443: sudo ss -tlnp | grep nginx. Check the Nginx error log for SSL-related messages.