
A CDN makes your website fast for visitors everywhere in the world. Cloud hosting gives you a powerful server that scales when traffic grows. Put them together the right way and your site loads quickly, stays online during traffic spikes, and costs less to run.
Put them together the wrong way and you get caching bugs, broken HTTPS, visitors seeing old content, and a CDN that hides your real server IP from no one. Most CDN cloud hosting configuration problems come from skipping small steps during setup.
This guide walks through the full setup step by step. It uses Cloudflare as the CDN (the most common choice, with a strong free plan) and a standard cloud server running Nginx (the most common web server on cloud hosting). Every command is included. Every setting is explained in plain words. By the end of this CDN cloud hosting configuration guide, your CDN and cloud server will work together correctly.
This is a practical guide, not a comparison. If you follow each step of this CDN cloud hosting configuration guide in order, your setup will be correct and you will avoid the mistakes that slow most sites down.

What You Need Before You Start
Before you begin the CDN cloud hosting configuration, make sure you have these things ready:
- A cloud server (a VPS or cloud instance from any provider) with root or sudo access
- A registered domain name
- Access to your domain’s registrar (where you bought the domain) to change nameservers
- A free Cloudflare account (sign up at cloudflare.com)
- Basic comfort with the command line and SSH
This guide assumes your cloud server runs Ubuntu 22.04 or 24.04, which is the most common choice. The commands work with small changes on other Linux distributions. If you are on a managed WordPress host, some of these steps are handled for you, and you should check your host’s CDN integration instructions first.
A note on choosing cloud hosting: the quality of your origin server affects everything the CDN does. A slow origin server means the CDN has to wait when it fetches uncached content. Our guide on fixing TTFB at the hosting level explains why origin server speed matters even with a CDN in front. For how cloud servers scale under load, our explainer on cloud hosting auto-scaling covers what actually happens during traffic spikes.
How CDN and Cloud Hosting Work Together in a Correct Configuration
Understanding the flow makes the configuration steps make sense.
Your cloud server is the origin. It holds the real files for your website: the HTML, CSS, images, and any application code. The origin is the source of truth.
The CDN is a network of servers spread across the world, called edge locations or points of presence. When you put a CDN in front of your origin, visitors connect to the nearest edge location instead of connecting directly to your origin server.
Here is what happens on a request:
- A visitor in Tokyo requests your homepage.
- Their request goes to the nearest Cloudflare edge location, which is in Tokyo, not to your origin server which might be in Frankfurt.
- If the Tokyo edge has a cached copy of your homepage, it serves it immediately. The visitor gets the page in milliseconds. Your origin server is never contacted.
- If the Tokyo edge does not have a cached copy, it fetches the page from your origin in Frankfurt, serves it to the visitor, and stores a copy for the next visitor.
This is why the CDN makes your site fast: most requests are served from a nearby edge instead of a distant origin. It is also why caching configuration matters so much. If the cache rules are wrong, the CDN either caches nothing (slow) or caches things it should not (visitors see stale or wrong content).
The connection between the visitor and the edge must be encrypted with HTTPS. The connection between the edge and your origin must also be encrypted. Getting both of these right is the part most people misconfigure.
Step 1: Prepare Your Cloud Server for CDN Cloud Hosting Configuration
Connect to your cloud server using SSH. Replace your_server_ip with your server’s actual IP address.
ssh root@your_server_ip
Update the system packages first. This makes sure you are working with current software.
sudo apt update && sudo apt upgrade -y
Set the correct timezone so your logs have accurate timestamps.
sudo timedatectl set-timezone UTC
Create a basic firewall and allow only the ports you need. Allow SSH (port 22), HTTP (port 80), and HTTPS (port 443).
sudo ufw allow 22/tcp
sudo ufw allow 80/tcp
sudo ufw allow 443/tcp
sudo ufw enable
Check the firewall status to confirm the rules are active.
sudo ufw status
You should see ports 22, 80, and 443 listed as allowed. Your server is now ready for the web server installation.
Step 2: Install and Configure Nginx
Nginx is the web server that will serve your website files. Install it.
sudo apt install nginx -y
Start Nginx and set it to run automatically when the server restarts.
sudo systemctl start nginx
sudo systemctl enable nginx
Check that Nginx is running.
sudo systemctl status nginx
You should see “active (running)” in green. Now test it by visiting your server’s IP address in a browser: http://your_server_ip. You should see the default Nginx welcome page.
Now create a server block for your website. Replace example.com with your real domain throughout. Create the configuration file.
sudo nano /etc/nginx/sites-available/example.com
Paste the following configuration into the file. This is a basic, correct starting point.
server {
    listen 80;
    listen [::]:80;

    root /var/www/example.com/html;
    index index.html index.htm index.php;

    server_name example.com www.example.com;

    location / {
        try_files $uri $uri/ =404;
    }
}
Save and close the file (in nano, press Ctrl+X, then Y, then Enter).
Create the web root directory where your site files will live.
sudo mkdir -p /var/www/example.com/html
Set the correct ownership so Nginx can read the files.
sudo chown -R www-data:www-data /var/www/example.com/html
Create a simple test page so you can confirm everything works.
echo "<h1>CDN cloud hosting configuration is working</h1>" | sudo tee /var/www/example.com/html/index.html
Enable the site by creating a link to the sites-enabled directory.
sudo ln -s /etc/nginx/sites-available/example.com /etc/nginx/sites-enabled/
Test the Nginx configuration for syntax errors before reloading.
sudo nginx -t
If you see “syntax is ok” and “test is successful”, reload Nginx to apply the changes.
sudo systemctl reload nginx
Step 3: Set Up SSL on Your Origin Server
Your origin server needs its own SSL certificate. This encrypts the connection between Cloudflare and your origin. Skipping this step is the most common cause of broken HTTPS in a CDN setup.
You have two good options. The cleaner option for a Cloudflare setup is the Cloudflare Origin Certificate, which is free, valid for 15 years, and trusted by Cloudflare. We will use that.
First, generate the Origin Certificate in your Cloudflare dashboard. Go to your Cloudflare account, select your domain, go to SSL/TLS, then Origin Server, then click “Create Certificate.” Leave the default settings (RSA, 15 years) and click Create. Cloudflare shows you two text blocks: the Origin Certificate and the Private Key.
On your server, create the certificate files. First the certificate.
sudo nano /etc/ssl/cloudflare-origin.pem
Paste the Origin Certificate block from Cloudflare, then save and close.
Now the private key.
sudo nano /etc/ssl/cloudflare-origin-key.pem
Paste the Private Key block from Cloudflare, then save and close.
Set strict permissions on the private key so only root can read it.
sudo chmod 600 /etc/ssl/cloudflare-origin-key.pem
Now update your Nginx configuration to use this certificate. Open the site config again.
sudo nano /etc/nginx/sites-available/example.com
Replace the entire contents with this updated version that listens on HTTPS.
server {
    listen 80;
    listen [::]:80;
    server_name example.com www.example.com;
    return 301 https://$host$request_uri;
}

server {
    listen 443 ssl http2;
    listen [::]:443 ssl http2;
    server_name example.com www.example.com;

    ssl_certificate /etc/ssl/cloudflare-origin.pem;
    ssl_certificate_key /etc/ssl/cloudflare-origin-key.pem;

    root /var/www/example.com/html;
    index index.html index.htm index.php;

    location / {
        try_files $uri $uri/ =404;
    }
}
The first server block redirects all HTTP traffic to HTTPS. The second block serves your site over HTTPS using the Cloudflare Origin Certificate. Save and close.
Test and reload.
sudo nginx -t
sudo systemctl reload nginx
Your origin server now serves HTTPS. The certificate is only trusted by Cloudflare, which is exactly what you want, because all real visitor traffic comes through Cloudflare.
Step 4: Add Your Site to Cloudflare
Log in to your Cloudflare dashboard and click “Add a Site.” Enter your domain name (example.com without www or https) and click Continue.
Cloudflare asks you to choose a plan. The Free plan is sufficient for most sites and includes the CDN, caching, SSL, and basic security. Select it and continue.
Cloudflare scans your existing DNS records. This takes a minute. When it finishes, it shows you a list of DNS records it found. Review this list carefully. Make sure your main A record (pointing your domain to your server IP) is present.
If your A record is missing, add it manually. Click “Add record,” choose type A, set the name to @ (which means your root domain), set the IPv4 address to your server IP, and make sure the proxy status shows the orange cloud icon (Proxied). The orange cloud is what routes traffic through Cloudflare’s CDN. A grey cloud means DNS only, with no CDN.
Add a second A record for www: type A, name www, same server IP, proxy status Proxied (orange cloud).
The orange cloud is the single most important setting in CDN cloud hosting configuration. If the cloud is grey, the CDN does nothing. If it is orange, traffic flows through Cloudflare’s edge network.
Step 5: Point Your Domain to Cloudflare
Cloudflare gives you two nameservers, something like tina.ns.cloudflare.com and walt.ns.cloudflare.com. These are unique to your account. Write them down.
Now go to your domain registrar (the company where you bought your domain, such as Namecheap, GoDaddy, or Google Domains). Find the nameserver settings for your domain. This is usually under “DNS” or “Nameservers” or “Domain settings.”
Replace the existing nameservers with the two Cloudflare nameservers. Remove any old nameservers. Save the changes.
This change tells the internet to send all traffic for your domain through Cloudflare first. The change can take anywhere from a few minutes to 24 hours to take effect worldwide, though it is usually fast.
Back in Cloudflare, the dashboard will show “Pending nameserver update” until the change is detected. When Cloudflare confirms the nameservers, your site is active on the CDN. Cloudflare sends you an email when this happens.
You can check whether the nameservers have updated using this command on your local computer.
dig NS example.com +short
When you see the Cloudflare nameservers in the output, the change is live.
Step 6: Configure Cloudflare SSL the Right Way
This is the step most people get wrong, and it causes redirect loops, security warnings, and broken pages.
In your Cloudflare dashboard, go to SSL/TLS, then Overview. You will see SSL/TLS encryption modes. There are several options. The correct one for the setup in this guide is Full (strict).
Here is what each mode means in plain words:
- Off: No encryption. Never use this.
- Flexible: Visitor to Cloudflare is encrypted, but Cloudflare to your origin is not. This causes redirect loops if your origin redirects to HTTPS, which yours does. Do not use this.
- Full: Both connections are encrypted, but Cloudflare does not verify your origin certificate. Works, but less secure.
- Full (strict): Both connections are encrypted, and Cloudflare verifies your origin certificate. This is the correct and most secure choice. Because you installed a Cloudflare Origin Certificate in Step 3, this will work perfectly.
Select Full (strict).
Now scroll down and turn on “Always Use HTTPS.” This makes sure every visitor gets the secure version of your site.
Also turn on “Automatic HTTPS Rewrites.” This fixes mixed content issues where a page tries to load an insecure resource.
Your SSL is now configured correctly end to end. The visitor connection is secure, the origin connection is secure and verified, and all traffic is forced to HTTPS.

Step 7: Set Up Caching Rules
Caching is what makes the CDN fast. By default, Cloudflare caches static files (images, CSS, JavaScript) but not HTML. For most sites this default is a safe starting point. You can improve it.
In your Cloudflare dashboard, go to Caching, then Configuration.
Set the Caching Level to Standard. This caches based on the full URL including query strings, which is correct for most sites.
Set the Browser Cache TTL to a reasonable value like 4 hours. This controls how long visitors’ browsers keep cached files before checking for new versions.
For a site with content that does not change every minute (most sites), you can cache more aggressively using a Cache Rule. Go to Caching, then Cache Rules, then Create rule.
Create a rule to cache static assets aggressively. Name it “Cache static assets.” Set the rule to match when the URI path ends with common static file extensions. Use this expression in the rule editor.
(http.request.uri.path.extension in {"jpg" "jpeg" "png" "gif" "webp" "css" "js" "woff" "woff2" "svg" "ico"})
Set the action to “Eligible for cache” and set the Edge Cache TTL to a long value like one month. Static files rarely change, so caching them at the edge for a long time is safe and fast.
Deploy the rule.
A warning about caching HTML: do not cache HTML aggressively unless you understand the consequences. If your site has logged-in users, shopping carts, or any personalised content, caching HTML at the edge can show one visitor’s content to another. For dynamic sites and any site with user accounts, leave HTML uncached at the CDN level and let your origin server handle it. Our guide on caching and website speed explains the different cache layers and when each one is safe to use.
Step 8: Lock Down Your Origin Server
Right now, your origin server still accepts connections from anyone who knows its IP address. This is a security gap. Attackers can bypass Cloudflare fully and hit your origin directly, which defeats the CDN’s protection.
The fix is to configure your origin server to accept connections only from Cloudflare’s IP ranges. This forces all traffic through the CDN.
Cloudflare publishes its IP ranges. Create a configuration snippet that allows only those ranges. First, create the file.
sudo nano /etc/nginx/cloudflare-allow.conf
Paste the current Cloudflare IPv4 ranges. These are the official ranges.
allow 173.245.48.0/20;
allow 103.21.244.0/22;
allow 103.22.200.0/22;
allow 103.31.4.0/22;
allow 141.101.64.0/18;
allow 108.162.192.0/18;
allow 190.93.240.0/20;
allow 188.114.96.0/20;
allow 197.234.240.0/22;
allow 198.41.128.0/17;
allow 162.158.0.0/15;
allow 104.16.0.0/13;
allow 104.24.0.0/14;
allow 172.64.0.0/13;
allow 131.0.72.0/22;
deny all;
Save and close. Now include this file in your HTTPS server block. Open the site config.
sudo nano /etc/nginx/sites-available/example.com
Add the include line inside the location / block of the HTTPS server (the one listening on 443). The block should look like this.
    location / {
        include /etc/nginx/cloudflare-allow.conf;
        try_files $uri $uri/ =404;
    }
Save and close. Test and reload.
sudo nginx -t
sudo systemctl reload nginx
Now your origin only responds to Cloudflare. Direct requests to your server IP are denied. To get the real visitor IP in your logs instead of Cloudflare’s IP, add this to your server block as well. Create a snippet.
sudo nano /etc/nginx/cloudflare-realip.conf
Paste this configuration which restores the real visitor IP.
set_real_ip_from 173.245.48.0/20;
set_real_ip_from 103.21.244.0/22;
set_real_ip_from 103.22.200.0/22;
set_real_ip_from 103.31.4.0/22;
set_real_ip_from 141.101.64.0/18;
set_real_ip_from 108.162.192.0/18;
set_real_ip_from 190.93.240.0/20;
set_real_ip_from 188.114.96.0/20;
set_real_ip_from 197.234.240.0/22;
set_real_ip_from 198.41.128.0/17;
set_real_ip_from 162.158.0.0/15;
set_real_ip_from 104.16.0.0/13;
set_real_ip_from 104.24.0.0/14;
set_real_ip_from 172.64.0.0/13;
set_real_ip_from 131.0.72.0/22;
real_ip_header CF-Connecting-IP;
Save and close. Include it at the top of your HTTPS server block, just inside the server { line.
server {
    listen 443 ssl http2;
    listen [::]:443 ssl http2;
    server_name example.com www.example.com;

    include /etc/nginx/cloudflare-realip.conf;

    ssl_certificate /etc/ssl/cloudflare-origin.pem;
    ssl_certificate_key /etc/ssl/cloudflare-origin-key.pem;

    root /var/www/example.com/html;
    index index.html index.htm index.php;

    location / {
        include /etc/nginx/cloudflare-allow.conf;
        try_files $uri $uri/ =404;
    }
}
Test and reload.
sudo nginx -t
sudo systemctl reload nginx
Your origin is now locked to Cloudflare and your logs show real visitor IPs.
Step 9: Enable Compression and HTTP/3
Compression makes your files smaller before they travel to visitors. HTTP/3 is the newest, fastest connection protocol. Both improve speed.
Cloudflare handles compression automatically with Brotli. Turn it on in the dashboard. Go to Speed, then Optimization, then Content Optimization, and enable Brotli.
Enable HTTP/3 in the dashboard. Go to Network and turn on HTTP/3 (with QUIC). This lets modern browsers connect to your site using the fastest available protocol. Our guide on HTTP/3 and QUIC hosting support explains why this protocol is faster, especially on mobile networks.
On your origin server, enable Gzip compression in Nginx as a fallback for the origin connection. Open the main Nginx config.
sudo nano /etc/nginx/nginx.conf
Find the Gzip section (it usually exists but is partly commented out) and make it match this.
    gzip on;
    gzip_vary on;
    gzip_proxied any;
    gzip_comp_level 6;
    gzip_types text/plain text/css text/xml application/json application/javascript application/xml+rss application/atom+xml image/svg+xml;
Save and close. Test and reload.
sudo nginx -t
sudo systemctl reload nginx
Your site now uses Brotli compression at the edge, Gzip at the origin, and HTTP/3 for modern browsers.
Step 10: Test Your CDN Cloud Hosting Configuration
Now confirm everything works. Run these checks one by one.
First, check that your site loads over HTTPS. Visit https://example.com in a browser. You should see your site with a padlock icon and no security warnings.
Second, confirm traffic is going through Cloudflare. Run this command from your local computer.
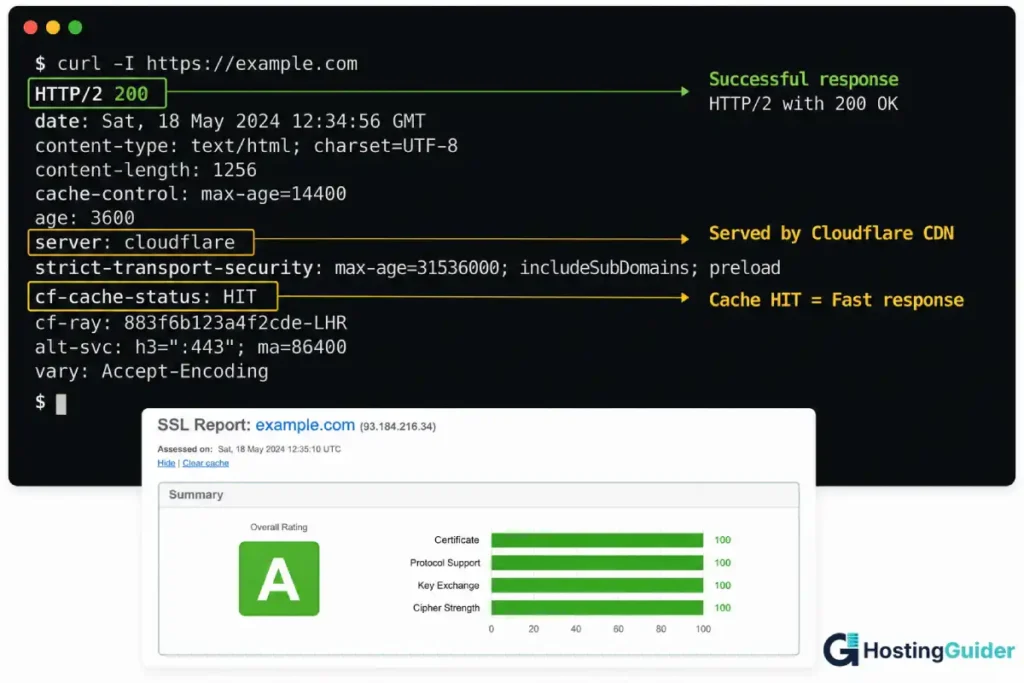
curl -I https://example.com
Look for a header that says server: cloudflare and a header called cf-cache-status. If you see these, Cloudflare is active. The cf-cache-status will say HIT (served from cache) or MISS (fetched from origin) or DYNAMIC (not cached).
Third, confirm your origin is locked down. Try to reach your origin directly by its IP over HTTPS.
curl -I https://your_server_ip --resolve example.com:443:your_server_ip
This should fail or be refused, because your origin now only accepts Cloudflare IPs. If it still responds, recheck Step 8.
Fourth, check that a static file is being cached. Request an image twice.
curl -I https://example.com/test-image.jpg
The first request may show cf-cache-status: MISS. Run it again. The second request should show cf-cache-status: HIT, which means the CDN is now serving it from the edge cache.
Fifth, test your SSL configuration quality. Use an online SSL checker like SSL Labs (ssllabs.com/ssltest) and enter your domain. You should get an A grade.
If all five checks pass, your CDN cloud hosting configuration is complete and correct.
Common Mistakes That Break a CDN Cloud Hosting Configuration
These are the errors that cause most problems. Avoid them.
Using Flexible SSL mode. This is the single most common mistake. Flexible mode does not encrypt the connection between Cloudflare and your origin. If your origin redirects HTTP to HTTPS (which a correct setup does), Flexible mode creates an infinite redirect loop and your site shows an error. Always use Full (strict) with an Origin Certificate installed.
Leaving the cloud grey instead of orange. In Cloudflare DNS, a grey cloud means DNS only, with no CDN. Visitors connect straight to your origin and get none of the CDN benefits. The cloud must be orange (Proxied) for the CDN to work. This is the most overlooked setting.
Not locking down the origin. If your origin accepts connections from any IP, attackers bypass Cloudflare and hit your server directly. This exposes your real IP and removes Cloudflare’s DDoS protection. Always restrict your origin to Cloudflare IP ranges as shown in Step 8.
Caching HTML on a dynamic site. If your site has logins, carts, or personalised content and you cache HTML at the edge, visitors can see each other’s content. Only cache HTML if your site is fully static. Our guide on CDN misconfiguration and site slowdowns covers the caching mistakes that cause both slowdowns and content leaks.
Forgetting the real IP restoration. Without the real_ip_header CF-Connecting-IP setting, every visitor in your logs appears to come from a Cloudflare IP. This breaks analytics, rate limiting, and security tools. Always add the real IP configuration in Step 8.
Not updating Cloudflare IP ranges. Cloudflare occasionally adds new IP ranges. If you hardcode the ranges as shown here, check the official Cloudflare IP list every few months and update your allow list. An outdated list can block legitimate Cloudflare traffic.
Maintenance and Monitoring Your CDN Cloud Hosting Configuration
A CDN cloud hosting setup is not “set and forget.” A few ongoing tasks keep it healthy.
Purge the cache when you update content. When you change a file that the CDN has cached, the old version stays cached until it expires. To show the new version immediately, purge the cache. In Cloudflare, go to Caching, then Configuration, then Purge Cache. For a single file, use “Custom Purge” and enter the file URL. For a full site update, use “Purge Everything” sparingly, as it temporarily slows your site while the cache rebuilds.
Monitor your origin server health. The CDN hides origin problems until the cache expires. Set up basic monitoring on your origin so you know if it goes down. A simple uptime monitor that checks your origin directly (not through Cloudflare) will alert you to origin issues before they affect visitors.
Watch your cache hit ratio. In the Cloudflare Analytics dashboard, check your cache hit ratio. A healthy static-heavy site should see 90% or more of requests served from cache. A low cache hit ratio means your caching rules are not working and most requests are hitting your origin, which is slow and expensive.
Keep your origin software updated. Run system updates on your cloud server regularly.
sudo apt update && sudo apt upgrade -y
Renew certificates if needed. The Cloudflare Origin Certificate is valid for 15 years, so you rarely touch it. If you used Let’s Encrypt instead, set up automatic renewal so the certificate does not expire.
With these maintenance habits, your CDN and cloud server will run fast and securely for years.
Frequently Asked Questions
CDN Cloud Hosting Configuration: Do I Need a CDN if I Have Cloud Hosting?
A CDN and cloud hosting solve different problems, and most sites benefit from both. Cloud hosting gives you a powerful, scalable origin server. A CDN makes your content fast for visitors anywhere in the world by serving cached copies from edge locations near them. Without a CDN, every visitor connects to your single origin server, which is slow for visitors far from that server. With a CDN, most requests are served from a nearby edge. For any site with a global or national audience, the CDN cloud hosting combination is worth setting up.
CDN Cloud Hosting Configuration: Is Cloudflare’s Free Plan Good Enough?
Yes, for most sites. Cloudflare’s free plan includes the global CDN, unlimited bandwidth, free SSL, basic DDoS protection, caching, and the Origin Certificate. The free plan handles the full configuration in this guide. Paid plans add advanced features like image optimisation, more detailed analytics, advanced security rules, and faster cache purging, but the free plan is sufficient for a correct, fast, secure setup for personal sites, blogs, and many business sites.
CDN Cloud Hosting Configuration: Why Does My Site Show a Redirect Loop?
A redirect loop almost always means your SSL mode is set to Flexible while your origin server redirects HTTP to HTTPS. Cloudflare connects to your origin over HTTP in Flexible mode, your origin redirects to HTTPS, Cloudflare follows it back over HTTP, and the loop repeats forever. The fix is to install an Origin Certificate on your server (Step 3) and set the Cloudflare SSL mode to Full (strict) (Step 6). This is the most common CDN cloud hosting configuration error.
How do I get the real visitor IP address with a CDN?
By default, a CDN replaces the visitor IP with its own edge IP in your server logs. To restore the real visitor IP, configure your web server to read the CF-Connecting-IP header that Cloudflare sends. Step 8 of this guide shows the exact Nginx configuration using set_real_ip_from for the Cloudflare ranges and real_ip_header CF-Connecting-IP. After this, your logs, analytics, and security tools see the true visitor IP instead of Cloudflare’s.
Should I cache HTML pages on the CDN?
Only if your site is fully static with no logged-in users, shopping carts, or personalised content. Caching HTML at the edge makes a static site extremely fast. But on a dynamic site, edge-cached HTML can show one visitor’s personalised content to another visitor, which is a serious problem. For sites with user accounts, leave HTML uncached at the CDN and cache only static assets like images, CSS, and JavaScript. Let your origin server and application handle dynamic content caching.
How do I update content when the CDN is caching old versions?
When you change a cached file, the CDN keeps serving the old version until it expires. To show the new version immediately, purge the cache in your Cloudflare dashboard under Caching, then Purge Cache. For one file, use Custom Purge with the file URL. For a full update, use Purge Everything, though this temporarily slows your site as the cache rebuilds. Many teams set up automatic cache purging that triggers when they deploy new content.
CDN Cloud Hosting Configuration: What Is the Difference Between the CDN Cache and the Origin Server?
The origin server is your cloud server. It holds the real, original files for your website and is the source of truth. The CDN cache is a temporary copy of those files stored on edge servers around the world. When the CDN has a valid cached copy, it serves that copy without contacting your origin, which is fast. When the cache expires or is missing, the CDN fetches a fresh copy from your origin. The origin is permanent and authoritative. The cache is temporary and exists only to make delivery fast.