
Migrating from a shared host to a VPS is relatively straightforward. The configuration footprint is small.
Migrating from a dedicated server to cloud is a different challenge entirely.
Dedicated servers accumulate complexity over years. Configuration files from half a decade ago that nobody remembers the purpose of. Cron jobs added by three different developers. PHP extensions compiled from source. A mail server that sends 50,000 transactional emails per month. An application that hardcodes the server IP. A MySQL configuration tuned over hundreds of hours that nobody documented.
Moving all of this to cloud without breaking anything requires a methodical audit before a single file is transferred. Most migration failures happen because teams skip this phase and discover dependencies only after the old server is gone.
This guide starts with the audit. The audit takes longer than the migration itself. That is not a bug. That is the reason this migration succeeds.
Key Takeaways
- The pre-migration audit is the most important phase. It takes longer than the actual migration
- Dedicated servers accumulate years of undocumented configuration. You must discover all of it before moving
- Match software versions exactly on the cloud server before transferring anything
- Cloud networking is virtualised. IP addresses, routing, and firewall behave differently from dedicated hardware
- Self-hosted mail is the hardest component to migrate. Consider external mail services instead
- The dedicated server must stay live for at least 72 hours after DNS switch
- Every dependency that is not documented before migration is a potential outage during it
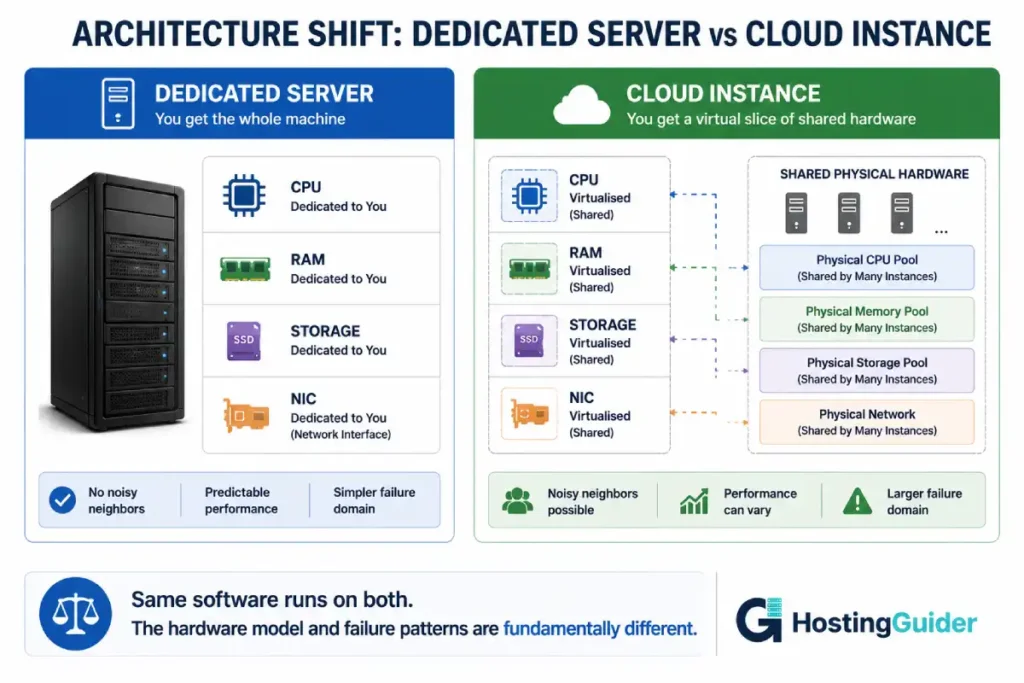
Understanding the Architecture Shift
A dedicated server gives you one physical machine. You own every CPU cycle. You own every byte of RAM. Storage is local hardware. Networking is a physical NIC connected to physical switches.
Cloud gives you a virtualised slice of shared infrastructure. CPU, RAM, storage, and network are all abstracted. This abstraction brings flexibility but introduces differences that matter during migration.
| Factor | Dedicated Server | Cloud Instance |
|---|---|---|
| Hardware | Single physical machine | Virtualised slice of shared hardware |
| CPU | All cores dedicated to you | vCPUs allocated from a pool |
| RAM | All RAM dedicated to you | RAM allocated from a pool |
| Storage | Local SATA/SAS/SSD | Local NVMe or network-attached block |
| Network | Physical NIC, fixed bandwidth | Virtual NIC, variable bandwidth |
| IP addresses | Persistent, tied to hardware | Persistent IPs must be explicitly reserved |
| Reboots | Hardware restart sequence | Fast virtual machine restart |
| CPU steal | None (your hardware) | Possible on oversubscribed hosts |
| Maintenance | Provider replaces failed hardware | Instance migrated to new hardware |
The difference between cloud and traditional hosting explains these architectural differences in detail. Understanding them helps you anticipate what will behave differently after migration.
Phase 0: The Pre-Migration Audit
This phase cannot be skipped or shortened. Every hour spent here prevents hours of incident response later.
Step 0.1: Document All Running Services
On your dedicated server, run:
sudo systemctl list-units --type=service --state=running
Save this output to a file:
sudo systemctl list-units --type=service --state=running > /root/migration/running-services.txt
Create the migration notes directory:
mkdir -p /root/migration
This list is your migration checklist. Every service running on the dedicated server must be accounted for on the cloud instance.
Common services found on dedicated servers that teams forget to migrate:
postfixorexim4(mail transfer agent)dovecot(mail delivery agent / IMAP server)spamassassinorrspamd(spam filtering)opendkim(email authentication)fail2ban(intrusion prevention)memcached(object caching)redis-server(object caching or queuing)elasticsearch(search engine)varnish(HTTP cache)cron(scheduled tasks)proftpdorvsftpd(FTP server)ntporchrony(time synchronisation)snmpd(monitoring)monitorsupervisor(process monitoring)
Step 0.2: Capture All Software Versions
Run this to capture exact versions of every critical piece of software:
cat > /root/migration/versions.txt << 'EOF'
=== OS ===
EOF
lsb_release -a >> /root/migration/versions.txt
uname -r >> /root/migration/versions.txt

cat >> /root/migration/versions.txt << 'EOF'

=== Web Server ===
EOF
nginx -v 2>> /root/migration/versions.txt
apache2 -v 2>> /root/migration/versions.txt

cat >> /root/migration/versions.txt << 'EOF'

=== PHP ===
EOF
php -v >> /root/migration/versions.txt
php -m >> /root/migration/versions.txt

cat >> /root/migration/versions.txt << 'EOF'

=== Database ===
EOF
mysql --version >> /root/migration/versions.txt 2>&1
mariadb --version >> /root/migration/versions.txt 2>&1

cat >> /root/migration/versions.txt << 'EOF'

=== Other ===
EOF
redis-server --version >> /root/migration/versions.txt 2>&1
memcached --version >> /root/migration/versions.txt 2>&1
cat /root/migration/versions.txt
Pay special attention to the PHP version and MySQL version. These two are the most common source of post-migration breakage.
The PHP version trap: Dedicated servers that have been running for years often have PHP 7.1, 7.2, or 7.4. Many plugins depend on deprecated PHP functions removed in PHP 8.x. If you upgrade PHP during the migration, plugins break. Match the PHP version first, then upgrade separately after the migration stabilises.
The MySQL version trap: Dedicated servers often run MySQL 5.7. Cloud defaults often install MySQL 8.0 or MariaDB 10.6. SQL mode differences between these versions can break applications that worked perfectly on the old setup.
Step 0.3: Capture All PHP Configuration
php -i > /root/migration/php-config.txt
Also capture the php.ini file:
php --ini | grep "Loaded Configuration File"
Copy that php.ini path and back it up:
cp /etc/php/7.4/apache2/php.ini /root/migration/php.ini.backup
cp /etc/php/7.4/cli/php.ini /root/migration/php-cli.ini.backup
Custom php.ini values that applications commonly depend on and that have non-default settings:
grep -E "upload_max_filesize|post_max_size|memory_limit|max_execution_time|max_input_vars|date.timezone|session.gc_maxlifetime|opcache" /etc/php/7.4/apache2/php.ini | grep -v "^;"
Step 0.4: Capture All Web Server Configuration
For Apache:
apache2ctl -S > /root/migration/apache-vhosts.txt
cp -r /etc/apache2/ /root/migration/apache-config/
For Nginx:
nginx -T > /root/migration/nginx-config-full.txt
cp -r /etc/nginx/ /root/migration/nginx-config/
Step 0.5: Capture All Cron Jobs
Cron jobs added over years are routinely forgotten during migrations. Run:
# Root cron jobs
sudo crontab -l > /root/migration/crontab-root.txt

# All user cron jobs
for user in $(cut -f1 -d: /etc/passwd); do
  crontab -u $user -l 2>/dev/null && echo "=== $user ===" >> /root/migration/crontab-all-users.txt
done

# System cron directories
ls -la /etc/cron.d/ > /root/migration/cron-d-files.txt
ls -la /etc/cron.daily/ >> /root/migration/cron-d-files.txt
ls -la /etc/cron.hourly/ >> /root/migration/cron-d-files.txt
ls -la /etc/cron.weekly/ >> /root/migration/cron-d-files.txt
Read every cron job carefully. Some will be critical (backup jobs, cache warmers, monitoring scripts). Some will be obsolete (jobs referencing software that no longer exists). Document what each one does before deciding whether to migrate it.
Step 0.6: Discover Hardcoded IP Addresses
Applications that hardcode the dedicated server IP address will break after migration.
Search your application code:
grep -r "YOUR.DEDICATED.IP" /var/www/ --include="*.php" -l
grep -r "YOUR.DEDICATED.IP" /var/www/ --include="*.conf" -l
grep -r "YOUR.DEDICATED.IP" /etc/nginx/ -l
grep -r "YOUR.DEDICATED.IP" /etc/apache2/ -l
Replace YOUR.DEDICATED.IP with your actual server IP. Any file that appears needs editing before or after migration.
Also check for hostname references:
hostname
hostname -f
grep -r "$(hostname)" /var/www/ --include="*.php" -l
Step 0.7: Capture Database Sizes and Engines
mysql -e "
SELECT
  table_schema AS 'Database',
  ROUND(SUM(data_length + index_length) / 1024 / 1024, 2) AS 'Size_MB'
FROM information_schema.tables
GROUP BY table_schema
ORDER BY SUM(data_length + index_length) DESC;
"
Also check for non-InnoDB tables that may not transfer cleanly:
mysql -e "
SELECT TABLE_SCHEMA, TABLE_NAME, ENGINE
FROM information_schema.TABLES
WHERE ENGINE != 'InnoDB'
AND TABLE_SCHEMA NOT IN ('mysql','performance_schema','information_schema')
ORDER BY TABLE_SCHEMA, TABLE_NAME;
"
Any MyISAM tables need attention. MyISAM does not support transactions. Conversion to InnoDB before migration reduces risk.
Step 0.8: Capture SSL Certificates
List all SSL certificates:
find /etc/ssl /etc/letsencrypt -name "*.crt" -o -name "*.pem" 2>/dev/null | head -30
For Let’s Encrypt:
sudo certbot certificates
For manually installed certificates:
find /etc -name "*.crt" -exec openssl x509 -noout -subject -dates -in {} \; 2>/dev/null
Capture which domains have certificates and when they expire.
Step 0.9: Capture Mail Server Configuration (If Applicable)
If your dedicated server sends or receives email:
postconf -n > /root/migration/postfix-config.txt
cat /etc/postfix/main.cf >> /root/migration/postfix-config.txt
ls -la /etc/postfix/ >> /root/migration/postfix-config.txt
Be honest about mail server migration complexity. Self-hosted mail is the hardest component to migrate. IP reputation takes months to build. A new cloud IP with no sending history goes straight to spam folders.
The strong recommendation for most migrations is to move email to an external service:
- Mailgun (transactional email)
- SendGrid (transactional + marketing)
- Google Workspace or Microsoft 365 (hosted email accounts)
Moving mail to external services removes it from the scope of the server migration entirely.
Step 0.10: Document All Open Ports
sudo ss -tlnp > /root/migration/open-ports.txt
sudo netstat -tlnp 2>/dev/null >> /root/migration/open-ports.txt
Every open port represents a service. Every service must be either migrated or intentionally dropped.
Step 0.11: Establish Performance Baseline
Run performance benchmarks before migration. These are your reference numbers for verifying the cloud instance performs equivalently.
# CPU benchmark
sysbench cpu --threads=$(nproc) --time=30 run | grep "events per second" > /root/migration/benchmarks.txt

# Disk benchmark
fio --name=randread --ioengine=libaio --rw=randread --bs=4k --direct=1 --size=1G --numjobs=4 --runtime=30 --group_reporting | grep "IOPS" >> /root/migration/benchmarks.txt

# Record site response time
curl -w "TTFB: %{time_starttransfer}s | Total: %{time_total}s\n" -o /dev/null -s https://yourdomain.com >> /root/migration/benchmarks.txt
Save the benchmarks file. After migration, you run the same tests on the cloud instance and compare.
Phase 1: Choose the Cloud Architecture
Lift and Shift vs Re-Architecture
You have two approaches to this migration.
Lift and shift: Move exactly what you have to the cloud. Same OS. Same software versions. Same configuration. The cloud instance looks identical to the dedicated server when done.
Benefits: Lowest risk. Fastest migration. No application changes needed. Downsides: You carry forward all the technical debt. You miss the opportunity to modernise.
Re-architecture: Rebuild the server from scratch with modern software. Update PHP to the latest version. Migrate from MySQL 5.7 to MySQL 8.0. Move from Apache to Nginx. Use managed cloud services where appropriate.
Benefits: Clean slate. Modern software. Better performance. Security improvements. Downsides: Higher risk. Application compatibility must be tested. Longer timeline.
Recommendation: For most migrations, start with lift and shift. Get to a stable cloud environment first. Then upgrade software versions one at a time after migration. Doing both simultaneously multiplies risk.
Choosing the Right Cloud Provider
| Provider | Best For | Management Level |
|---|---|---|
| Cloudways | WordPress and PHP apps, managed experience | Managed cloud |
| ScalaHosting | Multiple sites, managed VPS | Managed cloud VPS |
| DigitalOcean, Linode, Vultr | Technical users, full control | Unmanaged VPS |
| AWS EC2, GCP Compute Engine | Complex architectures, enterprise scale | Unmanaged cloud |
| Kinsta | WordPress specifically, premium performance | Fully managed WordPress |
For teams migrating from a dedicated server to the cloud, Cloudways is often the best balance. You get cloud infrastructure without managing the server yourself. Their platform handles updates, security, and backups. You manage applications.
Sizing the Cloud Instance
Do not downsize during a migration. Match or exceed dedicated server resources.
Your dedicated server has fixed, guaranteed resources. Your cloud instance shares hardware. To match the same real-world performance, provision more vCPU and RAM than the dedicated server’s raw specs suggest.
Rule of thumb for lift and shift:
- Match RAM exactly (4GB dedicated → 4GB cloud minimum)
- Double the vCPU count versus dedicated physical cores (4 dedicated cores → 8 vCPUs minimum)
- Match or exceed storage with NVMe
You can downsize after running for a month and observing actual resource utilisation. Downsizing during migration is a risk you do not need.
Phase 2: Build the Cloud Environment
Step 2.1: Provision the Cloud Instance
Provision your cloud instance before starting data transfer.
If using an unmanaged VPS, follow the complete VPS setup guide to establish the baseline configuration.
The instance needs these installed and configured before data arrives:
- Same OS version as dedicated server (or one major version up if tested)
- Same PHP version (exactly matching)
- Same database version (MySQL 5.7 → MySQL 5.7, not 8.0)
- Same web server and major version
Step 2.2: Install the Exact PHP Version
If your dedicated server runs PHP 7.4 and the cloud distro defaults to PHP 8.1, install 7.4 explicitly:
sudo apt install -y software-properties-common
sudo add-apt-repository ppa:ondrej/php
sudo apt update
sudo apt install php7.4 php7.4-mysql php7.4-curl php7.4-gd php7.4-mbstring php7.4-xml php7.4-zip php7.4-intl php7.4-imagick php7.4-bcmath php7.4-soap -y
Install every PHP module you captured in Step 0.3 of the audit.
Verify the version:
php7.4 --version
Step 2.3: Install the Exact Database Version
MySQL 5.7 is not the default on modern Ubuntu. Pin it explicitly:
wget https://dev.mysql.com/get/mysql-apt-config_0.8.22-1_all.deb
sudo dpkg -i mysql-apt-config_0.8.22-1_all.deb
Select MySQL 5.7 from the interactive menu. Then:
sudo apt update
sudo apt install mysql-server-5.7 -y
For MariaDB, specify the exact version:
curl -sS https://downloads.mariadb.com/MariaDB/mariadb_repo_setup | sudo bash -s -- --mariadb-server-version=mariadb-10.5
sudo apt install mariadb-server -y
Step 2.4: Apply All PHP Configuration
On the cloud instance, create a custom PHP configuration file that matches your audit output:
sudo nano /etc/php/7.4/apache2/conf.d/99-migration.ini
Paste your captured PHP settings:
; Migrated from dedicated server
upload_max_filesize = 64M
post_max_size = 64M
memory_limit = 512M
max_execution_time = 300
max_input_vars = 5000
date.timezone = UTC
session.gc_maxlifetime = 1440
opcache.enable = 1
opcache.memory_consumption = 256
Adjust values to match what you captured in Step 0.3.
Step 2.5: Set Up the Database on Cloud
Create databases and users that match the dedicated server:
sudo mysql
CREATE DATABASE app_database CHARACTER SET utf8mb4 COLLATE utf8mb4_unicode_ci;
CREATE USER 'app_user'@'localhost' IDENTIFIED BY 'strong_unique_password';
GRANT ALL PRIVILEGES ON app_database.* TO 'app_user'@'localhost';
FLUSH PRIVILEGES;
EXIT;
Use the same database name and username as the dedicated server. This avoids updating application config files.
Step 2.6: Configure the Firewall
sudo ufw allow OpenSSH
sudo ufw allow 80
sudo ufw allow 443
sudo ufw enable
Do NOT open port 3306 (MySQL) publicly. Database connections should always stay on localhost or internal network only.
Phase 3: Transfer the Data
Step 3.1: Set Up SSH Key Access Between Servers
From the dedicated server, generate an SSH key for the migration:
ssh-keygen -t ed25519 -f ~/.ssh/migration_key -C "dedicated-to-cloud-migration"
Copy the public key to the cloud instance:
ssh-copy-id -i ~/.ssh/migration_key.pub root@CLOUD_INSTANCE_IP
Test the connection:
ssh -i ~/.ssh/migration_key root@CLOUD_INSTANCE_IP echo "connection works"
Step 3.2: Run the Initial File Transfer
Use rsync for an efficient, interruptible transfer. Run it inside screen or tmux so it survives SSH disconnection:
sudo apt install screen -y
screen -S migration
Run the initial rsync:
rsync -avzP \
  --exclude="/proc/*" \
  --exclude="/sys/*" \
  --exclude="/dev/*" \
  --exclude="/run/*" \
  --exclude="/tmp/*" \
  --exclude="/var/log/*" \
  --exclude="/var/cache/*" \
  --exclude="/var/tmp/*" \
  --exclude="/root/migration/*" \
  -e "ssh -i ~/.ssh/migration_key" \
  /var/www/ \
  root@CLOUD_INSTANCE_IP:/var/www/
For a large site (50GB+), this initial sync takes hours. The screen session keeps it running even if your SSH connection drops.
Detach from screen: Press Ctrl+A then D.
Reconnect to screen anytime:
screen -r migration
Step 3.3: Transfer Web Server Configuration
Transfer Apache configuration:
rsync -avzP -e "ssh -i ~/.ssh/migration_key" \
  /etc/apache2/ \
  root@CLOUD_INSTANCE_IP:/etc/apache2/
Or Nginx:
rsync -avzP -e "ssh -i ~/.ssh/migration_key" \
  /etc/nginx/ \
  root@CLOUD_INSTANCE_IP:/etc/nginx/
On the cloud instance, test the transferred configuration:
sudo apache2ctl configtest
or:
sudo nginx -t
Fix any errors before proceeding. Configuration transfers sometimes include paths that exist on the dedicated server but not yet on the cloud instance.
Step 3.4: Export the Database From Dedicated Server
Run a full database dump:
mysqldump \
  --all-databases \
  --single-transaction \
  --quick \
  --lock-tables=false \
  --routines \
  --triggers \
  --events \
  --add-drop-database \
  --add-drop-table \
  -u root -p \
  | gzip > /root/migration/full-database-$(date +%Y%m%d).sql.gz
The --all-databases flag exports everything. Use this for the initial transfer. For the final sync on cutover day, you can export specific databases individually for speed.
Check the export file:
ls -lh /root/migration/full-database-*.sql.gz
The size should be roughly 10-30% of the total uncompressed database size.
Step 3.5: Transfer and Import the Database
Transfer to cloud:
rsync -avzP \
  -e "ssh -i ~/.ssh/migration_key" \
  /root/migration/full-database-*.sql.gz \
  root@CLOUD_INSTANCE_IP:/root/migration/
On the cloud instance, import:
gunzip /root/migration/full-database-*.sql.gz

mysql -u root -p < /root/migration/full-database-*.sql
This takes significant time for large databases. For a 10GB database, expect 10-30 minutes on fast NVMe.
Verify the import:
mysql -e "SHOW DATABASES;"
mysql -e "SELECT COUNT(*) FROM your_main_database.your_main_table;"
Compare the table count against the dedicated server.
Phase 4: Configure the Cloud Environment
Step 4.1: Restore Cron Jobs
On the cloud instance, add back all cron jobs from your audit:
sudo crontab -e
Paste the root cron jobs from /root/migration/crontab-root.txt, updating any hardcoded paths as needed.
For system cron directories:
# Check what was in /etc/cron.d/ on dedicated server
# Create matching files on cloud
sudo cp /root/migration-docs/cron-d/* /etc/cron.d/
sudo chmod 644 /etc/cron.d/*
Step 4.2: Configure Redis or Memcached
If your dedicated server ran Redis:
sudo apt install redis-server -y
sudo systemctl enable redis-server
sudo systemctl start redis-server
Copy the Redis configuration from your audit:
# Transfer Redis config from dedicated server
rsync -avzP \
  -e "ssh -i ~/.ssh/migration_key" \
  /etc/redis/redis.conf \
  root@CLOUD_INSTANCE_IP:/etc/redis/redis.conf

sudo systemctl restart redis-server
Step 4.3: Set Correct File Permissions
File permissions from rsync transfer should match the source. Verify web files are owned correctly:
sudo chown -R www-data:www-data /var/www/
sudo find /var/www -type d -exec chmod 755 {} \;
sudo find /var/www -type f -exec chmod 644 {} \;
For WordPress specifically:
sudo find /var/www/yourdomain.com -name "wp-config.php" -exec chmod 640 {} \;
Step 4.4: Configure SSL Certificates
For Let’s Encrypt certificates, get new ones on the cloud instance after DNS switch. Configure Certbot before the switch if using DNS verification.
For custom certificates transferred from the dedicated server:
rsync -avzP \
  -e "ssh -i ~/.ssh/migration_key" \
  /etc/ssl/custom/ \
  root@CLOUD_INSTANCE_IP:/etc/ssl/custom/
Update web server configuration to reference the transferred certificate paths.
Step 4.5: Update Application Configuration Files
Update any configuration files that contain the dedicated server IP address:
grep -r "OLD.DEDICATED.IP" /var/www/ --include="*.php" -l | while read file; do
  sed -i "s/OLD.DEDICATED.IP/CLOUD.INSTANCE.IP/g" "$file"
  echo "Updated: $file"
done
Replace OLD.DEDICATED.IP and CLOUD.INSTANCE.IP with actual IP addresses.
Also update any hostname references:
grep -r "old-server-hostname" /var/www/ --include="*.php" -l | while read file; do
  sed -i "s/old-server-hostname/new-cloud-hostname/g" "$file"
  echo "Updated: $file"
done
Phase 5: Testing Before Cutover
Do not change DNS until every test passes.
Step 5.1: Test All Sites via Hosts File
Add entries to your local machine’s hosts file:
CLOUD.INSTANCE.IP   yourdomain.com www.yourdomain.com
CLOUD.INSTANCE.IP   seconddomain.com www.seconddomain.com
Now browse to each domain. You see the cloud instance without changing DNS for anyone else.
Test every critical user journey:
- Home page loads
- Internal navigation works
- Login/authentication works
- Forms submit correctly
- Database reads return correct data
- File uploads work
- Search functions return results
- API endpoints respond correctly
Step 5.2: Test All Application Features
Create a checklist of every significant feature your application has. Test each one:
| Feature | Test | Pass/Fail |
|---|---|---|
| User login | Log in with existing credentials | |
| Content display | View 10 different pages | |
| Search | Search for a known keyword | |
| Form submission | Submit a contact or test form | |
| File upload | Upload a test image | |
| Database write | Create a test record, verify it persists | |
| Cron simulation | Run cron jobs manually, verify output | |
| Email sending | Trigger a test email, verify delivery | |
| SSL | Verify HTTPS works on all domains | |
| Redirects | Verify all custom redirects work |
Do not proceed to DNS change until every item passes.
Step 5.3: Performance Test
Run the benchmark suite from Phase 0:
sysbench cpu --threads=$(nproc) --time=30 run | grep "events per second"
fio --name=randread --ioengine=libaio --rw=randread --bs=4k --direct=1 --size=1G --numjobs=4 --runtime=30 --group_reporting | grep "IOPS"
curl -w "TTFB: %{time_starttransfer}s | Total: %{time_total}s\n" -o /dev/null -s http://CLOUD.INSTANCE.IP/
Compare against your dedicated server baseline from Phase 0.
CPU performance may be lower on cloud (due to vCPU sharing). IOPS should be comparable or higher if using NVMe. TTFB should match or improve.
If performance is significantly worse than the dedicated server baseline, investigate before switching DNS.
Step 5.4: Load Test
Simulate real traffic against the cloud instance:
wrk -t4 -c50 -d2m --latency http://CLOUD.INSTANCE.IP/
The server should handle your typical peak traffic volume without errors. Compare the results with an equivalent test against your dedicated server.
If you run Cloudways, their built-in monitoring shows resource utilisation during the load test. CPU and memory should stay well under 80%.
Phase 6: Lower DNS TTL
Three days before the planned DNS switch, lower your TTL.
Log into your domain registrar. Find the A records for every domain hosted on the dedicated server. Change TTL from its current value (often 3600 or 86400) to 300 seconds.
Wait 24 hours for the TTL change to propagate.
Verify:
dig yourdomain.com | grep TTL
The number should be 300 or close to it.
After TTL is low, DNS changes propagate globally in about 5 minutes. This minimises the cutover window.
Phase 7: The Cutover
Choose a maintenance window during your lowest traffic period. Look at your analytics hourly breakdown. Find the 2-hour window with the least activity.
Step 7.1: Final File Sync
Run rsync again immediately before cutover. This time, only changed files transfer:
rsync -avzP \
  --delete \
  -e "ssh -i ~/.ssh/migration_key" \
  /var/www/ \
  root@CLOUD_INSTANCE_IP:/var/www/
The --delete flag removes any files on the cloud instance that no longer exist on the dedicated server.
This sync typically completes in 2-5 minutes for an active site.
Step 7.2: Final Database Sync
Enable maintenance mode on the application. Then take the definitive database snapshot:
mysqldump \
  --all-databases \
  --single-transaction \
  --quick \
  --lock-tables=false \
  --routines \
  --triggers \
  --events \
  -u root -p \
  | gzip > /root/migration/cutover-database.sql.gz
Transfer and import immediately:
rsync -avzP -e "ssh -i ~/.ssh/migration_key" \
  /root/migration/cutover-database.sql.gz \
  root@CLOUD_INSTANCE_IP:/root/migration/

# On cloud instance:
gunzip /root/migration/cutover-database.sql.gz
mysql -u root -p < /root/migration/cutover-database.sql
Step 7.3: Switch DNS
Change every A record from the dedicated server IP to the cloud instance IP.
If you manage multiple domains, update all of them in the same session. Note the exact time of each change.
Verify propagation:
watch -n 10 "dig +short yourdomain.com"
The output should change from the dedicated server IP to the cloud instance IP within 5-10 minutes.
Step 7.4: Disable Maintenance Mode
The cloud instance is now receiving traffic. Remove maintenance mode:
# WordPress
cd /var/www/yourdomain.com
wp maintenance-mode deactivate
Step 7.5: Verify Traffic Has Shifted
On the cloud instance, tail the access log:
sudo tail -f /var/log/nginx/access.log
Real visitor requests should appear within minutes of DNS propagation.
On the dedicated server, tail its access log:
sudo tail -f /var/log/apache2/access.log
Traffic gradually drops to zero here as DNS propagates globally.
Phase 8: Post-Cutover Monitoring
Step 8.1: Watch the Error Logs for 24 Hours
On the cloud instance:
sudo tail -f /var/log/nginx/error.log
sudo tail -f /var/log/php_errors.log
sudo journalctl -f -p err
New error patterns appearing in the first 24 hours point to configuration differences that testing did not catch. Fix them immediately.
Step 8.2: Verify Cron Jobs
Check that cron jobs ran at their expected times:
sudo grep CRON /var/log/syslog | tail -20
Verify the output of critical cron jobs matches what the dedicated server produced.
Step 8.3: Check Mail Delivery
If you kept a mail server on cloud (not recommended but sometimes necessary), test outbound delivery:
echo "Test email from cloud server" | mail -s "Migration Test" your@email.com
Check delivery. Check mail logs for bounce messages:
sudo tail -50 /var/log/mail.log
Step 8.4: Keep the Dedicated Server Warm for 72 Hours
Do not cancel the dedicated server contract immediately. Keep it running for at least 72 hours after DNS switch.
Some visitors cache DNS longer than TTL. Edge cases in your application may only surface under real traffic. Having the dedicated server available as an instant rollback is worth the cost.
After 72 hours of stable cloud operation, you can proceed to decommission.
Phase 9: Decommission the Dedicated Server
Before cancelling the dedicated server, make one final backup of everything:
# Final backup of all web files
tar -czf /root/migration/final-web-backup.tar.gz /var/www/

# Final database backup
mysqldump --all-databases -u root -p | gzip > /root/migration/final-db-backup.sql.gz
Download both files to your local machine. Keep them for at least 90 days.
Then cancel the dedicated server contract through your provider’s billing portal.
Common Problems and Solutions
Problem: Application throwing database connection errors after migration
Check that the database user, password, and database name in the application config match what you created on the cloud instance. The password changed even if the username and database name stayed the same.
Problem: File upload failing after migration
Check the upload directory permissions and ownership. Also verify the PHP upload_tmp_dir setting points to a directory that exists and is writable by the web server user.
Problem: Cron jobs running but producing no output
The cron job probably references an absolute path from the dedicated server that does not exist on the cloud instance. Edit the cron file and verify every path exists:
find /old/path/to/script.sh 2>/dev/null || echo "File missing"
Problem: Emails stopped sending after migration
If you moved mail to an external service, the application SMTP configuration needs to point to the new service. Update the SMTP host, port, username, and password in the application settings.
Problem: Site loads but CSS or images are broken
The application is generating URLs with the old server IP or hostname hardcoded. Run the IP address grep search from Step 0.6 again on the cloud instance. Check the browser console for the specific broken URL patterns.
Problem: Redis connection refused after migration
Redis on the cloud instance may be configured to listen only on 127.0.0.1 by default. If the application connects to a different address, update either the application config or the Redis bind address to match.
Frequently Asked Questions
How long does a dedicated server to cloud migration take?
The audit phase takes 2-8 hours for a complex server. The environment build takes 2-4 hours. The initial data transfer depends on site size: a 20GB site typically takes 30-60 minutes on a 1 Gbps connection. Testing takes as long as it needs to take, typically 4-8 hours. The actual cutover window on migration day is 20-45 minutes. Total elapsed time from start to stable cloud operation is typically 3-7 days, including the 24-48 hour periods for TTL propagation and initial stabilisation.
Can I migrate without downtime?
Yes, using the same approach as migrating any live site. Lower the DNS TTL in advance, keep both servers live throughout the migration, do a final database sync with a brief maintenance window, switch DNS, then monitor both servers during propagation. The dedicated server serves all traffic until DNS propagates. The cloud instance takes over gradually as DNS updates propagate globally. Done correctly, visitors experience no downtime.
What is the biggest risk in this type of migration?
Undiscovered dependencies. A cron job that runs weekly and your test window does not cover. A PHP function deprecated in a newer version that you upgraded during migration. A third-party API that has the dedicated server IP whitelisted and blocks requests from the new IP. The pre-migration audit catches most of these. No audit catches all of them. Build your timeline to allow for fixing issues found after cutover.
Should I upgrade PHP and MySQL during the migration?
Only if you have tested your complete application against the new versions. The safest approach is to migrate first on matching software versions, then upgrade afterward one component at a time. Testing shows which plugins or code need updates for PHP 8.x compatibility. Doing the version upgrade and the server migration simultaneously means two potential sources of breakage are active at the same time.
How do I handle email if the dedicated server runs a mail server?
The honest answer is that migrating a self-hosted mail server is harder than migrating a web application. The new cloud IP has no email reputation. Outbound email from a fresh IP frequently lands in spam. The practical recommendation for most migrations is to move transactional email to an external SMTP service before the server migration. Hosted email accounts (Google Workspace or Microsoft 365) replace the IMAP/POP3 server. This removes the mail server complexity from the scope of the cloud migration entirely.