LiteSpeed Cache is one of the most powerful free speed plugins available for WordPress. It can dramatically reduce your page load times, improve your Google PageSpeed scores, and make your site feel noticeably faster for every visitor.
The problem is the settings. Open the LiteSpeed Cache plugin and you are immediately confronted with ten tabs full of toggles, sliders, and options with technical-sounding names. Most guides skip over this and just say “turn everything on.” That advice breaks sites.
This guide does something different. It explains every important setting in plain, simple language, tells you exactly what to turn on and what to leave alone, explains why each setting exists, and flags the ones that can cause problems so you know what to watch out for before you enable them.
By the end of this guide, you will have the LiteSpeed Cache best settings for WordPress configured correctly for your specific site, whether you run a blog, a business site, or a WooCommerce store.
Note: We used these settings on HostingGuider, and the page speed test results are shown below.
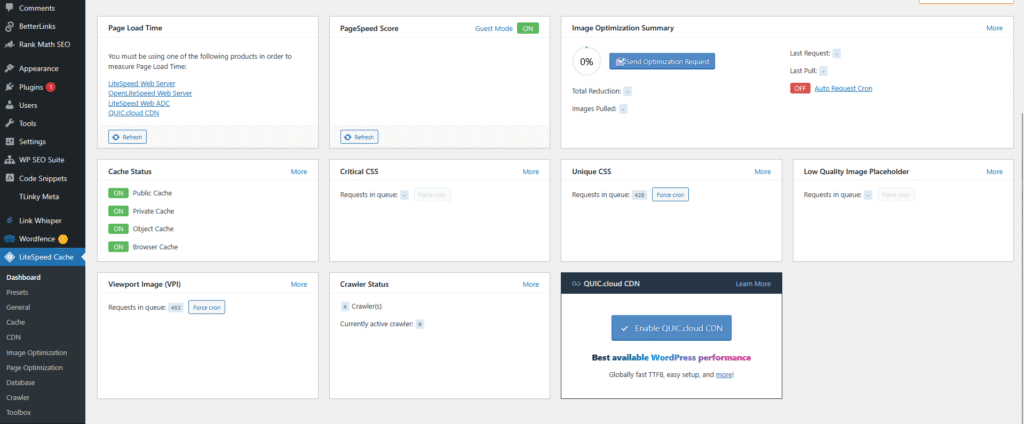
What LiteSpeed Cache Does: Understanding the Best Settings for WordPress
Before diving into settings, it helps to understand what is actually happening when LiteSpeed Cache is active. This makes the settings make sense rather than just being a list of things to toggle.
When someone visits your WordPress site without any caching, here is what happens: WordPress runs a PHP script, queries the database, assembles the page, and sends it to the visitor. This happens every single time someone visits a page, even if the page has not changed at all since the last visitor.
With LiteSpeed Cache active, here is what happens instead: the first visitor loads the page normally.
LiteSpeed Cache saves a copy of the finished, assembled page. Every visitor after that receives the saved copy directly, without WordPress having to run PHP or query the database at all. The page arrives much faster because the heavy work was already done once.
This is called full-page caching, and it is the most impactful thing LiteSpeed Cache does. Our broader guide on caching and website speed explains the different cache layers in more depth.
The other features in the plugin (image optimisation, CSS and JavaScript minification, database cleaning) are additional speed improvements that build on top of the caching foundation.
One important thing to know: LiteSpeed Cache’s full-page caching only works when your hosting server runs LiteSpeed Web Server or OpenLiteSpeed. This is common on Hostinger, LiteSpeed-based shared hosting providers, and some managed WordPress hosts.
If your host runs Nginx or Apache, the caching tab will not function at the server level, but the optimisation features (image, CSS, JS) still work. Check your hosting panel or ask your host if you are unsure which web server you are on. If your hosting account uses LiteSpeed, like Hostinger, the cache runs at the server level automatically.
Before Configuring LiteSpeed Cache Best Settings for WordPress
First: back up your site. Some LiteSpeed Cache settings, particularly in the Page Optimization tab, can cause visual problems or JavaScript errors. Having a recent backup means you can restore quickly if something breaks. Most managed WordPress hosts include one-click backups in their dashboard.
Our guide on what managed WordPress hosting should include covers backup quality as one of the five essential checks. Use it before starting.
Second: install and activate the plugin if you have not already. Go to your WordPress dashboard, click Plugins in the left sidebar, then Add New Plugin. Search for “LiteSpeed Cache.” The plugin is free and published by LiteSpeed Technologies. Click Install Now, then Activate.
Third: LiteSpeed Cache includes built-in presets that can configure many settings automatically.
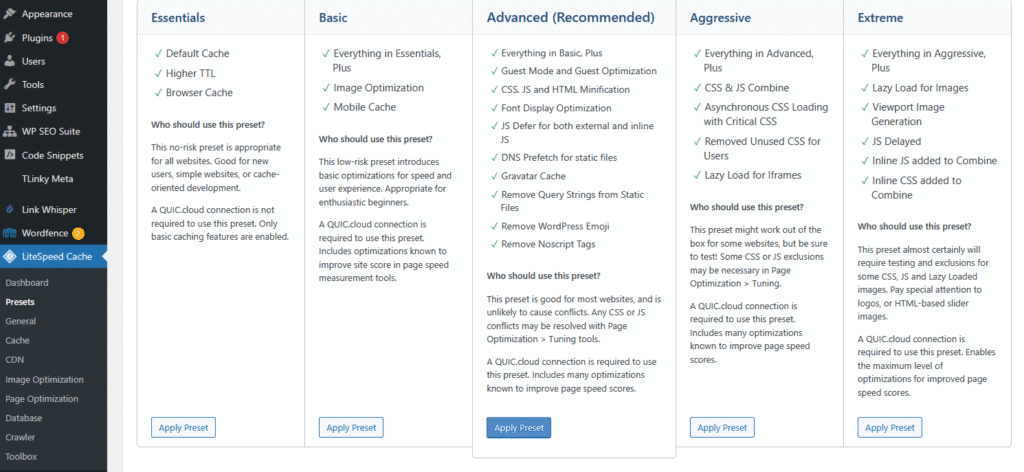
In this guide, we use the Advanced preset as the starting point, then review the most important settings individually so you understand what each option does and can make adjustments if needed.
Once activated, you will see “LiteSpeed Cache” appear in your left sidebar. You are ready to start.
LiteSpeed Cache Best Settings: The Cache Tab
The Cache tab is where the core caching behaviour lives. This is the most important tab and the one with the biggest impact on your site’s speed.
Click LiteSpeed Cache in the left sidebar, then click Cache.
Cache Sub-Tab
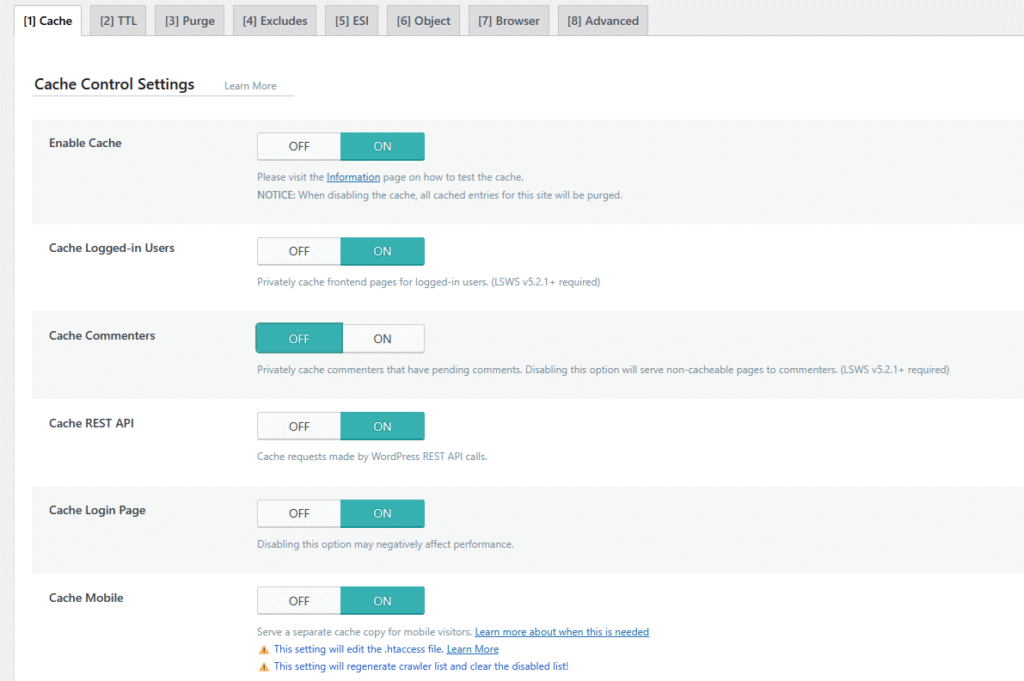
Enable Cache: Turn this ON.
This is the main switch. If this is off, nothing else in the plugin works for caching. Turn it on.
Cache Logged In Users: Leave this OFF for most sites.
When someone is logged in to WordPress (an admin, an editor, a member), the pages they see are often personalised to their account. Caching these pages can cause one logged-in user to see another user’s personalised content.
For most sites, leave this off. Exception: if you run a site where logged-in users all see identical content (some membership sites work this way), you can test turning it on.
Cache Commenters: Leave this OFF.
This caches pages for visitors who have recently left a comment. The benefit is small and it can occasionally cause issues. Leave it off.
Cache REST API: Turn this ON.
The REST API is how many modern WordPress themes and plugins fetch data. Caching these responses speeds up elements loaded through the API, like certain page builder components and blocks.
Cache Login Page: Turn this ON.
The login page itself does not need to be dynamic. Caching it speeds up the page for visitors who land on it.
Cache favicon.ico and robots.txt: Turn this ON.
These are small files that browsers and search engines request repeatedly. Caching them reduces tiny but unnecessary server calls.
TTL Sub-Tab
TTL stands for Time To Live. It controls how long cached copies of pages are kept before the cache refreshes. Think of it like an expiry date on a cached page.
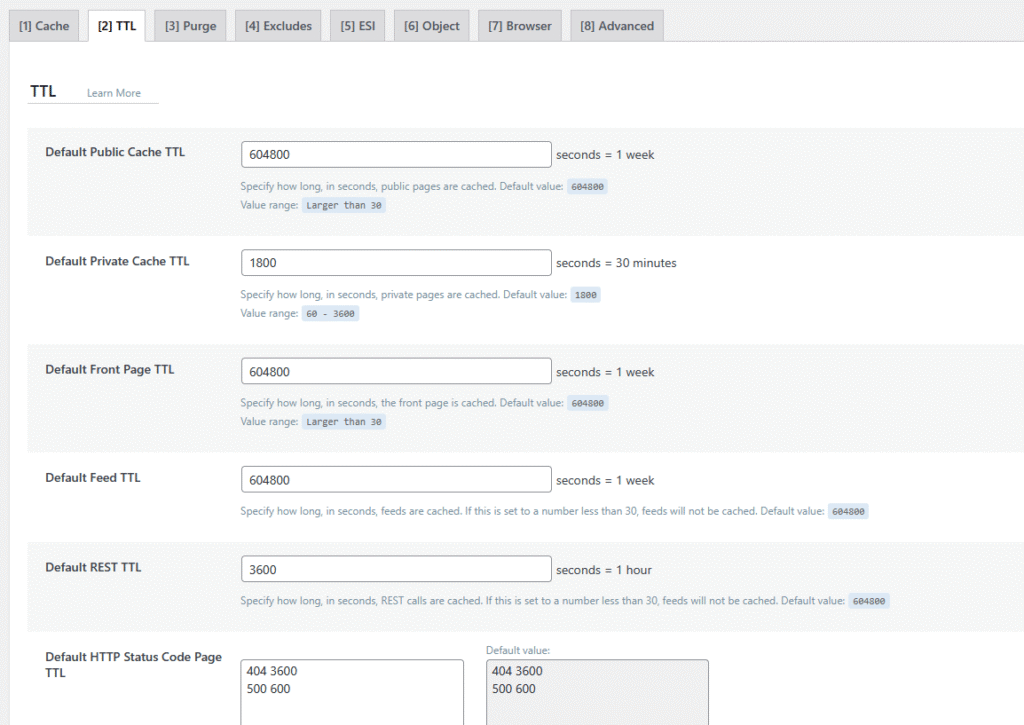
Default Public Cache TTL: Set to 604800 (this is one week in seconds).
For most sites where content does not change every few hours, one week is a sensible default. The cache automatically purges when you publish or update a post anyway, so the TTL is just a fallback safety net.
Default Private Cache TTL: Leave at the default (1800).
Private cache is for logged-in users. The shorter TTL is appropriate here.
Default Front Page TTL: Set to 604800 unless your homepage changes daily, in which case set it lower (86400 = one day).
Default Feed TTL: Set to 604800.
RSS feeds do not need to refresh constantly.
Default 404 Page TTL: Set to 3600 (one hour). Caching 404 pages prevents unnecessary database hits when someone types a wrong URL, but a shorter TTL is sensible in case the page is eventually created.
Purge Sub-Tab
Purge settings control when cached pages are automatically deleted and refreshed.
Purge All On Upgrade: Turn this ON.
When WordPress core, themes, or plugins update, the appearance or functionality of your site may change. Clearing the entire cache when this happens ensures visitors see the updated version.
Auto Purge Rules For Publish/Update: Turn on all options.
When you publish a new post, this setting automatically clears the cache for the pages that are affected: the homepage, the category pages, the author page, and related pages. This is exactly the right behaviour. Turn all options on.
Serve Stale: Consider turning this ON.
When the cache is being rebuilt after a purge, there is a brief moment where the server has to process requests normally. “Serve Stale” means the old cached version is served to visitors during this gap, rather than making them wait for a fresh version to be generated. This is generally a good setting for busy sites.
Excludes Sub-Tab
Exclude rules tell LiteSpeed Cache which pages or parts of the site should never be cached.
Do Not Cache URIs: Add these paths if you run WooCommerce:
/cart/
/checkout/
/my-account/
/wc-api/
Cart, checkout, and account pages are personalised to the visitor and must never be served from a cached copy. WooCommerce usually handles this automatically, but manually adding these as exclusions is a reliable safety net.
Do Not Cache Roles: Add Administrator and Editor.
You do not want to be testing your site while seeing a cached version yourself. Excluding admin and editor roles means you always see the live, uncached version when you are logged in.
LiteSpeed Cache Best Settings: The CDN Tab
A CDN (Content Delivery Network) stores copies of your site’s static files (images, CSS, JavaScript) on servers around the world. When someone in Tokyo visits your site hosted in the United States, they load those files from a nearby CDN server rather than crossing the entire Pacific.
This makes pages load faster for visitors who are geographically far from your server.
Click LiteSpeed Cache in the left sidebar, then click CDN.
CDN Sub-Tab
Use CDN: This depends on your setup.
If you use Cloudflare (the most common free CDN), you typically configure it at the DNS level by pointing your domain through Cloudflare. In this case, LiteSpeed Cache’s CDN tab is not needed for Cloudflare itself.
If you use QUIC.cloud (LiteSpeed’s own CDN service), enable this setting and enter your QUIC.cloud CDN URL in the CDN URL field.
If you use a different CDN service that provides a CDN URL to use for static files (Amazon CloudFront, BunnyCDN, KeyCDN), enter that URL here and turn this on.
If you do not use any CDN yet, leave this off and focus on the other settings first. A CDN is a meaningful improvement but it is not required for the plugin’s core caching and optimisation features to work.
Cloudflare Sub-Tab
If you use Cloudflare and have connected it at the DNS level, you can enter your Cloudflare API credentials here. This allows LiteSpeed Cache to automatically purge the Cloudflare cache when you purge the LiteSpeed Cache, keeping both caches in sync.
Cloudflare API Email and API Key: Enter these if you use Cloudflare.
You find your Cloudflare API key in your Cloudflare dashboard under My Profile, API Tokens, Global API Key. This integration is optional but useful if you use both LiteSpeed Cache and Cloudflare together.
LiteSpeed Cache Best Settings: The Image Optimization Tab
Images are usually the single largest contributor to slow page load times. The Image Optimization tab contains settings that automatically compress and modernise your images without you needing to touch them individually.
Click LiteSpeed Cache in the left sidebar, then click Image Optimization.
Image Optimization Settings Sub-Tab
WebP Replacement: Turn this ON.
WebP is a modern image format developed by Google. It compresses images more efficiently than JPEG or PNG, making them smaller and faster to load, while keeping quality the same or better.
When this is on, LiteSpeed Cache automatically serves WebP versions of your images to browsers that support it (which is almost every modern browser). Older browsers automatically get the original format as a fallback.
WebP for Extra srcset: Turn this ON.
WordPress automatically generates multiple sizes of every image you upload. This setting makes sure all of those sizes also get WebP versions.
Auto Request Cron: Turn this ON.
This tells LiteSpeed Cache to automatically send your images for optimisation in the background. Without this on, image optimisation has to be triggered manually. Turn it on and it runs on autopilot.
Lossless Optimisation: Leave this OFF for most sites.
Lossless compression keeps images pixel-perfect but achieves smaller file size reductions. Lossy compression (the default) achieves much larger file reductions with quality differences that are typically invisible to the human eye on a screen.
For photographs and complex images, lossy is the right choice. The exception: if you run a photography portfolio or print shop where exact colour accuracy matters, turn lossless on.
EXIF/XMP Data: Leave this OFF.
EXIF data is metadata embedded in image files (camera model, GPS location, copyright information) , see EXIF.org for a full explanation of what it contains. Visitors do not see this data in their browser, but it adds file size. Leave this off to strip it and reduce image file sizes.
Lazy Load Sub-Tab
Lazy loading means images below the visible part of the page (below the fold) do not load until the visitor scrolls down to them. This makes the initial page load faster because the browser is not downloading images the visitor cannot see yet.
Lazy Load Images: Turn this ON.
This is one of the most impactful settings in the entire plugin for initial page load speed. Turn it on.
Add Missing Sizes: Turn this ON.
Some themes and page builders do not include the standard WordPress image size attributes that browsers need to correctly display images. This setting fills in the gaps automatically.
Lazy Load Iframes: Turn this ON.
If your site embeds YouTube videos, Google Maps, or other iframes, lazy loading them means they only load when scrolled into view. YouTube embeds in particular are heavyweight and slow pages down significantly if loaded immediately. This setting prevents that.
Lazy Load Placeholder: Set this to a colour that matches your site’s background.
While an image is being lazy-loaded, the browser shows a placeholder in that space. Setting this to a colour close to your site’s background (usually white #ffffff) prevents jarring grey boxes appearing while pages load.
LiteSpeed Cache Best Settings: The Page Optimization Tab
This tab controls how your CSS (styling), JavaScript (interactive features), and HTML (page structure) are delivered. It has the biggest potential to speed up your site further, but it also carries the highest risk of breaking visual elements or interactive features if settings are turned on without testing.
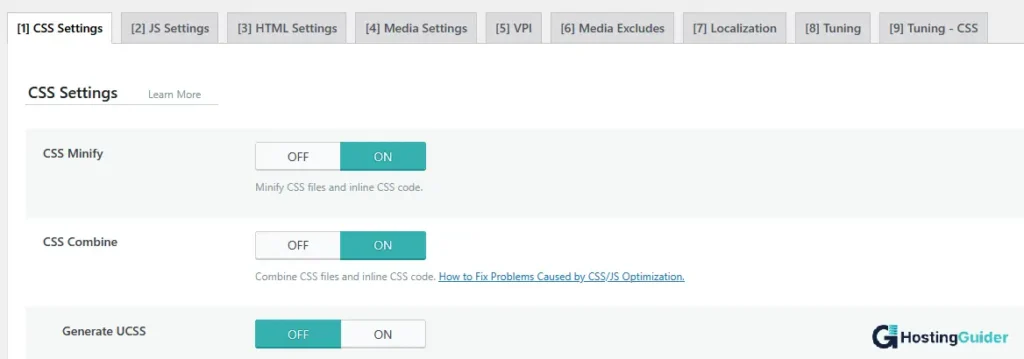
The golden rule for this tab: make one change at a time, then check your site in an incognito window before making the next change.
Click LiteSpeed Cache in the left sidebar, then click Page Optimization.
CSS Settings Sub-Tab
Minify CSS: Turn this ON.
Minification removes whitespace, comments, and unnecessary characters from CSS files without changing how they work. Smaller CSS files download faster. This setting is very safe to turn on.
Combine CSS: Use with caution.
This merges multiple CSS files into one, reducing the number of separate files the browser has to request. It can speed things up, but it can also cause styling to break on some themes or with some page builders. Test your homepage and key pages after enabling this.
Generate Critical CSS: Turn this ON.
Critical CSS is the minimum styling needed to display the visible part of a page (above the fold) immediately, before the rest of the CSS loads. This dramatically improves the visual appearance of pages during loading and has a direct positive effect on Google’s Core Web Vitals score (specifically Largest Contentful Paint). LiteSpeed Cache generates this automatically when this setting is on.
This process runs in the background and may take a few minutes per page to complete after you turn it on. The improvement becomes visible once the critical CSS has been generated for each page.
Load CSS Asynchronously: Turn this ON after Critical CSS is generated.
This allows pages to display without waiting for all CSS files to finish loading. It works best in combination with Critical CSS because the critical styles load first, making the page look correct immediately, while the rest of the styling loads in the background.
JS Settings Sub-Tab
Minify JS: Turn this ON.
Same principle as CSS minification. Smaller JavaScript files download faster. Safe to enable.
Combine JS: Use with extreme caution.
Combining JavaScript files is significantly riskier than combining CSS files. Many WordPress themes, plugins, and page builders include JavaScript that depends on loading in a specific order, and combining them disrupts this order and breaks interactive features: menus that stop opening, sliders that do not slide, checkout buttons that do not respond.
If you enable this, test your site immediately and thoroughly. If anything breaks, turn it off and leave it off. Many well-configured WordPress sites run with Combine JS turned off and are still very fast.
Load JS Deferred: Turn this ON.
Deferred JavaScript loads after the visible content of the page has been displayed rather than blocking it. This makes pages feel faster because visitors see content sooner. Most JavaScript does not need to run before the page is visible, so deferring it is safe in most cases.
Exclude jQuery from Deferred: Turn this ON.
jQuery is a JavaScript library that many WordPress themes and plugins depend on. Some of them expect jQuery to be loaded and available immediately. Excluding jQuery from deferral prevents these from breaking while still deferring all other JavaScript.
HTML Settings Sub-Tab
Minify HTML: Turn this ON.
Removes unnecessary whitespace and comments from the HTML source code. Safe, useful, and invisible to visitors.
Remove Query Strings from Static Resources: Turn this ON.
WordPress and plugins add version numbers to CSS and JavaScript file URLs (like style.css?ver=5.8). Some CDNs and proxies do not cache files that have query strings in the URL. Removing them can improve cache hit rates on CDNs. This is generally safe but test after enabling.
DNS Prefetch: Add domains of external resources your site loads.
DNS prefetch tells the browser to look up the IP addresses of external domains before it actually needs to load files from them. This reduces the delay when the browser eventually loads those resources. Common entries include:
//fonts.googleapis.com
//fonts.gstatic.com
//www.google-analytics.com
//www.googletagmanager.com
Add the domains of any external services your site loads (Google Fonts, analytics, social media scripts, payment processors).
LiteSpeed Cache Settings: The Database Tab
WordPress accumulates clutter in its database over time: old post revisions, spam comments, transients (temporary data that should have expired), orphaned metadata. This clutter slows down database queries, which slows down your site.
Click LiteSpeed Cache in the left sidebar, then click Database.
Database Optimization Sub-Tab
Post Revisions: Click Optimize.
WordPress saves a revision every time you save a draft or update a post. Over months, this can produce hundreds or thousands of revision entries. Removing old revisions makes your database leaner. You can also set a limit on how many revisions to keep going forward (3 to 5 is a sensible limit for most sites) in the WordPress settings.
Auto Drafts: Click Optimize.
Auto-save drafts accumulate silently. Clearing them regularly has no downside.
Trashed Posts: Click Optimize.
Posts in the trash but not permanently deleted still occupy database space.
Spam Comments and Trashed Comments: Click Optimize.
These serve no purpose and add to the database size.
Transients Expired: Click Optimize.
Transients are temporary pieces of data plugins store in the database. They have an expiry time, but WordPress does not always clean them up promptly. Removing expired transients is safe and helpful.
Do not click “Clean All” without reviewing first. The “Clean All” button performs all optimisations at once, which is fine for the items above, but be aware that it also affects post revisions. If you are not sure you have saved the latest version of an important post, check before clearing revisions.
Set up Automatic Cleanup: Turn on Database Optimization Schedule.
Once you have done a manual cleanup, set a recurring schedule (weekly is sensible for most sites) so the database stays clean automatically.
Best LiteSpeed Cache Settings: The Toolbox Tab
The Toolbox tab contains tools for testing your configuration and troubleshooting problems.
Click LiteSpeed Cache in the left sidebar, then click Toolbox.
Import/Export Sub-Tab
Once you have configured LiteSpeed Cache correctly, you can export your settings as a file. This is useful if you manage multiple WordPress sites and want to apply the same configuration to all of them without going through every setting manually.
Click Export to save your current settings. On a new site, go to Import, upload the settings file, and click Import.
Heartbeat Sub-Tab
The WordPress Heartbeat API sends regular pings from your browser to your server to keep the connection alive and enable auto-save in the editor. When many editors are logged in simultaneously, or when the Heartbeat runs very frequently, it can create unnecessary server load.
Heartbeat Control: Set this to Optimized.
Optimized reduces the frequency of the Heartbeat pulse on the front-end of your site (where visitors are) while keeping it at normal frequency in the admin area (where you need auto-save to work correctly). This reduces server load without affecting your editing experience.
Cache Purge All
The big blue Purge All button in the toolbox clears every cached page on your site. Use this when you make significant changes to your site’s design or settings and want to make sure all visitors see the updated version immediately.
LiteSpeed Cache Best Settings for WooCommerce
WooCommerce requires some specific attention in LiteSpeed Cache. The main concern is that cart, checkout, and account pages must never be cached, because they contain personalised information for each visitor.
LiteSpeed Cache includes built-in WooCommerce detection and should automatically exclude the right pages. However, these manual settings provide a belt-and-braces guarantee.
In Cache, Excludes sub-tab, Do Not Cache URIs, add:
/cart/
/checkout/
/my-account/
/wc-api/
/?wc-ajax=
/wp-json/wc/
In Cache, Excludes sub-tab, Do Not Cache Query Strings, add:
add-to-cart
wc-ajax
In Page Optimization, do not enable Combine JS on a WooCommerce site. WooCommerce’s checkout JavaScript is particularly sensitive to being combined with other scripts, and doing so breaks checkout on many themes.
In Image Optimization, turn on Lazy Load Iframes but be aware that if you use a product image gallery plugin that relies on JavaScript, test the product page after enabling lazy load to confirm images still load and zoom correctly.
Object Caching for WooCommerce: If your hosting provider offers Redis or Memcached object caching (many managed WordPress hosts do , see our guide on WooCommerce on managed WordPress), enabling object caching alongside LiteSpeed Cache significantly improves WooCommerce performance for database-heavy operations that cannot be cached at the page level: category filters, search results, stock level checks, and the account dashboard. Check your hosting panel for an option to enable Redis or Memcached.
LiteSpeed Cache Best Settings by Site Type
Not every site needs the same configuration. Here is a quick summary of recommended settings by site type.
LiteSpeed Cache Best Settings for a Blog or News Site
These sites have mostly static content (articles) and benefit most from aggressive full-page caching. How this interacts with your hosting server stack is explained in our caching and website speed guide.
Turn on: Enable Cache, Cache REST API, Cache Login Page, Minify CSS, Minify JS, Minify HTML, Generate Critical CSS, Load CSS Asynchronously, Load JS Deferred, Exclude jQuery from Deferred, Lazy Load Images, Lazy Load Iframes, WebP Replacement, Auto Request Cron, Database Optimization Schedule.
Leave off or test carefully: Combine CSS, Combine JS (test on your specific theme).
LiteSpeed Cache Best Settings for a Business or Portfolio Site
Similar to a blog. The page count is usually lower so caching is very effective.
Same recommendations as blog above. Additionally, add your contact form’s scripts to the exclude list if combining scripts breaks the form.
LiteSpeed Cache Best Settings for a WooCommerce Store
Turn on all the blog recommendations above, but additionally: exclude all WooCommerce pages from caching (cart, checkout, my-account, wc-api), do not combine JS, and enable object caching through your hosting panel if available.
Pay special attention to testing checkout after making any changes to the Page Optimization tab.
LiteSpeed Cache Best Settings for a Membership or Login-Gated Site
If most of your content is only accessible to logged-in members, full-page caching is less impactful (because logged-in users are excluded from the cache by default). Focus on the optimisation features: CSS, JS, HTML minification, image optimisation, and lazy loading. These improve speed for logged-in users regardless of caching.
What to Do If LiteSpeed Cache Best Settings Break Something
If you turn on a setting and something on your site stops working or looks wrong, here are the steps to fix it.
Step 1: Purge the cache first. In your WordPress dashboard, click the LiteSpeed Cache icon in the top bar and click Purge All. Then check the site again in an incognito window. Many problems that appear after changing settings are actually just the browser showing a cached version of the old state.
Step 2: Turn off the last setting you changed. Go back to whichever setting you just enabled and turn it off. Purge the cache again. Check if the problem is resolved. This is why the advice to change one setting at a time is important: it makes this step easy.
Step 3: If the problem persists and you cannot identify which setting caused it, go to LiteSpeed Cache, then Settings, then scroll to the bottom and look for a Reset or Default option. This resets the plugin to its default state, which is a stable starting point. Then work through the settings again, testing after each change.
Step 4: If the problem began immediately after enabling Combine CSS or Combine JS, these are the most frequent causes of visual or functional breakage. Turn them off.
For WooCommerce specifically: if checkout stops working after any change, disable Combine JS immediately. Checkout is the most sensitive part of a WooCommerce site and the most affected by an aggressive JavaScript combination.
HostingGuider Performance Results After Applying These Settings
The screenshots below show actual performance test results from HostingGuider after applying the LiteSpeed Cache configuration covered in this guide. While results vary depending on your hosting provider, theme, plugins, and page size, they demonstrate the type of improvements possible when LiteSpeed Cache is configured correctly.
GTmetrix Performance Results After LiteSpeed Cache Optimization
This GTmetrix test was performed after applying the LiteSpeed Cache settings recommended in this guide.
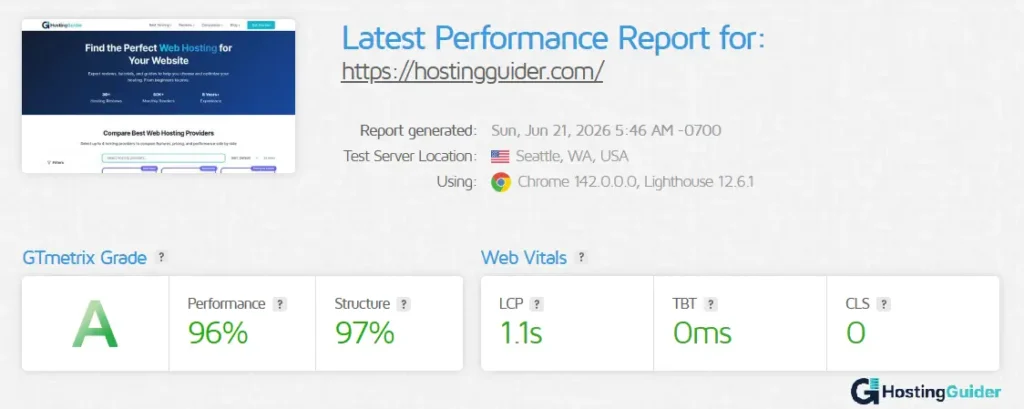
The homepage achieved a 96% Performance score and a 97% Structure score, with a Largest Contentful Paint (LCP) of 1.1 seconds and zero Total Blocking Time (TBT).
These results reflect the combined impact of page caching, image optimization, lazy loading, CSS optimization, and JavaScript delivery improvements.
Google PageSpeed Insights Score After Applying These Settings
Google PageSpeed Insights reported a desktop performance score of 97 after the LiteSpeed Cache optimization process. The site also achieved perfect scores for Best Practices and SEO.
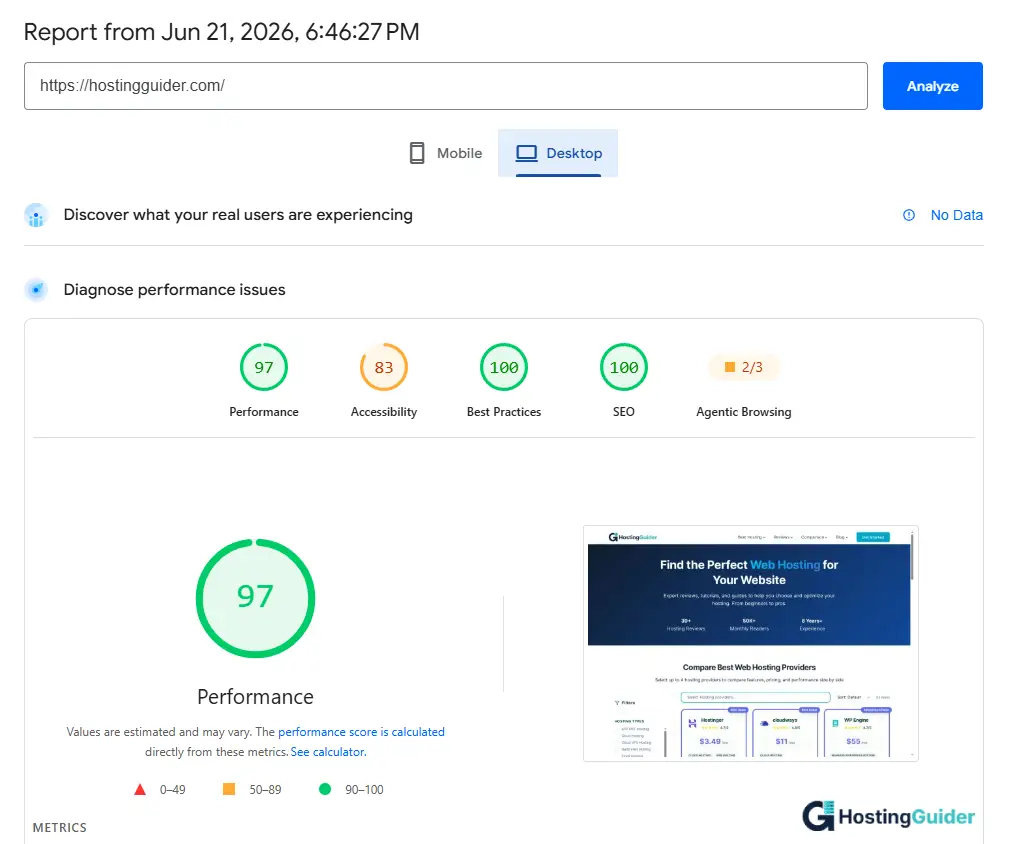
While no single speed test tells the whole story, this result confirms that the caching and optimization settings covered in this guide can significantly improve page performance when paired with quality hosting.
These results were recorded on HostingGuider using the LiteSpeed Cache configuration described throughout this guide. Your results may differ based on hosting infrastructure, theme quality, plugin usage, and overall site complexity, but the same settings provide a strong starting point for most WordPress websites.
Frequently Asked Questions
LiteSpeed Cache Best Settings for WordPress Beginners: Where to Start?
For someone setting up LiteSpeed Cache for the first time, the safest approach is to enable the main cache toggle, set the TTL to one week, add cart and checkout to the exclude list if running WooCommerce, enable WebP replacement, enable lazy load images, and enable minification for CSS, JS, and HTML. These settings are almost universally safe on any WordPress site and give you a significant speed improvement without the risk of breaking anything. You can then test the more advanced settings (Generate Critical CSS, Combine CSS, Combine JS) one at a time afterward.
LiteSpeed Cache Best Settings: Does It Work on All WordPress Hosting?
The full-page caching feature of LiteSpeed Cache only works on servers running LiteSpeed Web Server or OpenLiteSpeed. If your host runs Nginx or Apache, the cache tab will show that it is not active at the server level. However, the optimisation features in the Image Optimization and Page Optimization tabs work on any web server, so you still benefit from WebP images, lazy loading, minification, and database cleaning regardless of your hosting setup.
LiteSpeed Cache Best Settings with Cloudflare: Can You Use Both?
Yes, and they work well together. Cloudflare operates at the DNS and network level, caching and delivering your content from its global edge network. LiteSpeed Cache operates at the WordPress and server level, generating the cached pages that Cloudflare then distributes. Using both together is a common and effective combination. Configure Cloudflare at the DNS level as normal, and optionally connect your Cloudflare API to LiteSpeed Cache in the CDN tab so that both caches purge together when you update content.
LiteSpeed Cache Best Settings: Will It Conflict with Other Caching Plugins?
Yes, running two caching plugins at the same time causes conflicts and should be avoided. If you are switching to LiteSpeed Cache from another caching plugin (WP Rocket, W3 Total Cache, WP Super Cache, Autoptimize), deactivate and delete the previous plugin before configuring LiteSpeed Cache. Running both simultaneously does not speed up your site further and can cause unpredictable behaviour.
LiteSpeed Cache Best Settings: How Do I Know If It Is Actually Working?
Open your site in an incognito browser window (so you are not logged in to WordPress) and right-click, View Page Source. Search for the text “X-LiteSpeed-Cache” in the page headers. You can also check using your browser’s developer tools: press F12, go to the Network tab, reload the page, click the main document request (your domain name), and look at the response headers. If you see X-LiteSpeed-Cache: hit, the page was served from the cache. If you see X-LiteSpeed-Cache: miss, the page was not cached for that request.
Alternatively, use a free online tool like GTmetrix, Google PageSpeed Insights, or WebPageTest and run a test on your site’s homepage before and after configuring LiteSpeed Cache. Our guide on fixing TTFB at the hosting level explains why some speed issues go beyond the plugin and need server-level attention. The “before” and “after” numbers tell you exactly how much the settings have improved your load time.
LiteSpeed Cache Best Settings: Is the Plugin Free?
Yes. The LiteSpeed Cache plugin for WordPress is completely free and open source. It is available at no cost from the WordPress plugin directory. Some advanced features, such as QUIC.cloud CDN (LiteSpeed’s own CDN service), has paid tiers. However, the core caching and all the optimisation features covered in this guide are fully available in the free plugin with no paid upgrade required.
LiteSpeed Cache vs WP Rocket: Which Has Better Settings for WordPress?
WP Rocket is a premium paid caching and optimisation plugin (around $59 per year at current pricing). LiteSpeed Cache is free. In terms of features, LiteSpeed Cache includes everything WP Rocket offers and adds server-level full-page caching that WP Rocket cannot match on LiteSpeed-based hosting.
On Nginx or Apache hosting, WP Rocket has a slight user experience advantage (a simpler interface with fewer settings), but LiteSpeed Cache’s free price and superior server-level integration make it the better choice on any LiteSpeed-based hosting, including Hostinger.