
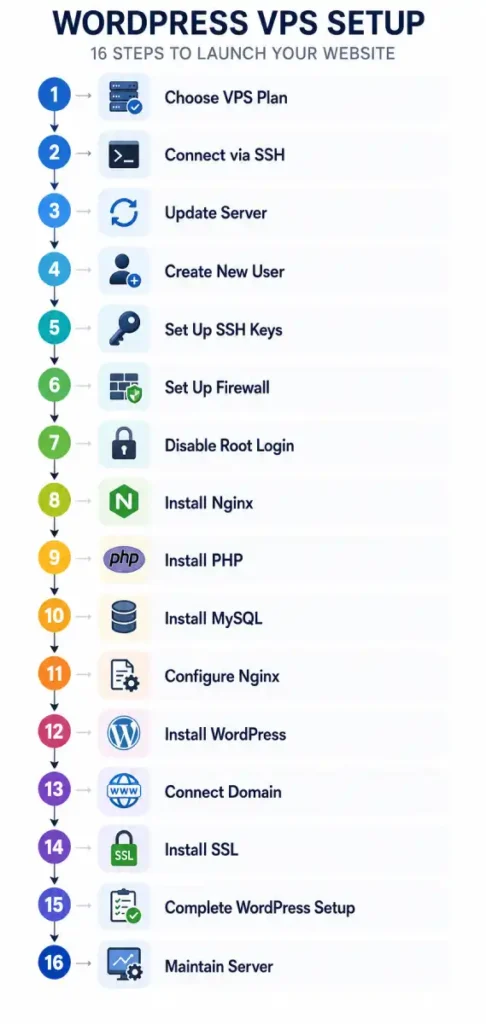
A VPS gives you your own private server space on the internet. You control it. You configure it. You install whatever you need on it.
Setting one up for the first time feels intimidating. There are commands to type. Connections to configure. Firewalls to set up.
This guide breaks every step into small, clear actions. You do not need to be a developer. You do not need any prior experience. Every command is explained in plain language before you type it.
By the end, you will have a running VPS with a web server, PHP, a database, and a working WordPress site.
What You Will Learn
- How to choose the right VPS for your first server
- How to connect to your VPS from your computer
- How to secure your VPS against common attacks
- How to install a web server, PHP, and a database
- How to install WordPress
- How to connect your domain name
- How to install a free SSL certificate
What You Need Before You Start
You need three things.
A VPS server. This tutorial uses Ubuntu Linux. Ubuntu is the most beginner-friendly Linux distribution. Hostinger VPS is used as the example provider. Contabo is another excellent choice for maximum resources at a low monthly cost. Both offer Ubuntu as an operating system option.
A computer with internet access. Windows, Mac, or Linux all work fine.
A domain name. You need this to point visitors to your server.
If you are still deciding between shared hosting and VPS, read our guide on shared vs VPS hosting first. If you want to understand managed vs unmanaged VPS, our managed vs unmanaged VPS guide covers that clearly.
Step 1: Choose and Order Your VPS
Pick the Right Plan
For your first VPS, you do not need a powerful server. A basic plan handles beginner needs well.
| Spec | Minimum | Recommended |
|---|---|---|
| RAM | 1GB | 2GB |
| CPU | 1 vCPU | 2 vCPU |
| Storage | 20GB SSD | 50GB SSD |
| Operating System | Ubuntu 22.04 LTS | Ubuntu 22.04 LTS |
Hostinger VPS starts from under $6 per month. It includes Ubuntu and a clean control panel.
Contabo gives significantly more resources for a similar price. It is a strong option if you want extra power from day one.
Not sure which plan fits you? Read our how to choose the right VPS plan guide before buying.
Choose Ubuntu as Your OS
When your provider asks which operating system to install, choose Ubuntu 22.04 LTS.
LTS stands for Long Term Support. Ubuntu will provide security updates for this version for five years. It is the most stable and well-documented option for beginners.
Note Your IP Address
After your VPS is created, your provider sends you an email. The email contains your server’s IP address.
An IP address looks like this: 203.0.113.50
Write it down. You need it in the next step.
Step 2: Connect to Your VPS with SSH
SSH stands for Secure Shell. It is how you control your VPS from your computer.
Think of it as a remote control. You type a command on your computer. It runs on your VPS. You see the result.
On Windows
Windows 10 and 11 include SSH built in. Open Command Prompt. Click Start, type cmd, and press Enter.
If you use an older Windows version, download PuTTY. PuTTY is a free SSH client.
On Mac or Linux
Mac and Linux include SSH built in. Open your Terminal application.
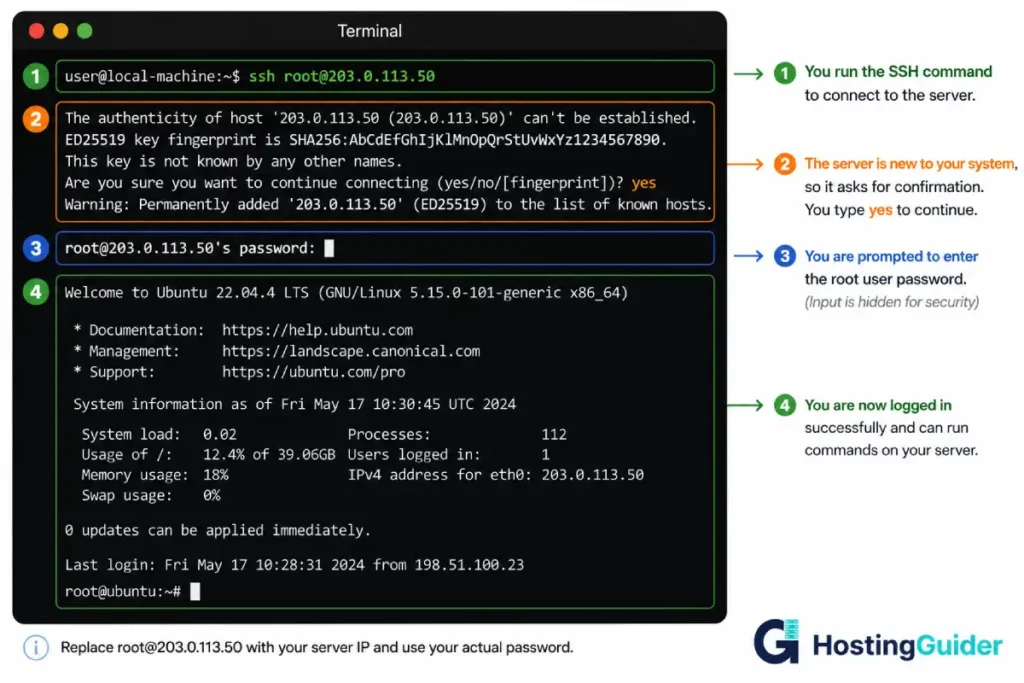
Connect to Your Server
Type this command. Replace the IP address with your actual VPS IP address.
ssh root@YOUR.VPS.IP.ADDRESS
Press Enter.
You will see a message asking if you trust this connection. Type yes and press Enter.
Next, it asks for a password. Type the root password your hosting provider gave you. The password will not appear on screen as you type. This is normal. Press Enter when done.
When you see this, you are in:
root@your-server:~#
That # symbol means you are logged in as root. You are now inside your VPS.
Step 3: Update Your Server
The first thing you always do on a new server is run updates.
Updating installs the latest security patches. It fixes known vulnerabilities.
Type this command and press Enter.
apt update
This checks what needs updating.
Now install the updates.
apt upgrade -y
The -y tells the server to automatically confirm all updates. This takes a few minutes. Wait until the command prompt returns.
Why this matters: An unpatched server is an exposed server. Attackers scan for servers with known vulnerabilities. Updating immediately closes most known risks. Read more about hosting security to understand what you are protecting against.
Step 4: Create a New User
Right now, you are logged in as root. Root is the most powerful account on any Linux server. It can do anything, including accidentally delete everything.
Working as root all the time is dangerous. One wrong command can break the server permanently.
Create a new user with administrative privileges. Replace yourname with your chosen username.
adduser yourname
The server asks for a password. Choose a strong one. Press Enter to skip the other questions.
Give this user sudo privileges. Sudo lets you run powerful commands when needed without being root all the time.
usermod -aG sudo yourname
Switch to your new user.
su - yourname
The prompt changes to show your new username. You are now logged in as this user.
From this point forward, most commands begin with sudo. This is intentional. It means you are using administrative power only when needed.
Step 5: Set Up SSH Keys
Right now you log in with a password. Passwords can be guessed. SSH keys cannot.
An SSH key is a pair of two files. One stays on your computer. One goes on your server. Only someone with both files can connect.
Generate Keys on Your Local Computer
Open a new terminal or Command Prompt on your own computer. Do not run this on the server.
ssh-keygen -t ed25519
Press Enter to accept the default file location. Set a passphrase for extra security or press Enter twice for none.
Two files are created:
- id_ed25519 (private key, stays on your computer, never share this)
- id_ed25519.pub (public key, this goes on the server)
Copy the Key to Your Server
On Mac or Linux, run this on your local computer:
ssh-copy-id yourname@YOUR.VPS.IP.ADDRESS
On Windows, first view your public key:
type %USERPROFILE%\.ssh\id_ed25519.pub
Copy everything that appears. It starts with ssh-ed25519.
Then on your server, run:
mkdir -p ~/.ssh && chmod 700 ~/.ssh
nano ~/.ssh/authorized_keys
Paste your public key. Press Ctrl + X, then Y, then Enter to save.
Set the correct permissions.
chmod 600 ~/.ssh/authorized_keys
Step 6: Set Up the Firewall
A firewall controls which connections are allowed to reach your server.
Without a firewall, every port on your server is open to the internet. With a firewall, only the connections you approve can get through.
Learn more about web hosting firewalls and how they protect servers.
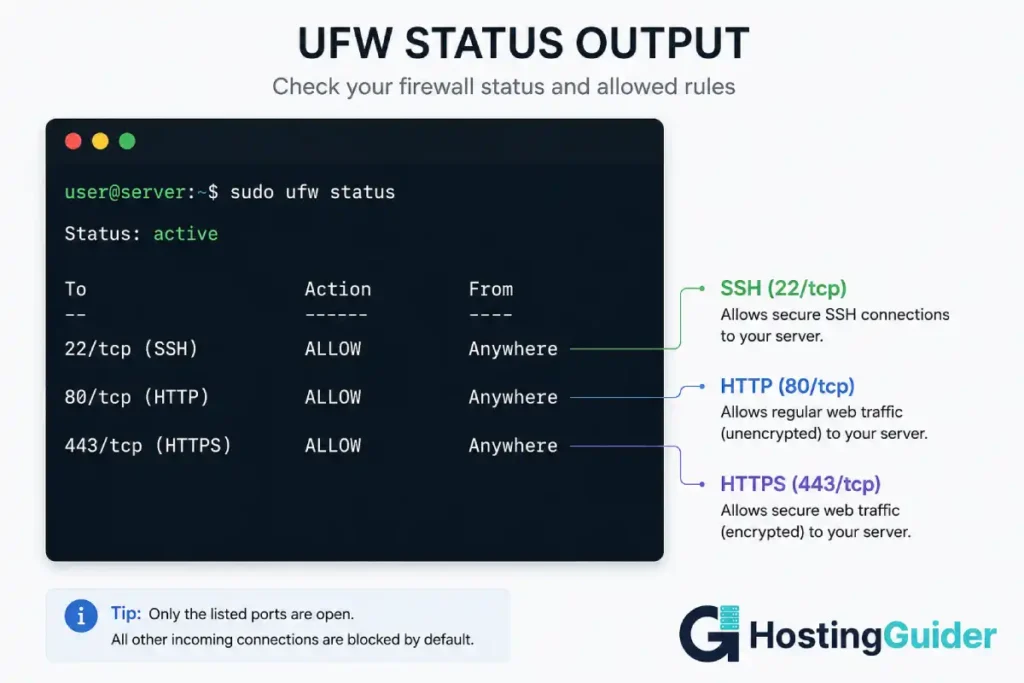
Ubuntu includes UFW. UFW stands for Uncomplicated Firewall.
Allow SSH so you do not lock yourself out.
sudo ufw allow ssh
Allow regular web traffic.
sudo ufw allow 80
Allow secure web traffic.
sudo ufw allow 443
Enable the firewall.
sudo ufw enable
Type y and press Enter.
Confirm it is working.
sudo ufw status
You will see SSH, port 80, and port 443 listed as allowed.
Step 7: Disable Root Login
Root is the most targeted account on every Linux server. Attackers know it exists. They try to break in through it constantly.
Disabling root login stops this category of attack entirely.
Open the SSH configuration file.
sudo nano /etc/ssh/sshd_config
Find this line. Use Ctrl + W to search for it.
PermitRootLogin yes
Change yes to no.
PermitRootLogin no
Find this line too.
PasswordAuthentication yes
Change it to no.
PasswordAuthentication no
Only do this after confirming your SSH key works. Disabling password login before your key is set up locks you out permanently.
Save the file. Press Ctrl + X, then Y, then Enter.
Restart SSH.
sudo systemctl restart sshd
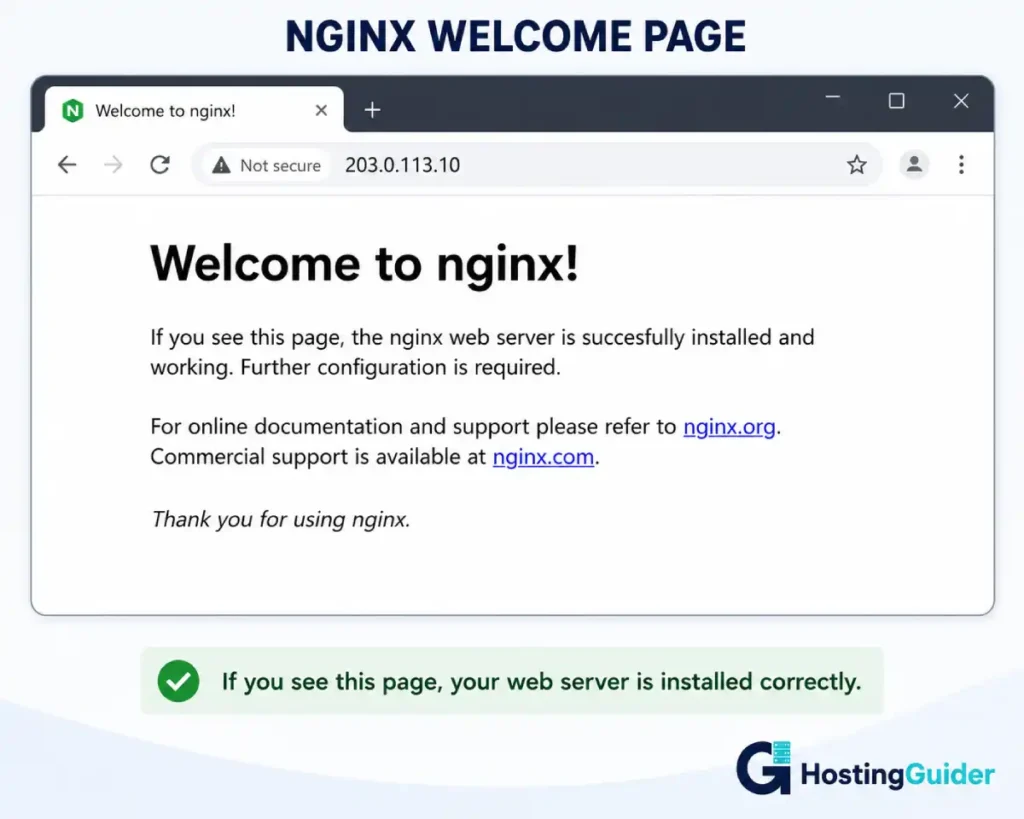
Step 8: Install Nginx
Nginx is a web server. It receives visitor requests and sends back your website files.
Install Nginx.
sudo apt install nginx -y
Start Nginx.
sudo systemctl start nginx
Set Nginx to start automatically on reboot.
sudo systemctl enable nginx
Test it. Open your browser. Type your VPS IP address. You should see an Nginx welcome page. That means your web server is working.
Step 9: Install PHP
PHP is the programming language WordPress runs on.
Install PHP and the extensions WordPress needs.
sudo apt install php8.1-fpm php8.1-mysql php8.1-xml php8.1-curl php8.1-gd php8.1-zip php8.1-mbstring -y
Verify the installation.
php -v
You will see the PHP version number. PHP 8.1 or higher is correct.
Step 10: Install MySQL
MySQL is a database. It stores all your website data. This includes posts, settings, user accounts, and everything else your site uses.
Install MySQL.
sudo apt install mysql-server -y
Run the security setup.
sudo mysql_secure_installation
Answer the questions like this:
| Question | Your Answer |
|---|---|
| Set up VALIDATE PASSWORD component? | N |
| Remove anonymous users? | Y |
| Disallow root login remotely? | Y |
| Remove test database? | Y |
| Reload privilege tables? | Y |
Log into MySQL.
sudo mysql
Create your website database. Replace mywebsite with your chosen name.
CREATE DATABASE mywebsite;
Create a database user. Replace myuser and mypassword with your own values.
CREATE USER 'myuser'@'localhost' IDENTIFIED BY 'mypassword';
Give the user access to the database.
GRANT ALL PRIVILEGES ON mywebsite.* TO 'myuser'@'localhost';
Apply the changes.
FLUSH PRIVILEGES;
Exit MySQL.
EXIT;
Write down these three things. You need them soon.
- Database name: mywebsite
- Database user: myuser
- Database password: mypassword
Step 11: Configure Nginx for Your Domain
Nginx needs a configuration file for your domain. This tells it where your website files are.
Create a new configuration file. Replace yourdomain.com with your actual domain.
sudo nano /etc/nginx/sites-available/yourdomain.com
Paste this configuration. Replace yourdomain.com in every place it appears.
server {
    listen 80;
    server_name yourdomain.com www.yourdomain.com;
    root /var/www/yourdomain.com;
    index index.php index.html;

    location / {
        try_files $uri $uri/ /index.php?$args;
    }

    location ~ \.php$ {
        fastcgi_pass unix:/var/run/php/php8.1-fpm.sock;
        fastcgi_index index.php;
        include fastcgi_params;
        fastcgi_param SCRIPT_FILENAME $document_root$fastcgi_script_name;
    }
}
Save with Ctrl + X, then Y, then Enter.
Create the folder for your website files.
sudo mkdir -p /var/www/yourdomain.com
Give Nginx ownership of this folder.
sudo chown -R www-data:www-data /var/www/yourdomain.com
Enable the configuration.
sudo ln -s /etc/nginx/sites-available/yourdomain.com /etc/nginx/sites-enabled/
Test for errors.
sudo nginx -t
You should see syntax is ok and test is successful.
Reload Nginx.
sudo systemctl reload nginx
Step 12: Install WordPress
Move to the temporary directory.
cd /tmp
Download WordPress.
wget https://wordpress.org/latest.tar.gz
Extract the files.
tar -xzf latest.tar.gz
Copy WordPress to your website folder.
sudo cp -r wordpress/. /var/www/yourdomain.com/
Set the correct ownership.
sudo chown -R www-data:www-data /var/www/yourdomain.com
sudo chmod -R 755 /var/www/yourdomain.com
Create the WordPress configuration file.
cd /var/www/yourdomain.com
sudo cp wp-config-sample.php wp-config.php
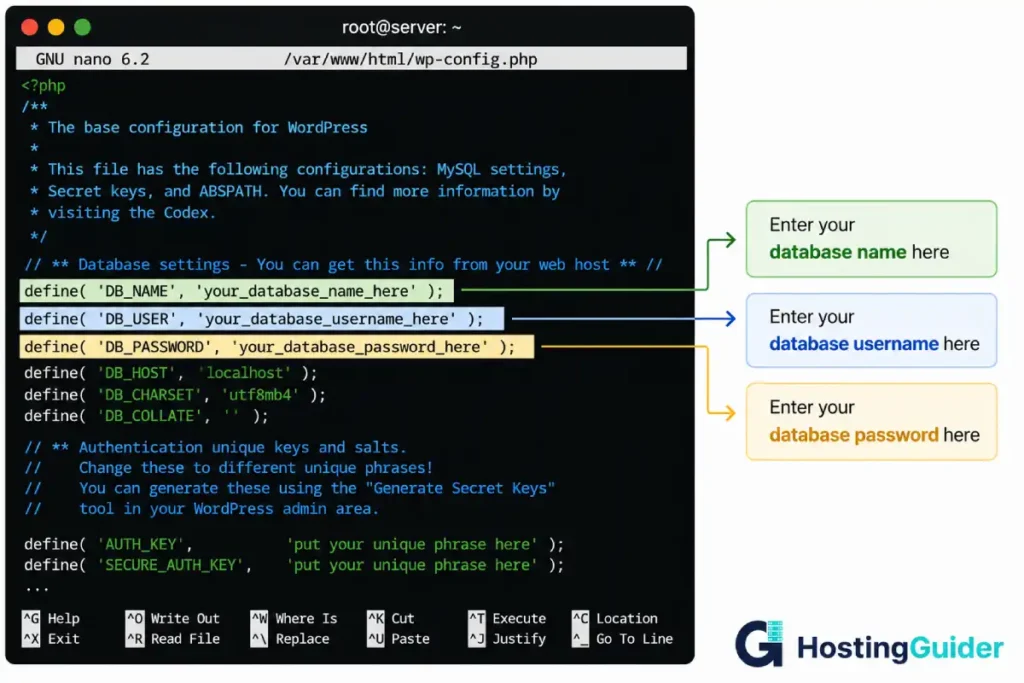
sudo nano wp-config.php
Find these three lines and update them with your database details from Step 10.
define( 'DB_NAME', 'mywebsite' );
define( 'DB_USER', 'myuser' );
define( 'DB_PASSWORD', 'mypassword' );
Save with Ctrl + X, then Y, then Enter.
Step 13: Connect Your Domain to Your VPS
Log into your domain registrar. Go to DNS settings. Find the A records section.
Update or add these records:
| Type | Name | Value |
|---|---|---|
| A | @ | Your VPS IP address |
| A | www | Your VPS IP address |
The @ symbol means the root domain (yourdomain.com). The www record covers www.yourdomain.com.
DNS changes take time to propagate. Most complete within 15 to 60 minutes. Some take up to 48 hours.
To test, open your browser and type your domain name. If you see the Nginx page or a WordPress installation prompt, DNS is working.
Step 14: Install a Free SSL Certificate
SSL creates the padlock in the browser. It encrypts data between your visitor and your server. Google requires it for good search rankings.
Read our SSL certificate guide to understand exactly what SSL does and why it matters.
You will use Let’s Encrypt. It provides free SSL certificates. Certbot installs and renews them automatically.
Install Certbot.
sudo apt install certbot python3-certbot-nginx -y
Get your SSL certificate. Replace yourdomain.com with your domain.
sudo certbot --nginx -d yourdomain.com -d www.yourdomain.com
Certbot asks for your email. Enter a real one. It sends renewal reminders there.
Agree to the terms. Type A and press Enter.
Certbot installs the certificate and updates your Nginx configuration automatically.
Test that automatic renewal works.
sudo certbot renew --dry-run
You will see Congratulations. Renewal is set up. Your certificate renews automatically every 90 days.
Open your browser. Go to https://yourdomain.com. You should see the padlock icon. Your site is now secure.
Step 15: Complete the WordPress Installation
Open your browser. Go to https://yourdomain.com.
You will see the WordPress installation screen.
Choose your language. Select your language. Click Continue.
Enter your site details:
- Site title: Your website name
- Username: Your WordPress admin username
- Password: A strong unique password
- Your email: A real email address
Click Install WordPress.
WordPress installs in seconds.
Log in at https://yourdomain.com/wp-admin with your username and password.
Your WordPress dashboard opens. Your website is live.
Now secure your WordPress installation. Our guide on how to protect your WordPress site covers the essential steps.
Also set up two-factor authentication for your WordPress and hosting accounts. Follow our two-factor authentication guide.
Step 16: Keep Your Server Maintained
Your VPS needs regular attention. A neglected server becomes a vulnerable server.
Run these commands regularly.
| Task | Frequency | Command |
|---|---|---|
| Update packages | Weekly | sudo apt update && sudo apt upgrade -y |
| Check disk space | Monthly | df -h |
| Check memory usage | Monthly | free -m |
| Check running processes | As needed | htop |
| Check Nginx status | As needed | sudo systemctl status nginx |
| View error logs | As needed | sudo tail -f /var/log/nginx/error.log |
| Check firewall | As needed | sudo ufw status |
Install htop for easy server monitoring.
sudo apt install htop -y
Run it by typing htop. Press Q to exit.
When your CPU or RAM usage stays consistently above 80%, your server needs more resources. Our guide on scalability with VPS hosting explains exactly how to scale and when to act.
Set up a free uptime monitor too. UptimeRobot checks your site every 5 minutes and alerts you if it goes down. Read our website uptime guide for context on why this matters.
Want a Simpler Option? Consider Managed VPS
This tutorial covers unmanaged VPS. You handled everything yourself.
That is great for learning. But it requires ongoing maintenance.
Managed VPS is an alternative. The provider handles server administration. You focus on your website.
ScalaHosting provides managed VPS with SPanel. SPanel does most of what this tutorial covered through a graphical interface. No command line needed.
Cloudways deploys your server on cloud infrastructure with a clean management dashboard. WordPress installs in a few clicks.
Our guide on managed vs unmanaged VPS explains which approach suits your situation.
Common Mistakes to Avoid
Enabling the firewall before allowing SSH. Always run sudo ufw allow ssh before sudo ufw enable. Blocking SSH before allowing it locks you out of your server.
Disabling password login before setting up SSH keys. Confirm your SSH key login works first. Then disable passwords. Getting this order wrong is unrecoverable without your provider’s help.
Working as root all the time. Log in as your normal user. Use sudo when needed. Root mistakes are often irreversible.
Not updating regularly. Run apt update and apt upgrade every week. Unpatched servers are the most common target for attackers.
No backups. Set up automated backups from day one. Your hosting provider may include backups. Verify this before assuming it is active.
Ignoring server logs. Check your Nginx error log when something does not work. Most problems leave a clear message in the log.
Commands Quick Reference
| Task | Command |
|---|---|
| Connect to server | ssh yourname@YOUR.IP.ADDRESS |
| Update packages | sudo apt update && sudo apt upgrade -y |
| Check firewall status | sudo ufw status |
| Allow a port | sudo ufw allow PORT |
| Restart Nginx | sudo systemctl restart nginx |
| Restart PHP | sudo systemctl restart php8.1-fpm |
| Enter MySQL | sudo mysql |
| Check disk space | df -h |
| Check memory | free -m |
| Monitor server | htop |
| View Nginx errors | sudo tail -f /var/log/nginx/error.log |
| Renew SSL | sudo certbot renew |
| Reboot server | sudo reboot |
Frequently Asked Questions
What is the best VPS provider for a beginner?
Hostinger VPS is a strong choice for beginners. It combines affordable pricing with a clean interface and good documentation. Contabo offers more RAM and storage at a similar price if raw specifications matter most. Both support Ubuntu and allow the setup steps in this tutorial. If you prefer a managed experience where the provider handles server administration, ScalaHosting and Cloudways are the most beginner-friendly managed VPS options.
Do I need to know Linux to set up a VPS?
You do not need deep Linux knowledge. The commands in this tutorial are all you need. Each command is explained before you type it. You will recognise these commands after using them a few times. If managing a server with commands is not appealing to you at all, choose a managed VPS instead. Managed providers give you a graphical panel so you never need to use the command line.
How do I connect to my VPS if I lose access?
If you lose SSH access, log into your hosting provider’s dashboard. Most providers offer a web-based console. This gives you terminal access to your server through the browser even when SSH is not working. From there you can diagnose and fix the problem. If the server is completely unresponsive, use the restart button in your provider’s dashboard. For severe issues, contact your provider’s support team.
How much does running a VPS cost?
A basic VPS suitable for this tutorial costs between $5 and $20 per month. Domain names cost approximately $10 to $15 per year. SSL certificates are free through Let’s Encrypt. The total monthly cost for your first VPS setup is typically $6 to $20 per month depending on your provider and plan choice.
Can I host multiple websites on one VPS?
Yes. Repeat Steps 11 through 14 for each additional website. Create a new Nginx configuration file for each domain. Create a new folder in /var/www/ for each site. Create a separate database in MySQL for each site. Run Certbot for each new domain. One VPS with 2GB of RAM can comfortably host five to ten small to medium WordPress sites.
What should I do if a command does not work?
First, check for typos. Linux commands are case-sensitive. Copy commands exactly as written. Second, check whether you used sudo where required. Most commands in this tutorial start with sudo. Third, check whether the software installed correctly by looking for error messages in the output. Fourth, search the exact error message in a search engine. Linux error messages are well-documented. You will almost always find the answer within the first few results.